1
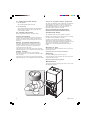
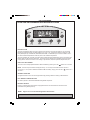
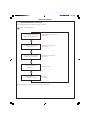
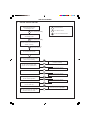
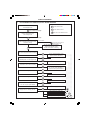
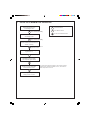
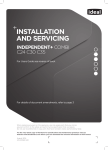
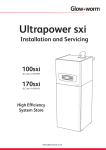
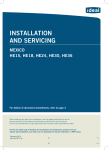
January 2010
UIN 205403 A01
istor
(Natural Gas only)
Destination Countries: UK, IE
G.C. Appliance No.
G.C. Appliance No.
HE260 ...... 41-394-13
HE325 ...... 41-394-14
Introduction
Wire the heater through a double-pole switch or controller,
having contact separation of at least 3mm, using a cable size
The istor HE260 & HE325 are fully automatically controlled,
of at least 1.5sq. mm flexible cable, 85 oC rubber insulated
condensing, system store, fan flued boilers.
HOFR Sheathed, complying with BS6141 Table 8. It MUST be
Due to the high efficiency of the boiler, condensate is produced
fully earthed. Ensure all terminal connections are securely
from the flue gases and this is drained to a suitable disposal
made. Do not however use excessive force when tightening
point through the plastic waste pipe at the lower rear of the boiler. terminals.
A condensate 'plume' will also be visible at the flue terminal.
The istor is a system store boiler providing both central heating
and domestic hot water.
Safety
z This appliance must not be operated without the casing
correctly fitted and forming an adequate seal.
z If the boiler is installed in a compartment then the
compartment MUST NOT be used for storage purposes.
Current Gas Safety (Installation & Use)
Regulations or rules in force.
In your own interest, and that of safety, it is the law that this boiler
must be installed by a Gas Safe Registered Engineer, in
accordance with the above regulations.
It is essential that the instructions in this booklet are
strictly followed, for safe and economical operation of
the boiler.
z If it is known or suspected that a fault exists on the boiler
then it MUST NOT BE USED until the fault has been
corrected by a Gas Safe Registered Engineer.
z Under NO circumstances should any of the sealed
components on this appliance be used incorrectly or
tampered with.
z This appliance is not intended for use by persons (including
children) with reduced physical, sensory or mental
capabilities, or lack of experience and knowledge, unless
they have been given supervision or instructions concerning
use of the appliance by a person responsible for their safety.
Electricity Supply (boiler)
This appliance must be earthed.
z Children should be supervised to ensure that they do not
play with the appliance.
Supply: 230 V ~ 50 Hz. The fusing should be 3A.
Connection must be made in a way that allows complete
isolation of the electrical supply such as a double-pole switch,
having a 3mm (1/8") contact separation in both poles, serving
only the boiler and system controls. Alternatively, a 3-pin
UNSWITCHED socket may be used. The means of isolation
must be accessible to the user after installation.
In cases of repeated or continuous shutdown a Gas Safe
Registered Engineer should be called to investigate and rectify
the condition causing this and carry out an operational test. Only
the manufacturers original parts should be used for
replacement.
Minimum Clearances
Electricity Supply (immersion heater)
Supply: 230 V ~ 50 Hz. The fusing should be 13A.
The immersion heater is supplied fitted to the cylinder and is
intended for use as a back up heat source for DHW should the
boiler fail for some reason. Optimum DHW performance will not
be achieved using the immersion heater only.
1
Important Notes
BOILER CONTROLS
Clearances of 165mm (6 1/2") above, 5mm (1/4") at the sides
and 450mm (17 3/4") at the front of the boiler casing must be
allowed for servicing.
The minimum front clearance allowed when built into a
cupboard is 5mm.
B
Legend
A. Boiler ON/OFF switch
A
C. Select button
prog
select
time
PROGRAMMER
+
ist9883
B. Display
-
C
All Gas Safe Registered Installers carry a Gas Safe Register ID card, and have a registration number. Both should be recorded
in the Benchmark Commissioning Checklist. You can check your installer by calling Gas Safe Register direct on 0800 4085500
Ideal Stelrad Group is a member of the Benchmark scheme and fully supports the aims of
the programme. Benchmark has been introduced to improve the standards of installation and
commissioning of central heating systems in the UK and to encourage the regular servicing of
all central heating systems to ensure safety and efficiency.
THE BENCHMARK SERVICE INTERVAL RECORD MUST BE COMPLETED AFTER EACH SERVICE
2
istor - User's
To Light the Boiler.
Frame 1
Refer to
The boiler incorporates a factory fitted programmer, refer to
page 5 onwards of these instructions for setting the
programmer before continuing.
1. CHECK THAT THE ELECTRICITY SUPPLY TO THE BOILER IS
OFF.
2. Set the mains ON/OFF switch (A) to OFF.
3. Ensure that all DHW taps are turned off.
4. Switch ON the electricity supply to the boiler and check that
the room thermostat is set to call for heat.
5. Set the mains ON/OFF switch to ON.
The boiler will commence the ignition sequence, first supplying
heat to pre-heat the domestic hot water and then to the central
heating, if required.
Control of water temperature
Domestic Hot Water
The DHW delivery temperature is controlled by thermostatic
mixer within the tank module (see illustration below).
Pull off the lower door from its locating pegs and adjust the
mixer valve to the required DHW delivery temperature.
IMPORTANT
60oC is the recommended maximum temperature.
Central Heating
The boiler controls the central heating radiator temperature to a
maximum of 82oC, adjustable via the CH temperature set point
adjustment within the programmer.
Note. In normal operation the itime programmer display (B) will
show the time of day.
Standby - no demand for heat.
CH being supplied.
DHW being supplied.
During normal running the flame symbol will remain
illuminated.
Note. If the boiler fails to light after 3 attempts the fault code
“LF” will be displayed.
Index
Mark
Press the select button (C) for greater than 3 seconds then
release. The boiler will repeat the ignition sequence. If the boiler
still fails to light consult a Gas Safe Registered Engineer or in IE a
Registered Gas Installer (RGII).
prog
select
tim
e
PR
OG
RA
MM
ER
+
-
Operation
Winter conditions - i.e. CH and DHW required.
The boiler will fire and supply heat to the radiators but will give
priority to DHW on demand during timed on periods.
ist9884
The DHW pre-heat will operate as described under 'Summer
conditions' during periods when there is no call for CH.
Summer conditions - i.e. DHW only required.
Set the CH mode to OFF.
The boiler will fire periodically for a short period to maintain the
DHW storage tank in a pre-heated condition during a timed on
period. The average time period between firing is 90 minutes.
This may vary considerably due to the surrounding ambient
temperature of the boiler. The boiler will fire whenever there is a
demand for DHW during a timed on period.
Note.
The pump will operate briefly as a self-check once
every 24 hours, regardless of system demand.
Domestic Hot Water
Knob
setting
DHW
Temp OC
Min
1
2
3
4
5
6
7
Max
30
34
39
43
48
52
56
61
65
Approx. flow temperatures for the
boiler thermostat settings are:
Central Heating
CH Flow
Temp
o
C (oF)
Max
82 (180)
Min
30 (86)
CAUTION. To avoid the possibility of injury during the installation, servicing or cleaning
of this appliance care should be taken when handling edges of sheet steel components.
istor - User's
3
To shut down the boiler
1. For short periods
Set the mains ON/OFF switch (A) to OFF
2. For longer periods
Set the mains ON/OFF switch (A) to OFF, and switch the
electricity supply to OFF. For longer periods the entire
system should be drained.
To relight the boiler
Repeat the procedure detailed in 'To light the boiler'.
Frost protection
If frost protection is required then the boiler should be left
powered. The boiler has built in boiler frost protection to
ensure that the water in the heat exchanger does not drop
o
below 4 C.
Boiler overheat thermostat
This thermostat will shut down the boiler in the event of
overheating. Should this occur a fault code “LA” will be
displayed. Press the select button (C) for greater than 3
seconds and the boiler will relight.
Loss of system water pressure
The gauge (see illustration below) indicates the central heating
system pressure. If the pressure is seen to fall below the
original installation pressure of 1-2 bar over a period of time
then a water leak is indicated. In this event a Gas Safe
Registered Engineer should be consulted.
DO NOT FIRE THE BOILER IF THE PRESSURE HAS
REDUCED TO ZERO FROM THE ORIGINAL SETTING.
Condensate Drain
The condensate drain must not be modified or blocked.
Blockage of the condensate drain, caused by debris or freezing,
can cause automatic shutdown of the boiler.
If freezing is suspected and the pipe run is accessible an
attempt may be made to free the obstruction by pouring hot
water over the exposed pipe and clearing any blockage from the
end of the pipe. If this fails to remedy the problem the
assistance of a Gas Safe Registered Engineer should be
sought.
Escape of gas
If the fault recurs, turn off the boiler and consult a Gas Safe
Registered Engineer or in IE a Registered Gas Installer (RGII).
Should a gas leak or fault be suspected contact your local gas
supplier without delay.
Flame failure
Do NOT search for gas leaks with a naked flame.
Should this occur a fault code “LF” will be displayed.
Press the select button (C) for greater than 3 seconds and the
boiler will relight.
If the fault recurs, turn off the boiler and consult a Gas Safe
Registered Engineer or in IE a Registered Gas Installer (RGII).
Cleaning
For normal cleaning simply dust with a dry cloth.
To remove stubborn marks and stains, wipe with a damp cloth
and finish off with a dry cloth.
DO NOT use abrasive cleaning materials.
Maintenance
The appliance should be serviced at least once a year by a Gas
Safe Registered Engineer.
prog
select
tim
e
PR
OG
RA
MM
ER
+
-
ist9885
4
istor - User's
POINTS FOR THE BOILER USER
Note. In line with our current warranty policy we would ask that you check through the following guide to identify any
problems external to the boiler prior to requesting a service engineers visit. Should the problem be found to be other than
with the appliance we reserve the right to levy a charge for the visit, or for any pre-arranged visit where access is not gained
by the engineer.
TROUBLESHOOTING - TYPICAL NON PRODUCT FAULTS
Problem
1 Boiler is not working for
central heating or hot water.
Solution
•
Check there is power to the boiler – switch (A) to the ON position and the time of day is
displayed on the controls. Ensure that the programmer is in an ON period if turned or set to ON.
•
If the time of day is not displayed then not a boiler fault – contact your installer/service company.
2 Boiler is not working for central •
heating or hot water but
•
attempts to fire by going
through 3 ignition attempts.
•
Display shows ‘LL : F ’ (flashing).
Press select (reset) button (C) for greater than 3 seconds to repeat ignition sequence.
Check gas supply (try another appliance – cooker/fire etc.) – If no gas supply then not a boiler
fault – contact gas supplier.
Check condensate pipe is not blocked or frozen. If blocked clear blockage – if not possible to
check contact your installer.
3 Boiler is not working for
central heating or hot water
L:A ’
and the display shows ‘L:A
(flashing).
•
Press select (reset) button (C) for greater than 3 seconds , the boiler should then re-light. If fault
recurs this indicates an overheat condition. The boiler should be turned off and your installer
contacted.
•
Check if ALL radiators have thermostatic radiator valves fitted. If they have contact your installer.
4 Boiler is not working for
central heating or hot water
and the display shows ‘H:A ’
(flashing).
•
Check pressure gauge on boiler shows a minimum of 1 bar. If not re-pressurise via the filling
loop to 1 bar (if unsure contact your installer), turn off the tap on the filling loop and turn the on/
off switch (A) off and then back on again to reset the boiler. If unable to do so or if the pressure
continues to drop after filling then contact your installer.
•
Check if ALL radiators have thermostatic radiator valves fitted. If they have contact your
installer.
•
If already set to an ‘ON’ period then check the programmer by setting to permanent ON if boiler
then fires – Contact your installer to rectify the programmer.
•
Check room thermostat by turning fully up, If
contact your installer.
6 Boiler comes on for
domestic hot water without a
tap being opened - the
display shows .
•
Check for dripping / dribbling taps or showers – turn fully off.
•
Check for leaks from the domestic hot water pipework and if found contact your installer.
7 Boiler fires occasionally for
approx. 2 minutes - the
display shows .
•
This is a normal function of the boiler, during an ON period, to periodically pre heat the plate
heat exchanger to optimise delivery time for domestic hot water to taps or showers.
8
•
Adjust the mixing valve to the required output temperature – see user instructions for
temperature settings - In order to access the mixing valve it will be necessary to
remove the lower front panel (refer to installation instructions).
5 Boiler will not fire for central
heating.
Domestic hot water is not to
the required temperature
istor - User's
is not displayed on the user controls then
5
6
istor - User's
PROGRAMMER
ISTOR ITIME PROGRAMMER USER REFERENCE GUIDE
MON
TUE
WED
THU
FRI
SAT
SUN
ON
1 2 3
o
C
ON
OFF
ON
AM
OFF
TIMED
OFF
PM
TIMED
+1hr
ADVANCE
ADVANCE
DEL
PROG
prog
select
time
PROGRAMMER
+
-
INTRODUCTION
The istor programmer allows the user to set the times at which they want the boiler to run for Central
Heating (CH) and Domestic Hot Water (DHW). It is a full, 7 day, programmer allowing setting of 3 ONOFF periods per day on MON-FRI, SAT-SUN, MON-SUN, or individual days. It also has a built in 12/24
Hr clock and allows adjustment of the set point for CH radiator temperature.
The user interface (UI) consists of 6 buttons and a backlit Liquid Crystal Display (LCD). The buttons are
broken down into two function categories. The first is that of changing the operating mode of the boiler
or programmer and the second is in the setting of parameters, time, time periods, temperatures, etc.
GMT / BST ADJUSTMENT
The clock can be easily adjusted between GMT and BST by pressing the “UP” ( + ) button for 3 seconds.
NOTE. The time is pre-set before leaving the factory. If on receipt of the boiler the time shown is
incorrect by ± 1 hour (due to difference between GMT and BST), simply press the “UP” ( + ) button for 3
seconds.
ADVANCE FUNCTION
A programme start or end can be brought forward by pressing either the heating or DHW buttons.
HOT WATER CYLINDER RE-HEAT
Hot water cylinder re-heat will be disabled during DHW off periods.
BATTERY BACKUP
If there is a power failure to the boiler all programme times are stored and the real time clock is
maintained using battery back up.
NOTE. Pages 7 to 17 are the itime Programmer Instructions.
SEE PULL OUT SHEET AT REAR OF THIS BOOKLET FOR EASE OF USE
istor - User's
7
ITIME PROGRAMMER
1
PROGRAMMING MODE STRUCTURE
Once the programming mode is entered the structure is as shown:
are the UP and DOWN buttons
The left hand “Timed” is flashing,
together with the radiator symbol
Central heating times setting / delete
Go to Frame 3
The Radiator symbol is flashing,
o
together with “ C”.
Radiator temperature setting
Go to Frame 4
The right hand “Timed” is flashing,
together with the Tap symbol
Hot water times setting / delete
Go to Frame 3
The Tap symbol is flashing,
o
together with “ C”.
Not applicable to istor
Display shows - - : - and a flashing clock symbol
Clock setting
Go to Frame 2
Note. Using the down arrow key will navigate the structure in reverse order.
8
istor - User's
ITIME PROGRAMMER
2
SETTING THE DAY AND TIME
DISPLAY SHOWS time / day
and backlight is OFF
P
Press ‘PROG’ button briefly
P
is the PROG button
S
is the SELECT button
are the UP and DOWN buttons
DISPLAY SHOWS time / day
and backlight is ON
P
Press ‘PROG’ button briefly
The left hand “Timed” is flashing, together
with the Radiator symbol and the word
“PROG” is showing
Press down arrow once or
up arrow four times until. .
Display shows - - : - and a flashing clock symbol
S
The clock symbol becomes steady and
one of the days is flashing
Use Up and Down buttons
to reset to current day
The day symbol becomes steady
and the 12 / 24 hr symbol flashes
S
Use Up and Down buttons
to select 12 or 24hr mode for display
The hours digits flash
S
Use Up and Down buttons
to reset to current hour
The hours digits become steady
and the minutes digits flash
S
Use Up and Down buttons
to reset to current minute
The ‘am’ or ‘pm’ symbol flashes
(in 12 hr mode only)
S
Use Up and Down buttons
to set ‘am’ or ‘pm’ as appropriate
The clock now displays the current day
and time in 12 or 24 hr mode
istor - User's
S
9
ITIME PROGRAMMER
3
PROGRAMMING THE HEATING (OR HOT WATER) PERIODS
DISPLAY SHOWS time / day
and backlight is OFF
P
Press ‘PROG’ button briefly
P
is the PROG button
S
is the SELECT button
are the UP and DOWN buttons
DISPLAY SHOWS time / day
and backlight is ON
Press ‘PROG’ button briefly
For Hot Water
Press down arrow twice or
up arrow twice until . .
The right hand “Timed” is flashing,
together with the Tap symbol
and the word “PROG” is showing
For Heating
S
Radiator (or Tap) symbol is steady.
The seven days of the week are flashing
○
○
○
○
○
○
○
○
○
S
○
○
○
○
“1” flashes, indicating that you have
selected period 1 on the day(s) shown
Use Up and Down Buttons to set
chosen day. (You can also select groups
Mon-Fri, Sat-Sun, Mon-Sun)
○
The left hand “Timed” is flashing, together
with the Radiator symbol and the word
“PROG” is showing
○
P
○
○
○
○
○
○
○
S
○
○
○
○
○
○
○
○
○
○
○
○
○
○
○
○
S
○
○
○
○
○
○
○
○
○
○
○
○
S
○
○
○
○
(12 hr mode only)
The “am” or “pm” symbol flashes
○
○
○
○
○
○
Set minute
○
○
○
○
○
○
○
○
○
○
○
○
The “minutes” figure flashes
○
○
○
○
Set Hour
○
○
○
○
○
○
○
○
○
○
○
○
The “hours” figure flashes
○
○
○
○
○
○
S
○
○
○
Select “ON” or “OFF” as required.
You can also select “DELETE” to
exclude this time period altogether.
○
○
“ON” flashes, and a time is showing
○
○
○
○
○
○
Select period 2 or 3 if required.
○
○
○
○
○
○
Set as appropriate
○
○
○
○
○
○
○
○
○
S
○
Now repeat for the “OFF” time
○
○
○
○
○
○
Display returns to flashing “ON” etc.
P
○
○
○
○
○
○
Next, do the same for period 2 (and 3)
Then repeat for other days as required
10
○
P
○
○
○
P
○
istor - User's
4
SETTING THE CH MAXIMUM FLOW TEMPERATURE*
DISPLAY SHOWS time / day
and backlight is OFF
P
Press ‘PROG’ button briefly
P
is the PROG button
S
is the SELECT button
are the UP and DOWN buttons
DISPLAY SHOWS time / day
and backlight is ON
P
Press ‘PROG’ button briefly
The left hand “Timed” is flashing, together
with the Radiator symbol and the word
“PROG” is showing
Press down arrow 4 times or
up arrow once until. . . .
The Radiator symbol is flashing
o
together with “ C”
S
The Radiator symbol is steady.
The temperature figure flashes
Use Up and Down buttons to set value.
Maximum CH flow temperature
o
can be set from 30 to 82 C
*For systems with underfloor heating or other systems requiring
o
a maximum flow temperature different to 82 C, the maximum
radiator temperature can be set.
S
Change accepted.
Display reverts to normal
istor - User's
11
5
QUICK REVIEW OF PROGRAMMED TIMES AND TEMPERATURES
Note.
This section cannot be used to amend the settings,
see Frames 3 and 4.
P
is the PROG button
S
is the SELECT button
are the UP and DOWN buttons
DISPLAY SHOWS time / day
and backlight is OFF
P
Press ‘PROG’ button briefly
DISPLAY SHOWS time / day
and backlight is ON
P
Press ‘PROG’ button and hold until . . .
The left hand “Timed” is flashing, together
with the Radiator symbol and the word
“PROG” is showing
Checking the Heating (or Hot Water) times
Checking the Hot Water Temperature *
The left (or right) hand “Timed” is flashing,
together with the Radiator (or Tap) Symbol
“oC” is flashing, together with the Tap
symbol
S
S
Radiator (or Tap) symbol is steady.
The first ON time for Monday is shown
The Tap symbol is steady.
Temperature is displayed
S
Monday’s first OFF time is shown
Return to time / date display
etc.......
The last OFF time for Sunday is shown
*For systems with underfloor heating or other systems
requiring a maximum flow temperature different to 82oC, the
maximum radiator temperature can be set in a similar
manner to “Setting the HW Temperature”.
Return to “Monday”
12
istor - User's
6
PRESET PROGRAM TIMES AND TEMPERATURES
The programmer comes with preset Central Heating and Hot Water times and temperatures.
These can be amended using the appropriate procedures. The times can be deleted if they are not required (refer to Frame 8).
Central Heating Periods:
Hot Water Periods:
MON-FRI
MON-SUN
Period 1 ON
Period 1 OFF
06:30
08:30
Period 1 ON
Period 1 OFF
06:30
00:00
Period 2 ON
Period 2 OFF
17:00
22:30
Period 2 ON
Period 2 OFF
—:—
—:—
Period 3 ON
Period 3 OFF
—:—
—:—
Period 3 ON
Period 3 OFF
—:—
—:—
SAT-SUN
Period 1 ON
Period 1 OFF
07:30
10:00
Period 2 ON
Period 2 OFF
12:00
14:00
Period 3 ON
Period 3 OFF
17:00
22:30
Radiator Temperature
82 oC
Hot Water Temperature:
60 oC
7
FAULT FINDING
If the display shows a ‘spanner’ symbol, and the time or temperature indication is replaced by a 2-symbol Fault Code, then the
boiler is being prevented from running because of adverse conditions.
Those Codes beginning with ‘H’ are temporary and will reset when the fault condition has (been) cleared.
Those Codes beginning with ‘L’ are ‘permanent’, causing a ‘Lockout’ situation.
When one of these faults has been cleared, the boiler should be reset by pressing the ‘Select’ button for greater than 3
seconds.
The Select button is the equivalent of the small Reset button on boilers without programmers.
Further details of the Lockout Codes are in the main boiler instruction book, Fault Finding section.
istor - User's
13
8
CLEARING THE PRESET TIMES
The programmer comes with preset time periods for Central
Heating and Hot Water. These can be individually cleared prior
to user programming using the following sequence.
DISPLAY SHOWS time / day
and backlight is OFF
P
P
is the PROG button
S
is the SELECT button
are the UP and DOWN buttons
Press ‘PROG’ button briefly
DISPLAY SHOWS time / day
and backlight is ON
P
Press ‘PROG’ button briefly
The left hand “Timed” is flashing, together
with the Radiator symbol and the word
“PROG” is showing
For Heating
For Hot Water
Press up arrow twice or down
arrow three times until . .
The left hand “Timed” is flashing, together
with the Tap symbol and the word “PROG”
is showing
S
Radiator (or Tap) symbol is steady.
The seven days of the week are flashing
Use Up and Down Buttons to set
chosen day. Select MON-SUN
“1” flashes, indicating that you have
selected period 1 on the days shown
S
Select period 2 or 3 as required.
S
“ON” flashes, and a time is showing
14
Select DEL. This will exclude this time
period altogether
istor - User's
istor - User's
15
Ideal Consumer Helpline
Tel: 01482 498660
www.idealboilers.com
Ideal Stelrad Group pursues a policy of continuing improvement in the design and performance
of its products. The right is therefore reserved to vary specification without notice.
Ideal Boilers, P.O. Box 103, National Ave, Kingston Upon Hull, HU5 4JN. Tel.
01482 492251 Fax. 01482 448858. Registration No. London 322 137.
ITIME PROGRAMMER - CONTROLS AND DISPLAY
"Heating"
"Hot Water"
MON
Press this
button to cycle
from 'TIMED' to
'ADVANCE' then
'ON' and 'OFF'.
TUE
WED
THU
FRI
SAT
SUN
ON
1 2 3
o
C
ON
OFF
ON
AM
OFF
TIMED
OFF
PM
TIMED
+1hr
ADVANCE
ADVANCE
DEL
Press this
button to cycle
from 'TIMED' to
'ADVANCE' then
'ON' and 'OFF'.
PROG
'ADVANCE'
indicates an
early change to
the next program
selection. 'ON
and OFF' are
'indefinite'
i.e. the boiler
will remain so.
prog
select
The 'Prog' button is used to change
into Programming mode, in order to
check programs and to reset the clock.
(See Frame 2 to 9)
NB - The Prog button also
functions in program mode as a
back key and an abort key (press
and hold).
time
-
+
PROGRAMMER
The 'Select' button is normally
used to make choices within menus.
It selects whichever option on the
display is flashing.
The 'Up' and 'Down' buttons
are used to amend values
and move around within menus.
NB - The Select button also
functions as a Reset button for
fault conditions. (See Frame 7)
NB - The 'Up' button also makes
the change to and from Summertime. For this function, press for 3
seconds.
These symbols relate to the times being programmed
1, 2 and 3 are the daily periods. ON and OFF are the
functions. DEL is used to clear a programmed period.
MON
TUE
WED
THU
FRI
SAT
SUN
ON
1 2 3
o
C
ON
OFF
ON
AM
OFF
TIMED
OFF
PM
TIMED
+1hr
ADVANCE
ADVANCE
DEL
'ADVANCE'
indicates an
early change to
the next program
selection. 'ON
and OFF' are
'indefinite'
i.e. the boiler
will remain so.
ON, OFF, TIMED, ADVANCE
indicate the current selected
mode for each channel.
In TIMED mode, ON will be
shown within a timed ON period.
ADVANCE is shown when the
channel is moved on to the next
programmed event. Once the
event has finished ADVANCE
will no longer be shown.
PROG
'PROG' is shown during
program amendment
"Heating demand" also
shown during programming
"Hot Water demand" also
shown during programming
This symbol is shown when
the clock is being set
"Summertime" indicator To set or reset this,
press the 'UP' button and
hold for 3 seconds.
A steady 'flame' symbol
indicates that the boiler is on.
If flashing, the boiler is active,
but not firing at the time.
The 'spanner' symbol is shown
when an engineer may be needed
(See Frame 7)