1
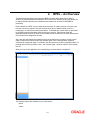
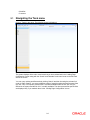
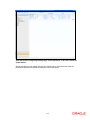
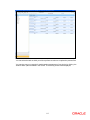
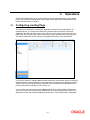
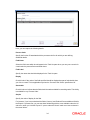
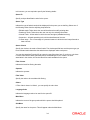
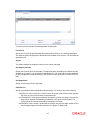
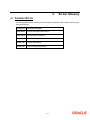
BPEL Workflow Oracle FLEXCUBE Universal Banking Release 11.3.0 [May] [2011] Oracle Part Number E51535-01 BPEL Workflow Table of Contents 1. ABOUT THIS MANUAL................................................................................................................................ 1-1 1.1 INTRODUCTION ........................................................................................................................................... 1-1 1.1.1 Audience ............................................................................................................................................ 1-1 1.1.2 Abbreviations..................................................................................................................................... 1-1 1.1.3 Organization ...................................................................................................................................... 1-1 1.1.4 Conventions Used in this Manual ...................................................................................................... 1-2 1.1.5 Related Documents ............................................................................................................................ 1-2 1.1.6 Glossary of Icons ............................................................................................................................... 1-2 2. BPEL – AN OVERVIEW ............................................................................................................................... 2-1 2.1 2.2 3. OPERATIONS................................................................................................................................................. 3-1 3.1 3.2 3.3 3.4 3.5 4. NAVIGATING THE TASK MENU .................................................................................................................... 2-2 NAVIGATING THE WORKFLOW MENU ........................................................................................................ 2-5 CONFIGURING LANDING PAGE ................................................................................................................... 3-1 CONFIGURING QUEUES ............................................................................................................................... 3-3 CONFIGURING SUB-STAGES ....................................................................................................................... 3-5 CHECKING DUPLICATE TRANSACTIONS ...................................................................................................... 3-7 ENABLING USER RIGHTS ............................................................................................................................ 3-8 SCREEN GLOSSARY .................................................................................................................................... 4-1 4.1 FUNCTION ID LIST...................................................................................................................................... 4-1 1. 1.1 About this Manual Introduction This manual is designed to help you quickly get acquainted with the basic features of the workflow layer using Business Process Execution Language (BPEL) in Oracle FLEXCUBE. 1.1.1 Audience This manual is intended for the following User/User Roles: Role Function Corporate Customer Service Executive Collection of applications Trade Finance Executive Updation of details of contracts Trade Finance Manager Verification and authorization of contracts Compliance Executive Performance of compliance details of all parties in a contract Compliance Manager Verification of compliance check carried out by Compliance Executive 1.1.2 Abbreviations The following abbreviations are used in this User Manual: Abbreviation Description BPEL Business Process Execution Language WF Workflow 1.1.3 Organization This manual is organized into the following chapters: Chapter 1 About this Manual gives information on the intended audience. It also lists the various chapters covered in this User Manual Chapter 2 BPEL - An Overview provides a basic understanding of the workflow and its features. Chapter 3 Operations explains the various actions that you can perform to suit your requirements of look and feel of the BPEL workflow. 1-1 1.1.4 Conventions Used in this Manual Important information is preceded with the symbol. 1.1.5 Related Documents The Security Management System User Manual 1.1.6 Glossary of Icons This User Manual may refer to all or some of the following icons: Icons Function New Copy Save Delete Unlock Print Close Re-open Reverse Template Roll-over Hold Authorize Liquidate Exit Sign-off Help Add 1-2 Icons Function Delete Refer the Procedures User Manual for further details about the icons. 1-3 2. BPEL – An Overview The Business Process Execution Language (BPEL) workflow layer allows you to define a workflow for handling different transactions. The front-end user interface of this layer allows you to capture details required for the transactions and sends them to Oracle FLEXCUBE for processing. Each transaction in BPEL can be configured as a process. At certain points in a process, input from the user-end is required. The input could be in the form of data to initiate or enrich a transaction or to authorize an existing transaction. To facilitate this, human tasks are generated by the BPEL engine as and when required during the process. These human tasks are associated with a Function ID. When a user initiates a task, the different user roles associated to the Function ID are assigned to the task. Also, each process (transaction) passes through the workflow layer in stages. Access to each stage is restricted to users who have the requisite rights. Once a task has been initiated or completed for a particular stage, it is placed in the relevant queue or task list (explained later). To proceed further with the process, a user - with relevant rights - needs to acquire it under his/her user ID. When you log into the application, the Landing Page, as shown below, is displayed:- The following options are available to you in this screen: Menu Tasks 2-1 Workflow Customer 2.1 Navigating the Task menu Click on ‘Tasks’ in the menu. The following screen is displayed: The system displays all the main menu items that you have maintained in the ‘Landing Page Configuration’ screen along with the ‘Search’ and ‘Standard’ main menu items on the left hand side of the screen. You can query existing workflow tasks by clicking ‘Search’ and then choosing the relevant link under it. Under ‘Search’, you are provided the option of searching tasks across all process flows (the ‘ALL’ link) or for specific process flows. The fields available under the link ‘ALL’ are predefined in the system and the link ‘ALL’ is readily available. The other process flow specific links are displayed only if you maintain them in the ‘Landing Page Configuration’ screen. 2-2 Refer the section ‘Configuring Landing Page’ under ‘Operations’ in this user manual for further details. Specify the basis for your search and click the ‘Search’ button. All the tasks that meet the parameters specified are fetched as displayed in the screen below: 2-3 If you do not specify any search parameter before clicking ‘Search’ button, all the tasks will be displayed. Under the ‘Standard’ menu, the system displays the following sub-menus and the number of tasks against each of these sub-menus: Acquired Assigned Completed Pending Supervisor When you click a sub-menu, the different process flows (transactions) for the sub-menu and the number of tasks outstanding for each process are displayed. Choose the process flow for which you require details and click on it. Details for all the tasks under the corresponding queue are shown in the Task List pane. When you click a task, the relevant details are displayed in the Transaction History pane (below the Task List pane) 2-4 The workflow actions that you can perform for a task are: Acquire/Release After a task is assigned to a group, you, as a user, can further process the task only if you acquire it. Select the transaction and click ‘Acquire’ button. The task will then be moved from the group queue to your task list. You can release the task that has already been acquired by clicking ‘Release’ button.. Reassign A task can be re-assigned only by a supervisor to any of his subordinates. If you have the requisite rights, you can select the transaction and click ‘Reassign’ button in your task list. This is done when a contract is transferred from the maker of the contract to another user for further operations. Resume A task that has been suspended can be resumed when you click the ‘Resume’ button in your task list. You can then continue with the suspended task. The system also gives you the option of carrying out the same action on many tasks simultaneously. To do this, you are required to select all the tasks that you want, by checking the box at the beginning of each row. The operations common to all the tasks are listed at the top of the Task Pane. You can select the appropriate one. The chosen action will be implemented for all the selected tasks. For example, after choosing the tasks that you require, you can acquire all of them in bulk (if the ‘Acquire’ operation is allowed for all the tasks) 2.2 Navigating the Workflow Menu When you click the ‘Workflow’ option in the Landing Page, the following screen is displayed: 2-5 The screen displays the different queues of the workflow process and the number of tasks against each queue. The workflow queues are as follows: Pending Assigned Failed Unassigned Completed Reversed Tanked Untanked To view the details of a particular queue, click on the queue. The details of all the tasks under the queue specified will be displayed as shown in the screen below: 2-6 You can select the task on which you wish to perform an action to complete the process flow. You can also carry out a search for tasks based on parameters of your choice by clicking the ‘Search Tasks’ option available in this screen. The following screen will be displayed; 2-7 You can specify the parameters for the query and click on the ‘Search’ button. All records satisfying the parameters are displayed. You can now choose the task on which you wish to perform some action.. 2-8 3. Operations Oracle FLEXCUBE allows you to configure Queues, Landing and Sub-stages in the workflow layer to suit your bank’s requirements. It also keeps track of duplication of transactions on the basis of the fields that you indicate. 3.1 Configuring Landing Page The page that is displayed on invoking the application is called as the ‘Landing Page’. As mentioned above, you can launch a search for a particular task on the basis of the fields displayed in the Task List pane under the ‘All’ sub-menu in the ‘Search’ main menu item. The fields under this sub-menu (All) are pre-defined in the system and represent all process flows. The search fields under the ‘All’ sub-menu are displayed as shown in the screen below: You can also choose to maintain additional fields for specific process flows, When you maintain additional fields for search operation for a process flow, the process flow is displayed under the ‘Search’ main menu and all the fields (pre-defined and the additional ones maintained for the process flow) become available for you to search on. You can define the process-flow specific additional fields in the ‘Landing Page Configuration’ screen, which you can invoke by typing ‘SMDLNDPG’ in the field at the top right corner of the Application tool bar and clicking the adjoining arrow button. The following screen is displayed: 3-1 Here, you can capture the following details: Process Code Specify the function ID associated with the process work flow for which you are defining additional details. Field Name Select the field name which should appear in the Task List pane when you carry out a search for a task under the process flow mentioned above. Field Label Specify the name that should be displayed in the Task List pane. Display Check this box if the value of the field specified should be displayed as part of task details when you click on a task. This is applicable only when the ‘Process Code’ field is ‘specified as ‘All’. Searchable Check this box to indicate that the field should be made available for searching tasks. This facility is available for any ‘Process Code’. Seq No Specify the order of display for the filed. For instance, if you have maintained the fields ‘Currency’ and Product ID as an additional field for the Export LC process flow, you can see these fields along with the ones available under the ‘All’ sub-menu, when you click the ‘Export LC’ queue under the ‘Search’ main menu item as shown in the screen below: 3-2 3.2 Configuring Queues A queue represents a set of human tasks that are grouped on the basis of the common characteristics they share. For instance, you could have groups based on whether the tasks have been completed, deleted or the type of transaction You can define the basis for grouping for each queue in the ‘Queue Maintenance’ screen. To invoke this screen, type ‘SMDQUEMT’ in the field at the top right corner of the Application tool bar and click the adjoining arrow button. The following screen is displayed: 3-3 In this screen, you are required to specify the following details: Queue ID Specify a unique identification code for the queue. Queue Type Indicate the type of tasks that should be displayed for the queue you are defining. Select one of the following values from the adjoining drop-down list: Editable tasks: Tasks where the user will be allowed to modify existing data. Read-only Tasks: Tasks where the user can only view existing information. Normal Tasks – All the tasks for which the user has rights (editable/read-only) Supervisor – All tasks pertaining to the all the subordinates of the user. Current stage – The current stage of a process instance in which the user has performed at least one task. Queue Criteria Specify the criteria to be used to filter all tasks. The criteria specified here and the queue type you have indicated earlier determine the tasks that are displayed under each queue. You can also associate Function IDs to queues by specifying them here. If you do so, only those Function IDs that have been associated can be accessed by the user. If there is no such association in the criteria, all Function IDs will be made available for the queue. Filter Column Indicate the basis for filtering the tasks. Operator Indicate the operator. Filter Value Specify the value to be considered for filtering. Others If ‘Filter Value’ chosen is ‘Others’, you can specify the value here. Language Code Indicate the language code to be used for the queue ID. Main Menu Indicate the name of the group under which the queue should be placed. Sub-Menu Specify the name for the queue. This will appear under the Main Menu. 3-4 Description Specify a relevant description that will be displayed when you point the mouse on the Sub-Menu. Workflow places the tasks that meet the criteria specified for each queue as shown below: 3.3 Configuring Sub-Stages In the BPEL workflow layer, there are several points at which human tasks are generated. These tasks can be further divided into sub-stages which have entry conditions, exit outcomes etc. You can capture these details in the ‘Task Sub Stage Maintenance’ screen. You can invoke this screen by typing ‘SMDSUBST’ in the field at the top right corner of the Application tool bar and clicking the adjoining arrow button. The following screen is displayed: 3-5 You are required to maintain the following details in this screen: Function ID Specify the Function ID associated with the human task for which you are defining sub-stages. The adjoining option list displays all valid function IDs available in the system. You can select the appropriate one. Seq No The system displays the sequence number for the current sub-stage. Sub Stage FunctionId Specify the Function ID for the sub-stage. The adjoining option list displays all valid function IDs available in the system. You can select the appropriate one. The roles and the screen displayed for the sub-stage are fetched accordingly. This can be the same as the main Function ID for the task. Sub Stage Name Specify a unique name for the sub-stage. Outcome List Specify the possible outcomes allowed for this sub-stage. You can have any of the following: MOVENXT: If this is chosen, the current Function ID screen will be closed and the process will move on to the next sub-stage in sequential order AUTOMOVENXT: If this option is selected, the task will go to the next stage. The next substage will be acquired automatically (provided the user has the relevant rights). The Function ID of the next sub-stage will be displayed in the screen. MOVEPREV: If this is chosen, the task will be moved to the previous stage mentioned or to the sub-stage sequence number specified in the ‘Reject To Stage’ field. 3-6 To facilitate this configuration, you need to map the first sub-stage to the Function ID of the human task. Also, you will be allowed to select only the ‘MOVEPREV’ option for the last substage you have defined. Entry Rule Specify the conditions that need to be fulfilled for this sub-stage to be initiated. The specification is done in the same syntax as that for the queue configuration. If the criteria specified are satisfied, then the transaction comes to this sub-stage. If not, it moves to the next sub-stage. Reject To Stage This is the sub-stage to which a task is sent to in case the task is rejected at any point in the substage process. If you do not specify any value for this, a rejected task will be sent to the previous level. 3.4 Checking Duplicate Transactions During initiation of a process flow, when you enter and save the data, the system checks for duplicate transactions among all authorized and unauthorized tasks carried out on the same day. This check is performed based on a list of fields maintained for every transaction type. If duplicate transactions exist, the system will display an override message containing the Workflow reference numbers of all the matching tasks, as shown below: You can however, override the message and continue with the current process. You can define the fields that need to be matched for duplication in the ‘Function Description Maintenance’ screen. You can invoke this screen by typing ‘SMDFNDSC’ in the field at the top right corner of the Application tool bar and clicking the adjoining arrow button. 3-7 In this screen, you are required to indicate the following details to facilitate checking for duplicate transactions: Duplicate Check Check this box to ensure that a validation is carried out to track duplication of transactions. Field Name Specify the field that should be the basis on which transaction duplication is checked. Enabled Check the box against each field whose values you want the system to compare across transactions. 3.5 Enabling User Rights As mentioned earlier, each human task has a Function ID and the roles assigned to the Function ID are inherited by the task when it is initiated. A user, with access rights to the Function ID for the task, can either view the details of the task or perform edit operations on it. You can define these rights in the ‘Process Stage Rights’ screen. To invoke this screen, type ‘SMDROLDF’ in the field at the top right corner of the Application tool bar and click the adjoining arrow button. In the ‘Role Maintenance’ screen that is displayed, click ‘Process Rights’ button. The following screen is displayed: 3-8 Specify the following details in the screen: Role Function Specify the Function ID for which you wish to define rights. The adjoining option list displays all valid function IDs available in the system. You can select the appropriate one. Editable Check this box if you wish to allow editing of data for this task/Function ID. If you do not check this box, the user can only view details for the role function specified earlier. You can, therefore, use this screen to allow only editing or only modifying rights for a user for different role functions.. 3-9 4. Screen Glossary 4.1 Function ID List The following table lists the function id and the function description of the screens covered as part of this User Manual. Function ID Function Description SMDFNDSC Function Description Maintenance SMDLNDPG Landing Page Configuration SMDQUEMT Queue Maintenance SMDROLDF Process Stage Rights SMDSUBST Task Sub Stage Maintenance 4-1 BPEL Workflow [May] [2011] Version 11.3 Oracle Corporation World Headquarters 500 Oracle Parkway Redwood Shores, CA 94065 U.S.A. Worldwide Inquiries: Phone: +1.650.506.7000 Fax: +1.650.506.7200 www.oracle.com/ financial_services/ Copyright © [2011] Oracle Financial Services Software Limited. All rights reserved. No part of this work may be reproduced, stored in a retrieval system, adopted or transmitted in any form or by any means, electronic, mechanical, photographic, graphic, optic recording or otherwise, translated in any language or computer language, without the prior written permission of Oracle Financial Services Software Limited. Due care has been taken to make this document and accompanying software package as accurate as possible. However, Oracle Financial Services Software Limited makes no representation or warranties with respect to the contents hereof and shall not be responsible for any loss or damage caused to the user by the direct or indirect use of this document and the accompanying Software System. Furthermore, Oracle Financial Services Software Limited reserves the right to alter, modify or otherwise change in any manner the content hereof, without obligation of Oracle Financial Services Software Limited to notify any person of such revision or changes. All company and product names are trademarks of the respective companies with which they are associated. 4-1