1
T HE
2
Installing the “9” on the harness / continued
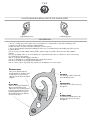
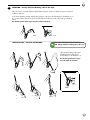
• Installing and removing the rope from the “9” can be done
without removing the device from the carabiner which can remain
attached to the harness.
directional
anchor
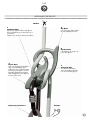
•It is Prohibited to attach the “9” directly to the belay. The “9”
must be attached to the belay loop of the belayer’s harness and
the rope must pass through a directional anchor above the belayer
when bringing up a second or when the leader leaves the belay on
a multi-pitch climb.
unlocking
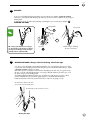
• When installed on a harness with a vertical belay loop and the
901D
“9” is in a vertical position, you must ensure that
the Top Horn (5)
unlocking
is on the lower side of the device to ensure better braking function
in case the rope is accidentally released from the braking hand.
3
unlocking
INSATALLING THE ROPE: The Traditional Position
902D
descent
descent
908D
901D
descent
902D
909D
903D
descent
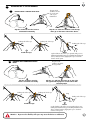
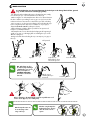
• Place the rope on the same side of your body as your braking
hand (i.e. on the right-hand side for right-handed people).
901D
902D
908D
903D
904D
909D
910D
915D
descent
916D
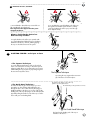
• Install the rope by passing a loop of rope into the “9” then
clipping the loop into the pear-shaped carabiner.
• Place the loop of rope behind the Lower Horn (2), this will
908D
provide good braking friction.
909D
915D
910D
911D
916D
923D
917D
• The climber’s side of the rope must pass through the Circular
Hole (4) and the braking side of the rope must pass through the
V-Shaped Slot (3) to be in position.
922D
923D
915D
916D
917D
924D
918D
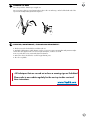
N.B. for stiffer ropes we recommend the Rapid Position, with all the advice and reservations of its use
(see chapter 10 Rapid Position)
922D
923D
925D
924D
5