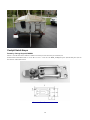
1
CATBOAT GUIDE and SAILING MANUAL Collected from Web sites, articles, manuals, and forum postings Compiled and edited by: Edward Steinfeld What I dream about. What fits my need best. ii Picnic cat by Com-Pac What I can trailer. Fisher Cat by Howard Boats iii Contents CATBOAT THESIS ...................................................................................................................1 A BRIEF HISTORY OF CATBOATS .....................................................................................3 MOORING AND DOCKING ...................................................................................................4 Docking ....................................................................................................................................................................................... 4 Docking and Mooring ............................................................................................................................................................. 5 Docking Lessons ...................................................................................................................................................................... 6 DOCKING OUTBOARD-POWERED SMALL SAILBOATS..............................................9 Approaching the Dock ........................................................................................................................................................... 9 Angling the Boat Properly and Coming to a Stop ........................................................................................................ 9 Turn the Rudder, Turn the Engine .................................................................................................................................. 10 MENGER CAT 19 OWNER'S MANUAL.............................................................................11 Stepping and Lowering the Tabernacle Mast ............................................................................................................. 11 Trailer Procedure ................................................................................................................................................................... 12 Sailing Tips .............................................................................................................................................................................. 13 First Reef ............................................................................................................................................................................. 14 Second Reef ........................................................................................................................................................................ 15 TRIMMING THE SAIL ..........................................................................................................16 How to get rid of Weather Helm?.................................................................................................................................... 16 Quick study guide.................................................................................................................................................................. 16 What I do to trim the sail is... .......................................................................................................................................... 17 Sail Trim .................................................................................................................................................................................... 17 Short Peak Halyard Primer ................................................................................................................................................ 18 Catboat Sail Trim ................................................................................................................................................................... 19 How ‘deep throat’ can give better performance in a single-sail, gaff-rigged boat................................................ 19 Angle of attack ................................................................................................................................................................... 19 Draft ..................................................................................................................................................................................... 19 Twist ..................................................................................................................................................................................... 20 Trimming to conditions ..................................................................................................................................................... 20 Points of sail ........................................................................................................................................................................ 20 ANCHORING ..........................................................................................................................22 HEAVING-TO IN A CATBOAT ...........................................................................................24 Family Cat ................................................................................................................................................................................ 24 Marshall Sanderling .............................................................................................................................................................. 24 Horizon Cat .............................................................................................................................................................................. 24 Sun Cat ...................................................................................................................................................................................... 25 RIGGING AND LAZY JACKS ..............................................................................................26 Rigging Length of Line Chart - Sanderling .................................................................................................................. 26 Single Line Reefing ............................................................................................................................................................... 29 iv Description of Lazyjacks on Cat Nap.............................................................................................................................. 29 Another Sun Cat Lazy Jacks Installation ...................................................................................................................... 31 Still Another ............................................................................................................................................................................ 32 Homemade Lazy Jacks ........................................................................................................................................................ 33 Lazy Jacks (Picnic Cat) ....................................................................................................................................................... 35 Simple Lazy Jacks for a Sun Cat ...................................................................................................................................... 36 MODIFYING SUN CAT'S RIGGING .................................................................................37 Adding Lazy Jacks ................................................................................................................................................................. 40 Creating a Gaff Boom Downhaul ..................................................................................................................................... 40 Improving the Reefing System ........................................................................................................................................ 40 Making an Adjustable Outhaul ......................................................................................................................................... 41 John’s Changes ...................................................................................................................................................................... 41 MORE SUN CAT MODS ........................................................................................................42 SUN CAT UNDER BRIDGEDECK CABIN STORAGE.....................................................49 NEW SAIL FOR THE SUN CAT ..........................................................................................53 SUN CAT WATER LEAK FIXES ..........................................................................................54 MAST AND SAIL RAISING TIPS ......................................................................................56 Raising the Sail (Com-Pac) ................................................................................................................................................ 56 Raising the Mast (Sun Cat) ................................................................................................................................................ 56 Raising the Sail (Sun Cat) .................................................................................................................................................. 57 Holding Course while Raising the Sail ........................................................................................................................... 59 Trimming the motor .......................................................................................................................................................... 60 Menger Tips ............................................................................................................................................................................. 60 To lower the sail: ............................................................................................................................................................... 60 As to reefing: ...................................................................................................................................................................... 60 STEP STORAGE SYSTEM FOR SUNCATS .......................................................................61 PICNIC CAT UPGRADES .....................................................................................................65 More Picnic Cat Mods ........................................................................................................................................................... 70 Installing Swim Ladder and Motor Bracket ................................................................................................................. 71 Cockpit Hatch Hasps ............................................................................................................................................................ 74 Flotation Bags and Pointed Screws ................................................................................................................................ 75 PICNIC CAT SPAR SPECS ..................................................................................................76 DM-284 Mast ........................................................................................................................................................................... 76 DM-275 Boom ......................................................................................................................................................................... 77 DM-1 Gaff ................................................................................................................................................................................. 77 PICNIC CAT SAIL DIMENSIONS .....................................................................................78 PICNIC CAT RUDDER NOT PLUMB .................................................................................79 v REEFING – HOW AND WHY ..............................................................................................81 A DIALOG ON REEFING .....................................................................................................83 JIFFY REEFING INSTALLATION – SUNCAT ................................................................84 REPLACING SEATS ON A SANDERLING .......................................................................86 KEEP THE BOOM FROM SWINGING ..............................................................................88 CAPSIZING .............................................................................................................................94 TRAILERING ADVICE..........................................................................................................97 QUESTIONS ABOUT TRAILERING ..................................................................................98 Tongue Weight, Tilting, Wheel Size, Bearing Buddies . .......................................................................................... 98 AUTOPILOT/TILLERPILOT .............................................................................................101 ST1000 installed .................................................................................................................................................................. 101 Raymarine ST1000 & ST2000 Tillerpilots .................................................................................................................. 102 DEPTH GAUGE INSTALLATION .....................................................................................104 SUN CAT MAIN SHEET/TRAVELER RELOCATION ...................................................105 SWIM LADDER STEPS ......................................................................................................107 IDASAILOR RUDDER FOR THE PICNIC CAT .............................................................109 SCUPPERS ............................................................................................................................111 Water Coming In Through the Scuppers .................................................................................................................... 111 Drain Tubes and Scuppers ............................................................................................................................................... 111 ANCHORS ..............................................................................................................................113 SUN CAT STABILITY .........................................................................................................114 OUTBOARD VS. INBOARD...............................................................................................116 MUST HAVES FOR A CAT BOAT .....................................................................................117 Comments from others ..................................................................................................................................................... 117 Teak Cockpit Grates ........................................................................................................................................................ 117 Tiller Tamer ....................................................................................................................................................................... 118 MARSHALL VS MENGER VS COM-PAC .........................................................................119 PICNIC CAT REVIEW ........................................................................................................120 HA-18 VERSUS SANDERLING ........................................................................................122 LENGTHS AND SURFACE AREA .....................................................................................123 MELONSEED CONVERSION .............................................................................................125 POINTS OF SAIL.................................................................................................................134 FLAG ETIQUETTE................................................................................................................136 vi The Flags ................................................................................................................................................................................ 136 Ensign................................................................................................................................................................................. 136 Burgee ................................................................................................................................................................................ 136 Private Signal .................................................................................................................................................................... 137 Courtesy Flags .................................................................................................................................................................. 137 Flags' Dimensions ............................................................................................................................................................... 137 Raising and Lowering Flags ............................................................................................................................................ 137 RENAMING A BOAT ...........................................................................................................139 Afterwards ............................................................................................................................................................................. 139 Vigor's Denaming Ceremony ........................................................................................................................................... 140 Christening Ceremony ....................................................................................................................................................... 140 GLOSSARY ............................................................................................................................141 vii Catboat Thesis C Posted By: Kristen Posey, 18' Sanderling. TX/LA atboats vs. Seaworthiness–a wave on the stern quarter will shove her around a bit but she is generally a heavier boat than a sloop of her same length, and her beamy nature does a lot in the way of added mass and damping to counteract most wave forces. Catboats vs. Ease of Launching–you can't get easier to launch than the Com-Pac line (Picnic Cat = 14ft, Sun Cat = 17ft, Horizon Cat = 20ft) with their Mastendr Mast Raising System. Some of our residents make it off the trailer and sailing in a Very Quick 10 minutes. Some of the other catboat lines also offer hinged masts, but we haven't heard much on how easy they are to set up right. A line that comes to mind there is the Marshall Catboats. (Sandpiper = 15ft, Sanderling = 18ft, Marshall 22 = 22ft). I do know that the Nonsuch line produced the 18' Naiad (Bill Wickett, who periodically visits owned one). It was possible for a couple to get the mast up. The Nonsuches are like normal catboats on steroids–think of a Windsurfer rig, blow it up, and put it on a boat. Naiads are no longer in production, but you can get them used if you watch long enough. Really fun boat. There are other Marconi rigged boats if gaff rigged just isn’t your style. Alerion Express Cat I believe has a furling main. Catboats vs. Ease of Single-Handing–the catboats were initially designed for fishing families–just a man and his little boy pulling fish out of the water in each boat. You have one giant sail, one sheet. The halyards come back to the cockpit. No headsails to fuss with. These boats are shallow water boats, for boats longer than 20 feet, you'll only have a draft of about 2 feet and a few pennies. Less of a wade to the beach if you've got kids. Catboats vs. Roomy Cockpits–catboats are the beamiest recreational sailboats out there–if you're looking at monohulls. Their beam is about half their length. It adds stability and damps down the rolling motion compared to what you'll see in a sloop to something much smaller and slower (and much more agreeable to a frightened wife or kids). For example, my boat is 18' long, and 8.5' wide. Half of my boat's length is cockpit, the other half is cabin. So the cockpit is 9' by 8.5'. That's about the size of Rhode Island, you know. Catboats vs. Dry Cabin–that whole beam thing comes back in to play here, and adds room to the cabin space. There's room in the cockpit to sit down, have a nap with the wife, take a ****, store some food, make a cup of tea, whatever. There's a lot of storage outside for your gear, but if you have lots and lots of gear, there's a lot of storage inside too. No mast in the way–it's way up forward in the chain locker. You might have a centerboard trunk to deal with in some of them (in others it's out of the way). By the way, the large beam means she has a large waterplane area, so you can add more gear to the boat than you would a sloop before she starts sitting a lot lower. Catboats vs. Stability–yeah. Lots of it. They won't react as much to you jumping on board as the sloops do, the added beam acts as a damper to what rolling motion there is in comparison to a sloop. The only bad little thing about catboat stability is that should you manage to actually get pooped in a really bad storm, bad things could happen (very rare occurrence, usually she "Rises" to the occasion). But you'd have pulled a big stupid being out in that bad of storm in the first place. Catboats vs. Sloops... The Advantages of a Catboat: Easy to handle–less sails, less lines, so there is instant gratification for new sailors. However, there is a learning curve, as the vessel is hard to learn to sail well, so there is still a challenge for more advanced sailors. It's easy to have all the lines come back to the cockpit, so it's rare anyone actually has to leave the cockpit to fuss with anything, thereby making it a safe boat. Beaminess adds to initial stability. Very shallow draft boats, especially the centerboard boats. (The Wylie Cat and some of the Nonsuches being the exception, with fixed keels). This allows exploration of shallow waters that similar sized non-catboat vessels would be unable to visit. Easy to single-hand, for people just getting into sailing, people with kids, and people whose knees don't care to go scampering about deck frequently. In some cases the boats has been set up for people who are confined to wheelchairs. Have a traditional salty-looking aesthetic appeal in most cases. The beaminess affords a lot of room in the interior, creating a sense that the boat may be 5 longer than she truly is. Meanwhile, the cockpits are generally enormous. These vessels on average hold their value better than other vessels, if decently maintained and located on the East Coast. 1 Can be faster than other boats on certain points of sail, due to their large sail area. • There are some famous racing associations for certain classes of catboats—e.g. WoodPussies, Sanderlings, Sandpipers, Beetle Cats. Some of the popular smaller catboats have hinged masts that make trailering, going under bridges and obstructions, and storage in covered slips very easy. The shorter masts used for gaff rigs have more ability to get under bridges and obstructions as well. The catboat's mast position leaves the cabin uncluttered, as does the Horizon Cat's centerboard, which retracts into a shoal draft keel. No compression post in any of these boats, and no centerboard trunk in some of them. Load carrying ability. The large waterplane area allows the vessel to carry more cargo. Catboats vs. Sloops: The Disadvantages These boats can be slower than other less beamy boats on certain points of sail. Can’t be raced against sloops fairly, without some attention to the handicap ratings. The vessel will be very hard to right if capsized (although capsizing is somewhat more difficult to achieve). Less sail redundancy. Most catboats only have one mainsail and generally no extras. Whereas, sloops, ketches, schooners, yawls, etc., carry at least a main and a headsail or two, providing redundancy should one sail fail. In smaller catboats, the cockpit is so large that getting pooped could be disastrous. Due to the one single large sail, the skipper must understand the need to reef earlier before the winds and the sail become unmanageable. Many skippers don’t care to reef and this can turn into a dangerous situation. Catboats are frequently known to have heavy weather helm. Most catboats have low freeboard with a curvaceous sheer line. Catboats are admittedly not the best design for bluewater cruising. The Nonsuch design has ventured across the Atlantic a number of times, and a few books published on the experience. (Saci IV, by Brian Shelley, Dangerous Waters, by David Philpott, and personal accounts/logs of Dr. Alain Cracco, unpublished.) The general consensus was that the vessel was surprisingly well built and could handle quite a beating in heavy weather, but that the unstayed rig and mast tracks were the weak links. Hinterhoeller, Inc., the company building the Nonsuch line, responded with improvements to the design as much as economically feasible. Catboats are not as popular on the Western and Gulf coasts, and may not sell as quickly or for as high values. 2 A Brief History of Catboats CAROL TITCOMB, © WindCheck Magazine “If there’s one boat that exemplifies the spirit of American boat design, it’s the catboat. Catboats are simple, strong, seaworthy, trustworthy, – and they’re beautiful,” says Doug Wagner of the Center for Wooden Boats, as quoted in the DVD Nine Lives. There is no date in the history books stating the launching of the first catboat. However, 19th Century pictures abound and records show an increased number of flat-bottomed, single-sailed boats being put to work on the East Coast. In the 1800s, catboats were used for three purposes; carrying cargo, fishing, and pleasure sailing. Catboats were used in harbors to transport goods from large ships anchored at the mouth of a harbor into the docks at shore. With their sturdy, flat-bottom construction close to the waterline and wide, open cockpit, catboats could be loaded quickly, scoot to shore for off loading and return to the cargo ship for another load. Millie at Old South Wharf, Nantucket © The Catboat Association Archives Fishermen enjoyed the sturdy structure of a catboat because the large sail allowed them to get quickly to offshore fishing grounds. The stable platform allowed them to haul in their catch and fill the hold below without worrying about capsizing. It is the fishermen who are credited with starting the catboat races that are still held today. They held fishing tournaments based on speed of sailing and the quantity of catch. Competitive instincts kicked in as each fisherman tried to find a bigger sail to fly, a newly-designed, faster boat or a more efficient way to sail. Boat shops began cranking out these workhorse vessels at an incredible rate in the 1800s as they realized the value of the sturdy craft. Boatbuilders from Cape Elizabeth, ME to Cape May, NJ honed their design skills to perfect the style best fitting their local waters. The Crosby family had several shops along the Massachusetts shores. Manuel Swartz, CC Hanley, R. Bigelow, L. Francis Herreshoff and others too numerous to mention capitalized on the need for catboats. With remarkable speed, these prolific builders hand-crafted each vessel and sent it down the railway. Oscar Pease (1912-1995) used his catboat Vanity for many years, fishing on Martha’s Vineyard in the summer and scalloping in the winter. He was one of the only remaining catboat fishermen who remained true to his craft until the 1980s. Pease’s depth of knowledge earned him the privilege of serving as technical advisor of The Catboat Association and he became a lifetime member. A recently published book, The Catboat Era in Newport, Rhode Island by John M. Leavens, edited by Judith Navas Lund, published by Tisbury House and available from The Catboat Association (Publications), provides a wonderful understanding of catboats in Newport in the 1800s. Lund describes the book best, saying, “When we first think of Newport at the end of the Nineteenth Century, we think of ‘writ-large’ – big houses, big yachts, big money…Newport was a thriving community whose population came from all levels of society. And like the diversity of people, there was a diversity of watercraft in the harbor. In among the yachts are found the workboats and other small craft. John Leavens took a look at the humble catboat and found a wealth of information about its origin, its builders and its owners.” This book is rich in historical photos and facts, including an index of recorded Newport catboats. By the 1900s, transportation had changed with the implementation of the internal combustion engine. Cargo was transported on land as well as sea and commercial fishing fleets changed the fishing industry. The catboat, however, remains a vital watercraft to this day. Historians differ on how the name “catboat” came to be used. Some say there are as many different definitions as there are catboat designs. The two most popular are “She’s as quick as a cat,” or the two traditional oval shaped portals on the cabin house look like cat’s eyes. Whichever definition you use is fine; the important fact is the name has been around for almost 200 years. 3 Mooring and Docking Docking D Posted By: Dick Herman, Muddy Duck ocking takes practice. I learned the hard way never to leave or approach a dock under sail. There is one marina on the Delta where I was asked to leave and not come back. Always motor away or into a dock with the sail furled. The secret is to be going slow enough to maintain way and control. I approach the dock dead slow and aim for the spot where I want the stern. I shift into neutral anywhere from twenty to thirty feet out and coast in, but ready to shift into forward or reverse and apply power as required. Usually, a little blip of the throttle is all that is needed. You also have to get proficient at tiller and throttle control. In tight quarters, that means you have to use the tiller and outboard together with one hand on the tiller and the other on the outboard's throttle, i.e. the twist grip. Swing the tiller and outboard together and the boat will spin on a dime (centerboard down if possible). It also works backing up. Face backwards and just point the tip of the rudder and outboard propeller in the direction you want to go. You may need to get an extension to fit over the outboard's twist grip. A piece of PVC pipe might do the trick. That way, you can control the throttle and still swing the outboard side to side in conjunction with the tiller. I've also seen extensions to the shift lever which are little more than rods attached to the shift lever so you can push or pull the lever from the cockpit. 4 Docking and Mooring 5 Docking Lessons L Posted By: Carl Haddick, Horizon Cat/Picnic Cat, Central Texas ounging in the sternsheets of our dependable catboat, watching freighters struggle uphill into Corpus Christi, it was enticing to think how much grander life might be sliding down a meridian over that horizon's edge. Just a dream, but a nice dream nonetheless. With eighteen feet of waterline, no matter how nicely making way, I'm not likely to see the edge of ancient charts from our lovely Horizon Cat. Quiet coves and coastal getaways, not a problem in the right conditions. On lakes and protected water, I have the boat I want, and she will take good care of me. The ocean won't mind if I try conditions beyond my capabilities or my boat's design limits, but I think I'll be better off with a correct sense of perspective. Maybe someday on a more suitable ocean kindly craft, though, I'll bury the land behind me in a watery grave. In the meantime I'm having a great time learning how to sail, taught by well-found vessels and good friends. I began that process 30 years ago, drifted away from the water, and have now seen that love rekindled. I'll not stray from sailing again. I think that sea-kindly cruiser will be something I rent. I sure don't want to be stuck without our lovely trailerable catboats. My trip to Corpus was done with little in the way of planning. The nice thing about spontaneous trips is you have this wonderful feeling of flexibility. The less nice thing is that you really better be flexible, not knowing exactly what you'll encounter. Docking was the first challenge I faced. I rather botched an approach into my assigned leeward slip and would have been a most unhappy camper had it not been for JimB's ready hand on the docklines. Sobering. Winds weren't that strong, but I let myself be thrown off like that. As it was about four in the afternoon when Jim and Joan bid farewell, I decided to think a bit before I counted on myself to dock singlehanded. I started to cast off around 4:30, but without any really outstanding plan other than "don't scratch the boat" I held off. I just didn't want to dock singlehanded, wind at my port quarter, and in the dark. That evening, a gentleman docked opposite me commented that when the wind swung and put his slip on the lee, he just didn't go out. Too easy to really goof up. "Just rosy," I thought, so I asked at the marina about changing slips, an option that might be available the following day. 6 Later that night, snug abed, I woke up thinking about a comment Jim made about using just one long dock line, one end cleated at the bow, the other at the stern. I've fouled a dock line on my prop twice, and compensated for that idiocy by keeping my docklines short. Not good. With short docklines, you can't shove the boat comfortably away from you to get easy angles on the lines to walk the boat. With one long dockline, I could drop one end and be able to recover it. A little more snoozing and it came to me that if I approached the end of the finger dock at 90 degrees to the slip with the wind over my starboard quarter it left me with a nice escape route. Flub the approach and I could just power up and keep going without having to fight inertia or the wind, and with nothing directly in front of me. That's when I decided I would park my boat where I darn well pleased, and that I didn't have to begging for an easier slip. The next morning I grabbed a 50 foot line, two and a half times my LOA, and worked an eye splice into each end. Now the problem was how to keep my silly self from letting that line end up around my prop. Loose lines on a boat are a menace, props notwithstanding, but I hit on a solution that worked well for me. Feel free to heckle, and I'll agree in advance this is not a good idea for the knot-impaired. I led the line aft from my bow bitt along the side deck, and doubled it up against its other end, the one secured to my stern cleat. I formed a bight, which I passed halfway around my port boom gallows stanchion, which I secured by passing a second bight made from the doubled standing end around the opposite side of the stanchion. Nothing wrapped all the way around, in other words, but still held to the stanchion. Then I just chained a few more slipped half hitches, single braid sennit style, to take up line. Horse people have a name for that kind of arrangement. The idea is that the horse can't pull his reins off a hitching rail, but a light tug on the bitter end of the reins makes them fall away cleanly. You can see a little of how I secured my docklines here - check out my port boom gallows stanchion: The really big powerboat in the background is the aircraft carrier Lexington, moored in Corpus as a musuem. That horse knot, whatever it's called, kept my dockline snug and out of trouble on the side deck yet a gentle pull on the end would cause 50 feet of dockline to fall free without fouling. Ideas that come in dreams are usually the best ones, but I tested my theories a time or two as well. One easy pull freed the dockline. Parking the free end loops of my chain of half hitches on top of a horn cleat kept it from falling free while I was still on the water. Coming back to the dock after a morning under sail, reefed and in enough wind to make docking a potential nightmare, I motored past my slip and rolled the wheel full starboard. I throttled back to neutral to avoid fighting prop walk, and spun the boat neatly around in the fairway, now coming up abeam to the end of the dock and drifting before the wind. A nudge in reverse slowed the boat to a crawl at the end of the dock just as it passed my position in the cockpit, but it also highlighted something to stay aware of. I had the wind at that point on my starboard quarter, and that burp in reverse ate up a good foot of clearance. The prop walk and the wind were both pushing the same direction. 7 I rolled over the coaming, pulling and unzipping the dockline behind me. The line jumped free and I halted the boat's remaining headway with the bow end of the line and pushed gently with my foot against the gunwale. As the stern found it's way across the wind, the boat swung to align nicely with the slip. Hauling in on the stern and paying out the bowline put the boat into the slip perfectly. I cleated off the stern, but the boat still had a nice strong wind on its stern, pushing it toward the forward wall of the slip. Fortunately, I had anticipated that in my dream-state as well, and already had one of my short docklines secured to a cabin top winch. I grabbed that line and led it aft to a dock cleat, using it for a spring line, still hanging on to the bow line, keeping the pointy end from swinging out from the dock. Once the spring was cleated I was ready to walk forward and secure the bow. That's when the most amazing thing happened. I became aware of the sound of running feet just as the first of a very friendly crew came to rescue me. A little out of breath, he said, "I'll get your bow line." "Thanks," I said, and handed him the line. That's about when he seemed to realize I was already docked. I asked him, "Did I do OK on this leeward slip?" As I dockside comedian I never expected I would hear that kind of comment - "Awesome." Chapman's suggests motoring into a slip at a 20 degree angle in these conditions, stopping your boat with a spring line led back from your bow. That's a good plan, but hard to pull off alone. Another accepted plan is to approach from upwind, traveling at right angles to the open end of the slip, and assist your turn and stop your boat with a spring line. That's basically what I did, I just hopped off my boat to handle the lines. Good lessons learned, and lessons I would have missed if I had gotten a slip pointing politely windward. A little adversity is not a bad thing. Prop walk is something to consider, and is really noticeable when the wind and the walk are both heading the same way. On my boat, for the tightest turns, turn to port under power, turn to starboard while idled in neutral. Remember that turning towards the wind will take more momentum to coast through. One long dockline is really convenient. Once led aft from the bow and tied off, it won't wander inboard of shrouds or fenders. If you drop the stern line in one hand, you've still got lines to both ends of your boat in your other hand. When the wind's a-blowing, spring lines are nice to have in place before you dock. And think while I sleep, perchance to dream of sailing, perchance to witness while I dream a perfect balance between earth, the dock I tie to, water, the ocean I ride, air, the wind that both confounds and delights me, and fire, the noisy motive force in my auxiliary. And through it all, music, the sound of one line docking. 8 Docking Outboard-Powered Small Sailboats Written by Tom Ray, Tropical Boating An outboard engine may look a little funny hanging off the back of a sailboat, but it can offer extra maneuverability that is impossible with inboard engines. Inboard engines are prone to "prop walk" at slow speeds, because the shaft is usually not parallel to the surface of the water. The angled shaft means that a propeller blade on one side of the shaft has a different angle of attack from the same blade when it has rotated around to the other side of the shaft. On most sailboats (with conventional clockwise shaft rotation), the prop walk will pull the stern of the boat to port when the engine is put into reverse. Outboard engines can be steered independently of the ship's rudder, and offer the ability to turn the thrust of the engine so as to cause a controlled "prop walk" effect. The 4 frames of these two pictures show the technique used. Approaching the dock Lining Up Approaching the Dock In the first frame, the boat is approaching the dock at an angle. The engine is running in forward at idle throttle, and the tiller has just been turned to swing the boat in line with the dock. The large red arrow shows the speed and direction of the boat. In frame two, the engine has been put into neutral, and the boat is coasting toward the dock. Less rudder is being used now, as it is not necessary with this technique to use the rudder to get the boat parallel to the dock. Angling the Boat Properly and Coming to a Stop In the third frame, the engine has been put in reverse and turned to port (meaning turned in the direction which would produce a turn to port if moving forward). The boat is almost stopped now, and the reversing engine will slow it further, while at the same time sucking the stern of the boat toward the dock. The boat has come to rest alongside the dock in frame 4, and the engine is put back in neutral. Because the boat is moving forward throughout the procedure, the rudder remains effective in controlling which way the nose of the boat is pointed. The engine is used only to slow the boat down and draw it closer to the dock. The boat could easily just coast in to the dock, but if there is not room to coast along for quite a distance while lining up with the dock, this little trick can help. "Crossing" the controls, with the rudder in a turn to port and the engine in a turn to starboard, will produce a bit of sideways slippage, and that is the point of the above procedure. But the engine and rudder do not have to fight each other. While some inboard sailboats can be very difficult to control when backing up, reversing in an outboard powered sailboat is very easy to master. 9 Turn the Rudder, Turn the Engine The key thing to remember is: when you turn your rudder, turn your engine at the same time and to the same angle. I have backed many small sailboats using the engine and rudder in tandem, and all are, if anything, too responsive to that kind of control input. There is none of the sideways propwalk and sluggish response to the helm seen in many larger, inboard-powered sailboats when backing. Yes, it is a bit more trouble to handle an outboard, reaching over here to throttle and steer it, over there to shift the gears, and all of it over the transom of the boat, which is not a great place to focus your attention when approaching a dock. But once you master the simple techniques of outboard engine control, you will find your small sailboat very easy to control in any kind of docking situation. 10 Menger Cat 19 Owner's Manual Stepping and Lowering the Tabernacle Mast Stepping the Mast on Tabernacle Boats P lace the mast aft side down into tabernacle. Put the top bolt in. Close the main hatch and walk the mast up the center of the boat until it is vertical. Put a long thin screwdriver in the bottom hole. Attach the forestay. Put the bottom bolt in. Tighten both bolts, but do not over tighten! Check to make sure the electrical wires and antenna coming out of the mast base are clear as the mast is raised. It also helps to have someone make sure the lines on the mast don't get snagged on cleats, tiller, etc. Put 6” S.S. bolt in fore and aft hole through mast and tabernacle. This bolt is used to secure the mast further, but is not really necessary for boats that are not left on a mooring. When your Menger Cat1 is in the water the mast is 23'6” high from the waterline, so be well aware of overhead obstructions to avoid serious injury or harm to yourself or others. Lowering Tabernacle Mast Following are the steps to be taken to lower the mast of a tabernacle Cat: 1. Put on the sail cover on in the normal way, and replace the boom crutch with the mast-boom carrier. 2. Unclip the forward flap on the sail cover 3. Remove the parrel line from one side of the gaff saddle. 4. Pull the gaff and saddle aft toward starboard. 5. Loosen the forestay. 6. Remove the fore-and-aft bolt from mast and tabernacle. 1 The Menger Cat boats are now called Thom Cat boats. Jerry Thompson, former manager of Menger Boatworks, has purchased the molds for the famous Menger catboats. Thompson Boatworks is currently producing in Amityville, New York the Thom Cat 15 and Thom Cat 19 based on the original Menger Cat 15 and Menger Cat 19 models. 11 7. Remove the lower bolt (jiggle the mast to ease removal) 8. Put a long screwdriver through the bottom hole 9. Disconnect the forestay turnbuckle from the boat 10. Close the main hatch 11. Standing on the cabin top, remove the screwdriver while holding the back of the mast. 12. Pull mast toward you and lower slowly, standing on port side. 13. Remove the forestay, coil up and stow. 14. Gather all lines, starting from mast top, and pull forward. Unclip the sail cover and tuck the lines inside. 15. Tie the mast down to the aft cleats and tighten the main sheet. 16. Using the line in the sail cover, tie the gaff to the boom and mast. That's it! Trailer Procedure On the Road 1. Your tow vehicle must have enough capacity to tow 3500 to 4000 lbs. There is a lot of information in the boat press as to towing capacity of common vehicles. Check with your auto dealer. (If you add a lot of gear, weight will go up.) 2. If you are doing long distance trailering, check the regulations in the states you are traveling through. You may be required to have surge brakes depending on the weight of your total load. 3. Carry enough spare parts! You should have a least a spare wheel bearing, light bulbs, waterproof bearing grease and gun, extra wheel studs, and a spare tire and rim. 4. Make sure all lines are tied down and nothing is loose. Tie a line around the outside of the sail cover to prevent it rubbing on the non-skid on top of the main hatch. Pad all metal to metal contacts. Remember that vibration will cause wear and tear very quickly. Launching 1. If you so desire, the mast can be raised before launching. This is much easier to do on the trailer than in the water. Be very careful of low overhead wires near the launching ramp or in the staging area. If you touch an overhead line do not make contact with the ground by stepping out of your vehicle or touching the boat or trailer! One Menger Cat owner bent his mast in two but continued on due to his four wheel drive. If he had stopped and got out-? 2. Check over your Cat to make sure you are ready to go into the water. Raise the centerboard fully. Close all sea cocks. Raise the outboard fully. Raise the rudder (Sun Cat). Remove all tie downs from the Cat to trailer. Unplug the trailer lights. Attach dock lines to the bow and stern long enough to reach from the Cat to dock with enough length to allow for the surge of launching. 3. Back up to the launching ramp until your trailer wheels start to touch water. Get out and determine how far you are going to go in. Remember; try not to submerge the trailer bearing as this is the weakest link in the trailer. Steep ramps are the most desirable in this respect. If you do submerge the bearings, be sure to give them a squirt of grease when you get home. Do not back up so far that the wheels of your car touch the water or slippery area. Put wood blocks on the ramp to prevent going in too far. 12 4. When you are in position, slowly release the pressure on the trailer winch, (be careful - the handle can spin fast enough to seriously hurt you), so that the hook becomes loose on the bow eye. Remove it. The Cat will not go flying off as the curve of the hull holds it on the trailer. 5. At this point, give the hull a push and it might start to slide off the trailer into the water, depending on the steepness of the ramp. 6. If you cannot push the hull free, pull forward slightly with your vehicle and then back up and slam on your brakes. Do not allow the rear wheels of your vehicle to enter the water. 7. At this point the boat will roll back and into the water. If this doesn't work the first time, try again. Doing this for the first time is rather traumatic, but it works on all types of ramps. Loading 1. Moor your boat as close to the ramp as possible. 2. Run lines from the bow and stern cleats long enough so that you are able to reach the launching ramp. 3. Raise the centerboard. Raise the motor. Raise the rudder (Sun Cat). 4. Back the trailer into the water until the wheels are submerged to the axle. Place wood blocks under the rear wheels of your tow vehicle to prevent the trailer from pulling it into the water. 5. Slowly position the bow so that it lines up with the center of the trailer. 6. Let the wire out until you can reach the bow eye and attach the hook to it. 7. Reverse the direction of the winch so that it is pulling in. Slowly crank the winch in. If excessive force is needed, stop winching and determine what is hanging up. The boat should roll slowly onto the trailer until the bow reaches the Vblock on the winch stand. 8. You can now pull away from the ramp. Use low gear and slow speed. Again, watch for overhead wires!! 9. Lower the centerboard and plug in the trailer lights. 10. See section on lowering the mast. Sailing Tips Centerboard T he centerboard on your Cat can be adjusted from time to time or left down about 24” all the time you are sailing. It should be pulled up while the boat is moored or under power. The purpose of the centerboard is to resist the boat's tendency to slide to the leeward while going into the wind. If necessary the Cat will sail to windward with board-up, but will make considerable leeway. To see this action, have one person sail and the other raise the board all the way while going hard on the wind. Observe that the wake has an “oily” appearance. Slowly lower the board until the wake becomes normal. This position is the right amount of board for sailing to windward with this amount of wind. It will measure about 20”-25” of pennant. If this is your local area's normal wind, mark the pennant with a permanent marker.. The helmsman will note that the amount of weather helm decreased significantly when the board was raised. Lowering the board all the way will considerably increase weather helm. Perhaps the reason catboats were saddled with a reputation for heavy weather helm was not the design's fault but the lack of sailing skill of the sailor. Try reducing the weather helm in a keel boat this way! You can sail your Cat to windward in up to about 7 knots of wind and calm seas, by only adjusting the centerboard pennant. Start out by setting a course to windward with your board set as you normally do. Let the tiller go and take the centerboard pennant in hand. Lowering it causes the Cat to go “higher”; raising it causes you to “fall-off”. Somewhere in between your Cat will sail herself to windward. Fasten the pennant and sit back and relax. (DO NOT FALL OVERBOARD AT THIS TIME!) Sail Trim Very few of us have had experience in adjusting a four-sided sail. The tricks of the gaff rig have been lost by all but a few. The gaff rig of the past was burdened by the gaff being set at an angle to the mast of 30 to 45 degrees. Sailboats with this 13 kind of gaff will not go to windward very well. The leading edge of a sail is what determines your windward ability. The Menger Cat gaff is set at an angle of about 10 degrees. In effect the gaff is an extension of the mast it is so closely in line. (Technical books term this rig a gunter rig rather than gaff.) To raise the sail, first untie the sail ties. Pull on both the peak and throat halyards together; pulling the gaff so it raises parallel to the boom. Make sure the gaff does not go on the wrong side of the topping lift as you are pulling up. DO NOT run the halyards through the inside hole of the cleats but let them run freely on the outside of the cleats. (The reason for tying a stopper knot through the hole in the cleat is to stop it from running up the mast.) Throw the line into the inside of the cabin. Don't worry about being neat. Keep on pulling until the throat halyard becomes taut. At that point make it fast. Keep on pulling the peak halyard up until it becomes taut. While making sail in open water, lay the boat on the port tack. When the gaff is hoisted it will swing to starboard, preventing the sail from fouling under the topping lift This gaff enables you make adjustments to the sail shape. Once again you can hoist the sail and leave it alone or “play” with the shape. The sail shape to go to windward should be set by increasing the tension in the peak halyard. While hoisting the sail bring the throat halyard as taut as possible. Continue raising the peak halyard until a crease extends from the peak to the tack. This crease will disappear when you haul in the mainsheet. Do not raise the peak too high as you will “double block” the peak blocks. This will prevent the saddle from rotating. An inch or two adjustment in peak halyard will drastically change the shape of the sail. When the halyards are new they will stretch shortly after being tensioned. Therefore tighten them again 15 minutes after hoisting sail. The outhauls on the boom and gaff should be stretched very taut for heavy airs, but loosened for light airs. A leech line runs up the leech of the sail. This line stops the fluttering of the leech while going to windward. Do not adjust it in advance as you will end up with a curled leech, ruining the shape of the sail. After you've had a chance to sail the Cat a while, adjust it only if there is excessive flutter in your leech, otherwise leave it alone. Only pull in a very small amount at any one time. There is a small “clam” cleat on the side of the sail to secure it. The mainsheet is your primary sail adjustment. The sail should never be hauled in closer than the corners of the transom (quarters) no matter how high you're trying to point, unlike the mainsheet on a sloop. Your Cat's mainsheet is like the sloop's jib sheet. For optimum adjustment while going to windward watch the aft end of the boom. While pulling it in note its travel. Keep pulling while it moves toward the center of the Cat; stop pulling when it moves in a downward direction. (The downward movement is flattening your sail and taking out the draft. You are in effect pushing the Cat sideways.) Off the wind, you can increase your speed by slacking off peak and throat halyards. Raising the centerboard all the way will decrease your skin friction, reduce weather helm and thus increase your speed. Reefing Reefing is the most important part of learning to sail your Cat. Since the catboat has only one sail, it has to be a light weather sail. The mainsail of your cat is equivalent in area to that of a sloop with a large genoa or spinnaker and a small mainsail. However, the catboat's beamy hull fools the novice into thinking that since the Cat doesn't heel like his old sloop did; he can carry all that sail in any kind of wind. WRONG! The end result is she rounds up in the puffs, has heavy weather helm and becomes uncontrollable. In rail-down wind conditions, reefing your catboat will make it sail faster (and more comfortably) than under full sail. You wouldn't carry a number one Genoa or a spinnaker on a sloop in those wind conditions, would you? The problem really comes down to making reefing easy to do in the conditions of high winds and rough seas. We at Menger Boatworks have been striving toward that end and have developed a new single line reef system for the first reef, in which a combined downhaul and outhaul leads to the aft end of the cabin. One of the most important things to remember when reefing is that the sail must be FLAT when reefed, with little draft. It is not enough to just shorten sail; it must also have less draft. First Reef 1. Let go of mainsheet and raise topping lift to take weight of boom. 2. Lower peak and throat halyards so lower cringle on the luff is at the level of the boom. 3. Haul in on the first reef line (aft end of cabin, port side, inboard cleat) to set the reef downhaul and outhaul, tight! 4. Raise peak and throat halyards. 5. Release topping lift, haul in mainsheet, and resume course. 14 Reef is complete. Sail can hang below boom along foot. The modern Dacron sail is strong enough not to require the mid-sail reef points to be tied in. However the sail will have a cleaner appearance and will set better if the loose sail is gathered up and the reef points tied. Second Reef 1. Let go of mainsheet and raise topping lift to take weight of boom, and let cat heave to. 2. Lower peak and throat halyards so upper reef cringle is at the level of the boom. 3. Go forward to secure 2nd reef downhaul to tack. 4. Secure reef outhaul on leech to cleat on the port side of the boom. 5. With this reef it is necessary to tie in some of the reef points to keep the sail from hanging below the boom. 6. Release topping lift and resume course. Note: Wind strong enough to require a second reef may also raise a considerable sea in open waters. The ability of any small boat to make progress to the windward under such conditions is limited, so keep well off a lee shore under conditions of rising wind. Heaving-To Cat boats are work boats in origin, and a typical 19th century crew consisted of one man and a boy. They had to handle the catboat while making a hard and dangerous living. Lines, traps and nets had to be pulled in all kinds of conditions while the cat took care of herself. Different wind and wave conditions will vary the way the Cat heaves to, so try practicing in various conditions beforehand. Simply let go of the tiller and mainsheet while going to windward. Take care that the mainsheet doesn't tangle on a cleat or the tiller. The Cat will stop and lie sideways to the wind. Raise the centerboard and slowly haul in the mainsheet until the sail partly fills and she begins to point up. She is now in “park”, moving very slowly forward and to the leeward, constantly adjusting herself to maintain this attitude. You can catch a fish, oil some teak, or go below to fix your lunch In stronger wind conditions you may want to try lashing the tiller to leeward and trimming the mainsheet in a little further. She should then “scallop” up to windward, fall off and do it again and again. Trying out these tricks beforehand will help make it easy when you have to heave-to while reefing in rough conditions. Racing The things that make one catboat faster than another are numerous. To mention a few: the skill of the skipper, the condition of the sail and hull, local knowledge, the start, having the right amount of sail up for the wind conditions, the design and others. In most of the above only you can help yourself. It's a good idea to follow the most successful skipper prior to the start to see how he aligns his catboat in relationship to the starting line. A sailboat goes through the water with laminar flow in about the forward third of the hull. It is therefore a wise idea to clean this area prior to racing. Rough bottom paint and marine growth disturb this smooth flow and should be cleaned up. (That is the reason we do not like to put through-hulls in this area.) The Cat will sail through a chop a lot better with an 80 pound lead ingot sitting on the forward bunk just aft of the mast. Try shifting crew weight up forward. Some of the things that work in light air don't in heavy air! Experiment; don't just sit there! Scandalizing According to the misinformation put out by the boating press, the advantage of the gaff rig is in being able to “scandalize” the gaff. Scandalizing is achieved by dropping the peak halyard and allowing the gaff to hang down. This provides a smaller, triangular sail. The disadvantages of scandalizing are numerous and it is not recommended. 1. The gaff is swinging wildly and uncontrollably and is aiming for the top of your head. 2. The sail is being stretched on the bias and will lose its shape if this is done frequently. 3. The sail that results from scandalizing is inefficient for anything but running down wind. It is reported that professional catboat sailors (i.e. fisherman) were never seen to do this, and rightly so.! 15 Trimming the Sail How to get rid of Weather Helm? N Posted By: Bruce, Sun Cat ow, if I could just get rid of a wicked weather helm that I seem unable to tune out of the boat–-she rounds up in every puff when any more close-hauled than a beam reach, tiller hard over. Having sailed all my life, taught sailing, and raced successfully in Marconi-rigged cats and sloops. I seem unable to tune this out of an otherwise delightful boat. It makes the boat ever-more unpleasant to sail. Any suggestions? Quick study guide E Posted By: Jim B., Sun Cat ase out the mainsheet and pull up some centerboard. Check that your rudder is ALL the way down. Literally, if it is back even a few centimeters, there will be more weather helm. The IdaSailor rudder will also make a difference, if you do not have that. There is no reason that these boats should have too much weather helm. I Posted By: Carl Haddick, Horizon Cat, Central Texas would stress the trim the centerboard, myself. When I sailed with the centerboard all the way down, I just sailed sturns any closer than a beam reach if the wind was at all cooperative. Every little puff would round the boat up, and I would end up dragging the rudder sideways. The magic thing is that as you pull up on the centerboard, you are rotating it back, moving the boat's pivot aft. The weather helm you are getting is because the boat's sail effort is aft of where the boat pivots in the water. Moving the pivot back cures the problem. Don't worry about slippage and losing draft - your boat will balance out nicely if you adjust the centerboard, and any leeway you gain will be difficult to detect. Single handing our Horizon Cat, I'll balance the helm with the centerboard, go below to grab a nicely chilled Deja Blue, and return to the helm on basically the same point of sail. In fact, the helm balances almost too nicely. Coming about, if you don't start the maneuver with a little weather helm it's easy to end up with the boat falling off too far on the new tack. If the wind is blowing and I've got all the weather helm trimmed out, I'll drop the centerboard as I use about half rudder to windward. On the new tack, as soon as the sail develops power it checks the swing off the wind. As that happens, coming back up on the centerboard and returning the helm amidships puts the boat on the desired heading. Good luck - my bet is that your weather helm will trim right out. O Posted By: Carl, Picnic Cat, Central Texas n our Picnic Cat the centerboard effect is really cool. When it's time to drop the sail, I move forward to the mast, giving the boat enough weather helm to point itself into the wind. I initially couldn't understand why things didn't get ugly once she started making sternway, but I think I've got it figured out, and it's because of the centerboard. When the boat begins to move backwards, the rudder will flop to one side or the other. However, without any on-axis water flow over the centerboard, it doesn't make any hydrodynamic lift, it's just a poor excuse for a drogue. The rudder to one side moves the stern off the wind and the drag from the centerboard farther towards the bow tends to weathervane (hydrovane?) the bow to the wind. The boat stays calm in a sort of hove to condition. Interestingly, centerboard full down helps produce weather helm as long as the boat still has forward motion. Then when we're drifting backwards, it helps keep the boat approximately beam to the wind. 16 What I do to trim the sail is... P Posted By: Mark Milam Nonsuch 33, Sun Cat cabinless, LA lace several tell tales on leach and draft of sail. Then I play with the gaff position and mainsheet, outhaul and downhaul to get then all flying back for that wind and enough draft for power, like as in light air or waves, a flatter sail for smooth water and more wind. Just for the record, I've been racing since I was 14. We did win Nationals in the F-27 class 3 times. I just approach the cat boat sail like any sail, you have to get all the air flowing over it and the only way for me is to use tell tales. So many boats don't even have any. Another thing about the Sun Cat sail is the gaff goes really high, almost makes it a Marconi rig as compared to other tradition gaff rigs. So I think, and I'm no expert, you would trim it more toward a Marconi rig. I know that playing with the gaff, and not much at that, made a significant difference in air flow and shape going to windward and off the wind. I found myself adjusting it for both conditions several times during the race, to get good air flow. There is a point going to windward that you can over trim the sail, but you'll know it because, 1st the leach telltales start to go forward, and the boat slows down. Jim's idea about traveling to windward and using less mainsheet, does bring the boom more toward the center, but in light air it is still over the edge of the boom gallows, but a fuller sail and does help to point a little higher with same boat speed. Pull it in 2 in. to much and you stall. I know the Sun Cat is under canvassed, so I didn't expect it to do to good against other boats in those conditions, Heck, it's like other boats sailing with a reef in light air, But the real test will be when its blowing 12 to 15, just enough not to reef, that'll be the day I'll be telling those sloops, "C'MON, YOU WANT A PIECE OF ME NOW", "YEA, WHOSE YOUR DADDY NOW." Sail Trim Posted By: Carl Haddick, Horizon Cat/Picnic Cat, Central Texas T he article you're referring to is probably in the January 2007 issue of Sailing magazine, (See page 19), called 'Technique - Gaff-Rigged Sail Trim'. An excellent article. I would add their 'deep throat' technique is verging on overtensioning the peak halyard, but it looks like it works. You can see in the pictures it's close to putting peak-to-tack wrinkles in the sail. I haven't experimented with deep throat mode yet, but will on my next sail. The tradeoff, I bet, is the detrimental effect of vertical wrinkles starting to appear versus the deeper foil shape he recommends for heavy air. When my peak halyard is too loose, it feels like stomping on the gas pedal when I trim it in - the peak trim is critical, and getting it right can accelerate the boat much like sheeting in. There is also a nice side effect in the way the sail behaves best with a precise angle of attack. In the article it talks about the gaff rig being forgiving, with a wide groove in terms of angle of attack. The angle of attack they are talking about is the angle of the apparent wind to the sail. Luffing up or falling off, sheeting in or out, those are the ways you control the angle of attack. The author says to get best performance when close-hauled you need to sail on the edge of the groove closest to the wind. I've found that to be helpful. In other words, bring your boat close to the weather and sheet in. Head up enough to put a flutter in the luff, and then fall off just a bit. That's the best part of the groove in the author's opinion, and that's been my experience as well. When I'm trimmed like that, the leech tales fly pretty much straight back. If they start curling leeward, that's getting off that windward side of the groove. The nice side effect is that when you're trimmed that close moving the tiller just four inches to the lee will immediately detune the rig enough to handle a lot of gusts. If you can point up a smidge every time you need to set the boat back down instead of sheeting out, you keep your speed up and sidestepping higher upwind is often a favorable thing to do. On the other hand, I don't think the catboat's reputation for not sailing well close-hauled is really deserved. My 20 foot Horizon Cat has a 17 foot boom, and the geometry of the rig makes it look different. A 30 foot sloop with a high aspect rig might only have an 8 foot boom. At more than twice the boom length, my boat will have its clew more than twice as far away from the boat's centerline with the sails set to the same angle. Anyway, it is indeed a good article. Sailing magazine is worth subscribing to. 17 Short Peak Halyard Primer Posted By: George Haycraft PC#29 T here are two wrinkles, the too tight wrinkle (peak to tack), and the too loose wrinkle (throat to clew). Neither wrinkle means you're in the ball park with the peak halyard tension. Within the no wrinkle range of peak halyard tension, which may only be a few inches, you have considerable control over the sail shape. In light air, tension the peak until you see the too tight wrinkle, and back off until it just vanishes. That puts you on the "tight" side of the no wrinkle range, and results in a fuller draft shifted forward, which is powerful for light air. In heavy air, loosen the peak until you see the too loose wrinkle. Then tighten until it just disappears. This leaves you on the "loose" side of the no wrinkle range. The sail is flatter, the draft is further aft, and the sail is less powerful, but faster, like fourth gear. Too loose wrinkle 18 Catboat Sail Trim © Sailing Magazine, January 2007 How ‘deep throat’ can give better performance in a single-sail, gaff-rigged boat I n many areas of the country, the traditional gaff-rigged catboat is seeing a comeback. They are stable, easy to sail and fun to race, with fleets sailing strong in Barnegat Bay, Cape Cod and in Florida. In a classic gaff-rig the sail controls are simple, but the essentials of sail shape remain the same as in contemporary three-sided racing sails. A properly managed four-sided gaff mainsail is very responsive to sail shape efforts, and the resulting increase in performance is astounding. It is important to approach the problem of sail shape by focusing on the end result: The shape of the sail. All of the controls effect changes in the three components of shape: angle of attack, draft and twist. With a four-sided gaff rig, there are limited controls, so compromises have to be made. First we will discuss the three components of sail shape, then speak to specific trim suggestions for various points of sail and wind condition. Angle of attack The mainsheet is the only sail control for bringing the mainsail to the proper angle of attack with the apparent wind. This is the familiar easing out or bringing in of the boom to attach airflow to the sail’s surface. With time in the boat you will develop a feel for when the boat is performing well, however, you will need telltales to actually see the wind on the sail. Telltales should be mounted on both sides of the main well back from the mast as well as on the leech. Usually four sets of telltales are sufficient; two above the throat and two below the throat, while only two are needed on the leech. Be sure to offset the starboard and port telltales from each other so you can tell them apart when the sun is behind the sail. Color-coding is also helpful. A look at the parts of a four-sided gaff-rig sail reveal similarities to the more familiar three-sided sail, with a few additional points. The reef points divide the sail lengthwise, and can be used to measure the position of the draft. The gaff-rigged catboat sail is very forgiving and generally has a wide groove upwind and down, making it very easy to sail. However, to get the best performance close-hauled, you need to sail on the edge of the groove closest to the wind. This is a very narrow part of the groove where the windward telltales should be lifting 50 to 80 percent of the time. It takes a lot of concentration and practice to stay in this narrow slot of performance through the constant changes in wind direction and strength. Draft Draft is the curvature of the sail, described as both the position of maximal depth along the length of the sail and how deep the curve is relative to the length of the sail. 19 The depth of the draft on a gaff-rigged catboat is only controlled by the outhauls, and there are two of them. Since the gaff is in a remote location while sailing, set your gaff outhaul tension before you raise the sail to match the expected winds. If needed between races, drop your sail and re-adjust the gaff outhaul. The boom outhaul adjustment is very effective to change the depth of draft in the lower half of the sail while sailing. In light air upwind, the boom outhaul should be tight enough to just remove the deep wrinkles coming up from the boom. As the wind increases and the boat starts to heel, tighten the foot with the outhaul proportionately. With 12 knots of wind the outhaul should be as tight as you can get it. The position of the draft is easy to control in a four-sided sail. The twin halyards of the gaff-rig allow you to easily tweak the draft position and entry shape. This is the major unique tool of the gaff-rig; there is nothing like it on a three-sided sail. Watch your sail as you adjust the peak halyard and observe the resulting change of draft position. The four photos of a sail viewed from the cockpit demonstrate this progression of draft position as the peak halyard is raised. With increased peak halyard tension the draft will move forward, affecting the entry shape that we call “deep throat.” This amazing control of the draft and entry shape by the peak halyard is a major key to maximizing your sail’s performance. In practice, to measure the position of the draft, use your reef points to estimate the length of the sail in percentage points. For example, if your sail has five reef points, they divide the sail into roughly six equal distances of about 17 percent each. Twist Twist is the tendency of the sail to rotate away from the perpendicular of the boom as it rises from the deck. This is a more complicated problem to control in a four-sided sail since the gaff is free-floating around the mast at its saddle, and there is no vang. Twist is necessary for proper sail shape because the apparent wind direction actually changes at different levels of the sail. The difference in the direction of apparent wind from the deck to the peak is greatest in lighter winds, and is minimal in strong winds. Therefore, twist should be greater in light air and less in a breeze. In a marconi (three-sided) sail with a vang, the amount of twist can be confidently matched to the wind above the deck. In a gaff-rig catboat (four-sided) sail the only controls effecting twist are the mainsheet and the peak halyard. When sailing close hauled or on a close reach, the mainsheet actually pulls down on the boom more than it pulls the boom toward the center of the boat. This is the only time that you have good control of the twist by mainsheet tension. The peak halyard also tightens the leech, and as a result controls twist. However, the proper tension on the peak halyard to position the draft in the sail is so important to performance that its function to control twist is usually ignored. Trimming to conditions Depending on the strength of the wind, you’ll want to adjust the sail shape to most efficiently take advantage of the conditions. In light air, first raise the throat halyard to tension the luff loosely, so that the sailcloth seems to sag slightly between the mast hoops. Then raise the peak halyard to remove the long wrinkle from the throat down to the clew. The body of the sail is now smooth and the draft should be around 35 to 40 percent aft of the luff. This is referred to as “flat throat.” The wind does not have to bend very much to stay next to the sail. The mainsheet is eased, keeping the boom well off the transom corner, allowing a smooth exit of air off the trailing edge of the leech. This is your drifting, light air shape, sometimes requiring a slight leeward heel to let gravity assist to shape the sail. In moderate breeze a deep throat can be very fast. First, tighten your throat halyard to create a smooth entry in the luff. Then tighten the peak halyard to move the draft into deep throat. You will find that there is extra sailcloth forward along the luff that allows the luff to slide to leeward of the mast creating a smooth flow of air along the backside of the sail as it passes the mast. The sheet does not have to be eased as much to keep the leech open in moderate breeze. The best indicator of the match of twist with the apparent wind is your leech telltales. Upwind the high leech telltale should stream aft more than half of the time, and the lower leech tell tale will only appear 20 percent of the time. As the wind strength increases the rig becomes overpowered, and deep throat and the extra power it creates is no longer needed. Therefore, in heavy air depower by easing the peak halyard, which will move the draft aft to 35 to 40 percent. Keep the throat halyard tight enough to allow a smooth entry along the luff. Ease the mainsheet to increase twist, spilling power from the top of the sail to decrease heel and helm. Sailing deep and keeping the boat flat seems to be fastest upwind in heavier air, particularly since there usually is a chop to sail against in these conditions. If you are sailing light or solo in a breeze (12 or more knots) and do not wish to reef, then sailing with a bubble in the luff and pinching in the puffs is your only option. Points of sail Now let’s look at what we need to do to when sailing on different points. When reaching, ease the peak halyard and the throat halyard as you bear off to maintain the same relative position of the luff curve to leeward of the mast, and a powerful deep throat shape. On a close reach, deep throat draft forward is max power. It doesn’t get any better than this. 20 Whoever is trimming your halyards needs to pay attention, since you usually have your hands full with the tiller and the sheet. As the reach broadens, difficulties with twist control rapidly take over and the game changes. The twist in the sail almost never matches the apparent wind in the sail. The bottom third of the sail is constantly stalled, and the top of the sail is near luffing. The trick is to keep as much of the sail properly trimmed and powered up as possible. The high leech telltale should be streaming and easily visible most of the time. The low leech telltale will be constantly hidden behind the leech, stalled like the lowest luff telltale pair. Running downwind, the large main is stalled and functions as a very flat and inefficient spinnaker. Deepen the draft by easing the boom outhaul and both halyards to improve potential circulation around the sail. Speed test with another boat of your class in various wind and wave conditions to see which is fastest: sailing by the lee, broad reaching or heading dead downwind. Move crew weight to windward and forward to balance the helm in light to moderate air. As the breeze freshens and the rig loads up, move the crew back into the cockpit and keep the boat flat. The principles of sail trim for a four-sided gaff-rigged sail are no different than those for the more familiar three-sided marconi sail: angle of attack, draft and twist. The biggest difference is the amazing function of the peak halyard to position the draft far forward for power. The greatest drawbacks of the four-sided sail are the lack of an effective vang and the inability to de-power the rig as the wind gets above 15 knots, except by reefing. The four-sided sail is very sensitive to sail controls, so constant fine adjustments are required to get the most from your rig. If your goal is maximum performance, then I recommend the following: 1. Use low stretch Dacron or Dacron/Spectra braid, in the appropriate size, for all running rigging. 2. Make sure all of your blocks run smoothly and all controls function easily. 3. Increase the purchase on your halyards to improve fine control. 4. Use cam cleats on your halyards and outhaul adjustment. 5. Have telltales on your leech and near the luff, and know how to read them. 6. Add marks on your control lines and adjacent deck for reference to a standard trim condition. 7. Practice with your crew to improve sail trim in all conditions. 8. Speed test with another boat of your class. 9. Spend time in the boat. In this article the Sandpiper (Marshall 15, www.marshallcat.com) catboat is used as an example. It is representative of small, gaff-rigged racing catboats. The trim techniques for four-sided sails shown here should translate to other similar classes. However, each class may have individual variations in trim techniques that may be more successful; consult your sailmaker and national champions in your class, then experiment. 21 Anchoring Posted By: Graham Parker Finally, after three years of sailing my Suncat, I did an overnight anchored in the bay right by Fort Ticonderoga on Lake Champlain. I was on my own and found it hard to drop the hook from the bow and return to the motor in time to reverse. So it took me a couple of goes to get my Delta Plow to dig in (the weeds didn't help either). But it got me thinking about a better alternative and I wondered what more experienced sailors thought and if anyone has tried it? Firstly I don't have an anchor roller at the front so I stow mine under the berth in the cabin. so next trip I think I'll try having the anchor rode tied off the rear cleat at say 100 ft. I'll still tie the bitter end to the front mooring cleat and have the rest of the rode sitting on my from cockpit seat. I'll approach the spot where I want to drop the anchor from the opposite direction - going with the wind. Then I'll drop the anchor and continue to motor forward until I feel it grab when I'll put it in neutral after giving it a quick burst of throttle to set it. After double checking that its got a firm hold I can go to the bow and tie off the cleat at what in this case would be 117ft of rode, return to the cockpit and undo the rode on the rear cleat, kill the motor and let nature take its course. What are the opinions of the many wiser minds out there? Posted By: Tom Ray If the boat goes around the wrong way when you transition from stern cleat to bow cleat, you could snag your centerboard, and the boat will make that swing more easily with the board up, so I would retract it before dropping the anchor. Posted By: Dick Herman I consider an anchor part of the boats safety equipment. As I sail alone 90 percent of the time, leaving the cockpit is not the smartest move, especially in an emergency. I carry two anchors, both in the cockpit lazarets and anchor from the cockpit. Normally, I clip the bitter end of the anchor rode to an amidship cleat and set the anchor. Once everything is set and secure, I walk the rode to the bow cleat and secure it. Although I have never had to anchor in an emergency where I want the bow into the wind, I have practiced it. I always lead the bow dock line back to the cockpit. I use a combination of carabiners and sheepshank knot with half hitches to tie the bitter end ends of the rode and dock line together and then set the anchor from the cockpit and let go. The one time I did it worked well. Posted By: Kruse’n, Mac 22 Preventing snags on the centerboard is no problem, just hold the line in your hand and move to the front of the cockpit as you ease it out, and it is fine. I always set my first anchor from the stern. The bitter end is attached to the bow cleat, and then runs down the starboard side to a cleat on the stern, then into the anchor "bucket". The rest of the rode is coiled down with the chain on top, then the anchor is set in upside down and the bucket is stowed in the cockpit corner nearest the cleat. I use a short piece of copper wire twisted tight to the shroud and formed into a hook to keep the rode up out of the water until used. The copper wire just straightens out when the rode tightens up The bitter end may have an eye splice, but don't put it on the bow cleat, do a standard once around plus locked figure 8. That way if you need to release the anchor in an emergency and it is too tight to pull in any slack, you can still uncleat and release it. I tie a small float to the eye splice so I can abandon an anchor and return to recover it. I haven't ever had to do that, but I know others who had to cut their anchor rode to get free in an emergency. Always set the anchor hard with the motor. I have gone to bed with a forcast of 10 to 12 K wind for the next day and woke to 26 gusting 34,MEASURED WITHIN 1 MILE OF ME and was glad the anchors were well set. I always sleep on 2 anchors, partly because I am in tidal waters, and also in case of a passing storm with large wind shifts. A thunderbumper rolling through can procduce 360 degree wind directions and gusts to 60 knots, without being a really bad storm. Setting the second anchor is often dificult to do, and simply winching it tight against the first is effective. IF the anchor is dug part way in, it will finish setting with the wind, but if it is fouled with weeds, it will not, so be sure it is holding before letting out the proper scope. I do often have an anchor and rode on the bow pulpit like every one else, but that anchor is the least used. It is sometimes the second anchor for an overnight, and I do not go up there to drop it until I have the primary anchor well set. 22 My lunch hook is in a bucket in the cockpit locker, and it goes over the stern and stays cleated at the stern for convenient recovery, and better breeze without the cabin to break the flow, Which makes better picnic conditions, at least in summer time. Setting and recovering from the stern has many advantages, including the use of the winch in breaking out the anchor, and a larger, safer space for pulling in the rode. To recover from the cockpit, put a line with a snap hook on the rode, pull it to the stern, and recover. Then put the rode back on the copper wire, and you are ready for the next ime. This got a little long, but you are on the right track, and with a little help, all will go well. I haven't dropped the first anchor from the bow in more than 12 years. At 76, the bow is not an inviting place to be if there are any waves at all, and running back to reverse the motor is not an option. 23 Heaving-To in a Catboat Family Cat S Posted By: Bob Breen ingle line reefing is probably the way to go, though it adds more lines and complexity. And one thing single-line reefing doesn't accomplish is tying up the excess sail around the boom which on my boat catches on my stove pipe during tacks if left unattended. So I'm a huge fan of heaving-to on a catboat for reefing (or serving lunch, or making sure my little three year old makes it in time to the potty!). If you haven't ever tried to heave-to your cat, you should. I'm sure it's been described before on this board, so forgive me if I'm repeating things, but here's what I do to heave-to my Family Cat: 1. Head up so you're sailing close to the wind. Ease the sail out to depower and slow down. 2. Tighten up the topping lift so the boom doesn't come crashing down on your head. 3. Lower the peak of the gaff two or three feet (might take more or less on your boat). 4. Raise the centerboard. 5. Trim in the main and head up into the wind as if to do a slow tack. 6. Tie off the tiller or wheel with it hard-over. When you do this, the boat will try to tack, but without the centerboard and peaked gaff, won't make it. She then falls off a bit until the rudder tells her to head up again. The boat will basically sit still (maybe making a knot or so), calm as can be, even in the stiffest of winds. I've gotten so I can do all these steps without really thinking – 15 seconds or so. Once in “park” as the late Bill Menger used to describe this maneuver, the boat is as docile as can be. Go forward to tie in a reef, straighten up things on the boom, make a sandwich, whatever. You'll swear the wind dropped in half as soon as you do this (but don't be fooled!). To get going again, follow the steps in reverse order. It's really simple and easy. If you get the hang of it in lighter air, you'll feel more comfortable employing it when you find yourself in the heavy stuff. Marshall Sanderling I Posted By: Howard Toft n my Sanderling I heave to with a little bit simpler method. While on a reach, I let the sail out all the way, pull up the centerboard, and as the boat loses speed or tries to turn downwind, I tie the tiller over to the lee side. I don't touch the gaff or the topping lift. I then can go below and make coffee or have lunch. I set a table up in the cockpit and sit and relax. Nice thing about it is that the boom is away from the cockpit giving a lot of room. Horizon Cat T Posted By: Carl Haddick, Horizon Cat, Central Texas he centerboard has great influence on the boat's balance. This is my favorite evangelical topic, so pardon me if I run on a bit. With the centerboard all the way down, the boat quickly develops a quite pronounced weather helm. When I first got the boat, I couldn't sail a straight and true course - it was always s-bends as I pushed away from the wind, eventually slowing the boat to a crawl by dragging the rudder sideways. Then I discovered that pulling up the centerboard pendant just a few inches took the weather helm right off. With the centerboard properly adjusted, I can leave the helm, go below, and grab a nicely chilled soft drink from the ice chest, and when I return to the helm at my leisure the boat is still on approximately the same point of sail. This past weekend I carried full sail into winds starting to kick up whitecaps, sailing at well over 5 knots closehauled and pointing high. With the centerboard retracted about a foot's worth of line, I had moderate weather helm. When a heavy 24 gust hit, I just sheeted out a little to keep it from rounding up. Reefed, everything was much calmer aboard, but almost the same speeds. You keep on your course with input from the centerboard, the sheet, and the helm. They all cooperate. On a long tack, the centerboard and the sheet balance the boat, and the helm corrects for wave action. Anyway, the trick is that as the centerboard pivots up, it's swinging aft. Moving the anti-leeway effort from the centerboard decreases weather helm as the centerboard pivots back. Weather helm is, of course, the result of the keel's center of effort ahead of the sail's center of effort. With the centerboard all the way up, you get back some weather helm because the centerboard has disappeared. However, running downwind and jibing you get your lightest helm with the centerboard fully retracted. Interestingly, it's hard to make 90 degree tacks without a little weather helm. If I've got it all balanced out, I drop the centerboard a bit before coming about. Otherwise, as soon as the sail starts to fill on the new tack I have to fight lee helm the centerboard develops its lift from forward motion, but as soon as the wind hits the sail on the new tack you've got the sail forces at play. That means you get lee helm until you accelerate on the new tack. At first, I thought I was just having to 'meet the boat' like on a battleship. After a few sails I figured out what was going on. I need to practice heaving to, so I can learn how best to manage that. Offhand, I think beam to the wind, centerboard almost all the way up, sheet free, and helm into the wind a bit is probably best. The cool thing about these boats is they don't sail like everybody else's boat. If you listen carefully, they will teach you what works, and that's just great fun. Ok, I'll shut up about my centerboard now, but one last observation. When you first raise your sail and are pointed into the wind making sternway, the boat is reluctant to fall off the wind. In that case, dropping the centerboard gives the boat a better pivot, gives the rudder a nice long lever on the boat's center of mass, and I think moving the keel's center of effort towards the pointy end of the boat when making sternway yields lee helm - and the boat, moving in reverse, falls off onto a tack much better. Or, it's all just a fascinating hallucination. Either way, I'm entertained. Sun Cat T Posted By: George Boley, ex-Sun Cat hat damn boat is smarter than you in all BUT ONE aspect. If your board is all the way DOWN, if you will just LET GO of both the tiller and the sheet, that STUPID-@$$ boat will head up directly into the wind IN LESS THAN A BOAT LENGTH. I Posted By: Roger Shoemaker, Picnic Cat did have a remarkable demonstration of the original working platform that is a catboat. I volunteered on the wooden replica working catboat Sarah this summer. Skip Hall, the captain, was describing the nineteenth century catboat use. He said that you just let everything go (tiller and sheet), and you can walk all over the boat and fish and pull nets without fear of being hit by the boom. When ready to go, you grab the tiller, pull in the sheet line and move to your next spot. He then did just that. While a PC is a lot lighter than Sarah the same applies. I was taught that is known as 'lying a-hull' and it is amazing how stable Katty Bay if you just do as Skip suggests. 25 Rigging and Lazy Jacks W Rigging Length of Line Chart - Sanderling e have found that over the years, when people make temporary rigging repairs, purchase a used boat, or for one reason or another do not launch their catboat for a year or two, the rigging may need to be replaced. Below, you will see port and starboard views of the Marshall 18' Sanderling with correct details of the rigging. Please note that the rigging for the 15' Sandpiper and Marshall 22 are essentially the same. In addition, we would like to remind you of the following things that should be done mid-season to keep your Marshall Catboat, whatever the size, in ship-shape. Wax the mast as high as you can reach. Spray lubricant on the tackpins. Try to clean the bottom occasionally to keep the barnacles and algae growth off. Check the water intake strainer on all inboards and clean if necessary. Since so may Marshall Catboat owners have found our Rigging Length of Line Chart that was included in the Spring 1993 CATSPAW Newsletter to be so useful, we have re-printed it on our web site for easy reference. We have found that over the years, when people make temporary rigging repairs, purchase a used boat, or for one reason or another do not launch their catboat for a year or two, the rigging may need to be replaced. Peak Halyard Throat Halyard Main Sheet Topping Lift 15 Ft. Sandpiper 5/16” x 60' 5/16” x 50' 3/8” x 70' 1/4” x 44' (2) 1/4” x 9'* (1) 1/4” x 28' 18 Ft. Sanderling 3/8” x 100' 3/8' x 63' 3/8' x 75' 1/4' x 57' (2) 1/4” x 9'* (1) 1/4” x 36' Marshall 22 Cat Rig 7/16” x 120' 7/16” x 75' 7/16” x 108' 3/8” x 71' (2) 1/4” x 13'* (1) 1/4” x 40' 7/16” x 122' 7/16” x 75' 7/16” x 104' 3/8” x 70' (2) 1/4” x 13'* (1) 1/4” x 40' Halyard 3/8” x 65' - Jib Sheet 3/8” x 90' Down Haul 1/4” x 50' (1) 1/4” x 38'* (1) 1/4” x 27' Marshall 22 Sloop Rig Mainsail Jib Lazy Jacks * With eye splices on both ends. Note: We use 3-strand polyester (dacron) as standard equipment. For the main sheet, braided line such as Stay Set is just fine. On the Sandpiper, add 5' to the main sheet if you have a Harken system. 26 Marshall Marine’s Sanderling Rigging Layout 27 28 Single Line Reefing O Posted By: Jim B., Sun Cat ur Sun Cat has a jam cleat and a horn cleat on the boom. The set-up is approximately: line attached at the front (tack) of the boom, up and through the grommet on the luff, back down to a turning block on the other side of the boom; line lead back to the aft end of the boom, another turning block, up through the grommet on the leach, back down to one more turning block, lead forward on the boom to the jam cleat and then secured with the horn cleat. Not sure of the exact diameter of the line, but less than 1/4". The reefing can be done from the cockpit. Our reefing technique on the Sun Cat is: if it looks like we'll need a reef, I'd rather put it in at the dock (or on the trailer). Just pull the line, cleat it. If we need to reef on the water: heave to or come into the wind; ease the halyards, pull the reefing line, and cleat it; pull the halyard to raise and set the sail. The lazy jacks keep the bottom of the sail under control, so no need for sail ties. I can't think of anything I'd change on this set-up (and thanks again, Russ). I don't singlehand a lot; this takes just a few seconds with the two of us, a bit longer if I am by myself. Since that reefed sail doesn't have far to go up and down the mast, I have also dropped the sail completely when singlehanding, then pulled the reefing line, secured it, and raised the sail. The reefed main is comfortable from about 12 - 25 knots. Much above that and it is more work than fun. Description of Lazyjacks on Cat Nap I Posted By: George Boley, ex-Sun Cat n the photo, my jacks are loosened all the way. So, it doesn’t look like there is much angle for the lines to catch the sail when it is lowered. However, before you lower the sail, you tighten up the jacks all the say, so the line for the lazy jack goes straight from the tang on the mast to the pad eye toward the end of the boom. It doesn't look like much angle, but is plenty enough. In fact, I have NEVER had a problem with the gaff catching the jacks (horror stories on some boats). This is saying something, too, because the day I was overpowered, trying to reef, I was all over the place, and everything on the boat did exactly as it was designed to do. EYE was the weak link in THAT chain... First, you already know to hang the lazy jacks from the shroud tangs. Next, starting from the mast, the first (dark) spot you see is the cheek block (turning block). Next, where the extra line has been coiled and is hanging down is where the clam cleat goes. Lastly, furthest aft is where the pad eye goes on the bottom of the boom. Again here is the sequence of “events”: the line starts at a pad eye on the port side of the boom, opposite the turning block. Then it goes up thru the port block (at the end of the lazy jack line from the mast. Then, aft thru the pad eye. Then, up thru the starboard turning block and down thru the cheek block on the boom, then aft along the boom, thru the clam cleat. Mark, the CONTROLLING factor on this is the GAFF LENGTH. Looking at the photos, you would innately want to move the lines further aft, to “catch” more sail. In actuality, the sail is “caught” perfectly as is. You don’t want that line far enough aft that the gaff even THINKS about catching in those lazy jacks! Don’t laugh; gaffs have a mind of their own! I have heard horror stories of some catboats getting the boom on one side of the mast while the gaff is on the OTHER side....I didn't ask!! I 've just finished scaling George's photo for placement of the Sun Cat’s lazy jacks. Because the wire from the tang in the picture is relaxed, it was difficult to get an exact length on those wires, but it should be close. Here's what I got: Length of Wire from Mast Tang to its block = 9'-7” Distance along boom from the gooseneck to the Cheek block (closest block to the mast) = 3'-7” Distance along boom from the gooseneck to boom cradle eyestrap = 9' George may be able to tell us how accurate these estimates are but I think it's a good starting place when taping on the blocks and testing. 29 30 Another Sun Cat Lazy Jacks Installation I fitted them on the Sun Cat, and they show up quite well on the attached photo. I ran the upper part of the lines over cheek blocks on the mast, then to a single control line back to the cockpit. This allowed adjustment of the tension of the lazy jacks from the cockpit, and also allowed the lazy jacks to serve as topping lifts. The way I had them positioned along the boom wasn't perfect as far as collecting all of the sail when it was lowered, but did well enough to keep it from falling all over the cockpit. 31 Still Another L ooking up the mast, you can see the attachment at the top of the mast and the rings mid-way. Sorry I don't have an over-all view; this was as far away as I could get on the boat. The eyestraps allow the line to move to either side of the sail. As a side note, we also use the lazyjacks when reefed to gather the sail up, instead of reefing lines. The black line on the boom is the single line reefing. Interesting but a little confusing, based on the photos; you and George differ quite a bit on your lazy jack systems. Since both work well, perhaps the arrangement isn’t as critical as I thought. Your top wires go all the way to the top of your mast while George’s appear to be tied off at the shroud tangs. It’s hard to tell on the boom photo, but it appears that the cheek block and cleat are placed aft of the mainsheet while George’s appear to placed forward of it. I wonder if that makes any difference. 32 The actual placement on the boom seems that yours are placed further aft on the boom but spaced about the same apart. Is it at all possible to get measurements, especially along the boom? Homemade Lazy Jacks I Posted By: Dick Herman made my own Lazy Jacks, total cost around fifteen dollars. The attached photos show how I rigged it. After a complete blotch, I went back to the drawing board. It is really very simple. I attached an eye pad about four inches above the mast hound at the top of the mast. I secured a quarter inch line to the eyepad and ran in down to the eyepad on the boom where the main sheet attaches and used a snap hook to attach it. Then I looped the line under the boom and ran it back up to the top eyepad. I rigged the sail and experimented as to how much slack the line needed. The idea is for the billow of the sail to push the line out and take the slack from the upwind side. It seemed to work. With the sail raised, I then reached as high as I could and tied the forward line to the line already in place. I dropped the line straight down and looped it under the boom and used another snap hook to secure the line to an eyepad that I installed at that spot on the bottom side of the boom. That's all there was to it. Materials: 60 feet of quarter inch line, two eyepads, two snap hooks. eight hog rings (for attaching the lines at the top eyepad and attaching the forward Lazy Jack line to the long Lazy Jack line running to the aft), and some black Atomic tape that I already had. 33 34 Lazy Jacks (Picnic Cat) Posted by: Steve Smith By: picnicbattlecat File Name: LazyJk_SF.JPG Posted: May 14, 2009 Resolution: 754x635 Size: 68KB A bove is a picture of a lazy jack system I made using a rope ratchet from Home Depot. I wanted a system that wouldn't get tangled up with other lines when stowing the mast. 35 There are a total of 5 eyelets needed. Top mast eyelet - in front of mast 12" from top Bottom mast eyelet - in front of mast above the mast hinge Forward boom eyelet - underneath mast about 30" from nose Two rear boom eyelets - eyelets on both sides of mast 14" behind main sheet (position catches end of falling gaff) I have ~ 35ft of 1/4" line threaded thru the top mast eyelet. One end of the line has a carbiner on a loop splice, the other end is threaded thru the rope ratchet (Note: rope ratchet comes with a ring on it - I cut ring off and replaced the ring with a carbiner). I put loops in the lift line using "alpine butterfly" type knots (Loops are not shown in picture). Loops need to below enough to reach when standing in the boat. A bungie line approx 7" long with carbiners on the each end is threaded thru the forward boom eyelet. Stowage: Lift lines are stowed using the bottom mast eyelet. Bungies are stowed by stretching them and hooking the carbiners thru the rear boom eyelets. Deployment: Detach bungies from rear boom eyelets Detach Lines from mast and hook them to rear boom eyelets Attach bungies to line Tighten lift lines by using rope ratchet till boom weight is supported Simple Lazy Jacks for a Sun Cat Posted By: Don Nemetz Cheap, simple, no hardware, dependable Lazy Jacks can be installed on a Sun Cat easily. Consider that Lazy Jacks (not used as topping lift) are used for only a FEW MINUTES each time you go sailing. Also, Lazy Jacks that are permanently installed chafe the sail even if loosened and can get in the way of other more important control lines. And, why put additional expensive hardware such as pad eyes, turning blocks, and cheek blocks on mast and boom when NOT REQUIRED. After considerable thought I arrived at a simple Lazy Jack System. Run two 3/16" Dacron lines down from the second bail from mast top to approximately 4' above the boom. Tie them to the bail with a small Bowline loop and tie another small Bowline loop at the lower end 4' above the boom. Then, run a long (10' - 12') continuous 3/16" Bungee cord through one of the Bowline loops in the Dacron lines coming down from the mast leaving the two ends resting on the cabin top. Now move over to the other side of the boom. Reach UNDER the boom and grab one end of the Bungee cord bringing it up to the other Bowline loop and pass it through letting excess dangle. Then reach UNDER the boom and grab the other end of the Bungee cord and bring it up toward the Bowline loop with dangling excess end. With one end of the Bungee cord in each hand remove all slack and tension slightly cutting off excess and fastening the ends together.(I used Stainless Hog Rings) You may have to increase tension later if necessary. You now have a two leg Lazy Jack system that when not needed is stowed forward just abaft the gooseneck. When needed reach forward and grab the two Bungee loops under the boom and pull back along the boom. I pull the two legs back leaving the forward one a few feet back from the mast and the aft leg back tight around the pad eye left on the boom from the old mid boom mainsheet tackle when Com Pac changed to end boom sheeting. The legs stay taut in place and effectively capture the mainsail and errant gaff when dousing sail. They stay in place until derigging at the ramp and stow conveniently along the mast with other lines. I've used mine for two seasons and am pleased with the simplicity and performance. 36 Modifying Sun Cat's Rigging TomRay, Tropical Boating I decided that my Com-Pac Sun Cat could be made even easier and more fun to sail with a few modifications to how the sail is handled. The sail and gaff boom are much more controllable with lazy jacks, and the gaff boom gooseneck's tendency to stick in the mast slot was annoying to my wife, so I wanted to install a downhaul on that gooseneck. Also, the outhaul on the main boom was not easily adjustable under sail, and the reefing system, while simple and traditional, left something to be desired when used singlehanded. After making some measurements and gathering all the needed hardware, I started drilling holes in spars. Clockwise from top left: 1. 2. 3. 4. 37 Hardware for tack reef point: Ronstan cheek block and bolts, small SeaDog Clamcleat, small eye strap, screws Hardware for lazy jacks: two Harken cheek blocks, two SeaDog clamcleats, and Harken stand up block on spring for downhaul Hardware for outhaul: Harken micro block, small shackle, SeaDog Lite Clamcleat Hardware for outhaul, also showing standard Com-Pac clew reef line Clew reefed Sun Cat with spars and sail removed to change out hardware Tack reefed from starboard side showing clamcleat Under sail, showing slack lazy jack line and slack tack reef line Tack reefed overview 38 Cleat for clew reef, block for lazy jack, cleats for lazy jack and reef line Downhaul with sail fully lowered Tack unreefed Sail partially raised showing lazy jacks holding main boom and constraining gaff boom and part of sail 39 Adding Lazy Jacks For the lazy jacks, I ran a pair of lines from stainless eye straps near the top of the mast through a pair of Harken cheek mounted bullet blocks on either side of the boom, and then through a pair of SeaDog Clamcleat aluminum jam cleats. It is easy with the Clamcleats to tighten the lazy jacks when needed, and when fully released they hang with just enough extra slack to allow the boom to come all the way down. They can exit the sail cover through the slot intended for the peak halyard when the sail is down and covered. It's a single leg lazy jack, so does not contain the sail as well as a multiple leg system, but it gathers the bulk of the sail together, and more importantly, it constrains the tip of the gaff boom, which otherwise might whack you in the head on its way to dropping down and scratching the gelcoat or woodwork on the boat. The lazy jacks allow you to lift the main boom prior to raising the sail, putting less load on the halyards, and allow you to relieve the weight of the boom from the sail to achieve better sail shape in light breezes. This technique combined with a boom vang would also stabilize the main boom against rocking in waves and allow the sail to better hold its shape. All of the hardware I used was stainless and I bought a couple of new taps to make the threads in the mast and boom. The spars are thin enough in most places that it really works out to be little more than one thread. Because of the mix of stainless steel and aluminum hardware and the aluminum mast and boom in a saltwater environment, I coated all the pieces with Tef-Gel as I put it together. Added later: If I were doing this on a new boat is that I would locate the lazy jack blocks a bit further aft. On mine, there were holes from a previous lazy jack installation. You want them near, but not past, the end of the gaff boom. That way they pass through the sail cover slot easily. Creating a Gaff Boom Downhaul I wanted to keep the gaff boom downhaul as simple as possible. I mounted a stand-up block near the base of the mast on the starboard side and ran a line from the gaff boom gooseneck down through the block and then just straight across the deck. The end is passed through one of the halyard cleats on the bulkhead and is stop-knotted. It doesn't look particularly neat with that line lying across the deck, but it's handy when you're in position to handle the halyards, and that's all that counts. A quick tug when the gaff gets stuck in the mast track, and down she comes. I think this was the best modification of all, since my wife seemed to like it best. Improving the Reefing System I was dissatisfied with the standard reefing arrangement on the Sun Cat because it requires a single handed sailor to be in two places at once. From the cockpit, you can control both halyards and you can take in the clew reef on the boom, but setting the tack reef cringle on the hook requires a trip to the mast. I wanted to be able to do that from the cockpit. My solution was to install an eye strap on the port side of the boom as far forward as possible, and a cheek block on the starboard side, also mounted as far forward as possible. A line goes from the eye strap through the cringle and down to the cheek block, then aft along the boom to another SeaDog Clamcleat mounted on the boom. My reefing procedure is now: 1. Tighten lazy jacks to support boom above gallows. 2. Release peak halyard and ease to level gaff boom. 3. Release throat halyard and wish the throat would come down. 4. Tug on the downhaul when it doesn't, bringing the throat down a little more than the distance from the tack to the reef cringle. 5. Tighten tack reef line and jam in cleat. 6. Tighten clew reef line and cleat on conventional cleat. 7. Tension throat halyard against main boom downhaul at proper height. 8. Tension peak halyard. 9. Release lazy jacks. 40 I tried it out in nice, light conditions, reefing the sail and shaking out the reef several times. It works smoothly and produces a reasonable sail shape. I wish I could have figured out a way to mount the tack reef line even further forward, as it pulls straight down, but I could not. Making an Adjustable Outhaul The foot of the Sun Cat sail has a bolt rope, so adjustability of the shape of the sail is somewhat limited by being attached to the boom, but outhaul tension does make a difference in performance. The problem is, it doesn't make enough of a difference to make me get up there and untie the outhaul, adjust it, and retie it. Also, running the outhaul straight to the hole in the fitting on the end of the boom will chafe the line. My solution was to add a small block on the end of the boom and yet another SeaDog Clamcleat. Now it is easy to reach up and adjust it then jam it back in place, and chafe on the line should be reduced quite a bit. A note about jam cleats of all types: I got the metal ones because jam cleats wear out, and I figure these will wear out more slowly. Even when new, they are not a very reliable attachment. The line can slip or be knocked free, and if jammed under a heavy load can be difficult to detach. I'm using them on this boat because they are small enough to fit on my small boom and they are cheap, quick, and easy to use. Installing the same kinds of modifications on a larger boat, I would use cam cleats or conventional cleats. Whether using moving cams with teeth or jamming in a wedge, cleats that stop a line by pinching down on it are harder on the line than good old fashioned cleats. I'm willing to replace running rigging or swap it end-for-end more frequently for the convenience of jam cleats on the Sun Cat, which is why my boom now has four of them. John’s Changes I visited Tom's Blog on the Sun Cat changes and copied his downhaul system. First Mate now likes the way the sail comes down. The sail and gaff are not heavy enough and the sail too stiff to drop the sail. Now I just release the halyard and use the downhaul and the gaff halyard to control the decent into the lazyjacks. I did make a few adjustments to his design. I used the same 3/16 line and attached to the the end of the gaff gooseneck with a knot. I added the same type of stand-up block to the base of the mast stub where the other halyard blocks are. I ran the line through the left section of the deck organizer. There is no sheave there and it runs against the frame of the organizer but there is no load so it should be ok. I installed a very small bullseye fairlead between the cabin slide and the spinlocks there is a opening there in the edge of the deck with screws. I sized the line and added a stopper ball to the end so that when the sail is fully up the ball is a few inches from the fairlead. Thanks Tom for getting me started on this, I had all the parts in my spares bag and only needed the line and stopper ball. 41 More Sun Cat Mods Posted by: John Fiedler, MOXIE, Com-Pac Sun Cat, Idaho As I get ready to pull MOXIE from Lucky Peak Lake for the season, I'm already thinking about projects for this next winter. First, I promised to share what all I did to my perfectly good brand new boat last winter. It began with finding a Humminbird FishFinder at Cabella's at half price. Had to buy it, right? So then the discussion with Lesley as to where to put it. I wanted to cut a hole in the bulkhead and recess mount it and somehow cover up the wiring and the back of the unit. However, given the half-life of any piece of electronic equipment, that didn't make much sense. So I figured I'd cut a small piece of teak to go across the companionway and make it a little bigger on one side to hold the fishfinder. Then Lesley suggested that we needed something to hold our wine glasses. So the unit ended up looking like this: And the backside like this: 42 With the wiring (GPS, tranducer, and power) coming through the oak-veneered plywood that supports the bridgedeck, like this: This teak stuff was getting fun. Next project was a traveler to replace the Com-Pac end-boom sheeting mess. The 1x4 piece of teak had to be curved on the bottom and on the front to sit as low as possible. The whole unit attached to the boom gallows with a pair of stainless steel U-bolts, like this: 43 I was spending too much money on mail order teak. My neighbor Paul (a woodworker who should get a lot of credit for all the projects) found some teak at a local hardwood dealer. They only had 16' long timbers a full 3" thick by 8" wide at less than $20 a board foot. So first I bought an 8" long piece and we carved it up to make a solid teak bracket to hold MOXIE's PFD and hung it off the boom gallows with another SS U-bolt, like this: 44 The cabin was a mess however because I had to remove the forward bulkhead and the starboard panelling to get the wiring from the bow to starboard lazarette for the FishFinder. So I pulled all the wood out of the cabin and stained and varnished it, like this: There is problem, though, with the new ash interior. The chainplates crush it and crack it. The solution was to make two small blocks that straddle the "carpet bar" and hold the chainplate firm against the hull surface on the top and spread the weight against the plywood on the bottom. Like this: 45 Since I was doing the interior, I decided to add two small grab bars to hoist my aging body out of the cabin. I had seen them on pictures of earlier Sun Cats and decided I needed them as well. 46 Then it was spring time and the original plywood hatchboards are looking lame. I bought a two foot piece of teak and sliced into three boards and made new solid teak hatch boards that look much better and have a far richer grain pattern. Paul (my wood-working neighbor) was worried that I'd damage the boards when I threw them into the lazarette, so I got some nautical looking canvas and his wife made a three-compartment storage bag, like this: 47 Now I had leftover teak and leftover stripped canvas. So the piece that was left over from the top hatchboard serves a holder for a brass curtain rod which holds a privacy curtain. 48 Sun Cat under Bridgedeck cabin storage Posted By: Don Nemetz When considering ways to improve organized easy access storage inside the cabin, removing the Porta Potti from its special place under the Bridgedeck provided the opportunity to more efficiently utilize a considerable amount of space. Aside from trying to "fit" something into a space that was quite irregular, I further constrained the design to be "Modular" with no permanent alterations or modifications to the boat's structure. And, it had to include an additional 6" step for easier movement in and out of the cabin. (Especially for my 67 year old knees.) Here are a few photos to provide food for thought. First the "Before" shot (for reference purposes). 49 The preliminary fitting. The "Module" standing alone. 50 The "After" shot with Module in place. Drawer pulled out, capacity 12"L X 12"W X 6"H. 51 The step removed showing large storage area back to bulkhead. 52 New Sail for the Sun Cat Posted By: Dick Herman, Muddy Duck I just bought a new sail from Hyde Sails in England. The color is Egyptian Cotton and I have only had it out twice. So far, I am very pleased with the construction and performance. I got a special for $700 and don't know if they are still offering it. You can contact either Commodore Judy at: [email protected] or Chip Buck at: [email protected] 53 Sun Cat Water Leak Fixes Posted By: Dick Herman, Sun Cat “Muddy Duck” To find water leaks in a Sun Cat first, check the drain outlets in the stern, especially the lowest three. Make sure they are all sealed. Second, check the cockpit drain holes on the floor of the cockpit. There are two of them in the forward corners. Unscrew the drain grates and make sure they are sealed. Third, check the centerboard bolt that the centerboard pivots on. It may be as simple as tightening the nut. I had to replace the gaskets which are pretty easy if you think it through. The photos are to help you with the location. If the above doesn't stop the water, you've got a little project. I've included a photo to show you where I found a major leak in the centerboard pennant standpipe. That’s the line that comes up through the floor of the cockpit through a pipe that you raise the centerboard with. You have to remove the teak block and make sure the hole is sealed. 54 First, I had to seal the big hole with fiberglass epoxy. Bondo works well. Then I sealed the hole around the pipe with 3M 5500 sealant. Then I cut a neoprene gasket 1/8 inch thick to the size of the teak block and punched a hole in it for the pipe to stick through. But I left the hole deliberately small so it would nipple around the pipe. Then I reinstalled the teak block. 55 Mast and Sail Raising Tips Raising the Sail (Com-Pac) Posted By: Dick Herman, Sun Cat “Muddy Duck” A fter a long, and disastrous, learning curve, I finally developed a routine for raising sail. Before I leave the dock, I pin the boom gooseneck into position so the slide in the mast track is just below the split in the hinge. The photo might give you an idea as to the exact position. Then I pull the downhaul tight. Once clear of the dock, I head into the wind and use just enough power on the outboard to maintain way. Then I lock the tiller and go forward to raise the sail. I pull on both halyards together to raise the gaff so it stays even with the throat, and parallel with the boom. When the luff of the sail is fully raised, the gaff should be pointed straight back. Then I pull the throat halyard with both hands, feet against the bulkhead, if need be. Once the luff is tight, I raise the gaff peak the rest of the way, but not before. I've gotten the routine down and get the sail up in less than a minute. Sometimes, I have to reach back and give the tiller a nudge to keep the bow into the wind. Posted By: Tom Galyen, Sun Cat “Merry Joy,” Champaign, IL Raising the Mast (Sun Cat) I 'm a “newbie” myself, sailing my Sun Cat since May of this year. However, I do have some ideas that work for me. I have raised my mast in the water at a dock; in fact I do this most of the time. I also lower my mast at the dock before recovering the boat onto the trailer. I actually recommend this practice as you lessen the chance of hitting power lines, trees, etc. at strange ramps. Things you may want to think about. 1. I leave my sail cover on until I have the mast up. This all but eliminates the chances of the halyards catching on the boom cleats or anything else. This I think will help you the most. 2. Make sure you remove the pin in the mast and check that the wires in the mast are clear and will not get pinched when the mast is raised. 3. Make sure the forestay is clear and not tangled around the mast. 4. Make sure you are standing inside the shrouds so they will come up outboard of you, and your feet are clear of them. 5. I have one foot near the mast and am standing on the port side of the mast facing starboard (as I am right handed), I take a large step aft with my right foot and grab the mast at a comfortable distance, bracing my elbow of that arm against my knee to get extra leverage, and can raise it with that one hand while using the other to steady it and control the speed at which it comes up. 6. I raise it slowly until I'm sure that all lines are clear and the mast is totally under control then guide it into the slot and pin it. 7. I then kneel down and brace myself by putting my right shoulder against the mast so I can lean forward to connect the forestay. Whenever you go forward make sure the Cabin hatch cover is closed. It gives you more room to walk (note, it does have the “non-skid” on it, and theoretically you can walk/stand on anything that has that coating on it.), and you have less chance of accidentally trying to step into the open hatch on your way aft. Lowering the mast is basically the same in reverse. 1. I first put the sail cover on. I leave the halyards outside the cover. 2. I go forward and disconnect the forestay, and let it dangle. 56 3. I pull the pin holding the mast up and with my hand roughly where it was for the raising, SLOWLY and under control lower the mast. I find it helps to again take that step aft while lowering the mast as it gives you more control. 4. Once the mast is lowered into the boom gallows I dress the halyard to the sailcover with bungees and put one around the upper end of the mast to hold it securely to the boom gallows so it will not be tempted to bounce around while trailering. 5. I also put a bungee cord around the halyards, shrouds, and forestay as close to the lower mast as possible to hold them in position, and one last one goes from the forestay to bow where the the forestay is connected while sailing. This last one stops the forestay from banging around and scratching things. I can raise the mast in about 5 minutes or less and lower it in about 10 or less. I should mention that because I am forgetful I have a mantra I go through when I'm launching or recovering the boat. To launch just before backing down the ramp I go Centerboard up, rudder up, motor up. I repeat it again as a last thing just before putting her into her trailer. Of course checking each item as I say it. The last thing I do before driving off is to make sure the centerboard is lowered and resting on the trailer. This prevents chafing of the centerboard lanyard. This step explains why I have the centerboard up statement in the mantra because if you don't have it raised the boat will not come off the trailer when launching. Raising the Sail (Sun Cat) B ecause I sail solo most of the time, I had to learn to raise my sail solo. I have found that one of the best thing to help is to use McLube on the sail track. The stuff is a lubricant made especially for sail boat use. It is not supposed to stain the sail, but I take precautions anyway. It is remarkable how much it will ease the raising and especially lowering of the sail. The next thing I have done is to get a tiller tamer and use it. I use the one from Canada as it uses a quick acting latch or cam mechanism. One change I have made to this system is to use a bungee cord instead of the line that is recommended. This means that once I have the boat on course and have set the tiller tamer to keep it there I can just bump the tiller if the boat wanders off a little. The bungee cord will of course bring the rudder back to where I had it set. When I go out I spend some time as I head out of the marina to find the wind, sometimes even stopping to cancel out the apparent wind, then put the boat on a heading that will allow the sail to be slightly to port as it raises, and set the tiller tamer to keep it there. I put the boom in the port notch on the boom galley to give me more room to starboard. I then move to the starboard side and make sure the boat is staying where I want it. Sometimes I have to readjust the rudder when I make the shift to starboard because of the ballast shift. When I am ready I remove the last one or two sail ties and I then sit in about the middle of the starboard seat. From here I can easily reach the tiller if it needs a "bump" to keep the boat where I want it, but yet work with both halyards. I at this time make sure the main sheet is free to run out. When I go to raise the sail I take both halyards in my hand and pull them together. I then pull once or twice on the peak halyard alone then both, then the peak continuing in this fashion until the throat halyard stops. I then make sure the peak halyard's cam is locked and let go of it, put both hands on the throat halyard and give a strong pull on it. This raises the throat up the final 3 inches or so until the eyesplice is trying to go through the block. I then return to the peak halyard and raise it as high as it needs to go. In between the times of hauling on the halyards I make sure the mainsheet is running free, and make adjusting "bumps" as necessary to keep the heading I want. Once I have the sail raised I quickly shut down the motor and release the tiller tamer. Here is one place where the quick action of the cam comes in handy. With the rudder and sheet released the boat is "hove to" and will just sit there which gives me time to raise the motor and neaten up the cockpit. I after all have two sets of halyards piled up on the cockpit floor. I have two canvas buckets which I hang on the cleats that are just below the halyard cams. I start with the bitter end of the halyard and just feed the line into it's bag. I do not try to make it neat just feed it in. If you have to lower sail in a hurry or when you are done sailing and you are lowering the sail the lines will feed out without any jams. It's a trick I learned from a firefighter. That is the way they make up their rescue lines. 57 When I am done sailing and want to lower the sail I again turn into the wind and hove to. I then start the motor and put it in neutral, I then just release the release the halyard cams and the sail mostly comes down without any effort from me, but at times I have to give it a little tug. It is here again that the McLube helps. I put one or two sail ties on to keep the sail together and head for the dock. I have found, maybe because I'm right handed, that I can steer better from the port and handle the raising and lowering of the sail better from the starboard side. The photo shows one of the canvas buckets I use to hold the peak halyard I have since gotten another one and use it for the throat halyard. Keep the sail up and the centerboard down, 58 Posted By: George Haycraft, Picnic Cat #29 W hen raising the sail, it is helpful to pull both halyards at once. The throat is a 1:1, and the peak is a 2:1. Therefore, to raise them both the same amount, you will need two pulls of the peak for every pull of the throat. I find the gaff goes up smoothly if it is kept parallel to the boom, or just slightly above horizontal, until the throat has reached it's sailing height. Once the throat is secured, then continue raising the peak until it is where you want it. A word about raising and lowering the mast which I almost always do on the water. Before the mast goes DOWN, make sure the gaff, sail, and boom are BELOW the hinge line on the mast stub, and the long fast pin is in place above the gaff to hold them there. Lowering the mast with any of the above within the hinge area will result in a lot of bent metal. Quick notes on sail set. There are two wrinkles. the too loose wrinkle, from throat to clew, and the too tight wrinkle, from peak to tack. For starters, adjust the peak halyard to eliminate both of these. With more wind, and a more windward course, you will need to "peak up". With less wind, and a downwind course, you'll need to ease off on the peak. There is a narrow range of peak halyard tension, maybe only a couple of inches, in which there will be neither wrinkle. Within this narrow range, if you are on the tight side ( the too tight wrinkle has just disappeared ) the sail will have a fuller draft located further forward. This, of course, is better for light air. If you are on the loose side of this narrow range ( the too loose wrinkle has just been tightened out ) the sail will have less draft, and it will be located further aft. This produces a flatter, less powerful, but faster shape. This is where you want to be in heavier air. A careful eye studying the sail can see the draft change with peak halyard tension over this narrow range. Posted By: Carl Haddick, Horizon Cat, Central Texas R aise the gaff pretty much horizontally; at least that's what works for me. I take a pull on both halyards, then take a couple of pulls on the peak halyard to accommodate its 3:1 purchase - repeat until sail is set. When the throat is all the way up, then haul the peak halyard the rest of the way. You'll have to tune the peak halyard for wind conditions - too tight, and you get vertical wrinkles, too loose and you get diagonal wrinkles. Both halyards should be pretty close to effortless, until the throat halyard starts raising the boom. Make sure your downhaul is loose enough to let the gooseneck up, and make sure the mainsheet is eased, so you're not fighting it, either. Posted By: The Sailboat Company, North Carolina M essage: Interested to find out what rigging changes you make on picnic cats regarding throat and peak halyards and hardware to get 2:1 or better purchase making it easier for us older folks to raise the sail. Answer: I think the problem is the drag between the current hardware and the halyards. It's normally pretty easy to raise the sail and the gaff until you reach a point where the boom has to leave the gallows. At that point, everyone has the same problem with all of our catboats (young and old). We use a barber haul system on the Sun Cats to raise the boom off the gallows and I think you can do the same thing with the Picnic Cat. Raise the sail and gaff to that hard point and cleat the halyards. Grab the throat halyard about 2 feet above the bottom turning block and pull the halyard towards the stern. When the boom jumps off the gallows, hold that halyard in one hand and pull the tail through the jam cleat at the bottom. It's a 2-hand job. Adding additional purchase power would add drag to the system and I don't that will work. More expensive blocks would make the system work better, but that's too much trouble and expense. I think the barber haul system is the only solution and it has worked for us. Holding Course while Raising the Sail Posted By: Jim B., Sun Cat I steer with just the tiller. I keep the motor pivot just tight enough to hold it in position, but loose enough to turn it by hand. In tight situations, I use both the tiller and motor to turn. I can rotate the Sun Cat in not much more than its own length with this technique. If you do not "trim" the motor when you change speed, you can feel a pull on the tiller. Try it next time out: as you are motoring along, turn the motor (just a teensy bit) until the boat stays on that course with your hand off the tiller. Then give it a bit more throttle; the motor will need a bit more turn. I don't even think about it, it's just second nature. I've done something like this with all our boats. Our home here is on a 55' wide canal, with boats on both sides. We occasionally do "canal tours" in the Sun Cat... and many of the canals dead-end; I can rotate the Sun Cat as tight as our dinghy. Then center the motor and "trim" as necessary to hold course again. 59 Trimming the motor With all the discussion of Sun Cats not holding course while motoring, I think this could use some discussion. I am a noncurrent commercial rated pilot with over 4000 hours. I've flown a lot of different planes. One thing most airplanes have is some method to trim out pitch and level. Hours of holding the yoke while you burn off fuel in one wing or the other would be very tiresome. Your outboard motor equipped boat has something very similar (and most powerboats with larger motors have trim-tabs). For every throttle setting, there is an angle of the motor that will allow your boat to go straight with no tiller "messing". Just move the motor a bit one direction or the other until your boat maintains the course you want without any pull on the tiller... you are now in trim. If you change the throttle setting, you will have to move the motor (re-trim) again to get that hands-off status. This is especially easy with the Sun Cat, 'cause the motor is “right there”... no big reach to get at the motor-tiller handle. If you find that your Sun Cat doesn't hold course while you are raising the sail, try trimming the motor. When under sail, you can adjust the centerboard to ease weather helm (yes, you will make a bit of leeway). On our Sun Cat, I can't usually sail with hands-off (depending on the point of sail), but I have no problem trimming it to take pressure off enough that the Canadian tiller tamer lever thingy can handle it hands-off. I am posting this in response to Vicki's first sail thread. I couldn't understand why some folks are not able to motor handsoff with the Sun Cat; I think may take care of that problem. Let's call it a bit of “boater education” that will, hopefully, make sail-raising easier. Menger Tips Posted by: John Henderson (CBA) P To lower the sail: osition the boat on port tack (the topping lift is on the port side) at approximately the angle to the wind that the boat would lie when hove-to. It's usually best to lower the centerboard. Raise the boom a bit with the topping lift. Lower the sail as fast as you can. You have to experiment to learn the best time to lower the peak halyard vis a vis the throat halyard. When the gaff is most of the way down, get the boom into the crotch. I think it helps to keep the gaff raised a little so it doesn't hit your head. When the boom is secure, with the mainsheet tight, lower the gaff and tie the gaff and sail and boom together. If you are single-handing, neatness doesn't count at this point – make it pretty back at the dock. As to reefing: I assume that your boat is rigged with a jiffy reef on the first reef only. The jiffy reef is easy to use. Follow Bill Menger's instruction book. The boat sails well with a single reef. The second reef is trickier because you have to go forward to tie off the tack. Frankly, especially if you are alone, I would not go forward in conditions that require a 2nd reef. Take the sail down and go home with the motor, as God intended. If it is windy when you leave the dock, tie in the 2nd reef before you go. In my experience, it is difficult to tack the boat in open water with the 2nd reef - the waves under such wind conditions are too big for the limited speed you generate with the 2nd reef, and it is hard to get the bow through the wind. If you are in sheltered water,so that the wind is high but the waves are small, then tacking is possible with 2 reefs. 60 Step Storage System for SunCats Posted by: Don Nemetz, Picnic Cat Before After 61 62 Drawer open, step storage closed. Storage under step, drawers closed. 63 Removable Module 64 Picnic Cat Upgrades Posted by: George Haycraft, Picnic Cat H ere's what I (George Haycraft) did with PC#29. I replaced all the blocks with Harken Big Bullet ball bearing blocks for 3/8" line. Mine came standard with non-ball bearing blocks for 1/4" line. With the 3/8" halyards supplied, there was excess friction at all the blocks. This freed up things very nicely. Next, I removed the gaff end fitting and replaced it with a fitting identical to the boom, the one with the ring on the bottom. That got rid of the throat fitting with the rod and loop sticking up, which had been bent by the previous owner. Using a loop of 5/16" line fastened to the ring below, I added a Harken block above the gaff. I also added an eye strap opposite the throat turning block up the mast. These additions allowed me to rig a 2:1 throat halyard, the same purchase as the peak halyard and the boom downhaul. 65 Each line end passes through the ring and half hitches to the side coming down: Now, I can raise the peak and throat together with an equal number of pulls. I no longer have to worry about bending the rod/loop sticking up from the gaff gooseneck fitting. The block just falls out of the way on either side. Now that my throat halyard is 2:1, like my boom downhaul, I adjust the luff tension with the throat halyard. With the boom raised, I replace the long fast pin underneath it, and snug the boom down against the pin with the boom downhaul before I raise the sail. Once the luff is tensioned with the throat halyard, the boom is barely touching or slightly above the long fast pin. I removed the rod bails along side the mast. I could never see any purpose for them, and, besides, they were attached with only two small sheet metal screws each. In their place, I mounted a pair of six inch black plastic horn cleats, one on either side of the mast. This is where I cleat off the halyards and coil and hang the excess to keep the cockpit clear. I run my halyards through the turning blocks at the mast base, and then back up to the big horns to cleat them off. I also removed the capture bails from the cam cleats at the front of the cockpit so I can easily lift the throat and peak halyards in and out of them. I use the cam cleats to temporarily hold the halyards while making adjustments and cleating. 66 With two of the smaller original cheek blocks, I added 2:1 outhauls for the peak and clew. Here's a pic of the clew: 67 I converted my original main sheet tackle to a boom vang. Here's two pictures: These pictures of the boom vang were taken after the change to Harken blocks, but before the removal of the mast bails and the addition of the horn cleats. the horns will go right in the middle of where the bail will come out. 68 The boom vang keeps boat wakes from upsetting the boom and shaking the shape out of the sail. It also keeps the boom down when broad reaching and running. When the reef is in, the boom vang tension has a lot of control over the fullness/flatness of the sail. I also added a second bail and shackle 65" up the gaff from the throat for the peak halyard block when the sail is reefed. If the peak halyard block remains in its original position, 42" up from the throat, when the reef is in, there's a lot of twist in the peak of the sail. This twist may be desirable in very high wind, but at the lower end of the reefed sail range, you loose some power if the peak halyard block remains at the original 42" position. With the outhauls, luff tension, boom vang, and peak block position, you have a lot of control over the sail shape. I prefer to reef early, but keep the reefed sail full and powerful at the lower end of the reef range of wind speed. It is at this point that tightening the boom vang will flatten the draft considerably and move it aft. If you're sailing beyond that, consider dropping the gaff, moving the peak block back down to allow maximum twist off, and tighten the peak outhaul some more. Here's a picture of the peak halyard block on one of it's two bails. There is a shackle swedged to each bail with SS wire. The block is fastened to the shackle with a button lock fast pin, which is attached to the block with a small lanyard. Moving the block takes just seconds. A shackle is ready at both positions, and the fast pin is always at hand. 69 Hope you find some useful information here. More Picnic Cat Mods Posted By: George Haycraft, Picnic Cat #29 I 've added both fore and aft biminis. My forward bimini was custom made at the same time my travel/storage cover was. However, the standard factory bimini works fine. The only modification is to shorten the two legs an inch or two (trial and error). To position the sliding tracks, place the folded bimini in its boot gently against the shrouds. Center the tracks on the ends of the legs and mount to the coaming. You can adjust the opening between the biminis to allow the main sheet to tack. It also allows dockside entry into the cockpit between the biminis. I'm not a camper, but the two biminis would make an excellent frame for a cockpit tent. A simple three sides and a top for forward, and another for aft. Zip them together in the middle. Windows/screens optional. I'm planning a four sides and top simple drop over for the front bimini area to provide a privacy room to use the plastic bucket (kitchen garbage liner with a Depends in the bottom) or change a wet swim suit. I'll use a light beige rip stop nylon. Light and easy to store in a stuff sack. I've changed some things to the boat. The lazy jacks are gone. Too much trouble. The throat halyard is now 2:1. The gaff block has two positions, the original one for full sail, and a new upper one for reefed. Each bail has a shackle seized in place with SS wire. It's quick to move the block with a fast pin which is secured to the block with light line. With the sail down, and a sail tie fixing the gaff peak to the boom, and one sail tie bundling the sail, the peak halyard in the upper position works as a topping lift. Ida rudder, a real must have. 70 All 3/8 Harken Big bullet blocks. All 5/16 New England fuzzy 3 strand dacron hallyards and mainsheet. Used old cheek blocks for 2:1 outhauls on boom and gaff. Weather seal under the hatch lids Eight Optimist dinghy 48 liter airbags below decks (almost 800 lb. of floatation by my calculation). I'm thinking of adding a belt pack manually inflatable PFD to the masthead with its rip cord extending down the mast face for antiturtling protection. ¾ inch plywood floor between the mast and the centerboard trunk below. Group 27 gell battery just aft of the mast. Wiring run aft to a 12 V trolling motor socket mounted in the center of the transom inspection port. Additional 25 lb. of trim ballast forward. The boat really slows down if she's allowed to bury her stern. Sail her level fore and aft. I used my old mainsheet tackle for a boom vang. Great for sail draft control, especially with the sail reefed. Also a great help broad reaching and running. Vang not useable with the forward bimini up. It's easily removed with fast pins. I removed those wire bails from the sides of the mast stub (what good/purpose were they anyway?) and added 5 inch cleats port and starboard where the bails were. I cleat the halyards off there now, and can store the coiled halyards hanging from the cleats, out of the cockpit. I still use halyard turning blocks at the mast base. I just secure them to the cleats above. I ditched the plastic goal posts on the trailer, and replaced them with side bunk guides, which make getting the boat centered easy, even in a cross wind. I changed the 2x4 trailer bunks for 2x6's which are a foot longer in the front. One of the original 2x4's bowed, forcing its front end into the hull. I rewired the trailer with all LED lights. Most often, I launch "hubs dry,” with water only covering the lower part of the tires. Be sure to slowly ease the boat back into the water using the winch to control the descent. For recovery, it helps to pretilt the trailer. I wedge a plastic wheel chock into the gap which opens above the trailer tongue when the frame tilts. Positive locking seat latches with snap hooks to lock them. Here's my replacement seat latch: You can get a similar item from Hamilton Marine for about $15 each. On my hatch lid, I have only a thin nut, secured with blue Loc Tite. The bolt end is ground flush with the nut using a Dremel tool with a grinding disc. I used flat washers and nylon insert lock nuts on the other two screws. I also ground off any excess bolt flush with the nut using the Dremel tool, so I wouldn't hang my sleeve or skin on the exposed bolt while reaching in for gear. I used a simple bronze snap hook to secure the cam lock. I have a small lanyard tied to the snap hook, and the other end is pinned under the lower part of the latch, between the two lower screws. (Not shown in my photo) Installing Swim Ladder and Motor Bracket Posted By: George Haycraft, Former owner of Picnic Cat #29 T he green hull pix I took at the factory in order to position my bracket and ladder. The white hull is #29 with the new ladder and motor mount in place. PC#29 came with a fixed mount. I replaced it with the retractable mount. As I recall, 71 I reused the upper pair of original holes, filled the lower pair of original holes with thickened epoxy, and drilled two new lower holes at the bottom of the mount. This gave me the greatest spread the mount bracket allowed between the upper and lower pairs of holes. I used 2" by 1/4" aluminum strip from Lowe's as backing plates inside the transom, one strip for each side. I also used SS fender washers behind the aluminum plate. I worked through the inspection port on the inside transom wall. I removed the white plastic inspection port entirely, in order to have the largest possible hole to work through. I covered the raw edges of the hole with duct tape so it wouldn't cut my arm when I reached through to work with the plates, nuts, and washers. I bedded the bolts thoroughly in Boat Life white caulking compound. Don't use adhesives like silicone sealer or 3M 4200 or 3M 5200. They could make future removal difficult or impossible. This shows the position of the upper right swim ladder mount relative to the HIN. I drilled the hole next to the HIN first, and put a bolt through it. Then I leveled the tops of the two top brackets, and drilled the outer left hole. I put a bolt in it. Then, I drilled the rest of the holes using the brackets as drill guides. Measure and level a bunch of times, drill each hole only once! 72 Here's the retracting motor mount. You can see it's mounted with only four bolts. The lower pair are in the uppermost of the three lower positions. I think the factory uses the same hole pattern for both the fixed and retractable motor mounts. You could email Gerry Hutchins at Compac to confirm that. I decided to fill the lower pair of factory holes, and drill new lower holes in the bottom position of the bracket, giving me the greatest spread possible. Here's PC#29 with the new ladder and motor bracket. This is an earlier pic before I scrapped the plastic goal posts in favor of side bunks. 73 Cockpit Hatch Hasps Posted by: George Haycraft, MS#253 Here's a nice SS alternative similar to what I used on my Picnic Cat. They're less than $15. Stainless Steel Lockable Latch A = 3-1/4" B = 1-1/8" C = 1-1/8" D = 1/8" MPD_715Regular price: $57.99 Sale price: $14.89 See Picture and website below. http://marinepartdepot.com/ststlola.html 74 Flotation Bags and Pointed Screws Posted by: Bruce, PC#308 I’m glad we took delivery in early February, outfitting has taken longer than I expected. I installed additional cleats, one aft of the shroud and one at maximum beam, drawer latches and gaskets on the hatches, and a lid stay on the aft bench. That can be locked at any height, below the swing of the tiller, or full down, to hold gear in place if we catch some water. I did put 8 Optimist 43 liter floatation bags in. Two nicely jam in each stern quarter aft of the side lockers, two I suspend athwartships, tight under the deck, aft of the mast stub in the forward locker. The last two tuck under the sole against the centerboard trunk. There’s still plenty of space for gear. I could see that the deck fittings are often fastened with pointed self-tapping screws, that could potentially puncture a bag. I replaced the hatch hinge leaf screws with machine screws (oval head). In the forward locker, I used a longer machine screw, one on each side, proud about 1/2” in the locker, and finished the end with a ball nut. A bungee, attached to the mast, snaps over these to suspend the floatation bags. There are also three pointed screws projecting down from the mast collar, that I thought might come into play. I fashioned an ethafoam collar that slips around the mast and slid it up into place. I mounted the C.E. Smith 2’ trailer side bunks that others have used, after the first retrieval when I struggled to get her aligned. I found the Starbrite sail lash that BJ had mentioned some time ago, that works great. I also made up some small bungee hangers to corral the halyards. Still undecided about the compass, but for now temporary mountings are durable enough. The aft end of the center board trunk was a bad idea, for all the reasons that everyone kindly pointed out. The factory did a nice job selecting for grain in the woodwork, so I went brighter with the finish than I intended. Berthed in the garage, it should hold up OK. I had the factory do the throat halyard upgrade, and Tred Avon’s sailmaker made up lazy jacks for us. And all the necessary and unnecessary equipment! Anyway, it’s great to finally get a chance to sail her. 75 Picnic Cat Spar Specs Posted by: George Haycraft, Picnic Cat S ince we were talking about mast, boom, and gaff hardware, I (George Haycraft, PC#29) thought I'd share this summary for any who may be interested. All the spars and rigging fittings are available from the Dwyer Aluminum Mast Co. Go to the page for the spar section you're interested in, and on that page, they list all the hardware fittings for that spar section. Below are listed the web pages, dimensions, and part numbers for our spars. You can order direct. I recommend keeping a spare gooseneck or two around. Those cast aluminum horns for the tack and throat pins are weak points. Hint: If you are replacing the mast and stub after unintentionally prematurely folding the mast down and splitting out the groove, you only need to buy the 12 ft. 7 inch mast section. You can cut three new stub sections from your old mast. Wonder how I know this ? ? ? NO, how dare you think that !! I just fixed the carnage. The unintentional premature folding occurred under the previous ownership. Mast (DM-284): http://dwyermast.com/items.asp?cat1ID=20&cat1Name=Masts&familyID=35&familyName=DM%2D284+Mast Boom (DM-275): http://dwyermast.com/items.asp?cat1ID=30&cat1Name=Booms&familyID=5&familyName=DM%2D275+Boom Gaff (DM-1): http://dwyermast.com/items.asp?cat1ID=30&cat1Name=Booms&familyID=3&familyName=DM%2D1+Boom DM-284 Mast 1/2" and 3/8" slugs shown. Mast length of upper segment is 12ft. 7 in. Mast stub is 53 in. Dimensions: 2.12 in. x 2.84 in. Weight: .908 lb./ft. Ix = .334 in^4 Iy = .610 in^4 76 DM-275 Boom 1/2" slug shown Dimensions: 1.75 in. x 2.75 in. Weight: .824 lb./ft. Ix = .25 in^4 Iy = .48 in^4 DM-1 Gaff 3/8" slug shown Dimensions: 2.00 in. x 2.25 in. Weight: .533 lb./ft. Ix = .189 in^4 Iy = .235 in^4 77 Picnic Cat Sail Dimensions Posted By George Haycraft, PC#29 78 Picnic Cat Rudder Not Plumb Posted by: George Haycraft, Picnic Cat W hen I replaced the fixed motor mount with the retractable motor mount and added the swim ladder, I ran into the same thing. I carefully mounted both the new motor mount and the swim ladder. I used 1/4" aluminum backing plates and everything. When I stood back to admire my work, whoa, it's all cockeyed! But wait, I had carefully leveled the hull, and used a level to place the motor mount and ladder. They were plumb to the hull and each other. IT'S THE RUDDER ! Laid the level along side the rudder mount and it was off. I removed the rudder and carefully marked the center line of the transom. Here's a picture: 79 The rudder was mounted 5/16" to port and rotated 3º clockwise. I guess they were lucky just to get the it on the transom the day it was built. S o o o, haul out the glass filled epoxy, fill holes, drill new ones, and this time, mount the rudder with 1/4" aluminum backing plates, not just the thin washers it came with. Now stand back, hey, that looks more like it! (The goal posts are history.) 80 Reefing – How and Why T his article first appeared in the 1985 Yearbook of the New England Beetle Cat Boat Association and has been slightly edited and updated as it appears here. Copyright © 2001 Jennifer Kano As we all know from experience, Beetle Cats sail best in light and moderate winds. On the surface of it, this fact seems somewhat ironic since the Beetle is a design adaptation of the 16-30 foot Cape Cod Catboat, a popular commercial fishing craft of the 1800s and early 1900s designed primarily for heavy weather use. However, history further reveals that the commercial cats also sailed reefed most of the time, reserving their full sail area for the gentle breezes more common during the summer months. For these year-round fishermen, reefing was the norm, not the exception it is today. Howard I. Chapelle once said that “modern yachtsmen have developed an allergy against reefing.” (The Catboat Book) Many exceptions to this statement can certainly be found, but as a whole, Beetle Cat sailors are unquestionably one of the most “allergic” groups around. The prevailing attitude among Beetle Catters is that reefing is for sissies, while the prevailing practice (except for scheduled races) is not to go sailing if it gets too windy. This is a rather unfortunate situation for a couple of reasons. Properly reefed and beautiful. First of all, Beetle Cats, like their big sister the Cape Cod Cats, handle very nicely in rough weather when reefed. While this is not an economic necessity for today's recreational sailors, it is still a nice plus as it can really extend the range of conditions considered enjoyable for pleasure sailing. As Stan Grayson puts it in his book Catboats, “The difference [between an un-reefed and reefed catboat] will be a choice between a helm that is barely if at all controllable with two strong arms, and a docile helm that can be attended by one untrained hand, or even two fingers.” Secondly, Beetles sail beautifully in heavy weather when reefed. Any boat with a well-designed sail properly reefed, not only handles better, it also goes just as fast as an un-reefed boat. In technical terms. The reason for this is that Beetles, like all non-planing boats, have an upper speed limit known as “hull speed” which can be calculated using the following formula: Hull speed in knots= 1.33 times the square root of the waterline length in feet. In practical terms, what this means is that the boat will go just so fast, and no faster, so carrying more sail than necessary to maintain this speed is, at best, a waste of power and at worst, a source of handing difficulties and possible breakage. Still Skeptical? Consider these two cases. 1. At the 1993 NEBCBA Women's Championship held at the New Bedford Yacht Club, Andrea and John York of Cataumet decide to race their boat reefed due to the heavy weather conditions. In the first race, they were the only boat in the race sailing reefed… they also won the race. By the start of the second race, they weren't the only boat reefed, and they didn't win. 2. In the middle of the 2000 Telesmanick Championship Carlo Zezza “tucked in” a reef and won the next race beating out the hot-shot sailors that were not reefed. Think about it. One notable exception to the reefing “allergy” occured at Mitey Mite (under 13 years) regattas where for some inexplicable reason, it almost always blows like crazy. When this happens, the race committee very sensibly requires all boats to reef– and then makes a rather disturbing discovery… Most of the kids don't know how to reef. 81 There has been some speculation from a few individuals (who shall remain nameless) that the reason adults don't reef more often is that they, too, suffer from the Mitey Mite syndrome. Assuming that this is the case, we now offer the following for closet non-reefers of all ages: Everything You Always Wanted to Know About Reefing (But Were Afraid to Ask) On boats without topping lifts (most Beetles fall into this category), reefing is done with the sail down. Before starting to tie in a reef, make sure the sail is bent onto the spars ready for normal, un-reefed sailing (everything attached, outhauls tight). Then follow these three steps: 1. Inhaul - Tie the reefing grommet in the luff down to the tack grommet or gooseneck fitting with a short piece of line using a reef knot. 2. Outhaul - Tie the reefing grommet in the leech to the boom in two directions: first out to the end of the boom. Be sure to pull it out tightly. Second, down to the boom directly under the reefing grommet. 3. Reef Points - Roll up the fold of sail between the boom and the reef points and tie the reefing lines by passing them between the foot of the sail and the boom (do NOT pass the reef lines around the boom). Be sure to use reef knots. Keys to Success Be sure to do the three steps in order. Make sure the leech reefing grommet is pulled out tight. (If you wind up with strain wrinkles coming from the reef pints when the sail is up, the leech grommet wasn't hauled out tight enough.) There isn't one right way to do this, but here is one method that does the job well and still unties easily afterwards. Thread one end of piece of 6-8 foot line though the leech reefing grommet so that half the line is sticking out on each side of the sail. Thread the ends of the line through the hole in the end of the boom (or the outhaul fitting or clew grommet) in opposite directions. Tighten out the leech reefing grommet by pulling on both ends of the line at the same time. Pass the ends of the line back through the leech grommet in opposite directions and then down around the boom. Secure with a reef knot. When furling the bottom of the sail pull all of the excess sailcloth to one side of the boom and roll it up firmly. Tie the middle reef points first and work out in both directions tying the next adjacent point. (This isn't vital, but it does produce a smoother job.) 82 A Dialog on Reefing Will Kingsbury wrote: Is there a rule of thumb about wind speeds and reefing? I am currently single handing, I weigh about 250 and I'm not exactly a speed demon moving around the boat. Current forecasts: tomorrow 10-15 kts with gusts to 20, next day 15 to 20 with gusts to 25, Wednesday 20-25 with gusts to 30. My instinct tells me that reefing would be appropriate tomorrow and Tuesday and Wednesday would be best spent with a good book, but I'm looking for a more educated opinion. George Haycraft wrote: T ry it with the reef tomorrow. See how it goes, then decide about Tuesday. After Tuesday, they you can decide about Wednesday. In addition, there's more you can do than just reef. The sail's draft and it’s position will also be important. You'll want a depowered sail with a flat draft located further aft. (Like 4th gear) The draft can be flattened by increasing the tension on the luff (throat halyard) and the peak and clew outhauls. The tension of the peak halyard will also be important. To flatten the draft, and move it further back, the peak halyard tension wants to be just barely enough to make the "too loose" wrinkle (throat to clew) in the sail disappear. If you find you've reefed a bit early, then you can tighten the peak halyard until you're just about to get the too tight wrinkle (peak to tack) to increase the draft and move it forward. This will give the reefed sail a more powerful shape. (Like 1st gear) Easing the throat halyard (luff) and the peak and clew outhauls will also help. A boom vang is also very helpful in shaping a reefed sail. Tightening the vang will help flatten the sail a lot. It's almost like a one line throttle adjustment. 83 Jiffy Reefing Installation – SunCat Dick Herman, Muddy Duck H ere are the photos of the Jiffy Reef in my luff that Tom Ray asked about. First, I ran the green and white line from the boom's gooseneck up to the reefing cringle in the luff. You can see how the boom is pinned in place with the long pin. The luff is pulled as tight as I could get it with the gaff's throat halyard. When I reef, I pull the cringle down to the boom, which is held in place by the pin. Here's how the jiffy reef looks on the other side. Here, I have also used it as downhaul. You can see how much slack I took out of the luff. 84 Here's how it look from the cockpit. I never have to leave the cockpit to reef and can reef down in about three minutes. I start the motor, head into the wind, maintain enough way to maintain direction, scandalize the gaff, lower the main halyard as I pull on the jiffy reef, set the two forward cleats, and then set the aft jiffy reef. Depending on conditions, and how I feel, I may tie the two center sail ties. Here's how it sets. The winds were around fifteen knots when this photo was taken. 85 Replacing Seats on a Sanderling Bill Dolan a.k.a Catboat Willy I have replaced the seats in several Sanderlings over the years. I am sure you have heard that many of the early Sanderlings (pre-1964) were kit boats and that they were usually shipped without seats. Some of the earlier boats had freestanding seats in their cockpits and folks would bring in a folding lawn chairs. A far cry from what is being shipped today. Let's talk about your seats; they are made of fiberglass covered plywood and the plywood delaminates over the years. Just getting the old seats out will be a chore as they are fiber-glassed to the side of the hull. It is not a difficult operation. Just a Milwaukee Sawzall, a Stanley Wonder Bar, heavier than normal claw hammer (20 oz.) and a heavy dose of patience. Allow yourself several days for this operation as it is not easy. Not complicated but just trying on the nerves. Good leather gloves and a facemask with eye protection are a must. First, save as much of the finish woodwork as you can, but chances are that it is old and should be replaced. Save the upright spindles (or seat legs) teak edging strips and anything else you can find. Start by taking some measurements since your existing seats will be totally destroyed in this process. Have the new ones ready before removing the old ones. The real truth is that the legs don't do much. Once the legs are removed, cut out as much as the seat as possible with your Sawzall just to reduce volume. Then, start cutting the seat from the center of the cockpit outward toward the side of the hull. Do this in 1" strips being careful not to damage the coaming with the saw blade. The forward edge of the seat is attached to the bulkhead with two - 3" bronze screws. Try and save these if you can. Inspect the bulkhead for rot and water damage as it is these two bronze screws that are the culprit in most of the bulkhead rot. Water is admitted around them and the subsequent leak, causes rot destroys the bulkhead. The rear and sides of the seat are fiber-glassed to the hull with three-inch strips of fiberglass mat. This will be the most difficult to remove and you will find the ‘Wonder-Bar’ tool to be an asset here as you must separate the old fiber glass strips away from the inner side of the hull. As people get on and off your boat, you will notice that their foot and subsequent weight always seems to land on the seat about 12-14” behind the point where the forward portion of the seat meets the bulkhead. This constant wear causes the seat to flex and eventually breaks the watertight bond between the seat and the bulkhead. For this reason, I recommend that a support be placed on the seat bottom between the edge of the seat and the hull. A piece of ¾-inch waterproof plywood does nicely backed with a kick plate epoxied to the cockpit sole. A kick plate of 1 ½” inch oak stock does nicely here. Be sure you calk (with a quality caulk) the top area seam between the new seat and the bulkhead as this will prevent water from entering from above. Please see photo below. A note here: If you place the ‘upright support’ back far enough from the bulkhead, the space nicely accommodates a commercially available Igloo ‘Picnic Model’ Cooler’ (Got mine at CVS) This simple addition will provide support for the seat where people step most frequently and assure that you will not have to repeat this process. With regard to new seats, I would suggest obtaining them directly from Marshall Marine along with the proper screws and teak finish pieces. Buy the complete set of needed parts so there is no delay when installing your new seats. When installing them, insure that there is adequate clearance underneath to accommodate whatever type of storage bin you are using. I’m using plastic mike crates and the seats are exactly 12” inches off the floor with the milk crates being 11 ½ high. You had mentioned making your new seats out of exotic hardwoods. While these would look outstanding, they may be very difficult top keep from a maintenance standpoint. An alternative method would be to obtain the seats from the manufacturer and the place a veneer over the top factory seat with epoxy. 86 87 Keep the Boom from Swinging Carl, Horizon Cat & Picnic Cat I'm afraid I've fallen out of touch, both with the good people here and with sailing. In fact, last night I awoke to a terrible nightmare about sailing – better than nothing, I guess. If it was a nightmare at least it was sailing, and I think I got a good idea from it. The last time I was on a boat outside of daydreams was September '09. Before that June '09. Before that, I think I remember '08 was a good year for sailing. Anyway, I dreamed I awoke on board my Horizon Cat sometime in the pitch black wee hours, lost, position unknown and waves giving my boat a toss in the otherwise calm conditions. It seemed so real. I had potable water, Rama noodles, and a bag of those Cape Cod potato chips with the catboat weathering the light – I wasn't in immediate peril but those waves presaged approaching PWC's. In minutes I would be caught in their maelstrom. I had to act fast. Something had to keep the boom from swishing across the bimini, and I couldn't find the bit of 3/16 line I always keep in my pocket. One problem with Com-pac's double ended sheet is that if the boom is held up off the gallows by a topping life or lazy jacks, the sheet won't keep the boom from swinging back and forth. In the past I've kept the boom under control with a constrictor knot (or, better yet, a boa) just under the boom mainsheet block, seizing all the parts of the mainsheet fall. It works well, but a constrictor will work loose and a boa takes some fussing. And I couldn't find my favorite length of 3/16 line. Working fast in my dream, dreading what fate could deal by the hands of PWC pilots, I tied two stopper knots in the sheet, one on each side of the boom triple block. For the first stopper, I followed the starboard end of the sheet through the cleat, up to the boom, and over one sheave of the triple block. That's where I tied the first stopper, on the opposite side of the block from the starboard cleat. With the stopper in place, hauling the starboard end of the sheet brought the stopper up to the block, pulling the boom to starboard. The second stopper went on the opposite side of the block on the part that came up from the port cleat. Hauling the portside end of the sheet now pulled against the stopper and pulled the boom to port. Caught between the stoppers like a snake caught in a knothole by boiled eggs, the boom couldn't flop around. In my nightmare I was ready for the PWC's. This morning I drove over to the storage yard and tried the idea out. I think it will work, although a test with the boom up out of the gallows and suspended by the lazy jacks will have to wait until I get the boat wet again. Here are the stoppers, before pulling them chockablock: 88 And here they are pulled up short into the block. If the boom were held up off the gallows by the lazy jacks I don't think it would swing back and forth at all, and the sheet wouldn't have to be drawn tight. The extra slack you see is in the parts of the sheet no longer able to take any tension because of the stopper knots: For stopper knots, a butterfly or alpine loop was my first thought, but when you tie a butterfly in the middle of a span it puts a full twist in the line. Not optimal. 89 There's a figure 8 variant used for trucker's hitches that works great, though. You start with a bight in the middle of a span: Lay the bight over the standing part: Wrap the bight around the standing part: 90 And finish the figure eight: Pulled tight, here's what you get: 91 The loops look handy for hanging the coiled mainsheet by, appropriately enough, slipped sheet bends: 92 Back in my nightmare the PWC's never showed up, and something nearby caught my eye, an old fuel sign sticking up out of the water, right out of an Andy Warhol painting. Then I saw two masts, there was Pilgrim, and Nelson's Mac, and Dockdog's boat. On the shore I could see a bunch of coals under a dutch oven – that was no nightmare, I wasn't lost, I was home. And homesick. Man, do I ever need to find a lake and a breeze... 93 Capsizing Kathryn Olivia, SunCat wrote: T oday I participated in a race sponsored by Claytor Lake Sailing Association. The forecast was for 15 knots of wind gusting to 25. Late afternoon could expect gusts above 30. Wisely, I did not take my girlfriend. Unwisely, I did not put in a reef before I left the dock. The breeze was as forecast pre-race and moderated a little during the race. Immediately after the race we got all 30 + knots. I deployed a sea anchor to try to head the bow into the wind so I could start getting the sail down. When securing the line at the bow a very strong gust hit causing a broach. Before I could completely release the sheet the boat heeled all the way over, mast in the water and dumped me over the side. When I popped up I released the main and immediately swam around the boat and climbed up on the keel/daggerboard. To my absolute delight the boat righted in a matter of only a few seconds. I had taken on maybe 15 gallons of water, everything in the cabin was piled on the upper port side. The water probably entered through the cockpit locker. The motor is mounted on the port side - it was right at the water's surface when the boat was on it's side but was not submerged. When the boat righted it took off at fair speed. I was able to grab the ladder and scramble aboard and finish deploying the sea anchor. By the time help arrived I had the sail down and the motor running. The boats standing by retrieved the contents of my cockpit which had been dumped and they escorted me back to the dock. The boat is apparently completely intact. The only loss was a few bottles of tea, a couple of granola bars and 2 cheap hats. I have the euphoria of disaster averted and am deeply appreciative to the powers that be and fellow sailors. Bill Dolan, Marshall 18 wrote: K athryn, My good friend Steve makes excellent reference to the technique of 'scandalizing' the gaff rigged catboat for better sail control in an emergency and he is absolutely correct. Many of us know of the technique but have never practiced it. But for catboat sailors, it can be a survival skill, for a catboat out of control is not a pretty thing. Additionally, that one big sail limits your options. In the hey-day of the big working cats, scandalizing was a standard catboat sailing skill that has been almost totally forgotten today. This is unfortunate because scandalizing is a very handy, simple-to learn technique, and I'll bet there isn't a catboat sailor alive who couldn't have avoided some hair-raising heavy weather experience if he or she had know how to do it. So what are the techniques? Simply put, scandalizing is fast, easy way of temporarily reducing the working area of a gaff rigged sail by setting up the topping lift (a line rigged like a halyard to support the end of the boom and slacking away on the peak halyard to lower the gaff and upper half of the sail. The remaining triangular section of sail represents about half the original area, and the whole operation takes only a few seconds to accomplish. Luckily, tightening the topping lift can be omitted when scandalizing a catboat since the boom is adequately supported by the sail, and many cats aren't fitted with lifts anyway. The small "trisail" left with a scandalized rig is surprisingly efficient and, although this rig works best when sailing off the wind, the boat handles remarkably well on any point of sail. Scandalizing is, however, only a temporary measure and not a substitute for reefing. In fact, prolonged scandalizing will eventually ruin the shape of your sail. So, if you are going out for a sail on a blustery day, plan on reefing before you leave the mooring. If you are thinking of one reef, take two. On the other had, if you get caught in a sudden squall and want to make a quick run for shelter, scandalizing is just the thing that might save you bacon. As you know, the catboat is, for the most part, a good, stable, safe boat for almost anyone. However, those of us without upper body strength are also much more quickly overpowered by a cat as the wind starts to come up than they would be in 94 a sloop-rigged dinghy of equivalent sail area. For this reason, scandalizing is a "survival" skill that should be taught to all catboat sailors. Those who know how to scandalize will be more confident in their ability to cope with a boat that suddenly becomes unruly. Scandalizing Tips: 1. Keep the centerboard all the way down. 2. Lower the gaff (with the peak halyard only) to the leeward side of the sail. 3. Set the peak halyard so that it is just tight enough to support the weight of the gaff. 4. When changing tacks, shift the gaff over to the new leeward side of the sail. (It may be helpful to pull the gaff back up a little when doing this.) So, the next time you are out sailing in lighter air, give scandalizing a try. You have nothing to lose-and then, on some wild and windy occasion in the future, you may well be glad you understand this emergency technique. One additional thought; I believe most traditional cats like to be sailed reasonably flat and, while a cat with one half her hull out of the water may be fun to sail to a certain point, she'll slip sideways faster than anyone could imagine. Her stability comes from her width and once you have a greater sail area aloft than the boat was designed to handle, you've got real trouble.I've been knocked over twice in a cat in my thirty five years of sailing the rig. Once in a 'Micro-burst' and once hitting a submerged object. The image of vast quantities of water pouring in over the coaming and into the cockpit is one that is still with me. When racing as you do on the lake, a reefed catboat in control of herself will almost always 'outsail' an 'overpowered' catboat. Try some studies with your GPS. Side slippage vs. speed and distance made good. I'd offer this; 1. Reef often. Learn how to sail the boat with a reef in and how the reef changes the sailing characteristics of the boat. You might want to keep the sail 'loose footed' rather than tie in all of the small reefing ties that usually accompany a sail. Look into 'jiffy reefing' systems and how to provide reefing entirely from the cockpit. 2. Reef early. The reef point is usually more easily shaken out than put in. Putting a reef in while underway can be difficult & dangerous. 3. When you are thinking about one reef ~ take two. Your boat will sail better and you'll be a lot safer. Going over This is super embarrassing episode to relate, but maybe it will benefit someone else. I kind of learned to sail by the wet "seat of my pants" so to speak; so please excuse my lack of proper sailing terms. Ok, I'll get on with it. Anytime there was much wind at all, and I wanted to change my sail from the port side to the starboard I would first turn the boat almost directly into the wind. I would then gradually let out the sail to the side I wanted it on, and then concern myself with whatever tack I wanted to be on. Well then one day, a friend and I take the boat out into the ocean at St. Augustine, Florida. He introduces me to what I believe he referred to as "Jibing" or "Jibbing". Anyway, in order to change the direction of the boom from one side of the boat to the other, when he had a tail wind, was to pull tight the line attached to the pulley on the boom, so that the boom was pointing directly to the stern (directly in the direction of the wind). He then gradually let the sail out to the side of the boat he wanted it on. Well, a month or so later, I'm on the St. Johns River in Jacksonville, Florida, and the wind isn't too strong, and I think that it would be a good time for me to try the maneuver for myself. And heck, with such little wind, and such a stable boat, I'll just wait to sit on the other side of the boat. So, I've pulled the line tight, and the sail is pointing to the back of the boat, and suddenly the wind hits the sail from the other direction. Now when I've more wind than I wanted to deal with in the past, I was used to quickly turning into the wind. And that was my sudden reaction this time. However, this time, instead of being headed into the wind, I was dealing with a tail wind. And instead of my line being loose it 95 was taunt. So my reaction of pulling the tiller hard towards me left the boat perpendicular to the wind, with the line taunt... and just make things worse, I was sitting on the side of the boat opposite the wind. If my hand was on the line and I was mentally prepared, I would have released the line holding the sail taunt. But in no time I was off- balance, going backward towards the water (and of course the boat was on its side). So then I was in the water and it was in the cold time of the year, and the mast was pointing downward. It was choppy, but at least I was in the river around other boats and not out in the ocean. My cell phone that I kept with me for any emergency was no good in the worst of emergencies. A motor boat came by and with pliers I loosened one of the stays (while still in the water). In hindsight, I just should have loosened the line holding the boom taunt. Of course, I would have had to release it by swimming completely under the upside-down boat. With my other sailboat, I would've put all my weight on the daggerboard and the boat would've popped up (I verified this during a storm one year). However, I was not dealing with a daggerboard this time. Now, I was fighting against the weight of the centerboard which was being pulled back into the boat by gravity. When I would get the centerboard out from the hull, I couldn't keep it out and at the same time use it as lever to righten the boat. It kept slipping back into the hull. I was fortunate that someone with a couple of huge engines came along. I was fortunate that I had some really strong rope to fasten to key points of the boat, and that I was able to righten the boat. And I was fortunate that I was able to get it close to a nearby shallow area to bail out the water. When it was finally upright, it had to be held level to keep water from pouring in from the sides while I bailed it out. I had to replace my sail cover, my mast, and had to have my motor serviced. I also had to replace my cell phone. It was a very expensive day. But for a while I feared that I might lose my whole boat. Anyway, the lesson I'm trying to pass along here (at my own embarrassment) is this: Although the Picnic Cat is extremely stable, if you manage to do EVERYTHING wrong, you CAN tip it. And if you do tip it, you have a major problem. Knowing what I know now, I would have had my hand on the line (and of course changed the side of the boat I was sitting on). And if I found myself with the boom still taunt while in the water, I would swim under the boat and loosen the line holding the boom. I then would do everything I could to get the mast down. But mostly, I would not assume that just because the boat is stable, it can't go over. And once it goes over, you're going to need help. One other thing, any type of phone or radio will be useless unless it is kept in a waterproof container. I suppose most of this is as obvious to you as it is to me. And you think that you're pretty knowledgable and pretty careful. But hopefully my horror story while add to your vigilance. 96 Trailering Advice Posted By: Tom Galyen 1. Remember that you will have a much larger turning radius so be careful, especially in gas stations. It is easy to catch the corners of the fueling islands wth the trailer wheels. 2. When hooking up make sure that your trailer hitch matches the ball on your tow vehicle. One fellow I met this summer did not do this. Fortunately nothing serious happened. 3. Again when hooking up make sure you cross the tow chains. This makes a cradle for the trailer tongue to be caught in if the unseen should happen and the trailer comes unhitched. The fellow mentioned above had this happen when he backed up to park the boat and trailer and he didn't have the chains crossed. I saw what happened and yelled at him quick enough that he stopped before any damage was done. 4. Make sure the boat is properly balanced on the trailer. You should have about 110 pounds of weight on the trailer tongue. You can measure this on a standard bathroom scale. Too little is as bad as too much. This should be checked after you have all the stuff you are going to carry stowed in the boat. 5. An easy way to back up is to look out your back window and put your hand on the bottom of the steering wheel, and then turn the wheel in the direction you want the boat to go. Take your time, even at a crowded ramp. When I begin to back up I lower the tailgate of my truck, it gives me a much better view of what’s happening. 6. Make sure all is clear behind you before you back up. Last summer I backed into a car at the boat ramp who had pulled into the lane behind me while I was getting the boat ready. I had seen him in the lane to my left and thought that he had backed straight back into the water when instead he backed into my lane. I put my rudder through his front license plate. No damage to my boat and only his plate damaged. He never asked for any damages, so I think he knows he screwed up, but I still could have checked better, if I had looked at his lane I would have noticed he was not where I thought he was and should have stopped until I knew for sure where he was. Once I start backing up I cannot see directly behind the boat and neither will you with your boat which is wider than my Sun Cat. See note 5 about gaining a little more viewing room. 7. I have included a photo from an earlier post of a mirror that I got from an RV dealer that hooks on the tailgate of my pick up and allows me to see the trailer hitch while hooking up. Even with someone with me to help I prefer to use this set up. I can see what’s happening and react faster than when someone is yelling at me. I also have a metal plate that slips into a holder between the ball and my truck to prevent me from going to far and bending up my license plate with the trailer hitch. 97 Questions About Trailering Tongue Weight, Tilting, Wheel Size, Bearing Buddies . Posted by: George Haycraft Do I lessen the tongue weight? M aybe yes, maybe no. You've probably got close to 800 lbs. of boat, trailer, and gear back there. The rule of thumb is about 10% as tongue weight, or about 80 lbs. If the tongue weight is too light, the boat trailers "squirrelly". You can check the tongue weight pretty close by putting a bathroom scale under your tongue jack wheel. If you're in the ball park, leave it. My boat is far enough forward to keep the tilt joint closed. Oh, be sure to pull out the spring loaded locking pin from the joint before attempting to use it. As for pushing the boat backward, that doesn't depend as much on tongue weight as it does on how the weight is distributed between the bunks and the rollers. If almost all your hull weight is on the bunks, you might not be able to push it at all. You want quite a bit of hull weight on the rollers. The bunks are there to support some, but mostly to keep the boat from tipping sideways. You want to make sure you have the right rollers. You don't want the "shoulders" on the rollers pushing into the hull. You may need to change them for very shallow "V" rollers, or flat rollers. I like to just barely loosen the roller brackets, and tap them upward with a hammer some, and retighten. If I can just barely rotate the roller with both hands, I call it about right. You may also consider adding a roller or two, if you have any vacant trailer cross members available in the midline. With enough rollers, and this weight balance between the rollers and the bunks, I can, with some effort, push my hull backward. I leave the bow strap attached to control the descent of the boat. I first loosen the strap about two feet and relock the winch. Push the boat back until the strap is tight. Then loosen another foot or so, then relock, and push the boat back. Continue in this fashion until the boat is headed back on its own and the trailer is beginning to tilt. Control the process with the winch handle. Nice and smooth is the ticket here. To reload the boat, you need to "pretilt" the trailer. I lift the tilt joint and wedge a plastic wheel chock (~6" wide) into the gap. This pretilt needs to be enough to get the rear most roller contacting the bow below the "brake" of the bow curve. That way, as you start to crank the boat back on, the bow will continue to push the rear of the trailer down. As soon as you see this happening, time to remove the chock. For lawn launching, have the wheels chocked, or have the trailer attached to your tow vehicle. For lawn recovery, I do neither. The winch sort of pulls the trailer under the boat. This also works well at a public ramp when your boat has slid off the side of the trailer in the driving lane. (Wet round bottom boat without side guide bunks or a tie down strap) DON"T ASK. At least it was a Boston Whaler. PC wouldn't have survived. Do I put larger wheels on? I tow trips of a thousand miles one way, in addition to forty to sixty mile trips one way to local lakes. I changed to 12" wheels. Fewer RPM's on the hubs and bearings. Do I add bearing buddies, grease, and replace hubs? Here's what I do with my trailer bearings. I have a good local trailer and hitch shop, and I also have a good local trailer supply store. Both are run by solid grease-under-the-finger-nails types. After reading a few good internet articles, I decided to do my bearings myself, and have done so for a number of years now. Even my good local shop once failed to do the final set up on the lug nuts on one wheel. Fortunately, I checked. Anyway, here's what I do, based on what I learned from these people. I replace bearings, races, and grease every 2000 miles. Every 4000 miles, the hubs get replaced too. I always carry a spare new greased hub with new bearings and races when I trailer. I use the clear lexan type of "bearing buddies". I don't add grease, though. I feel my hubs at every rest stop to see if ones temperature has gone up significantly. I always launch/recover with my hubs dry, utilizing the Performance trailer's tilting tongue. The clear lexan "bearing buddies" allow me to see the color of the grease inside my hubs. As long as it's the original color, it's fine. If it turns cloudy gray, it's contaminated with water and time for a bearing job. My trailer and hitch shop say they love customers with bearing buddies. Those customers are responsible for a lot of their business. They add grease, blow the rear seals, and have to come in for another bearing job. As they told me, the rear seals blow at about 5 lbs. pressure. The spring loaded disc in the bearing buddy is supposed to pressure the grease to about 3 lbs. A good stiff squeeze on a long grease gun handle can easily cause a pressure spike within the hub of more than 5 lbs. There goes the rear seal. Also, the disc in the bearing buddy almost never sits square across the chamber. It's usually at some angle, which causes the 98 edges to bind, and it takes more than 3 lbs. pressure to move the disc. There goes the rear seal again. They simply recommend changing the grease every 2000 miles and forget about it. The trailer supply store agrees, but with the addition of the clear lexan bearing buddies, so you can always observe the color of the grease for water contamination. The trailer store also recommends never reusing bearings or races, as well as never reusing rear seals. Here's their reasoning. Today, all the trailer bearings and races are cheap Asian imports. They aren't built to last. They are inexpensive to replace. The bearings, races, and seals come as a set in a plastic bag. In addition, the trailer bearings live in a horrible environment, compared to the bearings in your tow vehicle. The trailer wheels aren't balanced. The springs are stiff and there are no shock absorbers. The smaller trailer wheels turn faster than your tow vehicles, so the bearings also run hotter. It just makes good sense to replace them. Similar arguments apply to the hubs. They get exposed to the additional forces of driving out the old bearing races and driving in new ones. The cheap, imported cast iron hubs can be prone to cracking from their working environment as well as having their races changed. They recommend changing the hub, bearings, races, and rear seal as a complete unit every other bearing change (every 4000 miles or so.) There are two general types of trailer bearing grease. The blue marine type has an aluminum base. The tan type has a calcium base. The two don't mix. They precipitate. You must stick with the type you have, or thoroughly clean everything with a solvent like kerosene and dry with paper towels before changing types. The blue aluminum base has a breakdown temperature a couple of hundred degrees higher than the tan calcium type. The trailer supply store says that difference isn't enough to matter. The blue aluminum type is usually more expensive and harder to find. The trailer supply store only stocks the tan calcium type. It's cheaper and perfectly adequate if you're changing your grease every 2000 miles or so. I believe in two other things for trouble free life with your trailer. They are LED lights and soldered electrical connections. I'm almost exclusively a fresh water boater, but I always had trouble with "waterproof" trailer light housings and plug in bulbs. Since I switched to the factory sealed LED lights, I haven't had a single problem. I also use only soldered electrical connections. No clip ons. I like to seal the soldered (rosin core solder only) area with clear silicone sealant/adhesive or low temp hot melt glue. I then slide heat shrink tubing over the sealed solder joint and shrink with a heat gun. You can get expensive marine grade heat shrink tubes with the sealant already inside, but there's no Nordstrom's for Mariners (West Marine) around here, so I mostly shop at the big blue box (Lowe's) and make do. Do I continue to float the boat rather than tilting the trailer? I never do the float off/on anymore unless there's some reason I have to. I back in only until the water is up on the lower part of the tire, at or near the wheel rim. I always keep my bearings dry. The problem comes when you launch with bearings that are still warm, that is, warmer than the water temperature. The sudden cooling causes the remaining air inside the hub (there is always some) to contract and cause a vacuum. You may suck some grease out of the BB, if the disc is free to move, or you may suck water in through the rear seal. Using the tilt mechanism is so easy for me, I simply choose not to take the risk. I had an interesting discussion with my trailer parts dealer this spring. He no longer carries Timken bearings, just the "Made in China" ones. His point is, trailer wheels and tires are not finely balanced, like car wheels and tires. They are also a lot smaller, therefore turn a lot faster, and run hotter. It's a horrible environment for any bearings, and will destroy the expensive ones just as quickly as the cheap ones. He recommends using the cheap bearings and races and replacing them every time you repack. That extra hub should be less than $30, as well. Cheap insurance against late night or weekend bearing failure on a trip, as far as I'm concerned. Posted by Graham Parker, answered by Tom Ray Performance Trailer Question I drove the suncat 5o miles the other day to sail on Lake Champlain and when I arrived at the marina the wheel hub was smoking. Luckily I was at the ramp and have been able to dock the boat while repairing the trailer. I've heard two theories so far on why this may have happened. One was that I should have greased it at least twice this season. The other was that it had too much grease. Given that I did not put any grease in this year i think the former is the more likely explanation but will know more after the other hub is dismantled. Problem is Performance trailers (the marine ones!) seem to be out of business. Any tips on where to order replacement parts? Any thoughts other than I was lucky the whole thing didn't fall apart on the highway at 65mph! Bad Bearings Answer Both theories as to why they are bad could be correct. If you don't pump grease into them, they can run out of lubrication. Most had "bearing buddies" which are just a spring-loaded piston which keeps squeezing grease into the hub. The idea is to assure lubrication and also to create positive pressure inside the hub to counteract the water pressure trying to force water inside during launching. If you run out of grease, water will come in and corrode the bearings. 99 If the bearing buddy has been pumped too full of grease, it can blow the soft seal out of the back side of the hub, allowing all grease to escape and allowing easy access for water. Really bad. No matter what caused it, you have bad bearings. Changing them is not much fun. I've done it, which is why I prefer to hire someone else to do it. You can get a new set of bearings and races at West Marine or at auto parts places. Just make sure they're the right size for your axle. It doesn't matter that Performance isn't around any more, since you would not buy replacement bearings from the manufacturer anyway. Hope this helps. In the future, stop every now and then and (carefully) feel the wheel hubs. They should be pretty cool. If they're hot, you have trouble brewing. If they're almost smoking, you'll burn your fingers. 100 Autopilot/Tillerpilot ST1000 installed H Posted By: Darren – Sun Cat #255 in Dallas ere's a picture of the installation. I think the rigger/installer did a very good job. Mounting the pin: I had the tiller pin mounted further from the rudder pivot point than the instructions recommend in order to completely clear the back edge of the cockpit coaming while hand steering with the rudder hard over. This mounting location required extending the tiller pilot arm with five inches worth of extensions (a one and a four inch put together), which were still on order when the photo was taken. Mounting the socket: The rigger said fiberglass on the top edge of the coaming was pretty thick, and it was filled with foam below that. As I understand it, he drilled the socket mounting hole, dug out some foam through the hole he drilled to create a hollowed out area immediately under the fiberglass, tested the foam to make sure it would not be melted by the epoxy he was using, and filled in the hole he dug out with epoxy to provide a solid mount for the socket. I had the power socket mounted centered under the tiller so it would not take up any backrest space or interfere with use of the seat/fuel lockers. Note that it is mounted high enough to clear cockpit cushions. I used the front edge of the seat over the gas locker as a visual reference when marking the drilling locations with the rigger—tried to keep the tiller pilot parallel to that line, and as far aft as possible. If necessary to "level" the pilot, the rigger could have used an optional longer tiller pin and adjusted the depth of the mounting hole in the tiller. The only extra tiller pilot pieces I bought were the extensions. I recommend mounting everything before buying the extensions so you get the exact length you need for your boat. I have only used it twice so far, and only once with any wind. I'm pleased with how it works. I've calibrated/compensated the fluxgate compass but haven't fooled with the rudder gain. I'd like more time sailing with it before I start turning too many knobs. Got in a nice sail after work today. Here are a few pictures of my third sail with the ST1000 tiller pilot. The wind was roughly 10 mph, occasionally up to about 12 or 13, based on the few white caps I saw. I’m still tickled by the SunCat’s EASY performance. This picture shows the tiller pilot only a few inches away from the end of its travel. The centerboard was all the way down. I was able to make the tiller pilot “bottom out” at the end of its travel with the centerboar all the way down. 101 It was a nice evening sail–my GPS said I maxed out at 5.4 knots. Although we got a break from the heat this last weekend, it is still relatively warm, so I mostly just reached back and forth across Lake Ray Hubbard to take advantage of the breeze (no need to run until it really cools off). I'm happy with the tiller pilot. If I raise the center board to balance the helm as the wind increases, this installation works well. Mounting everything further aft (per the documentation) would allow me to delay raising the center board. However, there is not much room to mount this further aft without restricting the travel of the tiller when hand steering. This setup allows me to more gracefully set/strike sail, AND lets me adjust the stereo and take pictures in a leisurely manner! Raymarine ST1000 & ST2000 Tillerpilots I nvented by Autohelm in 1973, tiller pilots have consistently been the world’s most popular pilot ever since, setting the standard for performance, reliability, and ease of use. Advanced features are standard. AutoTack lets you handle the sheets, while the pilot tacks the boat and AutoSeastate intelligently keeps the boat on course while conserving power. 102 Whether used as a stand-alone pilot or with a SeaTalk/NMEA GPS, the clear backlit LCD and 6-button keypad make these pilots safe and easy to use. ST1000 for boats up to 6,600 lbs (3,000 kg) ST2000 for boats up to 10,000lbs (4,500kg) 10-15volt nominal supply voltage Power consumption in standby - 40 mA (90 mA with full lighting) Power consumption in Auto 0.5 A to 1.5 A depending on boat trim, helm load and sailing conditions Port or Starboard mounting Automatic compass deviation correction SeaTalk and NMEA 0183 compatible Dedicated course adjustment keys Dedicated standby and pilot engagement keys Waypoint distance data Waypoint number and bearing Cross track error Automatic trim Automatic seastate compensation 9 rudder gain and damping levels 15° - 40° adjustable off course alarm Automatic tack function Northerly/southerly turning error compensation Course memory Full range of mounting accessories available Optional Remote Control 103 Depth Gauge installation Problem Posted by Captain Mike I have a Compac Horizon Cat. I am attempting to install a Hawkeye Depth Gauge with an in hull transducer. I am having trouble getting the in hull transducer to work. I cannot get any readings. It works when hung over the side. Does anyone have any experience with in hull transducers or any suggestions as to how to make it work or what is the best location in the hull? Like I said, it will read the depth when hung over the side but not when placed inside on the hull. Any thoughts will be appreciated. Solution Posted by Riley Smith I'm not sure how much you know about this, so here goes, and if you already know any of this just ignore it. The transducer must be bedded to shoot through the hull. The usual way is to mount it in a bed of epoxy. You must make SURE there are no air bubbles in the epoxy. In order for you to make sure nothing ELSE in the hull is interfering with the installation, my suggestion is to either use a plastic baggie full of water and place the transduce on it and try it first, or a bed of peanut butter. You can move it around and make sure it works this way before you epoxy. Once you make sure the unit will work where you want it, break out the epoxy. If I am not mistaken some of the marine stores sell an epoxy just for this purpose. The transducer will NOT work just placing it on the hull by hand. The microscopic air gap will prevent it from working. Also if there is cored material in your hull where you want to mount it, it won't work. Do a little tinkering and see if it works. Solution Posted by Tom Ray I wouldn't use epoxy. You can just squish them down into a pile of caulk until the transducer almost, but not quite, touches the hull. Some people build a little tub and mount them soaking in oil, but that's asking for a mess. Caulk is not as good as epoxy at transmitting sound, so your depth finder will be less sensitive and won't shoot as deep, but for most purposes it works fine. Don't tell Rachel, but I have even used silicon. Solution Posted by Bob, Wandering Fox Silly Putty the kid toy; I used that on my Seaward Fox. Still works after nearly a year and is holding. Read about using it on one of these forums. As stated you need to be sure there are no air bubbles. Think of a sonogram where they need to put a jelly like substance on the skin to shoot through. You can move it around at first to assure you have the best spot. Solution Posted by Dennis, SunCat I cut a section of PVC about 3" long and using a mixture of epoxy thickened so that it will form a fillet, glued it to the inside of the hull (kneadable epoxy will work also). I used PVC with a diameter slightly larger than the transducer. As was recommended by the manufactured, I put Vaseline petroleum jelly in the bottom and pressed the transducer into the jelly. It has worked flawlessly for over 6 months and is removable if necessary. I initially used water in the PVC which worked also but would spill evaporate or spill out during heeling and had to be refilled. I located the transducer inside the port cockpit locker approximately 6 to 8 inches forward and outboard of the cockpit drain opening. I forgot to mention that I also used a wire brush on a drill motor to remove all paint in the area. Solution Posted by Captain Mike, Horizon Cat The Sailboat Company (a Compac Dealer in the Carolinas) recommends the following: The Horizon Cat hull is solid fiberglass. We have installed transducers in the hull under the floor in the forward cabin. The rug on the floor covers a removable panel for installation purposes. Ease the edge of the rug up for access. A transducer works well in that position. 104 Sun Cat Main Sheet/Traveler Relocation Posted By: Tom Black H ello All - A few weeks ago I posed the question of relocating the traveler and main sheet to the rear deck area of the Sun Cat between the boom cradle uprights. The responses were positive, so I went ahead with the project. I thought I might share what I have discovered. I designed a track and car unit to mount to the base of the boom cradle uprights so that no drilling of the deck was required. I reused the OEM blocks adding a new longer main sheet and purchased a new boom bail for mounting at the end of the boom. The installation was very easy and looks factory installed. The results are amazing. The cockpit has grown much larger in size and access below no longer requires gymnastics moves. This of course was the point of making the changes, the surprise was the improvement to the sailing characteristics the Sun Cat. The first thing I noticed was improved pointing. I think it is as much as an additional 5 degrees. The second thing I noticed was the sail required much less tending as wind conditions changed. I sail on a large mountain lake where wind speed and direction change constantly. I adjusted the main sheet much less often after the modification. And finally, sailing speed seems to be unaffected. I typically sail in 10 to 25 mph winds and the Sun Cat moves along as before with no ill handling effects. Any thoughts on my findings would be greatly appreciated. Here is the photo of the relocated mainsheet hardware as discussed in my previous post. The arrangement frees the area of the bridge deck and hatch for seating and easy passage. The hardware is high quality anodized aluminum components from 8020. The mounting brackets/clamps are a custom part fabricated from a standard part. The rest of the parts are “off the shelf.” The new boom bail came from West Marine as did the 50 feet of new mainsheet line. I reused the OEM blocks but did have to add a small strap on the new traveler car. My testing of the new setup continues and all seems to be positive. The wind this past weekend was very lively and I was unable to confirm my previous post of better pointing abilities. The Sun Cat definitely sails differently. I continue to be happy with the new setup and of course the nice thing about it is, if I decide to return to the original mainsheet/traveler setup, I can do so by repositioning the blocks. 105 Here is the close up of the traveler mounting hardware. The hardware clamps to the boom cradle upright just below the strut for added strength. Here is the overview photo, small as it is, of the relocated mainsheet. 106 Swim ladder steps M Posted By: Carl Haddick, Horizon Cat, Central Texas y swim ladder is made of 7/8” steel tubing, and was surprisingly rough on the unshod foot. If anyone else has a similar problem, this is what I found to be an adequate cure. I took 1 by 2 inch planking, and used a router to make a semicircular channel on the bottom of the plank. This channel fits over the ladder rungs, providing a distribution of force and helping the steps feel sturdy. I drilled one inch holes at just the right distance apart to match the spacing of the vertical rails, and then cut the plank across those holes. This gave me the right profile for the steps to grip the side rails, and to keep them from turning on the rungs. Finally, I rounded all the edges with the router, and cut a few tracks on the top sides of the steps to provide traction. To avoid drilling holes in the tubing, which I though would probably promote corrosion, I also used the router to cut channels around each end of the steps so I could use a short piece of line to hold the steps in place. They don't look too ratty, and I think the bindings are fine for a sailboat ladder. Best of all, I can use the ladder barefoot without so much trauma! 107 C Posted By: George Haycraft, Picnic Cat #29, Melonseed #253 arl, I did something similar with my Picnic Cat. I made the treads from 1 1/2 x 1 1/4 fence ballisters made from the recycled plastic decking from Lowe's. I passed the steps at an angle over the table saw to create a half parabolic channel, which I then gouged to half round with a piece of rigid copper pipe filed flat across the ends. I drilled the end holes similar to yours. I fastened mine with flathead SS bolts and nylon insert lock nuts and washers. The treads practically snap into place without the screws. 108 IdaSailor Rudder for the Picnic Cat Posted by: Will Kingsbury, PC #29 I never did get around to installing my IdaSailor rudder and I note from the IdaSailor website that it's no longer listed in its catalogue. Perhaps there just weren't enough of us. My rudder came with no documentation whatsoever and my son-in-law, who is fairly handy, came away from the attempted installation with the idea that perhaps I had received the wrong rudder. I know this is an imposition, but a photo of anyone's rudder (so we can see the shape and where the hole was drilled) would also be most helpful. Posted by: George Haycraft, PC #29 H ere's a picture of my IdaSailor rudder installed: My situation with the new rudder is as follows. Mine came with the pivot hole drilled. Installation was just removing the pivot bolt and inserting the new rudder blade. However, the new rudder would not come fully down, like the original. I removed the new rudder and compared the shape of the rudder head on the new and the original. They were a little 109 different. I made a template of the original rudder head from a side of manilla folder (light cardboard). I laid this template over the new rudder head, matching the pivot holes, and marked the original profile on the new rudder head. There was a thin arc over the top and down the front of the new rudder which was larger than the original. I used a jig saw with a metal blade to cut away the extra material and filed the edges smooth. When I put the new blade back in, it worked perfectly. If your new rudder doesn't yet have the pivot hole drilled, then a template made from your original rudder head should help you locate it just right. As you can see, my plastic rudder sleeve came with a hole in each top corner. The back hole is for the up haul line. I use a shock cord hooked into the front hole and looped over the hinge and back to the hole for a down haul. The shock cord isn't in the picture. 110 Scuppers Water Coming In Through the Scuppers Posted By: Fitz, Suncat Daysailer A while back I noted that I occasionally saw (small amounts of) water coming into the cockpit from the self-bailing drains when heeled over. Not wanting to mess with drain plugs, someone (I forget who - sorry!) suggested these transom mounted scuppers with self-sealing float balls. They may look a little funny, but since installing them, we haven't seen any water in the cockpit at all. West Marine #1930353, Flow Max Ball Scupper or Overton’s #33467 Flow Max Scupper (http://www.overtons.com/modperl/product/details.cgi?i=33467&pdesc=Flow_Max_Scupper ). Drain Tubes and Scuppers Posted By: David Green T he pvc tubes as drains don't seem to be water tight with the plugs (Picnic Cat). So on George Hayward's suggestion I bought two brass 1 x 3 drain tubes (West Marine part 355511) and epoxied them into place from the cockpit into the pvc tubes. They work perfect with the existing plugs and don't leak. Next George suggested the Flow Max Ball Scupper (West Marine part 1930353). Instead of removing the existing scupper, I just cut out the black flapper (which didn't work anyway), removed the screws and then mounted these new scuppers right on the back of the old one (the holes match perfectly) with 1 1/4 inch screws and a little marine caulk. (I left the old ones in place because they seemed really well "glued" on and the new ones fit so well right on the top of the old.) They seem to work better when the boat is not moving than the old scuppers, but if your flappers are working well I wouldn't 111 change to the Flow Max. They key for me was the new drain tubes which make solid contact with the plugs and do not leak at all! 112 Anchors Posted By: Gerald Donaldson I saw some of the posts on anchor choices, and I disagree strongly with many of them. I've been through every type of anchor imaginable, and the bottom line is that you keep a broken-down, bagged Danforth-type (Fortress) as a back-up, but do NOT use a Danforth-type as your primary anchor. They stink – they drag, they don't reset well (you find yourself across the creek, up against a bank!). Recommendations from long experience: 1. Max Anchor – had a 24 lbs. for 11 years on my Com-Pac 27 sloop. Sets INSTANTLY, NEVER drags, performs well in every type of bottom from tapioca pudding to hard sand. Needs virtually no chain expect to reduce bottom abrasion of the nylon rode. You will want the 10 lbs. model sold by Andy Peabody at Creative Marine in southern Mississippi (a prince of a guy). You will not be disappointed. It is far superior to plows (bad design) and to Brucetypes. 2. The new XYZ anchor is incredible. It only weighs 10.5 lbs., but sets instantly, requires no chain, will fit perfectly on the roller spit (you did get this, I hope?), and will dig in instantly, never drag, reset itself constantly even if you range at anchor because of bad wind and current combos. Andy Peabody sells this, too, but it is astoundingly expensive – $395.00!!!!! Made of stainless steel. www.creativemarine.com 113 Sun Cat Stability I Posted By: Gerald Donaldson have a Mud Hen sharpie that is essentially a dinghy design. Although with gear, motor, and a couple of people on board it presses 1,000 lbs.+, I never lose sight of the fact that it can be capsized, especially if one runs dead downwind which can lead quickly to a broach and overturn. I see that the Sun Cat has 300 lbs. of ballast and a foot more beam in its 17 feet than my Mud Hen. The ballast and form stability would seem, along with apparent undercanvasing, to provide for a very stable vessel. But can Sun Cats be capsized? Has anyone on the forum ever heard of a Sun Cat being capsized? I Posted By: Steve Haines, catboats, KY Lake/panhandle 've never heard of it happening, Gerald, and I think it would take an unlikely series of events to capsize a Sun Cat. But I'm sure the boat can be capsized, given lousy conditions, and, say, being pretty much blindsided by a large wave. Under less extreme conditions, the boat wants to round up when really pressed. A key point about the Sun Cat's stability is that it not only has ballast, but that the ballast is in the keel, down low. So ballast, ballast position, beam, and sail area combine to make the Sun Cat pretty safe. So my answer is that a capsize in a Sun Cat is very unlikely, but not impossible. Sun Catters? What do you all think? HAS anyone ever heard of a capsize in a Sun Cat? A Posted By: George Haycraft, Picnic Cat #29 s a former Mud Hen owner, let me comment. The boat, by design, is a capsize waiting to happen. It is a mismatch of one traditional hull form, with a different traditional rig form. Traditional hulls and rigs evolved together, for a reason. They complement each other. When you go mixing and matching the two haphazardly, you get an abomination. The narrow sharpie hull needs its original rig, a pair of low let-o-mutton sails, like the Sea Pearls. The gaff cat rig, on the other hand, needs the tremendous beam stability of the cat boat hull. The Mud Hen also has that huge flag pole mast, resulting in a lot of weight aloft. Another stability problem. Her cockpit isn't self bailing either, so green water over the side is going to stay on board, and make matters worse, until you or crew can get rid of it. Mud Hen's original sail was 10 to 15 sq ft under spec, and stretchy, and flat as a gym floor. No shape at all under 8 kts. That heavy flag pole mast also flopped about in a puff, wasting most of its energy. The good thing about those bad things was, though, that they did make the boat a little safer. I learned the hard way. I had Tom Clark, in Essex, CT; make me a real full sized sail. I also stabilized the mast with a head stay and two side stays. While the performance of the boat was much improved, what little stability it had was shot to hell. My Picnic Cat is all the good the Mud Hen was, without the bad. The Sun Cat should be even more stable. I would have gotten the Sun Cat, but it wouldn't fit under my 7 ft garage door, without removing the rig every time. Besides, I only “wanted” the cabin. I realistically didn't need it. With its stayed rig, by design, the mast section is very light. Much less weight aloft, and a lot easier to raise. The hull has the beam stability the rig needs. Even more stability on the Sun Cat, with the shoal keel. And we've got self bailing cockpits, too! I Posted By: geneWj, First Born, Bradenton, FL have carefully looked at the underbody, the hull form and the ballast of a Sun Cat, while I have never sailed one, I am an EXPERT in hull forms (stated by none other than Olin Stephens). It is my humble opinion, that the circumstances which would allow a Sun Cat to be over powered are not anything that a sailor would normally be venturing out in or caught out in. They could be capsized in the bigga ocean by a Growler or Freak wave, but then so could any other boat afloat and sailed. The conditions are just not readily available for this to happen to a Sun Cat. Gene Koblick, PHD Fluid Dynamics, Caltech... I Posted By: Carl Haddick got a ride in a Sun Cat before we got our Horizon Cat, and it was impressively stable. The dealer's representative sat on the leeward cockpit bench, and leaned back like he was in an easy chair. We had enough wind to make the major portion of hull speed, and everything was very much under control. On my Horizon Cat, if I'm curious about water coming over the rail, I'll just lean out to leeward and look. As far as weather helm, you will have a lot of it - but you can also trim it right out. Just pull the centerboard pendant up about 6 inches, and that moves the centerboard's effort aft, balancing the helm nicely. When I'm leaning over the lee watching the 114 water approach the rub rail, I have abandoned the helm and the boat keeps tracking. That means it will sail away if I fall off, but the choice is yours - if you don't want weather helm, just balance it out. G Posted By: George Boley, Capri 14.2, ex-Sun Cat erald, after I had sailed my Sun Cat for a month or two, and was comfortable with my sailing of her, I TRIED to capsize her, gradually heeling her over further and further to see if she would bury the rail or further, or if her incredibly strong weather helm would head her up into the wind. I am happy to say that it is the latter. The only way you could capsize her would be a rogue wave or a horrendous gust of wind while the sheet was cleated; in which case I suspect the mast would snap before she would capsize. I got her to heel 30 degrees (my other clinometer showed 35), and with both feet against the leeward seat and BOTH ARMS pulling with every bit of strength on the tiller, I could not keep her from heading up. A GREAT safety feature, in my opinion. The 300 lbs of “ballast” you mention is actually the stainless steel centerboard assembly. You did not hear this from me: a reliable source has it straight from a Hutchins reliable source that there is an extra 110 lbs of ballast in the keel, that no one will talk about. However, for intents and purposes, let's call it 300 lbs I Posted By: Dick Herman, Sun Cat, CA have been out in some very “sporting” conditions on San Francisco Bay. We're talking small craft warnings, winds of 30 plus knots, a confused sea with two to three foot swells with two to three foot waves blowing across at an angle. It looked like the inside of a washing machine. I was out to “howdy” the tall ships when they sailed under the Golden Gate. Most of them motored in under bare spars while I sailed along beside them under a single reef. The Sun Cat could take it, but I couldn't. 115 Outboard vs. Inboard N Posted By: Tom Ray ine out of ten Horizon Cats sold are the diesel version. Make that tenth one for me! Obviously, I'm in the minority on this one, but this seems a good place to share my reasons for preferring the outboard powered version, and asking others why they like the diesel. In no particular order: The outboard can be independently steered. It makes it easy to put the rudder one way while approaching a dock at an angle, and put the outboard the other way and in reverse, resulting in a power sliding stop alongside the dock. The outboard is quiet. Wind noise will drown out an idling Honda, but that diesel at idle sounds like the African Queen. If I wrap something around the prop of an outboard, I might free it without getting wet. I'm a real sissy when it comes to water below 80 degrees, and I don't like to swim in the ocean at night. I boat in the tropics. Sometimes, I'm in the cabin, and I don't want a 180 degree diesel down in there with me, making heat and noise. The space filled by the diesel is a nice, large storage area in the outboard version. Holes in hulls ultimately cause trouble. The diesel needs a water intake hole, a shaft log/stuffing box, and an exhaust. The only hole needed for the outboard version is above the waterline, for the fuel line. I would put an additional hole for remote controls, which are going to be messier even with the cleanest installation. That hole is still above the waterline. I hate bleeding diesels and changing the oil. I make a mess. I don't care much for working on engines in tiny spaces, either. An outboard gets worked on in a shop, next to a full tool set, under a fan, while standing or sitting comfortably. For the price of the diesel option, I can buy two really nice remote controlled electric start power tilt Hondas, and still have money left over. If one breaks, I go boating anyway with the other, and fix it later. Why drag a prop around when sailing? The downsides (for an outboard): While a 20" shaft will work fine most of the time, you really need a 25" shaft to keep the engine from cavitating when powering into a chop. Even with the XL shaft, I would think that it can cavitate if conditions get bad enough, which is the time you need it most. It would be really hard to get that diesel's prop out of the water. The remote controls are nicer on a diesel. The diesel's weight is down in the bottom of the center of the boat. Resale value on the outboard version is going to be terrible. You have to find me, and I have to have the money to add to the fleet. Finding any other buyer for the thing is going to be difficult. You're more likely to wait around for a while, and finally find someone who is willing to settle for the outboard version because you're willing to sell it really cheap just to make it go away. An outboard, especially an XL shaft when tilted, sticks way back off the transom. You can hit things with it in tight areas. The outboard's weight is hanging off the back on the port side. You can balance the outboard's weight with stuff like tools, anchors, etc that are heavy, but you might not want to/be able to store those things forward and on the starboard side. This, I think, is the big one for most people: It looks better and seems more like a little yacht without that silly outboard hanging off the stern. 116 Must Haves for a Cat Boat Y Posted By: George Boley, (original owner of Cat Nap) Sun Cat 2003 OU WILL NOT GET YOUR MONEY BACK ON A-N-Y OF THESE ITEMS WHEN YOU RE-SELL. Allowing for $5000 depreciation, I am probably going to lose another $5000 on items that I put on my Sun Cat and trailer. OK, here is my option list, in order. The first two are so important that I can't separate them: 1 Anchor roller. There is no place forward for the anchor. Without the roller, the anchor goes in a stern lazarette. I would not own a boat that had to carry its anchor in the stern. 2 Lazy jacks. Besides the obvious, intended, use of the lazy jacks, they also come in handy for raising the boom to keep it from hitting the crutch when reefing or lowering the gaff slightly in light air situations. I couldn't sail my boat without the lazy jacks. 3 Bimini. I live in Texas. I was AMAZED at how effective the bimini is. Besides providing shade, the slightest breeze blows thru it to the extent that you can feel in on your face. The rest of these I would not have enjoyed sailing my boat without, but they are money losers: 4 Idasailor foil rudder. Ingenious. 10 degrees closer point on each tack. 'Nuff said. 5 Trailer guides on trailer. Paid for themselves the first time I had to put the boat onto the trailer. 6 Compass and Depth Sounder. 7 Trailer: Tongue jack is a MUST, as the tongue is too heavy to lift without it (makes for WONDERFULLY STRAIGHT trailering!). Spare tire assembly and UV covers for wheels = a waste of money. 8 Cockpit Cushions. 9 Two teak racks, one essential, one not. Russ Browne gave me this wonderful idea: install the binocular/drink rack on the inside of your bottom hatchboard. That way, you can turn the board around when sailing, and have access to your binoculars, VHF, GPS, wind indicator, etc. etc. Magazine rack inside = waste of money. 10 Electrical System - for Depth Sounder and running lights. 11 A lot of the “standard equipment” I never needed, as the boat is so maneuverable (boat hook, oar, etc.). 12 I added things that you might decide you need later: quick-release fitting for gas tank, bar buoy drink holders, Perko fender locks, small battery charger for battery, matching sunbrella covers for everything, Windex, ss/teak flagstaff on transom. 13 BIGGEST WASTE of MONEY, TOTALLY USELESS: Forespar Tiller Extension and Lock Box. This was the ONLY thing that I regretted buying soon after installing it. The cockpit is so narrow that you have to get the short extension, and it is not long enough to reach to the front of the cockpit. And the basic design of the boat-tiller-rudder combo is so “loose” that the boat will NOT hold a course with the tiller extension locked in a specific position. A Comments from others re you sailing alone or with crew? (Spouse, Girl Friend, Kids, or Grandkids) If with crew - you must make the crew comfortable. Good Gloves to protect her hands. Good, dry, and warm foul weather gear - for her. The skipper can freeze his butt off, but keep the crew comfortable. Get very comfortable life jackets. One of the inflatable kind. I have always had cockpit cushions. They are a pain. I trip over them and they are hard to store. However, guests and crew find them comfortable. Keeps their butts warm and soft. DON'T ever raise your voice to the CREW. NEVER!!!!!! DON'T ever scare the crew. NEVER!!!! When the wind picks up, drop the main and head home. The crew will eventually gain confidence and you can sail on with one, two, or three reefs. Reef early and often. Take a reef in the first few times you sail. Learn how to do it. Teak Cockpit Grates The teak cockpit grates are expensive but really look cool. Because there is water splash coming from the centerboard trunk these grates will keep your feet and anything that falls to the deck dry. 117 Tiller Tamer A tiller tamer is useful when hove-to and when setting a reef. For $35 it is an inexpensive and useful option. The canSail Marine Supplies Tillerlock is very popular. Another tiller tamer that really looks good but is expensive is the UK based Tillermate. And maybe the most common is the Tiller-Tamer from Davis. http://www.tillermate.com http://www.cansail.com http://www.davisnet.com/marine/products 118 Marshall vs Menger vs Com-Pac Patrick Maguire have owned two Marshall Sanderling's, a Menger 19, and now a Com-Pac Sun Cat, which might (surprisingly) be the Iright one for me. First, you can't go very wrong with any of the above. Here are my impressions. (please keep in mind that these impressions are based upon the boats with me at the helm. I may detract from the net value of a boat just by stepping aboard.) The Marshall's were the best sailing boats. Faster and slightly quicker to tack. More weather helm than the others and they heeled more. I did not like the Marshall construction. The bulkhead and cockpit are made (cored? is that right guys?) with plywood. Water can get in the wood and delaminate. Sailing without a reef in winds over 15 can encourage this. I never reefed and as Bill Menger told me I was sailing the boat apart. See what feedback you get on this site but I expect many boats 10-20 yrs. old have had or will need a rebuild of the cockpit or bulkheads. Please, Marshall folks, I am not implying Marshalls are not well made. On the contrary, compared to production boats they are battleships. But I had two and had the same problem in both. It's a weakness you should watch for. The Menger was a well made beautiful boat. The max beam is further forward than in a Marshall so the cockpit is slightly smaller (but the cabin is larger). The Menger is more of a “seaboat” The cockpit design is more suited to open water and is solid fiberglass. I had a diesel in mine. Mistake for me. I am mechanically disadvantaged. (When I hooked up my DVD there was blood on it). I was sailing one day and a Sanderling put her sail up about 1/2 mile away. She rolled me in about 1/2 hour. Sold the Menger. Now that Bill Menger has passed I predict the 19s will hold their prices well. The Com-Pac is growing on me. I always wanted a blue hulled boat and in spite of conventional wisdom I got one and am glad I did. Very well constructed. The rig is still a gaff but some modern features like a traveler. The mast is slightly further back and the stays limit how far you can let the sail out when running. But that may force you to reach more than run and therefore avoid an accidental gybe. I still think she is under rigged for a light air area. Someone on this site (Jim B? if not sorry, don't want to put word in anyone’s mouth) told me to consider it as having main and working jib as opposed to genoa and that seems to be spot on. That's perfect for me as I don't like getting up and reefing. The first reef may already be in. The worst trade off here is in light air in chop thrown up by powerboats. But she tracks well and has a very neutral (for a catboat) helm. I keep mine at a mooring but the advantages the Com-Pac has for trailering are obvious. As for Sanderling's passing me by, well now I just put up the Bimini and wave. If I had to choose from these three I would buy the one in best condition in the same price range. For day sailing and catboat racing the Marshall 18 is hard to beat. You can heel it over and bury the rail and from the high side, see green water going by the porthole. But that will mean you should have reefed already and are fighting the helm for your life. If you’re going to overnight a lot or venture offshore for a few hours Menger is your boat For trailer sailing - the Com-Pac can't be beat Having said that any of these boats will be a great choice. Since it's still a niche market the construction of these boats is above normal production boats 119 Picnic Cat Review H Posted By: Carl Haddick, Horizon Cat/Picnic Cat, Central Texas ope none of this is boring or repetitive, but I'd like to do my part to spread the good word. Picnic Cats are delightful boats. We got ours to serve as a scouting vessel for our Horizon Cat, so I could launch and explore and get depth soundings, in advance of launching our bigger catboat. It also opens up sailing where our Horizon Cat won't go - my favorite ramp on Lake Limestone is separated from the lake by 2.4 miles of stump-filled creek, some of which is barely a foot deep, and I have to get under a low narrow bridge. I thought about a Sea Pearl, but I wasn't sure about setting the boat up on the water. Two masts, plus a bit of initial tenderness in the Pearl, from what I hear, made the Picnic Cat sound like a better choice. I've sailed our delightful little Picnic Cat at least a dozen times, and have visited four lakes in her. Only once have I sailed from a ramp that allowed me to set up the mast before launching. I think the boat points well with the standard plate metal rudder, but I've heard an Idasail rudder is a nice upgrade. For the shallow water I sail, even if I got an Idasail I'd often still use the stock rudder, because of the environment I sail in. There is a realitively narrow angle where everything is on the numbers, at least when pointing high, but that's pretty much true with any boat. With the leech telltales flying nicely, fall off just a little and they will start to curl to windward, or head up just a little and the luff will start fluttering. I don't find that narrow sweet spot objectionable - it's just that the boat keeps you informed about how she wants to sail. My least favorite aspects of the boat are the seat latches. If I were ordering a Picnic Cat, I think I would order it without seat latches and install them myself. Mine came with brass hooks for seat latches, and I just don't trust them. One is way too tight, but holds well, and the others don't have a very secure grip. Since air under the cockpit seats is a Good Thing in these boats, I worry about those latches. It's also a little bit of a reach to get to the outboard tiller, but each time I sail that gets a little easier. Mostly I just look for ways to minimize steering with the outboard. I've singlehanded in waves deep enough and close enough together to press the bow pretty far into the waves, and I've found the boat to be responsive and fun in light air. In winds reported to be 20-23, I was able to manage the boat without difficulty, singlehanding. That wasn't white-knuckle sailing, and it would take more wind than that to hit my panic button. In fact, I've jibed under full sail with whitecaps appearing - just make sure your centerboard is all the way up, and closehaul the sail enough to flatten it before the jibe. Don't try it at all, in fact, until you learn a little about the boat. I jibed under moderate wind on my first sail and scooped up a cockpit full of water - the centerboard really does need to be _all_ the way up! The centerboard balances the helm, just like it does on our Horizon Cat, but higher than a dead run I only need to trim it up a few inches. Raising, lowering, or reefing the sail is no trouble at all, but I rigged adjustable lazy jacks that also work as a topping lift. The trick there is some kind of automatic cleat for the lazy jack line so it's a just a quick tug to set or release the lazy jacks - I used a lance cleat. When it's time to drop the sail, I round up into the wind and take the weight of the boom with the lazy jacks. I also drop the centerboard all the way, which will help it stabilize about 45 degrees to the wind. I drop the sail while standing in the front of the cockpit, and my weight forward helps add weather helm. That's a cool thing, because if the boat falls off the wind I just pull the boom in a little bit. Grabbing a little wind with the boat balanced for weather helm has an amazing effect - it feels like someone grabbed a stern line and gently pulled you around to point back upwind, even if the sail is almost all the way down. It is such a pronounced effect that I will sight past the forestay while I pull the boom in, lest I bring it back to the wind too quickly and fall off on the other side. Pretty cool - stand in the pointy end, leave the tiller free and unlashed, and still have control over the helm. I like that. Singlehanding is a snap, but with ten foot cockpit seats you can carry a crew, too. I've had three adults (counting me) on board, and there was plenty of room. I was at the tiller most of the time, and my friends were able to stretch out and be comfortable. Your mileage may vary, of course. I've sought out boats to serve a more serious purpose than mere racing - I want to explore. My boats need to be quick to set up and easy to singlehand, and they need to safely carry me and my gear where I've never been before. Both our boats are great for that, but it's the Picnic Cat that takes me where few sailboats are ever seen. 120 There are many ways to have fun on the water, of course, but I am completely satisfied with our Picnic Cat. Melonseed, Marshall, Arey's Pond - there are plenty of boats that outclass the Picnic Cat in terms of traditional credentials, but I have not found that to bother me very much. 121 HA-18 Versus Sanderling D Posted By: Beau Schless oes anyone know of a comparison of the America versus the Sanderling? I'm in the market for a used one, and the prices seem to be relatively the same (maybe the Marshall is a little more, but not extravagantly.) Posted By: Howard Toft I t all depends who you ask. Since I own a Sanderling I can tell you all the good things about it but I don't know a great deal about the HA-18. In comparison the Sanderling is 6" wider than the HA-18 and does not have an outboard motor well as the HA-18 does. This is some of the reason that the Sanderling is much faster. We have owned the Sanderling since it was new in '72 and have been totally satisfied. I remember sailing near an HA-18 and literally going around in a circle around it. The Sanderling is still being built the same way it was in the '60s and parts and help from Marshall Marine are always available. I haven't needed much but I never have a problem getting what I do need. I would expect a bigger price difference in the used boats. What I have seen is that the Sanderling holds its value very well. I don't think you would be unhappy with either boat but I obviously would lean towards the Sanderling. I did do a search for information once and found a review of 3 catboats, one of which was a Sanderling, the other two I don't remember. Try a Google search with the word "reviews" included. If you have any specific questions let me know. Posted By: Don Southwick I agree with Howard about who you ask. I have an older HA-18 (1973) and we work on a few different catboats here at our marina. I like the motor well in the HA-18 mainly for the look. With the classic lines of the cat, the hidden motor in the well takes nothing away from the look of the hull. It does slow the boat down a bit but if you aren't racing, then why the need for speed. Also the outboard brackets on the transom have been known to snag the mainsheet once in awhile. As far as cockpits go, the Sanderling has more walkaround space with smaller seats, and the Ha 18 has larger seats and smaller walkaround room. The cabin on the HA 18 is slightly higher giving more sitting headroom in the cabin than the Sanderling. The availability of parts is the biggest difference between the two. I have just about made everything I have needed to restore my HA 18 where with the Sanderling; all that is needed is a phone number and a checkbook. It really comes down to personal preference. You should get on both boats to see how you fit. Good luck with your hunt. 122 Lengths and Surface Area Posted By: Kristen Posey, Sanderling (A naval architecture lesson) Lengths vs. Surface Area are two totally different things. Length in a unit, surface area is units^2, and happens to cover a volume of units^3. You add 8 feet, you add a whole lotta boat, and not just in length. The Outward Bound30s (OB30) are probably more robustly built by far for their intended mission. Not that Graham's a cheapskate, and not that I've seen his SS, but what I mean is the OB30s are for passengers, they're open, and they're supposed to take people away from land. The Southern Skimmer (SS) is more optimized for the EC challenge. The stresses and things asked of her are different. As much speed as possible. The OBs are focused on keeping crew safe and providing an ok experience with fairly minimal accommodations. For SS, an enclosed space provides some floatation as well as some closed structure, which the OBs don't really get to have--they have some enclosed spaces for floatation, gear, and such, but it's an open open boat. Now, could you take an OB30, re-write its mission, and come up with a boat that has sorta similar looks and sailplan, but more optimized for the EC? Oh heck yeah. She'd be lighter, the lines would change a bit--Southern Skimmer more approximates a sea sled than a long slender canoe, doesn't she? We could build our redesigned OB30 from carbon and Kevlar. Take out some of those seats, and simply raise the watertight sole and compartments some for increased floatation and storage for gear low in the boat. As for those masts, you might just get those carbon too, if you had the $. (And, uh, I prefer wishbones, but that's me.) Go back and look at the GA (General Arrangement, the sheet that shows the boat drawing from the side with the sails up) for the OB 30. In the Prinkers (me-speak Principle Characteristics) you'll find some intruiging data. First, LOA, LWL, BOA, BWL. Ignore the LOA and BOA for now, that just tells you what kind of dock size you need. LWL and BWL are Length and Beam at the Waterline. That's the meaty information. Length to Beam ratio for the boat is: approx 4.4. She's a long slender gall. Don't have the numbers on SS, but you can do the division if you do. Different missions for different boats. As for the weight... there are three weights given. Lightship is the boat, no gear, no fluids, no nuthin. Just the boat by her ownself. Running off the beach in a race, you'll have packed lightly, you'll not be on the boat, you'll be out pushing, so the push off the beach weight would be whatever your light gear is + the lightship, since your own butt comes later. They then show a 1/2 Load and a Full Load. This is people and their stuff, tankage, gear, toilet paper, toothbrushes all on the boat. That's quite the cargo. They mean to carry a lot of folks, and food for all those people for a week. Now, there are some other totally cool bits of information here. Prismatic and Block Coefficients. They're "form characteristics" that tell you things about the hull shape. The Prismatic Coefficient is, specifically: Cp = Volume of Boat when loaded to design Waterline /(Waterline Length * The cross sectional area of the boat at its fattest point). Basically, if you made half "cylinder" with the boat at its fattest point, the length of the waterline, what percentage would the actual volume take up of that. Then there's Block Coefficient: Cb = Volume of Boat/(Length * Beam * Draft) (That'd be draft without keel or rudder, or canoe body draft). That's drawing a box of the outer dimensions of your submerged body and determining the percentage of that volume taken up by the real body. These numbers are a little hard to make useful till you've been using them alot, but the best thing to do is make a list of boats, and start comparing the values. Wetted Surface Area. That would be, the square footage of an imaginary blanket covering exactly the submerged bits of the boat. You could, using a finite analysis, calculate out what that would be, approximately, if you had the lines plan to that old thing. Fortunately, engineers are lazy as hell and don't feel like that most of the time, so for different hull types we have different approximating equations that we use for the preliminary stages of design. Here is a wetted surface area equation for... a trawler, which won't work for you (um, my sailing books are not at work, mostly, and I don't have my thesis hard drive here at the moment, but I'll see if I have a better equation later) S = (Volume/Beam) * [(1.7/Cb) + (B/T) * (0.92 + (0.092/Cb))]. But that's for a hippo of a boat, not the sleek ladies we're talking about, so don't apply it for anything but hippos, and always remember that it's an AOF (Approximation from some Old Fart, that's another personal term), so take it with a grain of salt. (Equation from Schneekluth & Bertram) Generally, there are many grains of salt and the whole consideration of vessel design is black magic. Now... what else can we glean out of this... oh. Displacement Length Ratio. Ratio's a dumb word because it's not just a simple division, since they take it down to the same units first. It is: Displacement (in long tons) / ((.01 * LWL)^3). A long ton = 2240 lbs. It's a naval architecty thing. Now evil minded person that you are... since you have that "Ratio", what would the approximate new weight of the OB30 be, if it was the same length as SS? 123 Sail Area to Displacement Ratio... that's... SA/(Volume^(2/3)). Now...make sure where I say displacement to use the weight in pounds, and when I say Volume, use the volume of the water it displaces. The factor is the density of the water (either fresh or salt). Fun geek homework task is to get a list of your favorite boats or whatever you'd like to compare, and go into Excel, record all of their prinkers, and calculate out all of these values, and hemm and haww over the resulting charts. Now that I've gone through and written all of this... maybe it's better to just look at Ted Brewer's website, which doubtless wasn't written hastily on a lunch break and didn't comprise the entire bit of naval architecture Ted did in one day, myself now being a too highly educated drafter at the moment. http://www.tedbrewer.com/yachtdesign.html He has a book as well. Did you ever get Larsson and Eliasson's book? You know what, though, get that book by Dave Gerr that Rachel mentioned. That's the most important thing to read right now, with you building that boat. You can start your design career once you're done doing your building internship. 124 Melonseed Conversion Posted by: Gorge Haycraft, MS#253 About five years ago, I finally realized no one in my family cared for sailing except me. Before, I thought if I could just find the right boat, they would come. Not being very bright, I went through a dozen small boats during thirty years before the light finally came on. I only needed a boat for one, or at most, two on rare occasions. My attitude now is if anyone wants to go sailing or learn to sail, I'm willing to help, but they must want it bad enough to have their own boat. I'm through doing all the work for guests who whine. At the time, I had a three boat fleet. First, I sold a Drascombe Scaffie. The Picnic Cat followed. I kept only the Melonseed. The Scaffie and the PC were both fine boats, but the MS was the only one I could manage totally from home. During the season, it lives on the trailer in the garage ready to go, and my truck lives outside. For winter, I suspend the hull from the garage ceiling, and partially disassemble the trailer for storage in the push out corner of the garage. My truck comes inside. For three years, I've appreciated this arrangement. No more trips to the storage lot 25 minutes away, and no more monthly fees. During the last ten years, I developed some dissatisfaction with the Melonseed due to age and local sailing conditions. My hips and knees ache after a time sitting cross legged on the MS floor, and I tire of rotating myself 180º every tack on the narrow windward/leeward 140 acre lake I sail on. I'm becoming envious of sailors who sit in a seat and always face forward. With that in mind, I began looking at a Hobie Revolution 13 with sail add-ons, the Hobie Adventure Island, or a Triak, none of which I felt totally comfortable with the more I read. However, I would not have discovered a potential solution without reading about those alternatives. My plan is to modify my Melonseed to suit my preferences. It involves a combination of three changes: increased stability, forward facing seating, and steering. First, I will increase stability by adding beam with a set of Spring Creek kayak stabilizers. The floats are 42"x6"x6". The kayak mounting brackets should easily adapt to the Melonseed's oarlock sockets. I just need to get the main cross bar a custom 56" for the MS beam. I've read the Spring Creek stabilizers described as "agricultural" in appearance, but they look simple and robust enough to do the job. With their stability added to the MS's beam, I should be able to sit facing forward without having to rotate 180º on the floor every tack. 125 They would look approximately like this on the Melonseed hull: Second, I plan to sit on a Sport a Seat strapped to the floor boards just in front of the cross bar. I'd like to keep my seat, and therefore, my weight, as low as possible in the hull, but I need to be high enough my hips and knees don't get too sore and stiff. I may raise the seat with one or two boat cushions. This puts my center of mass very near the max hull volume of the MS, facing forward, but well in front of the tiller. So, third, I plan to add a steering line around the interior of the cockpit coaming. I had already added small two leg cleats to the four interior corners of the cockpit coaming, so the hard work for that was already done. I just needed to attach small blocks to each corner cleat. I'll tie the squared circular steering line to the tiller. Along one side, I may add a section of bungee cord to tension the line. Steering would be by a push/pull of the line along either side of the cockpit. 126 The mainsheet will be led forward to a double block (one steering, one sheet) at a cockpit front corner and then back to hand. I'll sit at a good height facing forward, with the one hand for the sheet, and one for steering, as before. The steering line may have enough friction to let it go for a short time. I could think about a cleat for the main sheet later. The steering is critical for the idea as a whole to work. Fortunately, I can set the steering up cheaply and try it first. I can drop the hull down from the ceiling when I want to work on it. The only cost will be a few small blocks and some line. If the steering works, I can add the kayak stabilizers and the seat in time for an early spring lake trial. Recently, I lowered the hull from the ceiling and did a trial set up for the steering line and seat placement. There were only a few minor surprises, and they were good ones. The steering line requires no added bungee cord for tension adjustment. I have a bowline loop at one end, and a rolling hitch for adjustment at the other. Photos show the bowline and rolling hitch joining of the port side. Eventually, I plan to have them on starboard. It was just easier to work in the garage from the port side. A simple constrictor knot worked fine at the tiller. There's a short section of small plastic pipe on the line forward to keep it from rubbing against the centerboard trunk. It was easy to get the tension in the steering line to adjust anywhere between what was obviously too tight and too loose. Just right will probably need to be set on the water. I didn't bother to drop the floorboards in for these photos. They will raise the seat a couple of inches. The tiller naturally swings in a downward arc toward the blocks in each corner. That's all the throw I would normally use. The tension seems constant throughout the swing. I should be able to get it just tight enough to 127 hold a little weather helm hands off. Of course, the Melonseed faithful will decry the loss of the exquisite finger tip sensitivity of tiller, but they may remain sore arses if they choose. The Sport A Seat is in relative position here. It places my mass very near the maximum fullness of the hull. The Opti Air bags will have to move back under the side coamings so I will have leg room under the fore deck. The centerboard adjustment is easy to reach. The sheet will be led forward to the top pulley of the double block in the forward port corner, a short lead to my hand. There's room for a small clam cleat for the sheet to be mounted on the teak top of the centerboard trunk if I want to. The same one I removed from the tiller. 128 Here's a couple of edited pix. The yellow line is the main sheet. It will go forward from the block on the rudder to a port side block or fairlead hanging from the cross bar for the floats. From there, it will go forward to the top pulley of the double block in the forward port cockpit corner. From there, it will lead back to hand. 129 This alternative shows the sheet forward leading across the cockpit to starboard laying across the small clam cleat I removed from the tiller. The little clam cleat will be mounted cross ways leading left to right immediately behind the cockpit coaming on the centerboard top block. It will be quick to reach forward and flip it up out of the cleat whenever I need to. The clam cleat lacks the built-in fairlead. It holds the 1/4" 3 strand pretty well if you push it down into the cleat. I don't want it to grab too hard. It needs to be easy to flip out quickly. 130 Here's a blow up of that area. The centerboard pennant comes up out of the block immediately behind its cleat and leads forward. There's room between the coaming and the c/b pennant hole to mount the little tiller cleat cross ways, leading left to right. It will be 90º to the pennant cleat. 131 The back half of the cockpit is open for gear or a passenger who will stay away from the steering lines. If the passenger is capable/willing to steer, the steering lines can quickly be removed. It also occurred to me, depending on how much stability the floats add, these modifications might make the MS a safe alternative for disabled sailing, only arms required to sail. I'm now awaiting the arrival of the parts from Spring Creek. In addition to the stabilizer floats, I ordered the plug in 16" wheels, to take the place of my Seitech dolly. I can wheel the boat into the water, unplug the wheels, and plug in the floats. Floats or wheels could be carried in the rear half of the cockpit, depending on which was in use. The wheels are the same size as the ones on my dolly, and the set up is rated for 250 lb. The wheels plug into the universal receiver bar, just like the floats. The only difference is they plug into both channels of the bar, instead of one like the floats do. Fore and aft swing of the wheel legs is controlled by nylon web straps across top of the boat. The Melonseed's fore and aft cockpit coamings should be great guides for these. 132 I may also add a small plug in transom to the universal cross bar for my 14 lb. thrust electric trolling motor. The telescoping arm of the side float passes directly through it. This will be less expensive and a lot less work than selling the MS and doing a sailing kayak and trailer set up. It just makes sense, now that I think about it, to make a few additions to the MS to get the comfort and stability I want, rather than trying to make a comfortable, stable sailboat out of a kayak. Most important, NO HOLES WILL BE DRILLED in Roger Crawford's precious Melonseed for these modifications. He doesn't have to faint! I can quickly remove everything in a few minutes, and no one would be the wiser. Well, except for those cleats in the four corners, which have already been there for a few years. In addition, I get to keep all the Melonseed's advantages. The boat's hardware all just plain works. Garage storage is already worked out. My weight represents a smaller percentage of the boat's carrying capacity than any of the kayak alternatives. The cockpit is dry and has plenty of room. There should still be space for a grand kid or two, even with this gear in place. Temporarily remove it, and I could carry all three. I hope the aluminum cross bar and gray floats won't detract too much from the Melonseed's looks, but if they get the job done, who cares? Bet if this works and I post it to the Melonseed email group, the choir will have a hemorrhage. New Melonseed Trimaran? They've sold a few Sea Pearls that way! 133 Points of Sail Copyright © 2009 by Shel Miller Contact SchoolofSailing.net here, by phone: 802 578-3524, or by snail mail: 150 Dorset St. PMB 169; S. Burlington, VT 05403 USA School of Sailing Florida location: 922 N.E. 20 Ave.; Ft. Lauderdale, FL 33304 USA Points of sail are defined by the angle of the wind coming over the boat relative to the bow. Looking straight ahead at the bow would be looking towards the top of the clock or, 12 o'clock. Running. This puts us directly downwind with the sails let out at right angles to the centerline of the boat. The wind is at a relative bearing of 6 o'clock. We want to expose as much sail area as possible. Sail trim is not critical, small adjustments don't make much difference in our boat speed. Note: The standing rigging on most boats will not allow the mainsail to eased far enough out. That's ok, let it out to the point just before the sail touches any rigging (so as to prevent chafe) then tension the boom vang to bring the boom down. Broad Reach. Here the wind is over one of our back shoulders or at a relative bearing of about 4 o'clock or 8 o'clock. We may adjust the sails but sail trim is not critical. Just as in running above we probably won't be able to let the mainsail out beyond just where it starts to touch the rigging. 134 Beam Reach. Now the wind is coming across the boat at a right angle to the centerline, the relative bearing would be 3 o'clock or 9 o'clock. In order to make the sails most efficient we adjust (trim) them for maximum boat speed. Close Reach. Now, the wind is coming from ahead of the boat with a relative bearing of 2 o'clock or 10 o'clock. The fastest point of sail for most boats. Sail trim is critical for our boat speed. Telltales on the sails will tell us how to trim. The basic idea is to let the sails out until they luff (flap) then bring them in just to the point on no longer luffing. Close Hauled (or Beating). This is defined as the closest to the wind we can efficiently sail and is usually a relative bearing of 1 o'clock or 11 o'clock. On this point of sail the sails are brought in as close to the centerline of the boat as possible. Here, we will be making small changes to our course to fill the sails since we already have them trimmed in all the way. When the wind is coming over the starboard side (boom on port) of the boat we are on a starboard tack. Likewise, when the wind is coming over the port side (boom now on starboard) we are on port tack. This is important to know because the rights of way for sailboats hinge on which tack each boat is on. To learn more about rights of way between boats go to Avoiding Collisions. When sailing we are usually headed towards some sort of destination. Pointing the boat towards our destination would be the first step followed by adjusting the sails to allow us to maintain good boat speed in that direction. Often times this is all we have to do. If, however, our destination lies directly upwind we will have to sail close hauled on one side of the wind then change tacks to the other close hauled side. Changing tacks by putting the bow of the boat through the eye of the wind is called tacking. The above diagram gives a rough idea of how sails should be trimmed for any point of sail. We are looking for smooth air flow over both sides of the sail with no luffing. When we have that, our sails are properly trimmed. We often employ telltales to help us determine not only the wind direction but also proper trim. 135 Flag Etiquette F lag etiquette has been transmitted to us by generations of mariners. Although not often appropriately respected these days, especially not by charterers, we might add, observing flag etiquette can provide some pride of perpetuating a very old tradition as well as some fun. We will not get into deep details and purist fanaticism. However, we will try to show charterers the minimum that is expected for basic respect of rules. Therefore, we will only talk here about 4 main flags, potentially used by charterers and charter boat owners: the Ensign or the National flag; the club burgee; the Private Signal; and the Courtesy Flags. The Flags Ensign Boats should fly the National Flag. Most pleasure boats in US waters have a choice of two. The yacht ensign, with its fouled anchor over a circle of 13 stars, the “Betsy Ross” flag. Originally restricted to documented vessels only, it is now commonly flown on recreational boats of all types and sizes instead of the National Flag. The 50-star flag “Old Glory” you are familiar with. The appropriate time to fly the ensign is from sunrise to sunset, except when racing. However, whenever a boat is taken into international or foreign waters, the 50-star U.S. ensign is the proper flag to fly and the yacht ensign not to be displayed. In other words, if you own a US boat in the British Virgin Islands, you should not fly the Ensign, but the National Flag. U.S. Yacht Ensign U.S. Flag Boats today fly the ensign from the stern, which provides the best visibility, but it can also be flown from the leech of the most aftersail. When flown from the stern, it should be on a staff (pole) that is sufficiently long and angled, and that is offset to one side (traditionally the starboard side), so the flag flies clear of engine exhaust and rigging. Burgee It is a small flag displaying the symbol of the skipper's yacht club or other sailing organization. It may be flown day and night. The Catboat Association Burgee Most people opt to fly the burgee lower in the rig, hoisted to the end of the lowest starboard spreader on a thin flag halyard. While purists rail this practice, it is an accepted adaptation of another tradition, which is that the starboard rigging is a position of honor (when you visit a foreign port, that's where we fly the host country's flag). Besides being 136 reasonable, flying the burgee in the starboard rigging is such a widespread custom that to try to end it would be close to impossible. Private Signal It is a small, custom-designed, and custom-made flag that carries symbols standing for the owner, so it can basically be anything. The signal may be flown day or night, but is not displayed when another sailor is in command. (The rule is: the private signal and burgee follow the sailor, not the boat.) On a multi-masted boat, the private signal is flown at the head of the aftermost mast. On a sloop, the private signal may be flown from the starboard rigging, either below the burgee or alone. Brent Putnam’s Private Signal Marshall 22 – Cranberry Courtesy Flags As a matter of courtesy, it is appropriate to fly the flag of a foreign nation on your boat when you enter and operate on its waters. There are only a limited number of positions from which flags may be displayed. Therefore, when a flag of another nation is flown, it usually must displace one of the flags displayed in home waters. However, it is hoisted only after the appropriate authorities have granted clearance. Until clearance is obtained, a boat must fly the yellow “Q” flag. All charter boats should carry the national flags of neighboring islands as well as the yellow flag, in case charterers want to visit those islands. The courtesy flag is flown at the boat's starboard spreader, whether the United States ensign is at the stern staff, or flown from the leech. If there is more than one mast, the courtesy flag is flown from the starboard spreader of the forward mast. As a side note, some authorities are not amused at all if you fly their courtesy flag using an old, raggy flag. Some will even fine you for disrespect! It happened to a friend of mine who was chartering in Turkey. Lastly, it is also a common courtesy to fly the national flag(s) of your guest(s) on board, if they have a different nationality than the ensign is showing. Flags' Dimensions Although flags come in standardized sizes, there are guidelines to help you selecting the proper size for your boat. The size of a nautical flag is determined by the size of the boat that flies it. Flags are more often too small than too large. So in the rules below, round upward to the nearest larger standard size. The flag at the stern of your boat: U.S. ensign or national flag should be about one inch for each foot of overall length. For example, on a 40ft. boat, the ensign should be 40 in. i.e. about 3.5ft. Other flags, such as club burgees, private signals and courtesy flags for use on sailboats should be approximately 1/2 inch for each foot of the highest mast above the water. For example, on a 30ft. boat, with 50ft. between the masthead and the water, the burgee should be about 25 in. i.e. about 2 ft. The shape and proportions of pennants and burgees will be prescribed by the organization which they relate to. Raising and Lowering Flags Fly the ensign from morning (8:00 a.m.) to evening (sunset) whether the boat is at rest, under sail, or under power. The exception to this rule is: The ensign is not flown by a boat in a race, which signals to other boats that you are racing. 137 To prevent wear and tear, the flag may not be flown when out of sight of other vessels or when nobody is aboard. The flag is flown while entering or leaving a port, even at night. For purists: In the morning, the ensign is hoisted rapidly before other flags. In the evening, it is lowered slowly and with ceremony after other flags come down. 138 Renaming a Boat I Vigor's Interdenominational Boat Denaming Ceremony by John Vigor once knew a man in Florida who told me he'd owned 24 different yachts and renamed every single one of them. “Did it bring you bad luck?” I asked. “Not that I'm aware of,” he said. “You don't believe in those old superstitions, do you?” Well, yes. Matter of fact, I do. And I'm not alone. Actually, it's not so much being superstitious as being v-e-r-y careful. It's an essential part of good seamanship. Some years ago, when I wanted to change the name of my newly purchased 31-foot sloop from Our Way to Freelance, I searched for a formal “denaming ceremony” to wipe the slate clean in preparation for the renaming. I read all the books, but I couldn't find one. What I did learn, though, was that such a ceremony should consist of five parts: invocation expression of gratitude supplication re-dedication libation So I wrote my own short ceremony. Vigor's inter-denominational denaming ceremony. It worked perfectly. Freelance carried me and my family many thousands of deep-sea miles both north and south of the equator, and we enjoyed good luck all the way. I used the same ceremony recently to change the name of my newly acquired Santana 22 from Zephyr to Tagati, a Zulu word that means “magic,” or “bewitched.” We're hoping she'll sail like a witch when I finally get her in the water this summer after an extensive refit. I'll give you the exact wording of Vigor's denaming ceremony, but first you must remove all physical traces of the boat's old name. Take the old log book ashore, along with any other papers that bear the old name. Check for offending books and charts with the name inscribed. Be ruthless. Sand away the old name from the lifebuoys, transom, top-side, dinghy, and oars. Yes, sand it away. Painting over is not good enough. You're dealing with gods here, you understand, not mere dumb mortals. If the old name is carved or etched, try to remove it or, at the very minimum, fill it with putty and then paint over. And don't place the new name anywhere on the boat before the denaming ceremony is carried out. That's just tempting fate. How you conduct the ceremony depends entirely on you. If you're the theatrical type, and enjoy appearing in public in your yacht club blazer and skipper's cap, you can read it with flair on the foredeck before a gathering of distinguished guests. But if you find this whole business faintly silly and embarrassing, and only go along with it because you're scared to death of what might happen if you don't, you can skulk down below and mumble it on your own. That's perfectly okay. The main thing is that you carry it out. The words must be spoken. I compromised by sitting in Tagati's cockpit with the written-out ceremony folded into a newspaper, so that any passerby would think I was just reading the news to my wife, sitting opposite. Enough people think I'm nuts already. Even my wife has doubts. The last part of the ceremony, the libation, must be performed at the bow, just as it is in a naming ceremony. There are two things to watch out for here. Don't use cheap-cheap champagne, and don't try to keep any for yourself. Buy a second bottle if you want some. Use a brew that's reasonably expensive, based on your ability to pay, and pour the whole lot on the boat. One of the things the gods of the sea despise most is meanness, so don't try to do this bit on the cheap. What sort of time period should elapse between this denaming ceremony and a new naming ceremony? There's no fixed time. You can do the renaming right after the denaming, if you want, but I personally would prefer to wait at least 24 hours to give any lingering demons a chance to clear out. (Scroll down for the wording of the ceremony.) Afterwards Now you can pop the cork, shake the bottle, and spray the whole of the contents on the bow. When that's done, you can quietly go below and enjoy the other bottle yourself. Incidentally, I had word from a friend last month that the Florida yachtsman I mentioned earlier had lost his latest boat, a 22-foot trailer-sailer. Sailed her into an overhead power line. Fried her. She burned to the waterline. Bad luck? Not exactly. He and his crew escaped unhurt. He was just very careless. He renamed her, as usual, without bothering to perform Vigor's famous interdenominational denaming ceremony. And this time, at long last, he got what he deserved. 139 Vigor's Denaming Ceremony In the name of all who have sailed aboard this ship in the past, and in the name of all who may sail aboard her in the future, we invoke the ancient gods of the wind and the sea to favor us with their blessing today. Mighty Neptune, king of all that moves in or on the waves; and mighty Aeolus (pronounced EE-oh-lus), guardian of the winds and all that blows before them: We offer you our thanks for the protection you have afforded this vessel in the past. We voice our gratitude that she has always found shelter from tempest and storm and enjoyed safe passage to port. Now, wherefore, we submit this supplication, that the name whereby this vessel has hitherto been known _____, be struck and removed from your records. Further, we ask that when she is again presented for blessing with another name, she shall be recognized and shall be accorded once again the selfsame privileges she previously enjoyed. In return for which, we rededicate this vessel to your domain in full knowledge that she shall be subject as always to the immutable laws of the gods of the wind and the sea. In consequence whereof, and in good faith, we seal this pact with a libation offered according to the hallowed ritual of the sea. Christening Ceremony After a boat is denamed, you simply need to rename it using the traditional christening ceremony, preferably with Queen Elizabeth breaking a bottle of champagne on the bow, and saying the words: I name this ship ___________ and may she bring fair winds and good fortune to all who sail on her. John Vigor, a resident of Bellingham, Wash., is a boating writer and editor. The denaming ceremony above is contained in his book “How to Rename Your Boat .. and 19 Other Useful Ceremonies, Superstitions, Prayers, Rituals, and Curses” (Paradise Cay) and is available from www.paracay.com. 140 GLOSSARY Many of the definitions in this glossary were taken from the Menger 19 User’s Manual and may be specific to the Menger Cat. angle of heel a hull reference point used while sailing. anchor rode n. the line attaching the anchor to the boat. apparent wind n. the wind perceived on a moving boat. It is the resultant of the actual wind and the wind generated by the boat's motion. athwartship adj. crossways to the boat. backing plate n. a reinforcing plate for a fitting attached to the deck or hull. bale n. a u-shaped fitting on the boom or gaff to which a block or bridle is attached. batten n. fiberglass or wooden strips used to stiffen the leech of a sail. beam n. the sides of a boat. beam reach n. sailing between close hauled and a broad reach. becket n. an attachment point on the bottom of a block for connecting a line. block n. roughly, the device known to landlubbers as a pulley. bobstay n. a short stay from the end of the bowsprit to the stem. boom n. the spar at the foot of the sail. boom crutch n. a device to support the boom when the sail is not in use. bowline n. (bo'lin) one of the most useful knots; it makes an eye in the end of a rope. bridle n. a short wire cable with both ends attached to the gaff, to which a halyard block is attached. bronze n. a strong, corrosion-resistant alloy of tin and copper. brow n. the strip of teak that runs along the top edge of the cabin. bulkhead n. a term applied to any athwartship partition. camber n. extra cloth in a sail designed to form an air foil. casting n. a cast metal object, spec. the parts fitted to the ends of the spars. catboat n. a shallow draft, broad-beamed craft with the mast stepped far forward. centerboard n. a broad fiberglass plate lowered through the hull to resist leeway. centerboard trunk n. the housing into which the centerboard can be withdrawn. Cetol n. brand name of a varnish-like finish. chock n. the bronze castings through which the bow lines are passed. chock-a-block adj. drawn so close as to have the blocks touching. Used of a ship's hoisting tackle. cleat n. a bronze fitting with arms or horns upon which to secure lines. clew n. aft end of sail at the foot. close-hauled adj. with the sail hauled in for sailing as close to the wind as possible. CLR n. center of lateral resistance. coaming n. the low, elevated rail around the cockpit. cockpit n. an open area from which the boat is handled. cockpit drain n. the drain leading into the centerboard trunk to drain water from the cockpit. 141 cringle n. a circular brass eye let into a sail for attaching a line for outhaul, reefing, etc. Dacron n. tradename of a synthetic fiber used for making strong, stretch-resistant rope or sailcloth. diesel engine n. (after Rudolph Diesel, a German inventor). An internal combustion engine in which ignition is achieved by the heat of compression. diesel vent n. on the Menger Cat, an engine compartment ventilator set in the cockpit coaming. dock master n. the person in charge of a dock(s). downhaul n. a line used to pull down the luff or forward edge of a sail. draft n. 1. depth of a boat below the waterline. 2. the particular shape of a sail that enables a sailboat to go to the windward. dropboard n. the board that closes off the entrance to the cabin. eyebolt n. a bolt with an eye on the end, used on the mast for attaching the halyard blocks, also on the stem for attachment to a trailer. fairlead n. a guide through which a line passes. fiberglass n. a fabric made from fine strands of glass, also, a very strong composite of fiberglass and resin, widely used in boatbuilding. Fiberglas n. tradename for a brand of fiberglass. figure eight knot n. a stopper knot tied in the end of a line. flag halyard n. a light line used to hoist a flag. foot n. the lower edge of a sail. forestay n. a wire rope from the mast to the tang on the stem or bowsprit. gaff n. the spar supporting the head of a sail. gaff saddle n. a curved plate at the bottom of the gaff, bearing against the mast, allowing hoisting and rotation of the gaff. gelcoat n. a smooth opaque outer layer acting as finish and protection on fiberglass. genoa or genoa jib n. a large headsail used on sloops and other non-catboats. gooseneck n. the universal joint on the forward end of the boom. gudgeon n. the female half of a rudder pivot. see pintle. gunter rig n. an essentially triangular sail with a high peaked gaff almost parallel to the mast. gybe see jybe. halyard n. a line used to hoist a sail. A gaff-rigged sail requires two halyards: a throat halyard and a peak halyard. head n. 1. the top of a sail. 2. a ship's toilet. This term has many other uses with the general meaning of front or top. heel n. a boat leaning over at some angle. isophthalic adj. a particular formulation of gelcoat. jib n. headsail. jib sheet n. jib sail shape and trim control line. jiffy reefing n. jiffy reefing, also called slab reefing or single line reefing, is quicker and easier than conventional reefing or conventional roller reefing and involves folding the sail in sections, or slabs, along the boom. One or two reefing lines placed through the reef cringles at the sail's luff and leach edges are used to pull those points down tight to the boom, creating a new tack and clew for the sail. Reefing lines can be led back to the cockpit, and crew members can perform reefing without going on deck in heavy weather. In jiffy reefing there is no need to tie to the boom at the reef cringles on the sail. The equipment for jiffy reefing is often integrated with Dutchman flaking, a furling technology that flakes (or folds up) the sail on alternate sides of the boom rather than on a messy pile on one side of the boom. 142 jybe v. 1. swing across boat: to make a fore-and-aft-sail swing across from one side of the boat to the other when sailing with the wind behind, or to swing across in this way. 2. change direction in sailing boat: to make a fore-and-aft rigged boat change direction by turning the stern across a following wind, or change direction by turning in this way. 3. n. sail shift or direction change: a sudden shift of a sail back and forth or change in the direction a ship is sailing. keel n. orig., the main longitudinal member of a hull; now, a similar shape molded in fiberglass. knot n. 1. a combination of loops and tucks that join a rope to other ropes or to objects. 2. a rate of speed of one nautical mile (6,076 feet) per hour. knotmeter n. an instrument for indicating speed through the water. lazyjacks n. light lines run between mast and boom to control the gaff and sail while being lowered. leach See leech. lee helm n. the tendency of a sailboat to fall off the wind, requiring the helm (tiller) to be pushed to leeward to maintain course. See weather helm lee shore n. the shore on the lee side of a boat. The wind blows onto a lee shore. leech n. the after edge of a sail. leeward adj. in the direction of the lee side of a boat. lift n. 1. the forward-acting force generated by the airfoil shape of a sail. 2. a similar force acting on the keel or centerboard 3. an advantageous shift in wind direction. luff n. the forward edge of the sail. v. to allow the wind to strike the leeward side of the sail. mainsail n. the sal located behind the main mast. mainsheet n. see sheet. make fast v. to secure, as with a halyard, outhaul or any line. marline n. a light, tarred line used to whip rope ends, secure mast hoops to sails, etc. mast n. the vertical spar supporting the sail. mast rings or hoops n. sliding rings attaching the sail to the mast. mat n. a non-woven fiberglass fabric. on-the-wind n. sailing as close to the eye of the wind as possible. outhaul n. a line used to stretch the head or foot of the sail along the gaff or boom. parrel beads n. revolving hardwood beads strung on the line holding the gaff saddle to the mast. peak n. the top corner of a sail. peak halyard n. the halyard which hoists the outer end of the gaff on a gaff-rigged sail. pennant n. 1. a short line attached at one end, i.e. a centerboard pennant. 2. A long narrow flag. pintle n. the male half of a rudder pivot. See gudgeon. port n. 1. When facing forward, the side of the boat to your left. (Note: The terms left and right are used relative to a person; port and starboard are used relative to a vessel.) 2. An opening, such as the ports in the side of a cabin. 3. The shipping outlet of a city or place, a harbor. Porta Potti n. A trade name for a portable, self-contained toilet. Purchase n. A block and tackle with multiple passes of the line to give power ratio increase. Quarter n. the after corner of a boat. reef v. to shorten a sail, usually because of rising winds. n. a shortening of sail. reef knot n. a square knot or “shoelace knot” often with only one end looped for quick release. reef points n. small lines attached to cringles in the sail for gathering up excess sail when reefed. 143 resin n. a material derived from petroleum which, when mixed with a catalyst, hardens into a rigid material. A composite of resin and fiberglass yields a material of unequaled value, strength and versatility. roach n. unsupported sail cloth, aft sail edge. run n. sailing downwind. sail n. everybody knows what a sail is. sea cock n. a valve to close off an opening in the hull for cooling water, etc. shackle n. a U-shaped metal piece with a threaded pin across the ends, for attaching two objects such as anchor to chain, block to bail, etc. shaft log n. fiberglass tube with stuffing box on one end and cutlass bearing on the other which allows the propeller shaft to pass through the hull. sheave n. a wheel or disk with a grooved rim; the moving part of a block. sheet n. the multi-part line from the end of the boom to the stern for controlling the angle of the sail. shroud n. a wire cable from the mast to the side of a boat; not used on small catboats. sintered adj. particles of metal partially melted together, resulting in a porous mass of great surface area. skeg n. the extension of the keel in the after part of a boat, serving to protect the propeller, support the rudder and provide directional stability. skeg bar n. the bronze bar across the bottom of the propeller opening on diesel Cats to support the rudder. spanker n. type of sail: the fore-and-aft sail on the mast nearest the stern of a square-rigged ship. spar n. a mast, boom or gaff. spinnaker n. the large balloon sail used in front of a jib. sprit n. spar across sail: a pole that crosses a fore-and-aft sail diagonally. square knot n. a knot of limited value, used on a boat only for reefing. See reef knot. standing rigging n. the fixed wires supporting the mast on a sailboat. Catboats normally use only a forestay. starboard adj. when facing forward, the side of the boat to your right. See port. stern n. rear of the boat. stopper knot n. a knot in the end of a rope to stop it from running through a block, up the mast, etc. stuffing box n. a device to admit a shaft through a hull while excluding water. surge brakes n. brakes on a trailer actuated by pressure on the tongue caused by the braking of the towing vehicle. throat n. the forward upper corner of the sail, where the gaff meets the mast. tack n. forward end of sail at the foot. tacking v. changing direction while sailing into the wind. throat halyard n. the line that hoists the inner end of the gaff. See peak halyard. topping lift n. the line from the masthead to the end of the boom, supporting the boom during reefing, furling, etc. traveler n. the bar across the stern on which the sheet block travels. turnbuckle n. a device to powerfully shorten or lengthen rigging. vang n. mainsail shape control line. VHF adj. Very High Frequency; a frequency band assigned to marine communications. Also, a transceiver using these frequencies. wainscoting n. decorative wood strips used to line the inside of the cabin. weather helm n. the tendency of a sailboat to point up into the wind, requiring the helm (tiller) to be pulled to the weather, or windward, to maintain course. See lee helm. 144 winch n. a device offering mechanical assistance in hauling lines, halyards, etc. windward adj. the direction from which the wind is blowing. woven roving n. a form of fiberglass material having strength in two directions. 145