1
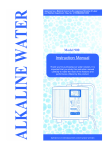
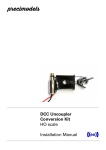
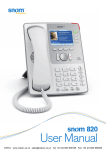
Ver. P-UK
VESTA ALKALINE WATER IONIZER
OPERATION MANUAL
GL-788
GL-788
Manufactured by GL Group Co., Ltd.
Warning: Incorrect installation and /or operation could void your valuable warranty.
Please protect your investment! Read this manual carefully.
Rev20120525
03
02
CONGRATULATIONS ON YOUR NEW PURCHASE!
Now that’s POWER!
Industry-first technology!
AutoAdjust™ optimizer automatically adjusts the ionizing power giving
the best performance and ionization for your particular water source.
Smart Switch™ next generation SMPS power supply provides the most
stable and efficient power platform.
Patented dual Biostone filtration
ensures you peace of mind, knowing your
water is not only alkaline and ionized,
but cleaned.
You have just purchased the finest, most advanced water system in the world!
Your new ionizer is designed to provide you with many years of the cleanest,
healthiest and most “functional” water available. There are many specific uses
and benefits of this amazing water, so read this manual carefully to learn how
to get both optimum performance out of your ionizer and to protect your investment.
Your new ionizer produces filtered alkaline, ionized water. Just exactly what is that?
Your ionizer employs computer accurate and selectable magnetic energy to perform
electrolysis through patented platinum bonded titanium electrodes inside a water cell.
Inside this advanced cell, the magnetic energy separates the water into an alkaline
(high pH) and acid (low pH) stream without using any chemicals. Ionizing the water
in this way re-structures the molecules and reduces their cluster size, binds extra
oxygen molecules, and concentrates ionized, absorbable and beneficial minerals like
Calcium, Magnesium and Potassium.
AutoClean fully automatic post use cleaning
– unlike other ionizers, never wait for your
alkaline water and protect your investment.
Contents
03
04/05
Key Features:
06/07
• 7 high-efficiency platinum titanium electrodes deliver more power per
square inch than larger less sophisticated electrodes requiring large wattage.
Think small. Think efficient.
• Advanced self-diagnostic MICOM circuitry system
• Widest range of 274 pH and ORP selections
• Energy-saving advanced water flow sensor
• Compact size – smaller than other 7 electrode ionizers
• Sleek mirror faced elegant design by Samsung
• Aesthetic touch screen sensors
08
09
10
11
12
13
14
15
16/17/18/19
20
21
22
23
04
Important safety warnings and precautions
WARNING
: Please read these pages carefully. They contain very important information
to protect you and the valuable warranty on your ionizer.
Warning Legend
The following symbols are used for different levels of warning.
DANGER
: Could cause personal injury or have an adverse effect on health.
CAUTION
: Could cause damage to ionizer and possibly void your warranty.
DANGER
If you have a chronic disease or serious health issue then please consult with a
healthcare provider before using the ionizer.
Installation warnings
Customers in hard water areas may need additional treatment otherwise risk voiding their valuable
warranty. If unsure about the quality of your water please contact a water specialist.
Precautions : Do not use the following types of water.
Contaminated
Turbid water
Salt water or Softened water
Hot water over 104 Fahrenheit / 40 Celsius
Do not use your ionizer at
voltages other than specified
(AC 110V FOR USA). Use a GFI
outlet. Do not plug in your
ionizer where it will exceed
the rating of outlet or electric
wiring. Failure to do so can
result in fire, injury and/or
damage to yourself, wiring or
ionizer!
Protect your ionizer from
freezing temperatures or from
direct sunlight.
When using the unit in a cold
place, remove the filter after
use to prevent the filter from
freezing.
The acidic water hose should
be installed so that the end is
lower than the connection at
the elbow on the ionizer. The
water should flow freely down
from the elbow.
Be sure that the ionizer is
connected to a COLD water
source. Connecting it to a hot
water source could damage
the water cell or other parts
of the ionizer.
Keep the power cord and your
ionizer away from hot surfaces
or appliances - failure to do
so may result in electric shock
or fire!
Do not try to fix the ionizer
yourself. Call the dealer to
have it fixed by a qualified
technician.
Don't move the unit by the
front cover. The unit could be
damaged or cause you bodily
injury if the cover falls off and
the main body falls.
Move the unit by putting both
hands underneath it. This will
prevent the unit from falling
during movement.
Don't use the unit in a dusty
place. This may cause the unit
to malfunction.
If the power cord develops a
break or short, stop using the
unit and call customer service
to have it replaced.
If you have never consumed alkaline water – start off with the lowest alkaline setting (level 1)
to begin with. Let your body adjust slowly and naturally for 4-7 days. After this initial adjustment
period, you may gradually increase the alkalinity of the water.
Do not drink alkaline water if you have achlorhydria.
Consult a healthcare provider before using acidic water if you have:
- Sensitive skin
- Allergies
Only use potable drinking water in your ionizer.
If on hard water please ask about pre-treatment options
Well water and water from smaller systems should be tested for safety before
using with an ionizer, and may require pre-filtering.
05
06
Parts and features
Parts and features
Installation accessories
Name of parts (Back)
Before installation, please check to ensure you have the following accessories.
6) Speaker grill
7) Wall mount hole
8) Filter covers (L/R)
User manual
Tubing
Flexible hose
Reagent drops
Fuse
6
7
Diverter
and screw anchors
8
Name of parts (Front)
1)
2)
3)
4)
5)
Water outlet cap
Flexible hose
Display indicators
Buttons
Water supply valve (Knob)
Name of parts (Base)
1
9) Water Inlet (1/4”)
10) Power switch (On/Off)
11) Power socket
12) Water outlet (PVC)
3
2
10
9
11
4
5
12
07
08
Control panel features
Installation to faucet
Control Panel Display
3
4
5
6
Installation to faucet
7
1
ORP Meter Indicator
2
Level Indicator
3
Sleep Indicator
4
Cleaning Indicator
5
Low Flow Indicator
6
Menu Selection Indicator
7
Check Unit Indicator
8
Alkaline Water Button
9
Menu Selector Button
10
Purified Water Button
11
Filter Reset Button
12
Acidic Water Button
13
pH Level Indicator
14
Primary filter life indicator
15
Secondary filter life indicator
2
1
13
14
15
10
8
9
12
11
1
Place the water ionizer near
the sink where the ionizer
will be installed.
2
Remove the aerator from the
faucet
4
Remove the compression nut
from the diverter valve and
thread the plastic supply
tubing through it, making
sure to keep the threads of
the compression nut facing
the diverter valve.
5
Attach the plastic supply
tubing to the diverter by
pressing it onto the compression nipple and securing
the compression nut to the
diverter valve.
Audio functions
When automatic cleaning is on
“It is being washed now.”
When Alkaline water is selected
“First grade alkaline water is being extracted now.”
“Second grade alkaline water is being extracted now.”
“Third grade alkaline water is being extracted now.”
“Fourth grade alkaline water is being extracted now.”
When Acidic water is selected
“First grade acidic water is being extracted now.”
“Second grade acidic water is being extracted now.”
“Third grade acidic water is being extracted now.”
When Purified water is selected
“Clean water is being extracted now.”
6
3 Attach the diverter valve to
the faucet using any included
adapter rings necessary. Be
sure to clean any exposed
threads and apply plumbers
tape to prevent leaks. If
installing to a faucet,
please contact your dealer
for informationon a
specialty adapter that
may be required.
09
10
Installation for connecting directly to cold water line
Installation for connecting directly to cold water line
Using your water ionizer
Using your water ionizer
Display and operation
1
4
Find the cold water supply
line and close the valve.
Connect the cold water line
adapter to the cold water
supply valve as shown.
As fittings vary you will need
to find the right size adaptors
at your local plumbing store.
2
5
Disconnect the cold water
hose from the line. Make
sure it is the cold water hose
and not hot because hot
water will cause the unit to
malfunction.
Connect the plastic tubing
as shown.
Instructions
1
Ensure both filters are fully installed and seated
properly prior to running any water through the
ionizer. Filter installation instructions can be found
on page 13 of this manual.
2
Turn the power switch on at the bottom of the unit.
Before operation, check to see if the sleep light is
on. When the main flow control valve is turned on,
the sleep light will turn off.
3
Set the water supply valve to the “ON” position.
This is the knob on the front of machine and has an
“ON” and “OFF” position. Important; This is one of
the most critical features in controlling your ionizer’s
performance. This contro WILL DIRECTLY impact
the performance of your ionizer.
A slow flow will yield higher pH; a fast flow will yield
lower pH.
4
Once water flow has been established , select
“Purified” water, and let the ionizer run for 3 minutes.
This is important as it will flush out residual filter
media dust created during the manufacturing
process.
5
Once the filters have had sufficient time to flush,
select alkaline water and choose the level of your
choice. Press the button until the number goes up
to your desired selection.
6
Select acidic water and choose the level of your
choice. Press the button until the number goes up
to your desired selection.
7
When finished using, turn the water supply knob
valve to the off position. When the valve is turned off,
the sleep light will turn on again.
3 Separate the water line.
6
Connect hoses to the water
inlet and acidic water outlet
then open the cold water
supply valve.
CAUTION
Be sure the valves are all connected tightly to prevent leakage.
Be sure of where you want to install the ionizer as a hole needs to be drilled through the sink
top to thread the tube.
Be sure you connect the unit to cold water as hot water can damage the unit.
This is a good time to double check and make sure all your fittings are tight and the tubing is
secure in the fittings.
Check daily for any leaks during the first week after installation and check for leaks occasionally
thereafter.
CAUTION
When switching from Acidic water to Alkaline water, let the water run for 5 seconds before drinking.
Run acidic water through the unit for 10 to 15 seconds each day before drinking the water.
Run acidic water through the unit for about 30 seconds if the unit has not been used for several days.
11
12
Drinking Alkaline Water
Changing the filter
CAUTION
Changing the filter
Error indicatiors
Error 1
When the water pressure drops too low, this symbol will
appear before the unit switches off automatically.
If this appears, increase water pressure either at the front
valve or, if that does not work, at the water source valve.
Error 2
This symbol will appear if the unit has turned off due to
low water pressure. Check the source water valve for
obstructions.
1 Push in on the snap tabs and slide the
2 Rotate the bezel in the direction
3 Pull the filter down as shown
4 Tilt the filter out and remove the
filter cover over as indicated to open.
indicated by the arrow to open.
Drinking Alkaline Water
Drinking and using Alkaline Water
old filter.
The following kinds of water should not be consumed:
Water with greater than 10 pH.
Acidic water.
Any water that comes from the acidic water hose.
or
Drinking purified water
1) Created by using the “Purified” mode has been cleaned without altering the pH level.
2) Drink this water to take medication.
3) Store Alkaline or Purified water in a sealed bottle inside the refrigerator. Only store Alkaline
water for a maximum of 3 days. For optimal effect, drink the water within one day.
Press the Filter Reset button
and choose Filter1 or Filter 2.
5 Insert the bottom of the filter to match
the valve base. Tilt the new filter into
the filter holder screw top and tighten.
Check for leaks and tighten if there are
any leaks. Do not overtighten as this
could break the unit.
Alkaline Water usage guide
When using during the first seven days
Alkaline Water
Child
Adult
Amount
pH 7.5
pH 7.5-8.5
Open
6 Press the Filter Reset button for
more than 3 seconds to reset the
primary filter, and press the Filter Reset
button for more than 3 seconds to
reset the secondary filter indicator
After getting used to the water
CAUTION
Child
The method for changing the primary and secondary filters is the same.
pH 7.5-8.5
Adult
pH 8.5 +
Amount
Open
The filter life indicator consists of 5 sections of light for each filter. If the indicator lights are all off,
it is time to change the filter.
Let the water run for 3 minutes after changing the filter to be sure that any loose particles in
the filter are discharged.
If the ionizer has not been used for an extended period of time, flush the ionizer by producing
acidic water for about 5 to 10 minutes before switching to alkaline.
13
14
Filter configuration
Adjusting settings
Carbon Filter (Optional)
1
2
3
4
5
6
7
8
Adjusting settings
1. Felt
Filters large particulate matter out of the water.
2. Calcium
Slightly increases the alkaline mineral content in your water and
improves the taste of water and removes odors. It also eliminates chlorine.
3. Felt
Filters out rust and other large particles.
4. Activated Carbon
Coconut tree based activated carbon used to make water taste better
by eliminating organic compounds, bad smells and flavors as well as
foreign substances at the 18-50 mesh size.
5. Felt
Filters out rust and other large particles
6. Activated Carbon
Coconut tree based activated carbon used to make water taste better
by eliminating organic compounds, bad smells and flavors as well as
foreign substances at the 18-50 mesh size.
7. Felt
Filters out rust and other large particles.
8. Tourmaline
Tourmaline emits Far Infra Red(FIR) energy naturally. FIR produces well documented
health benefits and it also has an amazing effect on water. The Biostone contains the
semi-precious gemstone tourmaline in ceramic form, so you get FIR on tap!
UF Filter
Display and operation
Instructions
1
To access the setting adjustment mode on your
ionizer, press and hold the Menu button for more
than 3 seconds, “F00” appears on the ORP display
window and “0” appears on the pH display window.
2
Press the Alkaline button to cycle forward through
the different functions F00 - F14.
Press the Acidic button to cycle backwards
through the functions F14 - F00.
3
To adjust a specific function, cycle through the
function list F00 - F14 until the specific function
number you wish to change appears in the ORP
display window. To cycle forward through the function
settings, press the Purifier button. To cycle backwards
through the function settings, press the Filter Reset
button. The function setting values will appear in the
pH display window.
Sediment Filter
1. UF(Ultra Fine) Filter
Hollow heavy duty fiber with pores
that will effectively filter down to
0.01M in size, removing bacteria and
other micro-organisms.
1
2. Felt
Filters out rust and other large
particulate matter from water.
1
3. Activated Carbon
2
3
4
5
Coconut tree based activated
carbon used to make water taste
better by eliminating organic
compounds, bad smells and
flavors as well as foreign
substances at the 18-50 mesh size.
4. Calcium
Slightly increases the alkaline
mineral content of your water and
improves the taste of water.
Helps also to eliminate chlorine.
2
1. Sediment Filter
The Sediment Filter reduces infusible
particles from feed water and protects
the membrane and pre-carbon filters
from being clogged with the largest
particles extending the life of the rest
of the filters.
2. Tourmaline
Tourmaline emits Far Infra Red(FIR)
energy naturally. FIR produces well
documented health benefits and it also
has an amazing effect on water.
The Biostone contains the
semi-precious gemstone tourmaline
in ceramic form, so you get FIR on tap!
5. Tourmaline
Filter Replacement Notification
The filter life indicator consists of 5 sections of light for each filter. When the filter is ready to
change, all the sections of light will go off. An audio message will give a warning 10 days in
advance of filter replacement. When the filter indicator blinks, the filter must be replaced.
There are instances in which sediment and carbon filters should be changed separately
depending on the places of use or region.
Filter life will change depending on the region's water quality. If water flavor worsens or if the flow
rate slows down considerably, it is highly recommended to change the filter.
Once all settings are made, select the MENU button to save
your settings.
Note: There is no need to change any settings
if ionizer is working well.
Example of language function setting change
Function - 10 : Language selection F09(Setting code)
1. Press and hold the MENU button for more than 3 seconds.
2. “F00” will appear on the display.
3. Press the ”Alkaline” button to cycle forward until F09 appears
in the ORP display window.
4. Press either the “Filter Reset” button to make the display number
go down and or the “Purifier” button to make the number go up
until you arrive at the language you want.
5. After the language is selected, press the “MENU” button to save
the selection.
15
16
Product function and settings
Function
setting code
Setting code
(ORP)
Setting description
Product function and setting
Setting description(pH)
F00
Function
setting code
Setting code
(ORP)
Setting description
Setting description(pH)
F04
Setting grade : -19~0~19
(Voltage from -19 to 19 for Acidic Water)
Setting grade : -19~0~19
(Voltage from -19 to 19 for Alkaline Water)
F01
F05
Setting grade : -19~0~19
(Voltage from -19 to 19 for Alkaline Water)
F02
Setting grade : -19~0~19
(Voltage from -19 to 19 for Acidic Water)
F06
Setting grade : -19~0~19
(Voltage from -19 to 19 for Alkaline Water)
F03
Setting grade : -19~0~19
(Voltage from -19 to 19 for Acidic Water)
F07
Setting grade : -19~0~19
(Voltage from -19 to 19 for Alkaline Water)
5:5 plates => 7:7 plates
17
18
Product function and settings
Function
setting code
Setting code
(ORP)
Setting description
Product function and setting
Setting description(pH)
F08
Function
setting code
Setting code
(ORP)
Setting description
Setting description(pH)
F11
There are 4 cleaning modes available:
1. This is the mode that allows pre and post cleaning with the
"Now cleaning" announcement.
2. Pre-cleaning with the "Now cleaning" announcement
and Post cleaning no announcement is made.
3. Post-cleaning only - with the "Now cleaning" announcement.
4. Post cleaning - no announcement is made.
F09
F12
1.Korean 2. Chinese 3. English and 4. Spanish
F13
F10
F14
Visible /
Invisible
19
20
Trouble shooting
Calcium in water
Please check out the following troubleshooting suggestions before calling for repair.
Symptom
Possible cause
Resolution
Display panel does not
light up.
* Is the power cord plugged in
correctly to an active outlet?
* Plug the power cord in properly.
Switch does not work.
* Is the power plug connected to the
outlet properly?
* Is the fuse on the back blown?
* Plug the power cord in properly.
* Is the source water valve line closed?
* Is the source water line connected?
* Is the filter clogged?
* Running the acidic water on
Acidic Level 3 for 10+ mins.
* Turn the water supply valve on.
* Be sure the water supply hose is
connected properly.
* Be sure the water line is not bent.
* Replace the filter.
* If the unit is leaking, turn off the water
supply valve and contact customer
service.
* Replace the filter.
* Turn off the ionizer at the power switch
for 5-10 minutes to allow for a reset
period then turn the ionizer back on.
Water is leaking from the
hose at the attachment.
* Check to see if the hose is
disconnected
* Connect the hose snugly to the
attachment.
The water has a strange
odor or tastes bad.
* Has the unit been unused for a
long time?
* Let acidic water flow through the unit
for 3minutes or more. If the water
does not improve, replace the filter.
Water does not flow out
or the unit has stopped
functioning.
* Is the hose bent?
* Is the water pressure too low?
* Is the main water supply turned on
or is the line frozen?
* Has the drain water hose been
immersed in water?
Even though the filter has
been replaced, the filter life
indicator still shows no-life.
* Did you reset the filter counter?
There is a strange noise
coming from the unit.
* Unknown.
Calcium in water
When filling your cup with alkaline water, white
flakes are seen floating in the cup.
* Check the fuse and replace it if necessary.
* Remove the drain hose from water.
* Reset the filter by pressing the filter
replacement button.
* Switch off and stop using the ionizer
and contact customer service.
Explanation
* When ionized water is generated, the water
molecules are reduced in size. This results in a
higher concentration of dissolved hydrogen in
the water.
* This large quantity of mineral flakes in the water
may occur right after a filter change or first use
of the ionizer. There is no problem with drinking
this water as it is mostly calcium which is not
harmful to consume.
When high alkaline water is left in a container,
the water will form a white film around the
edges or on the bottom. The substance is
CaCO2 which has bonded with calcium and
falls to the bottom of the container.
If you prefer to not have this white substance
in your water, adjust the pH to a lower level
which will reduce the possibility of calcium
bonding.
Calcium flakes form by bonding with hydrogen
which is abundant in alkaline water.
The presence of calcium is a sign that the water
ionizer is functioning properly. If you would like
to clean calcium out of any container, put a
spoonful of vinegar in the container and fill it
with water. Vinegar will dissolve the calcium.
Leave the water in the container for 1 hour and
shake the water out.
21
22
Product specifications
Memo
Product specifications
GL-788
100~250Vac, 50/60Hz
230W
15.5” X 12” x 6.75”
LCD indication
(Hollow ultra fiber, Sediment Filter optional)
Temperature shut down
Memo
23