1
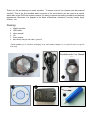
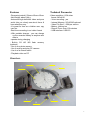
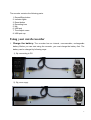
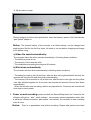
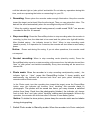
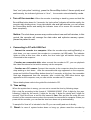
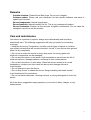
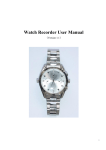
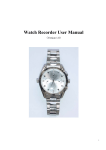
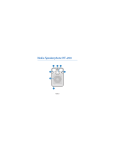
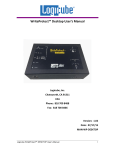
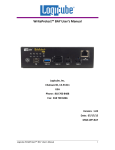
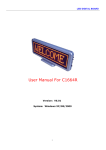
Watch Recorder User Manual
!Version 1.1"
1
Thank you for purchasing our watch recorder . To ensure correct use, please read this manual
carefully. This is the first portable watch recorder in the world which can be used as a normal
watch also a mini DVR and a photo camera. It’s easy to operate, beautility, portability and delicate
appearance. Moreover, it is popular in the fields of business, education, security, media, legal,
tourism , etc.
Packing:
1. Watch recorder
2. USB cable
3. User manual
4. CD
5. Power adapter
6. Mini battery charger and cable (optional)
* Power adapter (5) is standard packaging item, mini battery charger (6) is optional item for special
order only.
#
%
$
!
"
&
2
Technical Parameter
Features
. Dimension(watch): 52mm!45mm!15mm
. Net Weight: about 144 g
. Advanced high definition video and pure
audio lets you clearly see who’s there &
hear what they say
. It’s great for use as a hidden cam, spy
cam etc
. Real time recording in avi video format
. With portable charger , you can charge
up the recorder battery at anytime and
able to
operate during charging
. Built-in 2G /4G /8G flash memory
(optional)
. Use it as a photo camera
. Use it as plug and play PC camera
. Use it as a normal watch
. Playback video on PC
.Video resolution: VGA video
format ,640!480
. Voice recording : yes
. Internal Memory: 2G/4G/8G optional
. Video File Size:!22M per minute
. Battery :Lithium-ion
. Record Time: Over 100 minutes
. USB interface: USB 2.0
Overview :
5
2
1
6
3
8
3
The recorder contains the following parts:
1. Record/Stop button
2. Indicator lights
3. Reset button
4. Recording lens
5. Mic
6. USB port
7. Time adjust crown
8. USB port cap
Using your watch recorder
1. Charge the battery: The recorder has an internal, nonremovable, rechargeable
battery. Before you can start using the recorder, you must charge the battery first. The
battery can be charged by following ways:
1), By connecting to PC:
1
2
2). By power supply:
1
2
4
3). By Mini battery charger:
1
3
2
4
During charging, the blue color light twinkle, when the battery’s power is full, the indicator
“pale yellow” keeps on.
Notice: The internal battery of the recorder is a lithium battery, can be charged and
used anytime. But for the first five times, it’s better to run out before charging and charge
to full before using.
a) Video file saved automatically:
The recorded video file will be saved automatically in following three conditions:
. The battery’s power is low
. The memory of the recorder is full
. The continuous recording time beyond 60 minutes
b) Shut down automatically
The recorder will shut down automatically in following three conditions:
. The battery’s power is low (at this time, after the blue color light twinkled 8 second, the
recorder will save the file and shut down automatically)
. The memory of the recorder is full (at this time, after the blue color light and the yellow
color light twinkled together for 8 seconds, the recorder will save the file and shut down
automatically)
. When the recorder stop recording, without any operation for 3 minutes, the recorder will
shut down to save power.
2. Power on and recording: press and hold the Record/Stop button for 3 seconds, the
indicator will light on “ blue” ,which indicate the recorder entered preparation state, after
a while the indicator becomes “pale yellow” and twinkle, the recorder is start recording
video & voice.
Notice: There is a preparation time before recording. Please take patience and wait
5
until the indicator light on “pale yellow” and twinkle. Do not take any operations during this
time, such as re-pressing the button or connecting it to your PC.
3. Recording: Please place the recorder under enough illumination. Keep the recorder
toward the target, and at least 50cm from the target. Then you can get perfect video . The
data will be saved automatically when the recoding time beyond 60 minutes.
* When the watch’s second hand turning around, a walk sound "Bi,Bi " will also be
recorded to the file. It’s normal.
4. Stop recording: Press the Record/Stop button to stop recording when the recorder is
recording ,by this time, the data start to be saved and the yellow color light still twinkle;
After finished saving , the indicator turned to “blue”. When in stop recording mode
(stand-by mode), if no operation for 3 minutes, the recorder will shut down to save battery
power.
Notice: Please wait during file saving. If you do other operations, the recorder could
not respond.
5. Re-start recording: When in stop recording mode (stand-by mode), Press the
Record/Stop button once to re-start recording, at the same time, the indicator turned from
“blue” to “pale yellow” and twinkle immediately. Every time recording will be saved to a
relevant file.
6. Photo mode: When the recorder is in stop recording mode(stand-by mode) , the
indicator light on “ blue”, press the Record/Stop button 3 times quickly and
continuously, the indicator will become both “blue” and “pale yellow” twinkling, the
recorder entered Photo mode.
In the Photo mode, turn the recording lens toward the target, press the Record/Stop
button once, the indicator will become “blue” twinkling, the recorder starts to
photograph. The photos will be saved two times, you may choose a satisfied
picture from them. Each time the photography finished, the indicator will change
back to both “blue” and “pale yellow” twinkling, waiting next photograph. Without any
operation, the recorder will shut down after 3 minutes to save battery power.
Notice: To obtain the clear picture, please keep the recorder static and not shake
during photographing.
7. Switch Photo mode to Stand-by mode: When the recorder is in Photo mode(both
6
“blue” and “pale yellow” twinkling), press the Record/Stop button 3 times quickly and
continuously, the indicator light turns to “ blue”, the recorder entered stand-by mode.
8. Turn off the recorder: When the recorder is working or stand-by, press and hold the
Record/Stop button down for 3 seconds, the “pale yellow” indicator will twinkle rapidly, the
recorder start shutting down. It may take about one and half minutes, you can release
the Record/Stop button and waiting the indicator turns off to ensure the recorder shut
down completely.
Notice: The shut down process may continue about one and half minutes, in this
period, the recorder will arrange the data order and optimize memory space,
please be patient to wait.
9.
Connecting to PC with USB Port
. Connect the recorder to a computer: When the recorder stop working(Stand-by) or
shut down, you can connect the recorder to a computer via USB cable. The indicator
lights on blue at this time, after a while, the blue color light will twinkle during it be
connected to the computer.
. Function as a removable disk: when connect the recorder to PC, you can playback
the video files stored in the build-in memory via the computer
. Function as a PC camera: Connect the recorder to the computer when the recorder
stop working or shut down. After the removable disk sign appeared on the computer,
press and hold the Record/Stop button down for 3 seconds, at this time, the removable
disk sign disappeared from the computer, after a while the USB video device sign
appeared on the computer, now you can use the recorder as PC camera
*More details please refer to the guide files included in CD.
10. Time setting
When the system time is wrong, you can set or correct the time by following steps:
Edit a text file according to the format of “20080806153000” (First 4 digits for the year,
following 2 digits for the month, 2 digits for the day, 2 digits for minute and 2 digits for
second), Save the file as a text file and named it time, then put this file under the root
directory of the recorder memory when the recorder be connected to computer. When you
power on the recorder, you can see the time have been set up automatically.
*A sample file “time.txt” is included in the CD, you can modify and use it directly.
11. Reset: In case of system broken down or hung up, please reset the recorder by
7
pressing both the Reset button and Record/Stop button once in same time. The recorder
will work normally again.
12. Watch time adjusting:
1. Pull the crown out to the time correction position.
2. Turn the crown to move the minute hand to set the correct time.
3. Securely return the crown to the normal position.
* The other watch functions are totally same as a regular watch, it’s simple and easy to
use.
8
Remarks
Suitable situation: Please follow State’s law. Do not use it illegally.
Software update: Please ask your distributor for the relevant software and ways to
update your recorder.
Record temperature: Natural temperature
Record humidity: Natural humidity for life. This is not a waterproof product.
Record luminance: Please use the recorder at lightful environment. Do not make the
strengthen rays focus on the recorder.
Care and maintenance
Your device is a product of superior design and craftsmanship and should be
treated with care. The following suggestions will help you protect your warranty
coverage.
" Keep the device dry. Precipitation, humidity, and all types of liquids or moisture
can contain minerals that will corrode electronic circuits. If your device does get wet,
allow it to dry completely.
" Do not use or store the device in dusty, dirty areas. Its moving parts and
electronic components can be damaged.
" Do not store the device in hot areas. High temperatures can shorten the life of
electronic devices, damage batteries, and warp or melt certain plastics.
" Do not store the device in cold areas. When the device returns to its normal
temperature, moisture can form inside the device and damage electronic
circuit boards.
" Do not attempt to open the device.
" Do not drop, knock, or shake the device. Rough handling can break internal
circuit boards and fine mechanics.
" Do not use harsh chemicals, cleaning solvents, or strong detergents to clean the
device.
All of the above suggestions apply equally to your device, battery, charger, or any
enhancement.
9
FAQ
1. Q:Why my PC can not find the recorder when I connect it by USB extension line?
A:Please check the USB extension line, use the USB extension line which is enclosed in the
package, or use the standard USB 2.0 extension line
2. Q:Why is the video deviant when use it as PC camera?
A:Please check the USB extension line, use the USB extension line which is enclosed in the
package, or use the standard USB 2.0 extension line
3. Q:Why does the “blue” LED (or the “pale yellow” LED or the both LED) light on continuously
over 1 minutes?
A:Please press the record/stop button, if the recorder does not respond to the button, please
reset the recorder again.
4. Q:Why does the recorder frequently hang up when turn it on?
A:Please backup the files in the recorder and format the recorder memory once, then copy the
backup files to the recorder. Try it carefully, and then the recorder will work normally.
5. Q:Why the system time is wrong?
A:Please reset the time again.
6. Q:Why does the recorder shut down after the blue color light twinkled 8 Seconds?
A:You need to charge the recorder, use the recorder again after the power of the recorder is
full
7. Q:Why does the recorder shut down after the blue color light and the “Pale yellow “color light
twinkled together 8 seconds?
A:It means the disk space is full, please check the disk space of the recorder, backup or delete
the files in the recorder in order to have enough disk space to save files.
10