1
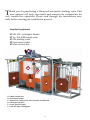
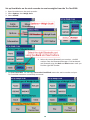
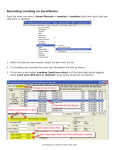
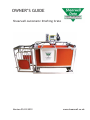
OWNER’S GUIDE
Shearwell Automatic Drafting Crate
Version 25.03.2012
www.shearwell.co.uk
1
T
hank you for purchasing a Shearwell automatic drafting crate. This
user manual will help you install and connect the components for
safe, trouble-free operation. Please read through the instructions carefully before starting the installation process.
Supplied equipment
; SDL 130 - Intelligent Reader
; Tru-Test 3000 weigh scale
; SDL dra ing crate
; Dual panel reader
; Main control box
C
A
B
D
E
A = Main Control box
B = Dual panel reader
C = Mounts for weigh scale, stock recorder and SDL 130
D = Back gate (in gate)
E = Front gate (out gate)
F = Le and right sor ng gates
2
F
Table of contents
Pre-installa on requirements - Page 4
Se ng up the dra ing crate - Page 5
Connec ng the panel reader - Page 7
Connec ng the Tru-Test weigh scale - Page 12
Connec ng the 3-way dra er - Page 17
Opera ng the dra ing crate - Page 22
Trouble-shoo ng - Page 25
Contac ng technical support - Page 27
Appendices for older Psions - Page 30
Copyright © 2012 Shearwell Data Ltd
3
Pre-installation requirements
Electrical requirements:
» The main control box (A) and the air compressor both need a mains power
supply. We recommend the air compressor be connected to a separate
circuit on your electrical panel. An air compressor draws a significant
amount of power which can affect the performance of the other
components.
Air pressure requirements:
» The dra ing crate gates are operated by air pressure of about 40 PSI.
You will need an air compressor and enough air hose to connect the
compressor to the control box.
» Ice crystals in the air hoses can stop your dra ing crate from working
properly. For cold weather opera on (below -15oC) ask your Shearwell
representa ve for the best prac ce in your area.
Environmental requirements:
» The crate must be installed on firm, level ground to get accurate weights.
Provide a solid base about 3.5 metres (12’) long by 1.2 metres (4’) wide.
The area should be level from front to back, and from side to side. Weigh
something with a known weight, like a bag of feed, to check for accuracy
a er installa on.
» The crate should be installed in a loca on protected from the weather. Do
not allow snow to accumulate on the unit. The electronic components
(stock recorder, SDL 130 and the Tru-Test weigher) should be stored in a
warm environment when not in use: connectors must have their covers
and caps in place to keep out moisture.
4
Setting up the crate
1. Set the SDL 130, the Tru-Test weigh scale and the stock recorder into their moun ng brackets.
2. Connect the SDL 130. Two cables come from the plate readers and another supplies power.
The two top cords are from the plate reader - one is grey and the other is black. They are male
with different ends - one has five pins and the other has three pins. The two plate reader cords will
not plug into any outlet except their own. The power cord is female and connects at the bottom.
3. Connect the Tru-Test weigh scale by connec ng the two blue leads and the small black power cord.
4. A ach an air line to the fi ng on the Main Control box.
Two blue cables from the load bars under the crate connect to the weigh scale. The third cord is
black with a threaded collar that fits into a smaller socket. Tighten all connections.
5
5. Plug the Main Control box into a power supply. Push the rocker switch on the Main Control box to
the On posi on. The red light will come on.
6. Push the green rocker switch on the SDL 130 to ON. The red light comes on and stays on. The green
light will flash once and go off.
7. Turn on the air compressor. Be careful - the gates may move unexpectedly!
8. The dra ing crate should now be fully powered on and ready to work.
The fitting for the air hose is at the bottom left-side of the main control box. The gates may
move once the air is hooked up. The unit must be supplied with a minimum of 40 PSI. This
is then regulated to a preset level within the main control box.
9. Start FarmWorks on the stock recorder. Refer to the instructions for establishing Bluetooth
links with the different components.
6
Bluetooth connection to the SDL130
Dual Panel Reader
A
A
B
A = SDL 130
B = Panel reader
Connec ng the SDL 130
1.
2.
3.
4.
Connect the SDL 130 to the panel reader.
Connect the power cord.
Push the rocker switch to the on posi on.
The red light comes on and stays on. The green light will flash once and go off.
7
Pairing the stock recorder with the SDL 130 panel reader
* If the Bluetooth Manager on your stock recorder looks different than what is pictured here you might
have an older version - see the appendices at the back of this guide to find the right procedure.
1. Turn on the SDL 130 you are trying to link to the stock recorder. Make sure it is close by.
2. On the stock recorder desktop find the computer icon. It may be called My Device or My Computer.
Double tap the icon to open it.
3. A shortcut to the Bluetooth Manager is to tap the BT icon on the bo om taskbar.
4. Open Control Panel.
5. Find the Bluetooth symbol. It may be an icon or it may be in a list of folders.
Double-tap to open Bluetooth Device Properites.
8
6. On the devices tab press Scan. Now the stock recorder tries to find all the Bluetooth devices in the
area. This may take a few minutes - be pa ent!
7. When scanning is complete the screen will show all the Bluetooth devices in the area, including
mobile phones.
8. Highlight SDL130 and tap Pair.
9. The Authen ca on screen opens. All Shearwell products use 1111 as the default PIN. Type in the
PIN and tap Next.
9
1. The Services screen will open. Tap in the Serial Port ck box.
2. The Serial Profile screen will open. Leave EncrypƟon disabled. Leave Mode as serial.
3. Open the Port menu. On the list find the next available BSP a er BSP 1. Make a note of the BSP
number.
4. The Serial Profile screen opens again. Tap Next. On the Services screen tap Done.
10
Set up FarmWorks on the stock recorder to receive tag numbers from the SDL 130
1. Open FarmWorks on the stock recorder.
2. Select OpƟons, then RF Reader.
3. Select SDL 130R.
4. Select the correct Bluetooth port number - the
BSP number from the Bluetooth Manager. Click
backwards and forwards using the Back and Next
bu ons un l you find the right BSP number.
5. Click Test ConnecƟon.
6. The message ConnecƟon Established means the stock recorder and SDL 130 have been successfully
connected.
11
Bluetooth connection to Tru-Test 3000 weigh scale
A
A
A = Tru-Test weigh scale
Connec ng the Tru-Test 3000
1. Connect the two blue cables and the power lead to the ports on the bo om of the weigh scale.
2. Switch it on by pushing the power bu on.
12
Pairing the stock recorder with the Tru-Test 3000
* If the Bluetooth Manager on your stock recorder looks different than what is pictured here you might
have an older version - see the appendices at the back of this guide to find the right procedure.
1. Turn on the weigh scale you are trying to link to the stock recorder. Make sure it is close by.
2. On the stock recorder desktop find the computer icon. It may be called My Device or My Computer.
Double tap the icon to open it.
3. A shortcut to the Bluetooth Manager is to tap the BT icon on the bo om taskbar.
4. Open Control Panel.
5. Find the Bluetooth symbol. It may be an icon or it may be in a list of folders.
Double-tap to open Bluetooth Device Properites.
13
6. On the devices tab press Scan. Now the stock recorder tries to find all the Bluetooth devices in the
area. This may take a few minutes - be pa ent!
7. When scanning is complete the screen will show all the Bluetooth devices in the area, including
mobile phones.
8. Highlight the ID3000 and tap Pair.
9. The Authen ca on screen opens. All Shearwell products use 1111 as the default PIN. Type in the
PIN and tap Next.
14
1. The Services screen will open. Tap in the Serial Port ck box.
2. The Serial Profile screen will open. Leave EncrypƟon disabled. Leave Mode as serial.
3. Open the Port menu. On the list find the next available BSP a er BSP 1. Make a note of the BSP
number.
4. The Serial Profile screen opens again. Tap Next. On the Services screen tap Done.
15
Set up FarmWorks on the stock recorder to receive weights from the Tru-Test 3000
1. Open FarmWorks on the stock recorder.
2. Select OpƟons, then Weigh Scale.
3. Select JR3000
4. Select the correct Bluetooth port number - the BSP
number from the Bluetooth Manager. Click backwards
and forwards using the Back and Next bu ons un l you
find the right BSP number.
5. Tap Test ConnecƟon. The message ConnecƟon Established means the stock recorder and your
Tru-Test 3000 have been successfully connected.
16
Bluetooth connection to the 3-Way Drafter
Preparing the 3-Way Dra er
1.
2.
3.
4.
Connect the Main Control box to a power supply.
A ach an air line from the air compressor to the Main Control box.
Check for 40 psi on the air gauge.
Push the rocker switch to the ON posi on.
17
Pairing the stock recorder with the 3-Way Dra er
* If the Bluetooth Manager on your stock recorder looks different than what is pictured here you might
have an older version - see the appendices at the back of this guide to find the right procedure.
1. Turn on the dra er you are trying to link to the stock recorder. Make sure it is close by.
2. On the stock recorder desktop find the computer icon. It may be called My Device or My Computer.
Double tap the icon to open it.
3. A shortcut to the Bluetooth Manager is to tap the BT icon on the bo om taskbar.
4. Open Control Panel.
5. Find the Bluetooth symbol. It may be an icon or it may be in a list of folders.
Double-tap to open Bluetooth Device Properites.
18
6. On the devices tab press Scan. Now the stock recorder tries to find all the Bluetooth devices in the
area. This may take a few minutes - be pa ent!
7. When scanning is complete the screen will show all the Bluetooth devices in the area, including
mobile phones.
8. Highlight DraŌ-035 and tap Pair.
9. The Authen ca on screen opens. All Shearwell products use 1111 as the default PIN. Type in the
PIN and tap Next.
19
1. The Services screen will open. Tap in the Serial Port ck box.
2. The Serial Profile screen will open. Leave EncrypƟon disabled. Leave Mode as serial.
3. Open the Port menu. On the list find the next available BSP a er BSP 1. Make a note of the BSP
number.
4. The Serial Profile screen opens again. Tap Next. On the Services screen tap Done.
20
Set up FarmWorks on the stock recorder to operate the 3-way dra er
1. Open FarmWorks on the stock recorder.
2. Select OpƟons, then DraŌer.
3. Select 3-Way
4. Select the correct Bluetooth port number - the
BSP number from the Bluetooth Manager. Click
backwards and forwards using the Back and
Next bu ons un l you find the right BSP number.
5. Click Test ConnecƟon. The message ConnecƟon Established means the stock recorder and 3-way
dra er have been successfully connected.
21
Operating the drafting crate
Read the instrucƟons for seƫng up the Bluetooth connecƟons before starƟng. This secƟon
deals with the actual operaƟon of the crate aŌer the iniƟal installaƟon.
1.
2.
3.
4.
5.
6.
7.
8.
9.
Open FarmWorks on the stock recorder, then OpƟons, then RF Reader.
Change RF Reader to SDL 130R
Test connec on. Tap Escape.
In OpƟons menu open Weigh Scale.
Change Weigh Scale to JR3000
Test connec on. Tap Escape.
In OpƟons open DraŌer.
Change Dra er to 3 Way
Test connec on. Con nue to Sheep Procedures then DraŌing.
This is the procedure for using the stock recorder and auto dra er to weigh and sort animals based on
their weight. If you want to dra animals based on other criteria, like sex or breed, or if you want to
separate animals into special groups, then you must do that through a Dra ing Setup in FarmWorks on
the computer. See the FarmWorks User Guide for specific instruc ons on dra ing setups.
Dra by Weight
This op on reads the EID tag and records a weight against each animal before dra ing three ways.
The three dra s can also be named as management groups, which will be imported into
FarmWorks during the next data transfer.
1.
2.
3.
4.
On the stock recorder go to Sheep Procedures > DraŌing.
Select DraŌ by Weight.
You can choose to save the weight of each animal - Yes or No.
You can choose to save the dra ed animals into management groups - Yes or No. Tap Next.
5. Set the weight parameters and select the gates - Le (L), Right (R) or Forward (F). Tap Next.
6. If you chose to save into management groups then you must type in a name for each group. Make
unique names that will be easy to find in FarmWorks. Tap Next.
7. The in-gate (back gate) of the dra ing crate will open for the first sheep to enter, and close behind it.
8. The EID number will appear in the Tag field, the weight will show, the appropriate management group
is named and an arrow shows the direc on of the gate opening.
22
Operating the drafting crate
Dra by Weight Alone
This op on does NOT record any animal informa on. It only weighs and then dra s in three
different direc ons depending on your weight parameters.
1.
2.
3.
4.
5.
On the stock recorder go to Sheep Procedures > DraŌing.
Select DraŌ by Weight Alone.
Set the weight parameters and select the gates - Le (L), Right (R) or Forward (F). Tap Next.
The in-gate (back gate) of the dra ing crate opens for the first sheep to enter, and closes behind it.
AwaiƟng Next Animal appears in the Tag field, the weight will show, and an arrow shows the direcon of the gate opening.
Manual dra ing with the stock recorder
Occasionally you may want to stop the auto dra er and operate the gates manually using the stock recorder.
Note that if you are dra ing into management groups, NO data will be recorded about an animal that
is dra ed manually. The 3-way dra er must have a Bluetooth connec on to the stock recorder before
star ng.
1. On the stock recorder go to Sheep Procedures > DraŌing.
2. Select any of the dra ing op ons and prepare to dra .
3. There is an op on to switch to Manual dra ing at the bo om of the screen.
4. Use the bu ons to open and close any of the dra ing gates. To revert to automa c dra ing, tap Auto.
23
Operating the drafting crate
Using the remote control
The remote control can be used to operate the gates for manual dra ing of animals. This can be done
independently of the stock recorder, or used in conjunc on with the stock recorder for recording
treatments, movements, etc when animals are not being automa cally dra ed.
1. On the stock recorder, go to OpƟons > DraŌer, and select None as the dra crate.
2. Connect the remote control to the Main Control box. The port is above the air line connec on.
3. Use the four bu ons to open the front, rear, le and right gates.
24
Trouble-shooting Guide
The back gate of the crate will not open automa cally.
1. Go to Reconnect Devices on the stock recorder. Test the connec on.
2. Check the remote control is not connected. If it is then power off the Main
Control box, unplug the remote control cable and switch the Main Control box
back on. Go back to Reconnect Devices and test connec ons.
3. Check the stock recorder has the 3 Way DraŌer selected. (OpƟons > DraŌer)
4. The right Bluetooth port is BSP ____. (Check your Quick Connect guide.)
5. Is the airline connected and showing 40 PSI on the gauge?
Stock recorder is not receiving weights.
1. Go to Reconnect Devices on the stock recorder. Test the connec on.
2. Check the Tru-Test is connected and powered on.
3. Check the stock recorder has the weigh scale JR3000 selected.
(OpƟons > Weigh Scale)
4. Select the right Bluetooth port - BSP ____. (Check your Quick Connect guide.)
Error message on stock recorder...
These errors can indicate that Bluetooth ports are cross-linked, or else the Bluetooth
connec on to the stock recorder has been broken. If the Psion switched off or was
moved out of range it will lose the Bluetooth connec on.
1. Check that the Bluetooth port for each device is correct and none are shared.
2. Go to Reconnect Devices on the stock recorder. Test the connec on.
3. Check the Main Control box s ll has power (light is on).
4. Check that all cords and plugs are secure. If the power fails for even a second
the Bluetooth connec on will be broken.
5. If none of these resolve the problem there may be a fault in the control box.
Please contact your distributor.
25
Trouble-shooting Guide
Stock recorder is not receiving tag numbers.
1. Try a test tag. Does the green light flash?
2. Go to Reconnect Devices on the stock recorder. Test the connec on.
3. Check the SDL 130 is connected and powered on. (Is the red light on?)
4. Check the stock recorder has the RF reader SDL 130R selected.
(OpƟons > RF Reader)
5. Select the right Bluetooth port - BSP ____. (Check your Quick Connect guide.)
6. Move radios, fans, laptops, etc. away if they could interfere with the Bluetooth
signal.
Error message on stock recorder...
The in-gate (or back gate) closes when there is weight on the scale. This message results
when the in-gate can not close because of an obstruc on, commonly by two sheep trying
to enter together. The gate is programmed to try two mes to close, then it stops to allow
you to clear the obstruc on.
1. Check there is nothing preven ng the gate from closing. Press Reset. The gate
should now close when a weight is in the crate.
2. If there are no obvious obstruc ons then check how quickly the gate is closing.
If the gate is taking too long to close then it thinks there is a blockage. Check the
compressor is running and there is enough air pressure to close the gate quickly
enough.
3. If there is no blockage and sufficient air pressure, then there may be a fault
with either the sensor which detects that the gate is closed, or inside the dra ing
control box. Please contact your distributor.
26
Contacting support
Technical support in the UK
Shearwell Data Ltd
Putham Farm, Wheddon Cross
Minehead
Somerset
Tel: 01643 841611
Fax: 01643 841628
Email: [email protected]
Technical support in Canada
Shearwell Canada Support
Erona Farms Ltd
Barrhead, Alberta
Tel: 780 674 9564
Email: [email protected]
www.eronafarms.ca
27
Appendix A
G2 Bluetooth connection to the SDL130 Dual Panel Reader
Pairing the stock recorder to the SDL 130
1. On the stock recorder desktop open My Device, go to Control Panel.
2. Open Bluetooth Devices.
3. On the devices tab select the SDL 130. If the SDL 130 is not visible on the list click Scan and the
stock recorder should find it.
4. Highlight the SDL 130 and tap the PIN bu on. Enter in the default PIN - 1111. Click OK.
28
5. Click the Services bu on and wait for a window to pop up. It may take a few seconds.
6. Double tap PRINTER.
7. From the drop-down menu select AcƟve.
8. On the Services page you should see a port number i.e. BSP3 or some other BSP number.
Remember this number for your panel reader!
9. Click OK and close all the windows.
10. Your stock reader is now paired to the SDL 130.
29
Appendix B
G2 Bluetooth connection to the Tru-Test 3000
Pairing the stock recorder with the Tru-Test 3000
1. On the stock recorder desktop open My Device, go to Control Panel.
2. Open Bluetooth Devices.
3. On the devices tab select the ID3000. If the ID3000 is not on the list click Scan and the stock recorder
should find it.
4. Highlight the ID3000 and tap the PIN bu on. Enter in the default PIN - 1111. Click OK.
30
5. Click the Services bu on and wait for a window to pop up. It may take a few seconds.
6. Double tap PRINTER.
7. From the drop-down menu select AcƟve.
8. On the Services page you should see a port number i.e. BSP3 or some other BSP number.
Remember this number for your weigh scale!
9. Click OK and close all the windows.
10. Your stock recorder is now paired to the Tru-Test weigh scale.
31
Appendix C
G2 Bluetooth connection to the 3-Way Drafter
Pairing the stock recorder to the 3-Way Dra er
1. On the stock recorder desktop open My Device, then go to Control Panel.
2. Open Bluetooth Devices.
3. On the devices tab select DraŌ. If the dra er is not visible on the list click Scan and the stock
recorder should find it.
4. Highlight DraŌ and tap the PIN bu on. Enter in the default PIN - 1111. Click OK.
32
5. Click the Services bu on and wait for a window to pop up. It may take a few seconds.
6. Double tap PRINTER.
7. From the drop-down menu select AcƟve.
8. On the Services page you should see a port number i.e. BSP3 or some other BSP number.
Remember this number for your 3-way draŌer!
9. Click OK and close all the windows.
10. Your stock recorder is now paired to the 3-way
dra er.
33