1
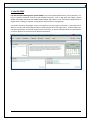
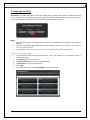
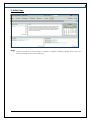
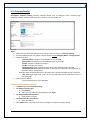
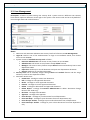
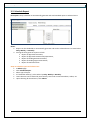
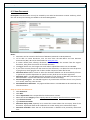
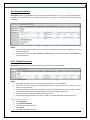
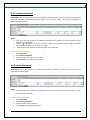
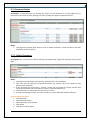
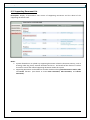
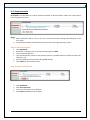
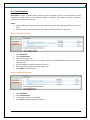
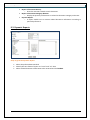
User’s Manual for niix ISO DMS [This document is the user’s guide for the niix ISO DMS. It describes the various features of the system and shows what the user will see on the screen, the responses to be entered, and the results produced. Further, enables the user to understand how to use the niix ISO DMS.] User’s Manual - Revision 3.70 EN HK Comp Software Standards (M) Sdn. Bhd. User Manual’s for niix ISO DMS Table of Contents 1. niix ISO DMS............................................................................................................................................................. 3 2. Single Sign-On (SSO) ................................................................................................................................................ 4 3. Admin Page .............................................................................................................................................................. 5 3.1. Company Setting .................................................................................................................................... 6 3.2. User Management .................................................................................................................................. 7 3.2.1. Edit User ................................................................................................................................. 8 3.3. Quality Policy .......................................................................................................................................... 9 3.4. System Setting ...................................................................................................................................... 10 3.5. Schedule Report ................................................................................................................................... 11 3.6. Audit Log............................................................................................................................................... 12 3.6.1. Audit Log based on User ...................................................................................................... 12 3.6.2. Audit Log based on Document ............................................................................................. 12 3.7. Send For Review ................................................................................................................................... 13 3.8. Send For Approval ................................................................................................................................ 14 3.9. Pending Review .................................................................................................................................... 15 3.10. Pending Approval ............................................................................................................................... 16 4. Document Page ..................................................................................................................................................... 17 4.1. Document Master List .......................................................................................................................... 17 4.2. New Document ..................................................................................................................................... 18 4.3. Edit Document ...................................................................................................................................... 20 4.4. Revise Document .................................................................................................................................. 21 4.5. Delete Document ................................................................................................................................. 22 4.6. Document Report ................................................................................................................................. 23 4.6.1. Delete Document ................................................................................................................. 23 4.6.2. Inactive Document ............................................................................................................... 24 4.6.3. Active Document.................................................................................................................. 24 4.7. Document Status .................................................................................................................................. 25 4.7.1. Delete Document ................................................................................................................. 25 4.7.2. Cancel Document ................................................................................................................. 26 4.7.3. Document Change Record ................................................................................................... 26 4.8. Reference Document List ..................................................................................................................... 27 4.9. Supporting Document List .................................................................................................................... 28 5. Department Page ................................................................................................................................................... 29 5.1. Department List .................................................................................................................................... 29 5.1.1. Create New Department ...................................................................................................... 30 5.1.2. Edit Department .................................................................................................................. 30 5.1.3. Delete Department .............................................................................................................. 31 6. Deskboard Page ..................................................................................................................................................... 32 6.1. Deskboard ............................................................................................................................................ 32 6.2. Announcement ..................................................................................................................................... 33 6.3. Task Reminder ...................................................................................................................................... 34 7. Personal Page ........................................................................................................................................................ 35 7.1. Personal Document .............................................................................................................................. 35 8. Search Document .................................................................................................................................................. 36 9. Reports .................................................................................................................................................................. 37 9.1. Document Reports ............................................................................................................................... 37 9.2. Dynamic Reports .................................................................................................................................. 38 Appendix……………………………………………………………………..………………………………………………………………………………………39 2 User Manual’s for niix ISO DMS 1. niix ISO DMS niix ISO Document Management System (DMS) is a proven web based document control solutions, not only to improve document control at ISO certified companies such as ISO 9001, ISO 14001, ISO/TS 16949, ISO 13485, ISO 17025, ISO 22000, OSHAS 18001, ISO 27001, etc, but also widely implemented at organizations seeking to improve overall general documentation management. It provides countless advantages such as increased security and rights based access, improved search ability of current and historical documents including approvals and change history, reduced hard copy storage requirements, shortened change process cycle-time, as well as automate electronic distribution of current documents and removal of obsolete documents. 3 User Manual’s for niix ISO DMS 2. Single Sign-On (SSO) Description: niix Software Solution offers the Single Sign-On (SSO) feature which enables authorized user to access various niix Software Solutions via the niix Software Portal, without requiring the user to re-entering username and password for each and individual software solution. Notes: 1. Login ID, Organization ID and Password serve as the authentications to login to niix Software Solution. 2. Login ID, Organization ID and Password are case sensitive. Make sure the proper case is used or the access will be denied. 3. niix ISO DMS is best view with Internet Explorer, Mozilla Firefox and Google Chrome. Steps to login to niix ISO DMS: At web address field of the Internet browser, type in IP address of niix Software Portal to launch Login page. At Login ID box, type your login ID. At Organization ID box, type your organization ID. At Password box, type your password. Click Login. At niix Software Portal, click niix ISO DMS to access the system. 4 User Manual’s for niix ISO DMS 3. Admin Page Notes: 1. The user interface of niix ISO DMS is available in English or Malay language, which user can select according to their own preference. 5 User Manual’s for niix ISO DMS 3.1. Company Setting Description: Company Setting contains company details such as company name, company logo, telephone number, default email notification duration, contact details, etc. Notes: 1. ONLY user with Executive Administrator security level can access to Company Setting. 2. Executive Administrator can update company details except Company Name and Signup Date. 3. Company details: · Company Name: Company name displays in niix ISO DMS. · Signup Date: Date where niix ISO DMS delivered to customer. · Tel No.: Company telephone number. · Fax No.: Company fax number. · Company Logo: To be displayed at Login Page. Recommended size is 96 x 96. · Notification Duration: Default duration (in days) given to Reviewer and Approver for document review and approval. Reminder email automatically sent in daily basis after review and approval task is past due. · URL Link: Login page’s URL. User can click the URL from email notification to link to the Login page. 4. Contact person Details: · System Administrator of niix ISO DMS. Steps to amend Company Setting; At Admin page, click Company Setting To change company logo: a. Click Browse b. Select the logo file to be uploaded then click Open. To change Notification Duration: a. Type number of day(s) To change the URL Link address: a. Type URL address Click Submit after amending all necessary changes to complete company setting. 6 User Manual’s for niix ISO DMS 3.2. User Management Description: A feature to edit existing user security level. System consist 5 different User Security levels which represent difference access right to the system. User Access Level can be set by default or reset through check and uncheck feature. Notes: 1. ONLY user with Executive Administrator security level has full access to User Management. 2. Login ID: Used as one of the authentications to login to niix Software Portal, then further access to niix ISO DMS. 3. System consists of 5 default Security Level as follow : Executive Administrator: Full access to every feature in niix ISO DMS. Administrator: Full access to every feature except delete function. Manager: Full access to every feature except delete function and authority limit to own department ONLY. Supervisor: Authority to view all document and print own department document. General: Authority to view document ONLY. 4. Security Level can be manually assigns through Check and Uncheck feature and the assign authority is limit to own department ONLY. 5. Document Access Level: Create New - Privilege to create new document. Edit - Privilege to edit approved document. Revise - Privilege to revise approved document. Inactive - Privilege to inactive approved document. Delete - Privilege to delete draft and approved document. Delete Report - Privilege for Executive Administrator to delete “Document Change Record” and “Audit Log”. Reviewer - Privilege to be Reviewer. Approver - Privilege to be Approver. Print All Dept. - Privilege to print document from all department. Print Own Dept. - Privilege to print document from own department only. Print All Dept. Archive - Privilege to print archive document from all department. Print Own Dept. Archive - Privilege to print archive document from own department only. 7 User Manual’s for niix ISO DMS 6. User Access Level Edit - Privilege to edit other users’ security level. Deskboard – Privilege to create Announcement and Task Reminder. Dashboard Report – Privilege to access document report in dashboard. Schedule Report – Privilege to setup standard report schedule. Dynamic Report – Privilege to generate dynamic report. 7. Personal Folder: Authority to create and store confidential document such as recipe, product formula, etc. Personal Document can only be accessed by Author, Reviewer, Approver and Executive Administrator. Author can assign personal document access rights to Manager, Administrator and Executive Administrator. 8. Email Notification: Indicate whether the particular user is allowed to receive email notification from system related to document activities, task, announcement, etc. 3.2.1. Edit User Description: A feature to edit existing user access level, personal folder, email notification, etc. Notes: 1. User cannot be edited while the account owner is using the system. 2. Authorize User can only edit other users which the security level is equal or lower than the Authorized User. Steps to Edit User Click User Management Click Edit You can search specific user through the Login ID, Family Name, Given Name, Department Name, Job Position or Security Level. OR select the user from the generated list. Upon selecting user, make necessary changes. 8 User Manual’s for niix ISO DMS 3.3. Quality Policy Description: To display the ISO Policy such as Quality Policy, Environmental Policy, etc of the company. Notes: 1. This function only can be performed by Executive Admin (EA). 2. Existing Quality Policy cannot be edited. Steps to Revise Quality Policy: At Admin page Click Quality Policy Click Revise to create new Quality Policy. At the dynamic text field, type your quality policy. Function such as bold, underline, italic is available in the text field. Click Submit to complete. New Quality Policy will appear at home page. Steps to Delete Quality Policy (WARNING!!! Deleted Quality Policy is not retrievable) At Admin Click Quality Policy Tick any quality policy to be deleted. Click delete and OK to confirm delete. 9 User Manual’s for niix ISO DMS 3.4. System Setting Description: To setup scheduler of reminding user to change user system login password. Notes: 1. This function is optional. System Administrator can decide whether or not to utilize this function. Steps to schedule password change reminder: At Admin page. Click System Setting. Check “Activate” box. Select reminder schedule either by “weekly”, “monthly” and “time” to send reminder email. 10 User Manual’s for niix ISO DMS 3.5. Schedule Report Description: Setup scheduler to automatically generate and send standard report to selected users. Notes: 1. Report can be scheduled to automatically generate and send to selected users via email either Daily, Weekly, or Monthly. 2. Among the auto generate reports include: Report of Approved Document, Report of Approved Document By Department, Report of Pending Review Document, Report of Pending Approve Document, Report of Draft Document. Steps to schedule report and select users: At Admin page. Click Schedule Report. Select type of report. At “Reminder Send By”, select either by Daily, Weekly or Monthly. Users selection can be filtered by User Security Level such as Executive Admin, Admin, etc. Upon selecting all desired users, click Submit. 11 User Manual’s for niix ISO DMS 3.6. Audit Log Description: A comprehensive record to keep track of who has accessed niix ISO DMS, what changes were made, by whom and when and subsequent review of the system activity. Notes: 3. This function can only be performed by Executive Administrator (EA). 4. Audit Log can be retrieved based on User or Document. 5. It is useful for security purpose as it permits subsequent review of the system activity such as: create, edit, revise, delete, access, print of document, activities related to announcement and task reminder, department, user management and etc. 6. Authorized user can delete the activities from Audit Log. 3.6.1. Audit Log based on User Description: To view the system activities based on user. Steps to view Audit Log based on User: At Admin page. Click Audit Log Check User. Filter search by entering specific user login ID, family name or given name and etc. Select the period of activities you want to retrieve by selecting From and To date. Click Search to obtain result. To Delete any activities, check the specific activity then click Submit and OK to complete. 3.6.2. Audit Log based on Document Description: To view the system activities based on document. Steps to view Audit Log based on Document: At Admin page. Click Audit Log Check Document. Filter search by entering specific document name, document number, etc. Select the period of activities you want to retrieve by selecting From and To date. Click Search to obtain result. To Delete any activities, check the specific activity then click Submit and OK to complete. 12 User Manual’s for niix ISO DMS 3.7. Send For Review Description: All the draft document that has not yet been reviewed will be stored here. Only the creator of the document can retrieve their own draft document from “Send for Review”. Notes: 1. Document creator can only see their own draft document at Send For Review page. 2. Creator can retrieve the draft document and continue to create the document. 3. System allows document to be sent to multiple reviewers for review. Steps to Retrieve Draft Document: At Admin page and Click Send for review Click the selected draft document from the document list to continue to create document. Steps to Send Document for Review (from Send for Review page) At Admin page and Click Send for review Retrieve document by using the search function or select directly from the document listing in the “Send for Review” page. Click the Document Number of the document to be sent for review. Click Update & Review Select (Tick) the reviewer(s) name Click Submit.(System will automatically send email notification to the reviewer(s) to review the document. 13 User Manual’s for niix ISO DMS 3.8. Send For Approval Description: The entire draft document that have been reviewed but not yet send for approval will be stored here. Only the creator of the document can retrieve their own draft document from “Send for Approval”. Notes: 1. Document creator can only see their own document at Send For Approval page. 2. Creator can retrieve the document and continue to send the document to approver for approval. 3. Creator can retrieve document send for approval from either Document Bulletin or Send for Approval page. Steps to send document for approval: Retrieve document from either Document Bulletin or Send for approval. Click on the document. Author will be able to see comment made by reviewers and also the time and date the comment being made. Select approver of the document. System only allows one approver to approve the document at each time. Click Submit to proceed. The page will become dim and user shall wait for the process to complete. Approver will receive email notification to take action on approving the document. 14 User Manual’s for niix ISO DMS 3.9. Pending Review Description: Indicate the document that is pending for reviewer to review the document and the due date given to the reviewer to review the document. Notes: 1. Reviewer can retrieve their “Pending Review Document” from Pending Review or Document Bulletin. 2. Document creator can see who has not yet review the document and also the due date given to the reviewer to review the document. 3. System will automatically send email notification to Reviewer in daily basis when the document in past due. Steps to review document: At Pending Review or Document Bulletin page. Click the document name. Reviewer can see the document details such as document name, document number, name of creator and etc. The document located on the bottom of the page. It is not editable. Reviewer to type the comments related to the document review. Eg: “Agreed” OR “Please amend document …….”. Select YES to agree the document, otherwise select NO to reject the document. Click Submit and OK to complete the review. Author will be notified via email notification for further action. 15 User Manual’s for niix ISO DMS 3.10. Pending Approval Description: All the document that is pending for Approver to approve will be stored here. Approver can retrieve their own “Pending Approver Document” from here. Notes: 1. Approver can retrieve their own “Pending Approval Document” at “Pending Approval” or “Document Bulletin”. 2. Document creator can see who has not yet approved the document and also the due date given to the approver to approve the document. 3. System will automatically send email notification to Approver in daily basis when the document in past due. 4. If document is approved, system will automatically send email notification to all user, update document master list and update department list, and related activities. 5. If document is rejected, system will automatically send email notification to creator to continue amend the document. Steps to approve document: At Pending Approval or Document Bulletin page. Click the document name. Approver can see the document details such as document name, document number, name of creator, reviewer comments, and etc. The document located on the bottom of the page. It is not editable. Approver to type in comments related to the document approval. Eg: “Approved” OR “Please amend document …….”. Select YES to approve the document, otherwise select NO to reject the document. Click submit and OK to complete the approval. 16 User Manual’s for niix ISO DMS 4. Document Page 4.1. Document Master List Description: niix ISO DMS support multiple ISO Standards such as ISO 9001, TS16949, OSHAS, ISO 14001, etc. within one system. All approved document will be automatically updated and displayed at the Document Master List. Notes: 1. Information available includes document name, document number, clause, revision number, creator, approver and approval date. 2. Name of Reviewer will be display at the tool tips when pointing the cursor at the creator name. 17 User Manual’s for niix ISO DMS 4.2. New Document Description: New document can only be created by user who has document creation authority, which the user security level setting is available in the User Management. Notes: 1. Document can be created in the format of MS Word, MS Excel or MS PowerPoint. 2. To be able to create document, user PC must have the MS Office and Java Runtime Environment (JRE). JRE can be downloaded at www.java.com. 3. If creator already have softcopy document, creator can copy the content from the original document, then paste the content at the new document. 4. The bigger the file size, the longer time it will take to upload document into niix ISO DMS. 5. If you want to insert picture into the content of the document, it is advised to save the picture in jpeg format, which jpeg file size if rather smaller compare to other file format. 6. Document Access allows creator to select the document whether can be accessible by all users or personal or specific department or specific security level once it has been approved. 7. Document Type. niix ISO DMS supports document in the format of MS Word, MS Excel, and MS PowerPoint. Creator shall select the document format accordingly. 8. Attach Supporting file. niix ISO DMS supports any attachment document that is in any format such as PDF, video clip, voice and etc. 9. Attach Reference Document. Any approved document in niix ISO DMS can be attached to any other documents. Steps to create new document: Click Document. Click New. Select Department that is responsible for the document creation. Select the correct category such as Quality Manual, Procedure, Work Instruction, Form and etc. Type document name Type document number Document Expiry Date (optional) is to remind the creator about the next expiry date of the document. System will send email notification to creator 30 day prior to document expire. Document Printable: check the box if the document is allowed to be printed by authorized user. 18 User Manual’s for niix ISO DMS Select the related ISO standard for the document creation. Select related ISO clause. (Clause displayed according to the selected ISO standards. If the selection is ISO 9001, system will display ISO 9001 clause requirement). Select Document Access. (Whether the document is to be viewed by all users, personal, selected department or security level) Select file document format (MS Word, Excel or PowerPoint) Attach Supporting Document (optional): the file can be in any format. Click Browse Navigate to the file user want to attach Click open Click upload button Reference Document (optional): can attach any approved document Click upload Click search Tick desire document Click upload Click Create Document button to create document. Blank document will appear according to document format selected early on. Type the document content OR can copy document content from other document then paste at the new document. Click Save or CTRL + S at the MS Office. Close the MS Office (NOT the browser) Click Save button at the niix ISO DMS browser and wait until it finish. Click View to display the document before send for review. Select document review due date (optional) Select Reviewer(s) Click on Submit. (System will automatically send email notification to Reviewer). 19 User Manual’s for niix ISO DMS 4.3. Edit Document Description: EDIT function is used for making minor correction on document that has been approved in the system, such as spelling error, transfer document from one department to another, etc. Notes: 1. Edit function is advised to be used for making minor correction on the document that has been approved in the system, such as spelling error, transfer the document from one department to another department, change document category, correct document name, document number, document expiry date, supporting document, reference document and clause, etc. 2. Document Revision Number remains unchanged after the editing is taken place. 3. System does not require edited document to be sent for review and approval again. Thus, it is advised to ONLY give the “EDIT” authority to specific authorized user(s). Steps to edit document: Click Document Click Edit Select document from search list or search result Edit any related field. At Reason box (compulsory field), type in the reason why you want to edit the document. (the text will be displayed in Document Comment history). Click Update to complete editing. 20 User Manual’s for niix ISO DMS 4.4. Revise Document Description: Revise function is used for making major changes on document that has been approved in the system. Any revise document shall be sent for review and approval again. Notes: 1. While an Approved Document is being revising, users will still be able to view the existing revision of the document. 2. Reason for Change/Revise: (it is mandatory filed). This is to help reviewer and approver to know the reason of revising and changing the document. 3. There are two options when revising the document – Revise and Save to Draft. 4. When the document has been Revised and Approved, system will automatically: List the latest revision document in the Document Master List. Update document revision number, for example from Revision 1 to Revision 2. Display the latest revision document when user clicks to view the document. Old revision document is archived at “Document History” under the individual document, and is still traceable. Steps to revise document: Click Document. Click Revise. Select document from search list or search result At Reason of Changes / Revise (compulsory field), type the reason why you want to revise the document (the text will be displayed in Document Comment history). Click Revise to proceed. Make necessary changes to the department selection, category, document name, supporting document, reference document, etc. Click Update to proceed to revise document content. Update document content accordingly. Once done, click save or CTRL + S at the MS Office. Close the MS Office (NOT the niix ISO DMS browser). Click Save button and wait until it finish. Click View to display the document before send for review (optional). Put the revise due date for reviewer (optional). Select Reviewer(s). Click Submit. (System will automatically send email notification to Reviewer). 21 User Manual’s for niix ISO DMS 4.5. Delete Document Description: This is the function used for deleting unintended used “approved” document from niix ISO DMS. Notes: 1. Warning!! Document will be permanently deleted and it is not retrievable. 2. Only user who has authority to DELETE the document can perform the action. (Refer to User Security Level for detail) 3. Document can be deleted from Delete page, Document Report page and Document Status page. 4. If the document has more than 1 revision, system will only delete the latest revision then automatically display the second latest revision in Document Master List. 5. Authorized user can only delete one document at a time. 6. Instead of deleting document, user may consider to use the INACTIVE document feature. Inactive document can only be access by authorized user. Steps to delete document: Click Document. Click Delete. User can choose to search the document with the search function provided in the delete document page or select from the document list that is generated once user click the Delete button. Click document to be deleted. Click Submit and OK to confirm. 22 User Manual’s for niix ISO DMS 4.6. Document Report Description: More comprehensive compared to Document Master List, it lists all approved document inclusive every document revisions (latest and archives) with feature to Delete, Inactive and Activate document. Notes: 1. The Document Report allow user to view the all approved document including latest and archive document. 2. Authorized user has the right to Delete and Inactive the approved document, and Activate the inactive document. 4.6.1. Delete Document Description: Any unintended used document can be deleted from niix ISO DMS. Notes: 1. Warning!! Document will be permanently deleted and it is not retrievable. 2. Only user who has authority to DELETE document can perform the action. (Refer to User Security Level for detail) 3. If the document has more than 1 revision, and user has deleted only the latest revision, system will automatically display the second latest revision in Document Master List. 4. Authorized user can delete multiple documents at once. 5. Instead of deleting document, user may consider to use the INACTIVE document feature. Steps to delete document: Click Document Click Document Report Tick document to be deleted. Click delete. Click OK to confirm the delete. 23 User Manual’s for niix ISO DMS 4.6.2. Inactive Document Description: This function can be used to temporary prevent other users to access to the particular approved document. Approved Document that is at “Inactive” status can only be accessible by Executive Administrator. Notes: 1. Only user who has authority to INACTIVE document can perform the action. (Refer to User Security Level for detail) 2. Legend “ ” will appear next to the document name in the Document Report page, it indicates this particular document is at “Inactive” status. 3. “Inactive” document can be “activated” again at any time later. Steps to inactive document: Click Document Click Document Report Tick document user want to inactivate Click Inactive to complete the process 4.6.3. Active Document Description: This is the function to “activate” the inactive document so that users can access the particular document again. Notes: 1. Only user who has authority to INACTIVE document can perform the action. (Refer to User Security Level for detail) Steps to activate document: Click Document. Click Document Report. Tick document to be activated. Click Active to complete the process. 24 User Manual’s for niix ISO DMS 4.7. Document Status Description: A comprehensive list showing the status of each document in niix ISO DMS, such as document in the status of draft, pending for review, pending for approval, approved and etc. Notes: 1. This page also includes other features such as Delete Document, Cancel Document and View Document Comment History. 4.7.1. Delete Document Description: This is the function used for deleting unintended used “approved” document from niix ISO DMS. Notes: 1. Warning!! Document will be permanently deleted and it is not retrievable. 2. Only user who has authority to DELETE document can perform the action. (Refer to User Security Level for detail) 3. If the document has more than 1 revision, system will only delete the latest revision then automatically display the second latest revision in Document Master List. 4. Authorized user can only delete one document at a time. 5. Instead of deleting document, user may consider to use the INACTIVE document feature. Steps to delete document: Click Document Click Document Status Select document to be deleted. Click Delete. Click OK to confirm delete. 25 User Manual’s for niix ISO DMS 4.7.2. Cancel Document Description: This function enable authorized user to cancel the document, which will change the document from its existing status such as “document pending for review”, “pending for approval”, “approved”, etc back to “draft” status”. Notes: 1. This operation only can be performed by Executive Administrator (EA) and Document Owner 2. Once the document has been canceled, the document will remain back to existing revision. Steps to Cancel Document: Click Document Click Document Status Click Cancel and the document to be cancelled. Type the reasons to cancel the document Click Submit and OK to confirm 4.7.3. Document Change Record Description: Display complete history of each document revision and process start from creation, review and approval, comments, etc. Notes: 1. Reviewer comments, Approver comments, Reason of Edit, Reason of Changes, Reason of Cancel document will be display in the Document Change Record section. 26 User Manual’s for niix ISO DMS Steps to view Document Change Record: Click Document Click Document Status Click View at the selected document. 4.8. Reference Document List Description: Display all the documents that consist of Reference Document and the cross-reference between one document and another. Notes: 1. niix ISO DMS support document cross-referencing between approved documents to another document in the event the document is related between one and another. 2. This is an easy way to tie through all related documents within the system. 3. Reference Document can be linked to another document during New document creation, Edit and Revise function. (see details at create New Document, Edit Document, and Revise Document). 27 User Manual’s for niix ISO DMS 4.9. Supporting Document List Description: Display all documents that consist of Supporting Document and the detail of the supporting document itself. Notes: 1. System allowed user to upload any supporting document related to document activity, such as drawing, video clip, photo, external document and so on. The benefit of this function is reduce the time to search the related supporting document within the system. 2. Supporting Document can be added to another document during New document creation, Edit and Revise function. (see details at create New Document, Edit Document, and Revise Document). 28 User Manual’s for niix ISO DMS 5. Department Page 5.1. Department List Description: An informative page to show the list of department created in the database. Users can also retrieve the information of how many documents have been created under a particular department and whether the document is categorized under Quality Manual, Procedure, Work Instruction, Form and etc. niix ISO DMS allow user to create unlimited number of department. Notes: 1. Authorized user can create multiple departments in the niix ISO DMS. 2. Department name listing in Document Master List, Document Report, Document Status, Department List can be set accordingly. If no listing priority is selected, system will list department name in alphabetically order. 29 User Manual’s for niix ISO DMS 5.1.1. Create New Department Description: A feature for Executive Administrator to create new department where the system can support unlimited number of departments. Steps to Create New Department: Click Department Click New Type department ID. Type department name. Set the priority for the department listing. Click submit to create new department. 5.1.2. Edit Department Description: Edit existing department details such as department name, department ID and department listing sequent. Steps to Edit Department: Click Department Click Edit Find department using search function or select from generated department list. Click on department to edit. Change either department ID, department name or priority Click Submit to complete. 30 User Manual’s for niix ISO DMS 5.1.3. Delete Department Description: This is the function used for deleting unintended used department from niix ISO DMS. Notes: 1. Warning!! Document will be permanently deleted and it is not retrievable and this will delete all document revision. 2. The department can only be deleted if there is no user and no document is attached to the selected department. 3. This operation only can be performed by Executive Administrator (EA). Steps to delete department: Click Department. Click Delete. Find department using search function or select from generated department list. Click department to be deleted. Click Submit and OK to confirm delete. 31 User Manual’s for niix ISO DMS 6. Deskboard Page 6.1. Deskboard Description: The Deskboard is served as company "Digital Deskboard" or platform for announcements, news releases and publishes ISO related information and business activities. Notes: 1. Deskboard consist of two functions named Announcement and Task Reminder. 32 User Manual’s for niix ISO DMS 6.2. Announcement Description: niix ISO DMS can support unlimited number of Announcement within the system which can be viewed by all users. Notes: 1. Email notification will be sent to all users and announcement message will be display at the main page. 2. Announcement will be automatically removed from home page upon expiry date. Steps to add announcement: Click Deskboard. By default, it will bring user to announcement page. Click Add. Type announcement title. Type announcement content in the dynamic text box. (Available feature include font bold, italic, underline, etc) Set the availability announcement date (From and To). Click Submit to add announcement. Steps to delete announcement: Click Deskboard. Click Announcement. Tick on announcement to be deleted. Click Delete and OK to confirm delete. 33 User Manual’s for niix ISO DMS 6.3. Task Reminder Description: A space to publish tasks related to other employees and acts as a reminder for other employees to take action on the tasks accordingly. In addition, this feature will also to improve communication within the company. Notes: 1. Email notification will be sent to all users and task reminder message will be display at the main page. 2. Task Reminder will be automatically removed from home page upon expiry date. Steps to Add Task Reminder: Click Deskboard Click Task Reminder Type task reminder title. Type task reminder content in the dynamic text box. (Available feature include font bold, italic, underline, etc) Set the availability reminder date (From and To) Select access level which the task is assigned to. Click Submit to add reminder. Steps to delete task reminder: Click Deskboard Click Task Reminder. Tick on task reminder to be deleted. Click Delete and OK to confirm the delete. 34 User Manual’s for niix ISO DMS 7. Personal Page 7.1. Personal Document Description: A folder to store all personal documents and documents that are only available for limited access by other users, such as agreements, contracts, product formulas, recipes, etc. The Personal Folder provides the author with a unified view of the document list that he/she has created in niix ISO DMS. The author also has the authority to assign the access rights for other users to access to the documents. Notes: 1. To create Personal document. User shall select the Personal as the document access rights when creating new document. 2. Personal document can only be accessed by Creator, Reviewer, Approver and EA. 3. Creator has the authority to assign the access rights to any other manager, Administrator and executive administrator. 4. Indicator will appear next to the documents indicate the document is Personal. 5. Legend “ ” will appear next to the document name in the Document Report page, it indicates this particular document is a Personal Document and can only be viewed by Creator, Reviewer, Approver and Executive Administrator. 35 User Manual’s for niix ISO DMS Steps to assign personal document Click Personal Select the document which to he assigned to other user. Select the user name. Click Assign. 8. Search Document Description: niix ISO DMS offer smart search function for user to easily search document within the system by using keyword or any sequence of characters of the document name and document number, which provides the flexibility for user to either broaden up or narrow down the search result. Notes: 1. User can search document by typing in the keyword or any sequence of characters of the document name and document number. 2. The search is not case-sensitive. It does not matter whether you use capitals or lower case. 3. To narrow down the search, please avoid using the word that is too general. 4. Search result will show complete document list including draft document and approved document that its document name or document number match the keyword. 5. From the search result, user can click the document name to view the content of the approved document. 6. Content of the draft document is not viewable. Steps to search document: At the Search box, type in the keyword or any sequence of characters of the document name and document number. Click . System will list down the complete list of document that matches the input. To view the content of the approved document, click the document name. 36 User Manual’s for niix ISO DMS 9. Reports 9.1. Document Reports Description: niix ISO DMS offers various document reports enable management to see real time document status at one glance. Notes: 1. Among reports available include: Report of Approved Document. o List of document which had been approved in the system. Report of Approved Document by Department. o Quantity of document which had been approved in each department. Report of Pending Review Document. o List of document which is still pending to be reviewed by Reviewer. Report of Pending Approve Document. o List of document which is still pending to be approved by Approver. Report of Draft Document. o List of document which had been created but yet to be sent for review. 37 User Manual’s for niix ISO DMS Report of Document History. o Show the activities related to each document. Report of Document Category & Status. o Display the quantity of document in related to document category and status. Dynamic Report. o A report enable user to retrieve related document information according to personal preference. 9.2. Dynamic Reports Steps to generate Dynamic Report: Select the preferred ISO standard. Identify the time frame of report via “From” and “To” date. Select related document information to be retrieved and click Submit. 38 User Manual’s for niix ISO DMS Appendix Java Pop-up For First Time User For the first time when you use nix ISO DMS system, a JAVA window may pop-up as shown below, user shall: o Click “Always trust content from this publisher” o Click “Run”. 39