1
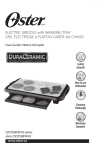
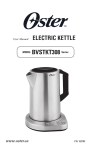
User Manual
MODEL
www.oster.ca
CERAMIC
ELECTRIC KETTLE
BVSTKTC0 Series
160055
IMPORTANT SAFEGUARDS
When using electrical appliances, basic safety precautions should
always be followed to reduce the risk of fire, electric shock, and/or
injury to persons, including the following:
1. Read all instructions before using the machine.
2. Do not touch hot surfaces. Use handles or knobs.
3. To protect against electric shock, do not immerse this appliance
including power base, in water or any other liquid.
4. Close adult supervision is necessary when this appliance is used by
or near children.
5. Unplug the power base from the power outlet when not in use,
before repositioning and before cleaning. Allow to cool before
putting on or taking off parts, and before cleaning the appliance.
6. Do not operate any appliance with a damaged cord or plug or
after the appliance malfunctions, or has been damaged in any
manner. Return this appliance only to the nearest authorized
service center for examination, repair or adjustment.
7. The use of accessory attachments not recommended by the
appliance manufacturer may result in fire, electric shock
or injury to persons.
8. Do not use outdoors.
9. Do not let cord hang over edge of table or counter, or touch hot surfaces.
10. Do not place this appliance on or near a hot gas or electric burner
or in a heated oven.
11. Ensure that the kettle is properly located on the power base before
plugging into the wall or switching on. To disconnect, turn all
controls to “Off” then remove plug from wall outlet.
12. Remove the kettle from power base before filling or pouring. Do
not attempt to remove the kettle from the power base until it is
switched off, manually or automatically.
13. Use the kettle only with the power base supplied and vice versa.
14. Do not use appliance for other than intended use.
15. Use on a hard, flat level surface only, to avoid interruption of air
flow underneath the appliance.
16. Extreme caution must be used when handling or moving kettle
and pouring from the kettle containing boiling water.
17. Scalding may occur if the lid is removed during the heating cycle.
SAVE THESE INSTRUCTIONS
2
SPECIAL CORD SET INSTRUCTIONS
1. A short power supply cord is provided to reduce the hazard resulting
from becoming entangled in or tripping over a longer cord.
2. A grounding Type 3 - conductor extension cord may be purchased
and used if care is exercised in its use.
3. If an extension cord is used the marked electrical rating of the
extension cord must be at least 15 amps and 120 volts. The
resulting extended cord must be arranged so that it will not
drape over the counter top or table top where it can be pulled
on by children or tripped over accidentally.
* This appliance has a grounded 3-prong electrical plug. It must be
plugged only into a properly grounded 3-prong outlet. Do not
modify the plug in any way.
PRECAUTIONS:
WARNING: TO AVOID SCALDING, handle this kettle with care as
water is heating, boiling, and cooling. The lid must remain in place
during use to avoid steam burns. Keep spout away from persons as
scalding can result from steam.
1. Place the electric kettle well back from the edge of the counter.
2. This kettle is intended for boiling WATER ONLY. Do not heat any
other liquid or attempt to cook any food in this appliance.
3. NEVER place the kettle NEAR HOT SURFACES.
4. Hand wash filter only. NO PARTS ARE DISHWASHER SAFE.
5. Do not exceed the “Max” water level mark when filling.
Overfilling could cause hot water to boil out of the spout.
6. Do not hold the switch on as this may damage the auto
shut-off mechanism.
7. Carry or move electric kettle by handle only.
8. Kettle body may get very hot, be careful when handling.
9. Do not immerse the kettle or power base in water or any
other liquid.
FOR HOUSEHOLD USE ONLY
3
INTRODUCTION
Table of Contents
Page #
Important Safeguards ....................................................................... 2
Special Cord Set Instructions ........................................................... 3
Precautions ...................................................................................... 3
Introduction .................................................................................... 4
Diagram of Parts ............................................................................. 4
Clean Your Electric Kettle Before First Use ..................................... 5
Using Your Electric Kettle ............................................................... 5
If The Kettle Does Boil Dry ............................................................... 6
Filter Instructions ............................................................................ 6
Filter Removal/Cleaning/Refitting ................................................... 6
Care and Cleaning ........................................................................... 7
Limited Warranty ............................................................................ 8
Diagram of Parts
1. Lid Release Button
1
2
2. Kettle lid
6
3. Spout
4. Handle
4
5. Ceramic body
3
6. On/Off switch
7. Power base
8. Cord storage (not shown)
9. Indicator Light
5
7
9
4
8
Clean your electric kettle before first use
1. Wash the inside of the kettle and lid with mild detergent and water.
Rinse each thoroughly. Do not immerse the kettle or power base in
water or any other liquid. These items are not dishwasher safe.
2. Fill the electric kettle with fresh water to the “MAX” water level. Boil
the water, following the directions below for use of your kettle.
3. When the water and unit have cooled, discard the water. Rinse with
cold water and repeat.
4. Your electric kettle is now ready for use.
Using your Electric Kettle
1. Position the power base on a flat, heat resistant surface, as close as
possible to a power outlet.
2. Follow cord routing in power base according to exit patterns. Proper
cord routing will result in the power base laying flat when kettle is
placed in base. DO not operate kettle if power base is not flat. If
power base is not flat, remove kettle from power base and repeat
cord placement instructions.
3. To fill with water, press the lid release button to open the lid. Fill the
electric kettle with water to below the “MAX” water level mark.
NOTE: Do not exceed the “MAX” water level mark indicated on
the electric kettle.
4. Plug the electric cord into an electric outlet. Turn the switch ON
by pushing down on the on/off switch. The indicator light will
illuminate to indicate the unit is on. The water will heat and the
electric kettle will switch off automatically when the water boils.
NOTE: Ensure the ON/OFF switch is clear of obstructions and the
lid is firmly closed. The electric kettle will not turn off automatically
if the ON/OFF switch is constrained, or if the lid is left open.
5. Carefully lift the kettle from the power base and pour the hot water.
6. The kettle will not re-boil until the on/off switch is again switched
ON. Wait 25 seconds, allowing kettle to cool down, then switch ON.
5
IF THE KETTLE DOES BOIL DRY
If the kettle is operated in accordance with instructions for use, it is
unlikely that the kettle will boil dry. However, in the event that the
kettle does boil dry, it is protected by a boil dry, fail-safe device which
will switch the kettle off automatically on sensing a boil dry situation
and keep it switched off until the kettle is refilled with at least the
minimum amount of water. Always allow the kettle to cool for half an
hour before reuse if the kettle has boiled dry.
Filter instructions
A mesh filter has been integrated into the kettle to reduce the amount of
scale residues entering your beverages or food. The filter is removable
for cleaning. To reduce scale build-up, empty out any residual water
after boiling.
How often the filter should be cleaned will vary according to where
you live and how often you use your kettle. Filter should be cleaned
whenever there are noticeable deposits left on the filter and especially if
the rate of pouring decreases.
Filter removal/cleaning/refitting
Important: The kettle must be switched off, disconnected from the
power outlet and allowed to cool down completely prior to removing
or refitting the filter. Do not use excessive force, as this might damage
the filter or the lid.
1. Empty the kettle and lift lid.
2. Grip the top part of the filter with index finger and thumb and
pull upwards. You may have to hold kettle while removing filter.
Caution: Keep fingers clear of mesh. Pressing into mesh may
damage filter.
3. To clean the filter, rinse under a tap while brushing it gently with
a soft brush.
4. To refit filter, once again hold filter with index finger and thumb.
Gently push filter back into the kettle until you hear a click. The
filter is now reattached. Gently tug on filter to ensure filter is
attached properly.
5. Rinse out kettle with fresh water and it’s ready for use.
6
Care and cleaning of your electric kettle
1. Mineral deposits in tap water may cause scale deposits to form
inside the electric kettle after frequent use. To remove this scale
build-up, fill the kettle with a solution of 3 cups of white vinegar
and 3 cups water. Let sit overnight.
2. Empty the vinegar solution from the electric kettle. Remove any
stain remaining inside by rubbing with a damp cloth.
3. Fill the electric kettle with clean water. Place kettle on power base
and bring to a boil, then discard water. Repeat and the electric kettle
will be ready to use.
4. The electric kettle will not operate again until the on/off switch is
pressed downward.
5. Always remove kettle from power base and disconnect power base
from electrical outlet before cleaning. Do not immerse kettle or
power base in water or other liquid.
6. The outside of the electric kettle can be wiped with a soft damp cloth.
NOTE: Never use any chemical, steel wool, or abrasive cleaners to
clean any part of the kettle, including the power base.
For product questions contact:
Jarden Consumer Service
USA : 1.800.334.0759
Canada : 1.800.667.8623
www.oster.ca
© 2012 Sunbeam Products, Inc. doing business as
Jarden Consumer Solutions. All rights reserved.
In the U.S.A., distributed by Sunbeam Products, Inc. doing business as
Jarden Consumer Solutions, Boca Raton, FL 33431.
In Canada, imported and distributed by Sunbeam Corporation (Canada) Limited,
doing business as Jarden Consumer Solutions,
20B Hereford St., Brampton, Ontario L6Y 0M1.
GCDS-OST25414-PH
Printed in China
7
1-Year Limited Warranty
Sunbeam Products, Inc. doing business as Jarden Consumer Solutions or if in
Canada, Sunbeam Corporation (Canada) Limited doing business as Jarden Consumer
Solutions (collectively “JCS”) warrants that for a period of one year from the date of
purchase, this product will be free from defects in material and workmanship. JCS,
at its option, will repair or replace this product or any component of the product
found to be defective during the warranty period. Replacement will be made with a
new or remanufactured product or component. If the product is no longer available,
replacement may be made with a similar product of equal or greater value. This is your
exclusive warranty. Do NOT attempt to repair or adjust any electrical or mechanical
functions on this product. Doing so will void this warranty.
This warranty is valid for the original retail purchaser from the date of initial retail
purchase and is not transferable. Keep the original sales receipt. Proof of purchase is
required to obtain warranty performance. JCS dealers, service centers, or retail stores
selling JCS products do not have the right to alter, modify or any way change the terms
and conditions of this warranty.
This warranty does not cover normal wear of parts or damage resulting from any of the
following: negligent use or misuse of the product, use on improper voltage or current,
use contrary to the operating instructions, disassembly, repair or alteration by anyone
other than JCS or an authorized JCS service center. Further, the warranty does not
cover: Acts of God, such as fire, flood, hurricanes and tornadoes.
What are the limits on JCS’s Liability?
JCS shall not be liable for any incidental or consequential damages caused by the
breach of any express, implied or statutory warranty or condition.
Except to the extent prohibited by applicable law, any implied warranty or condition of
merchantability or fitness for a particular purpose is limited in duration to the duration
of the above warranty.
JCS disclaims all other warranties, conditions or representations, express, implied,
statutory or otherwise.
JCS shall not be liable for any damages of any kind resulting from the purchase, use or
misuse of, or inability to use the product including incidental, special, consequential
or similar damages or loss of profits, or for any breach of contract, fundamental or
otherwise, or for any claim brought against purchaser by any other party.
Some provinces, states or jurisdictions do not allow the exclusion or limitation of
incidental or consequential damages or limitations on how long an implied warranty
lasts, so the above limitations or exclusion may not apply to you.
This warranty gives you specific legal rights, and you may also have other rights that
vary from province to province, state to state or jurisdiction to jurisdiction.
How To Obtain Warranty Service
In the U.S.A.
If you have any question regarding this warranty or would like to obtain warranty
service, please call 1 800-334-0759 and a convenient service center address will be
provided to you.
In Canada
If you have any question regarding this warranty or would like to obtain warranty
service, please call 1 800-667-8623 and a convenient service center address will be
provided to you.
In the U.S.A., this warranty is offered by Sunbeam Products, Inc. doing business as
Jarden Consumer Solutions located in Boca Raton, Florida 33431. In Canada, this
warranty is offered by Sunbeam Corporation (Canada) Limited doing business as
Jarden Consumer Solutions, located at 20B Hereford Street, Brampton, Ontario L6Y
0M1. If you have any other problem or claim in connection with this product, please
write to Consumer Service Department.
PLEASE DO NOT RETURN THIS PRODUCT TO ANY OF
THESE ADDRESSES OR TO THE PLACE OF PURCHASE.
8