1
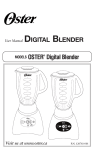
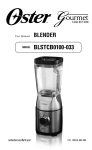
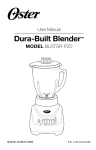
User Manual
Manual de Instrucciones
Manuel d’Instructions
MODELS/
MODELOS
MODÈLES
www.oster.com
BLENDERS
LICUADORAS
MÉLANGEURS
Push Button Blenders
Mélangeurs à poussoirs
P.N. 133093-005-000
IMPORTANT SAFEGUARDS
When using electrical appliances, basic safety precautions should be followed,
including the following:
Read all instRuctions befoRe use
• Unplugcordfromoutletwhennotinuseorbeforecleaning.
• Toprotectagainstriskofelectricalshock,donotimmersethecord,plugormotorbasein
water or any other liquids.
• Donotletcordhangoveredgeoftableorcounterortouchhotsurfaces.
• Neverleaveapplianceunattendedwheninuse.
• Closesupervisionisnecessarywhenusedbyornearchildren.
• Avoidcontactwithmovingparts.Keephandsandutensilsoutofjarwhileblendingtoprevent
personal injury or damage to the blender. A rubber spatula may be used only when the blender
is not running.
• Thebladeissharp.Handlewithcare.
• Toreducetheriskofinjury,neverplacecutter-assemblybladesonbasewithoutjarproperly
attached.
• Alwaysputthelidonthejarbeforeoperatingtheblender.
• Donotblendboilingliquidsintheblender.
•Whenblendinghotliquidsbewareofsteam.Removethefillercapfromthelidtoallowsteam
to escape.
• Donotoperateanyappliancewithadamagedcordorplugoraftertheappliancemalfunctions
or is dropped or damaged in any manner. Return the appliance to the nearest Authorized
Sunbeam Appliance Service Center for examination, repair or electrical mechanical adjustment.
• Donotuseoutdoorsorforcommercialpurposes;thisapplianceisforhouseholduseonly.
• Alwaysoperateonaflatsurface.
• Unplugtheblenderwhennotinuse,beforetakingofforputtingonpartsandbeforecleaning.
• Usethisapplianceforitsintendeduseasdescribedinthismanual.Theuseofattachmentsnot
made by the manufacturer, including canning or ordinary jar and processing assembly parts, is
not recommended by Sunbeam Products, Inc. and may cause injury.
this PRoduct is foR household use only
The maximum rating marked on the product is based on the attachment that draws
the greatest load. Other attachments may draw less power.
PoWer cord InstructIons
Please follow the instructions below to ensure the safe use of the power cord.
• Thisapplianceisequippedwithapolarizedplug.Thistypeofplughasonebladethat
is wider than the other. This plug will fit in a polarized outlet only one way. This is
a safety feature intended to help reduce the risk of electrical shock. If you are unable
to insert the plug into the outlet, contact a qualified electrician to replace the obsolete
outlet. Do not attempt to defeat the safety purpose of the polarized plug by modifying
the plug in any way.
• Youmayuseanextensioncord,ifnecessary,butbecertaintofollowtheseguidelines:
– The marked electrical rating of the extension cord must be at least 120/127 Volt,
60 Hz, 10A.
– The extension must be arranged so that it will not drape over the countertop or
tabletop, will not be within the reach of children, and will not be tripped over.
– Do not pull, twist or otherwise abuse the power cord.
SAVE THESE INSTRUCTIONS
2
Welcome
Congratulations on your purchase of an Oster® Blender! To learn more about
OSTER® products, please visit us at www.oster.com.
Features
A.
B.
C.
D.
E.
F.
G.
H.
I.
J.
oF Y our B lender
Feeder cap for adding ingredients while blending
Leak-proof lid
Your Oster® Blender includes one of the following:
5 or 6-cup (1.2–1.4 L) Dishwasher-Safe Glass Jar
8-cup (1.89 L) Party Pitcher Glass Jar
6-cup (1.4 L) Break-Resistant Plastic Jar
Sealing ring for tight seal
Ice Crusher Blade pulverizes ice for smooth frozen drinks
Threaded Jar Nut or Threaded Jar Skirt (Select Models Feature a Threaded
Jar Skirt)
Powerful motor with ALL-METAL-DRIVE for lasting durability
Control panel
Pulse for precise blending control (Location varies per model)
HIGH/LOW Switch (Select Models Only)
D
E
A
B
*F
C
G
H
I
J
*Note: Blender models will feature a Threaded Jar Nut OR a Threaded Jar Skirt (F)
3
8-Speed
1
2
PURÉE
3
CHOP
4
MIX
5
PULSE
LIQUEFY
6
7
SHAKE
LOW
8
SMOOTHIE
ICE CRUSH
HIGH
10-Speed
1
EASY CLEAN
2
PURÉE
3
4
CHOP
5
WHIP
6
MIX
GRATE
7
8
BLEND
LOW
GRIND
9
10
LIQUEFY ICE CRUSH
HIGH
12-Speed
1
EASY CLEAN
2
PURÉE
3
4
CREAM
5
CHOP
6
WHIP
MIX
7
8
GRATE
BLEND
9
SHRED
LOW
10
GRIND
11
LIQUEFY
12
ICE CRUSH
HIGH
14-Speed
1
2
3
4
5
6
7
8
9
10
11
12
13
14
EASY CLEAN
BEAT
PURÉE
CREAM
CHOP
WHIP
MIX
MINCE
GRATE
BLEND
SHRED
GRIND
LIQUEFY
ICE CRUSH
LOW
HIGH
16-Speed
1
PULSE
2
EASY CLEAN
3
STIR
4
B E AT
5
PURÉE
6
CHOP
7
WHIP
8
MIX
9
ICE CRUSH
LOW
10
G R AT E
11 12 13 14 15 16
BLEND
SHRED
GRIND
MASH
LIQUEFY
HIGH
Using Your Blender
1. Clean blender according to the instructions in the “Cleaning and Storing
Your Blender” section.
2. Turn jar upside down so the small opening is at the top. (Figure 1)
3. Place sealing ring over jar opening. (Figure 2)
4. Place blade into jar. (Figure 3)
Figure 1
Figure 2
4
Figure 3
FRAPPÉ
5. Place threaded jar nut or threaded jar skirt over
blade and jar (Note: If there are slots on top of
collar, line them up with notches on jar.) Place the
threaded jar nut or threaded jar skirt on jar and turn
it clockwise to tighten. (Figure 4)
6. Place jar assembly onto base. (Figure 5)
7. Line up tabs of jar with tabs on blender base.
Make sure the tab of the jar on the left side is in the
back of the tab of the blender base and the tab of
the jar on the right side is in front of the tab of the
blender base. Make sure jar is seated into position.
(Figure 6)
8. Place ingredients into jar.
9. Place lid with feeder cap on jar.
10. Plug the power cord into a 120 Volt
AC electrical outlet.
11. Slide switch to HIGH or LOW. (If your model does
not have a slide switch, push HIGH or LOW button.)
12. Push desired speed and blend ingredients
to desired consistency.
13. Press OFF to stop the blender.
14. To use PULSE, select HIGH or LOW. Push PULSE
and hold down for desired length of time. Release
PULSE and allow blade to stop. Repeat cycle as
desired.
Figure 4
Figure 5
Blending Tips
•Putliquidsinthejarfirst,unlessarecipesaysotherwise.
•Crushingice:Crush6icecubesorapproximately2cups
of ice at a time.
•Donotremovethelidwhileinuse.Removefillercapto
add smaller ingredients. (Figure 7)
•Cutallfirmfruitsandvegetables,cookedmeats,fishand
seafood into pieces no larger than 3/4 inch (1.8 cm) to
1 inch (2.5 cm). Cut all kinds of cheeses into pieces no
larger than 3/4 inch (1.8 cm).
•Thisblenderwillnotmashpotatoes,whipeggwhitesor
substitute dairy toppings, mix stiff dough or grind raw
meat.
Figure 6
Figure 7
Hot Foods
•OpentheFillerCaptoventsteam.TiltFillerCapawayfromyou.
Keephandsawayfromthecoveropeningtopreventpossibleburns.
•Whenworkingwithhotliquids,removeFillerCapandstartblendingat
a low speed. Then move to a faster speed. DO NOT add liquid over the 4 cup
(1 liter) level.
5
Processing Foods in Blender*
food
PRocessed
Quantity
unPRocessed
Quantity
sPecial
instRuctions
Breadcrumbs
1/2-cup (125 ml)
1 slice, torn in 8 pieces
Pulse on low
Celery
3/4-cup (200 ml)
1-cup (250 ml) of 1-inch (2.5 cm) pieces
Pulse on low
Cheese, Cheddar
1-cup (250 ml)
1-cup (250 ml) of 1-inch (2.5 cm) pieces
Pulse on low
Cheese, Swiss
1-cup (250 ml)
1-cup (250 ml) of 1-inch (2.5 cm) pieces
Pulse on low
Cheese, Hard
or Semi-Hard
1-cup (250 ml)
1-cup (250 ml) of 1-inch (2.5 cm) pieces
Chop continuously
Coffee Beans
1-cup (250 ml)
1-cup (250 ml)
Grind 45 seconds or to
desired consistency
Cookies, Wafer
1/2-cup (125 ml)
10 wafers
Pulse on low
Crackers, Graham
1/2-cup (125 ml)
8 crackers
Pulse on low
Peppers
2/3-cup (150 ml)
1-cup (250 ml)
Pulse on high
Meat, Boneless,
Cooked
1-cup (250 ml)
1-cup (250 ml) of 1-inch (2.5 cm) pieces
Chop continuously
1-cup (250 ml)
1-cup (250 ml)
Pulse on high
Nuts, almonds,
peanuts, pecans,
walnuts
*Suggested processing and blending guidelines.
Cleaning and Storing Your Blender
IMPORTANT: UNPLUG BEFORE CLEANING. DO NOT IMMERSE THE
BLENDER BASE IN WATER OR ANY OTHER LIQUID. Use a damp, soft
sponge with mild detergent to clean the outside of the blender base. All parts except
for the blender base are dishwasher-safe. Place sealing ring in bottom basket of
dishwasher. You can also wash the parts in warm, soapy water. Rinse well and dry.
Easy Clean
Note: Easy Clean is not a substitute for regular cleaning described above.
It is especially important to disassemble and thoroughly clean your blender when
processing milk, dairy products, meats, seafood and eggs.
Pour 3 cups of warm water in the blender jar. Add 1 – 2 drops of liquid dishwashing
detergent. Select Easy Clean or blend on lowest speed. Blend detergent for 10 – 15
seconds. Empty jar of soapy water into sink. Rinse jar thoroughly with clean water.
Storing Your Blender
After cleaning, reassemble blade to jar with sealing ring and jar bottom. Store blender
with cover ajar to prevent container odor.
Recipes
For fun and creative recipes for your new Oster® blender please visit www.oster.com.
Here you will find everything from the perfect Breakfast Smoothie to creamy Soups,
Sauces and a host of Oster signature Frozen Drinks. For the perfect recipe for any
occasion—turn on your creativity with Oster® Blenders!
6
1-Year Limited Warranty
Sunbeam Products, Inc, or if in Canada, Sunbeam Corporation (Canada) Limited
(collectively “Sunbeam”) warrants that for a period of one year from the date of purchase,
this product will be free from defects in material and workmanship. Sunbeam, at its option, will
repair or replace this product or any component of the product found to be defective during
the warranty period. Replacement will be made with a new or remanufactured product or
component. If the product is no longer available, replacement may be made with a similar
product of equal or greater value. This is your exclusive warranty.
This warranty is valid for the original retail purchaser from the date of initial retail purchase and
isnottransferable.Keeptheoriginalsalesreceipt.Proofofpurchaseisrequiredtoobtainwarranty
performance. Sunbeam® dealers, service centers, or retail stores selling Sunbeam® products do not
have the right to alter, modify or any way change the terms and conditions of this warranty.
This warranty does not cover normal wear of parts or damage resulting from any of the following:
negligent use or misuse of the product, use on improper voltage or current, use contrary to the
operating instructions, disassembly, repair or alteration by anyone other than Sunbeam or an
authorized Sunbeam® service center. Further, the warranty does not cover: Acts of God, such as
fire, flood, hurricanes and tornadoes.
What are the limits on Sunbeam’s Liability?
Sunbeam shall not be liable for any incidental or consequential damages caused by the breach of
any express, implied or statutory warranty or condition.
Except to the extent prohibited by applicable law, any implied warranty or condition of
merchantability or fitness for a particular purpose is limited in duration to the duration of the
above warranty.
Sunbeam disclaims all other warranties, conditions or representations, express, implied, statutory
or otherwise.
Sunbeam shall not be liable for any damages of any kind resulting from the purchase, use or
misuse of, or inability to use the product including incidental, special, consequential or similar damages
or loss of profits, or for any breach of contract, fundamental or otherwise, or for any claim brought
against purchaser by any other party.
Some provinces, states or jurisdictions do not allow the exclusion or limitation of incidental or
consequential damages or limitations on how long an implied warranty lasts, so the above
limitations or exclusion may not apply to you.
This warranty gives you specific legal rights, and you may also have other rights that vary from
province to province, state to state or jurisdiction to jurisdiction.
How To Obtain Warranty Service
In the U.S.A.
If you have any question regarding this warranty or would like to obtain warranty service, please
call 1 800-334-0759 and a convenient service center address will be provided to you.
In Canada
If you have any question regarding this warranty or would like to obtain warranty service, please
call 1 800-667-8623 and a convenient service center address will be provided to you.
In the U.S.A., this warranty is offered by Sunbeam Products, Inc located in Boca Raton, Florida
33431. In Canada, this warranty is offered by Sunbeam Corporation (Canada) Limited, located
at 20B Hereford Street Brampton, Ontario L6Y 0M1.
PLEASE DO NOT RETURN THIS PRODUCT TO ANY OF
THESE ADDRESSES OR TO THE PLACE OF PURCHASE.
7
For product questions contact:
Sunbeam Consumer Service
USA : 1.800.334.0759
Canada : 1.800.667.8623
Mexico : 1.800.506.1700
www.oster.com
© 2011 Sunbeam Products, Inc. doing business as Jarden Consumer Solutions.
All rights reserved. Distributed by Sunbeam Products, Inc. doing business as
Jarden Consumer Solutions, Boca Raton, Florida 33431.
Para preguntas sobre los productos llama:
Sunbeam Consumer Service
EE.UU. : 1.800.334.0759
Canadá : 1.800.667.8623
México : 1.800.506.1700
www.oster.com
© 2011 Sunbeam Products, Inc. operando bajo el nombre de Jarden Consumer Solutions.
Todos los derechos reservados. Distribuido por Sunbeam Products, Inc. operando bajo
el nombre de Jarden Consumer Solutions, Boca Raton, Florida 33431.
Pour les questions de produit:
Sunbeam Consumer Service
États-Unis : 1.800.334.0759
Canada : 1.800.667.8623
Mexique : 1.800.506.1700
www.oster.com
© 2011 Sunbeam Products, Inc. faisant affaires sous le nom de Jarden Consumer Solutions.
Tous droits reservés. Distribué Sunbeam Corporation(Canada) Limited faisant affaires sous le nom de
Jarden Consumer Solutions, 20B Hereford Street, Brampton (Ontario) L6Y 0M1.
SPR071111-475
Printed in U.S.A.
Impreso en EE.UU
Imprimé aux États-Unis