1
Windows, Macintosh
Step 4
When the Device Detector screen does not appear
4 Double-click the [ACDSee for PENTAX] icon on the
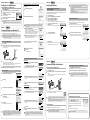
Setting Up Your Digital Camera
4
5
6
Press the 3 button.
Press the four-way controller (5) to display the [u Setting] menu.
Use the four-way controller (23) to select [USB
Setting
2/3
Connection].
English
Folder Name
Standard
Press the four-way controller (5).
PC
USB Connection
A pull-down menu appears.
Use the four-way controller (23) to select [PC].
Press the Q button.
Video Out
Brightness Level
MENU Cancel
PictBridge
OK
5
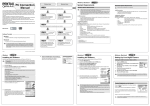
Installing the Image Processing Software
(ACDSee for PENTAX)
Double-click [My Computer].
This section describes the procedures for installing ACDSee for PENTAX, which lets you view
and edit images transferred to your Macintosh.
6
1
2
3
4
Double-click [Removable Disk].
OK
• Do not connect the camera to your PC while [PictBridge] is selected for the USB
Connection mode.
• Do not connect the camera to your printer while [PC] is selected for the USB Connection
mode.
If the SD Memory Card has a volume label, the volume label name appears instead of
[Removable Disk]. A new unformatted SD Memory Card may show the manufacturer
name or model number.
Step 5
Windows
If the message [CarbonLib-xxxxx could not be found] appears during installation;
You must add the extension file “CarbonLib” to the Extension folder in the System folder
in order to install the provided software in Mac OS 9.2.
This message appears when this extension file does not exist or when an older version
of the file exists.
The latest version of the CarbonLib file is available on the Apple website. Download the
file and then install it.
Apple website: http://www.apple.com/
∗ Contact Apple for detailed information on how to use the CarbonLib file.
Installing the Software
desktop.
Setting the USB Connection Mode to [PC]
1
2
3
Step 2
Macintosh
7
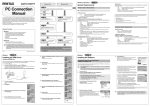
Transferring Images to a Windows PC
When the digital camera is connected to your Windows PC and the camera is turned on, the
PC automatically recognizes the camera and begins transferring images.
If the digital camera is connected to your PC in [PictBridge] USB Connection mode, the
images cannot be transferred. Disconnect the USB cable from your camera and PC, follow
the instructions in “Setting Up Your Digital Camera” to set the USB Connection mode to
[PC], and then reconnect the USB cable.
8
5
Turn your Macintosh on.
Insert the CD-ROM (S-SW30) in the CD-ROM drive.
Double-click the CD-ROM (S-SW30) icon.
Installing ACD photostitcher
Double-click the [Install ACDSee] icon.
The PENTAX Software Installer screen appears.
Double-click the [Master Installer] icon to display the PENTAX Software Installer screen.
This section describes the procedures for installing ACD photostitcher, a software application
that lets you join a number of images together to form a panorama picture.
You can choose the languages from the
displayed screen.
1
Click [ACD photostitcher].
The licensing agreement appears on the screen. After
reading it, click [Agree] to accept the terms of the agreement.
A selection screen to install your desired software appears.
Double-click the [DCIM] folder.
Images are stored in folder [xxxPENTX], where “xxx” is a threedigit folder number. When [Folder Name] on the
[u Setting] menu is set to [Date], folders are displayed with a folder
name indicating the date the images were taken. Images taken on
September 15, for example, are stored in folder [xxx_0915].
6
Click your applicable Mac OS.
2
The software selection screen appears.
Select [Install Location] and click [Install].
Installation starts. When the message appears telling you
that the software has been successfully installed, click [Quit].
Select the folders you want to copy to the PC.
Hold the [Ctrl] key on the keyboard while clicking on the folders in
which the images you want to copy are stored.
Select folders
Connecting the Camera and PC
1
2
9
Select [Copy To Folder...] from the [Edit] menu.
7
The Copy Files screen appears.
Turn your PC on.
The setup screen appears. Follow the on-screen guidance to
input registration information and install the software.
With your camera turned off, connect to your PC using the USB cable.
If there is no SD Memory Card in the camera, the images stored in the built-in memory will
be transmitted to your PC.
3
Click [ACDSee™].
10 Specify the destination folder.
11 Click [OK].
The image is copied to the PC.
2
Disconnecting the Camera from Your PC
3
Turn your camera on.
The Device Detector screen appears automatically.
If the Device Detector screen does not appear, display and copy the images following the
steps in “When the Device Detector screen does not appear”.
When the camera is connected to a PC with the USB cable, the power indicator blinks to
indicate that the camera is communicating with the PC.
Windows XP
1 Double-click the
[Safely Remove Hardware] icon
in the task bar.
2
The Safely Remove Hardware screen appears.
Select [USB Mass Storage Device] and click [Stop].
The Stop a Hardware device screen appears.
4
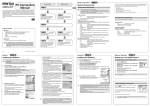
Transferring Images to a Macintosh
Connecting the Camera and Macintosh
1
2
Transferring Images
Confirm that [Acquire images from the device with
ACDSee] is checked and click [OK].
3
Select [USB Mass Storage Device] and click [OK].
1
With your camera turned off, connect to your Macintosh using the USB
cable.
Drag [untitled] on the desktop to the trash.
If the SD Memory Card has a volume label, drag the icon of that name to the trash.
Disconnect the USB cable from your Macintosh and the camera.
• If the camera (removable disk) is being used by an application such as ACDSee for
PENTAX, the camera cannot be disconnected until the application is closed.
• The camera will automatically switch to the Playback Only mode when the USB cable is
disconnected.
3
Click [Next].
4
6
Disconnecting the Camera from Your Macintosh
2
Turn your Macintosh on.
If there is no SD Memory Card in the camera, the images stored in the built-in memory will
be transmitted to your Macintosh.
A message appears indicating that the hardware can be safely
removed.
5
Step 5
Macintosh
Select an image to copy and click [Next].
Disconnect the USB cable from your PC and the
camera.
Windows 2000/Me
1 Double-click the
2
[Unplug or eject hardware] icon
in the task bar.
2
The Unplug or Eject Hardware screen appears.
Select [USB Mass Storage Device] and click [Stop].
The Stop a Hardware device screen appears.
7
Specify the name and save destination of the image,
and click [Next].
The image is copied to the PC.
3
8
Select [USB Mass Storage Device] and click [OK].
A message appears indicating that the hardware can be safely
removed.
Click [Finish].
The ACDSee for PENTAX 2.0 Browser starts.
3
Turn your camera on.
The camera is recognized as [untitled] ([NO_NAME] in Mac OS X) on the
desktop. The drive name can be changed.
• If the SD Memory Card has a volume label, the volume label name appears instead of
[untitled]. A new unformatted SD Memory Card may show the manufacturer name or
model number.
• When the camera is connected to a Macintosh with the USB cable, the power indicator
blinks to indicate that the camera is communicating with the Macintosh.
Transferring Images
4
5
The first time ACDSee for PENTAX 2.0 is run, “ACDSee has detected that you do not have
the following software installed on your computer: Ghostscript 7.0 (or later)” may appear
in the [Components missing] dialog box. If you will only display or edit images inside the
digital camera, it is not necessary for Ghostscript 7.0 to support ACDSee for PENTAX 2.0.
Click [Close] to close the message window.
Click [OK].
Disconnect the USB cable from your PC and the
camera.
• If the camera (removable disk) is being used by an application such as ACDSee for
PENTAX 2.0, the camera cannot be disconnected until the application is closed.
• The camera will automatically switch to the Playback Only mode when the USB cable is
disconnected.
See your Macintosh user’s manual for how to copy or move files.
• Even if camera images are not transferred, they can be directly displayed on the
Macintosh from a camera connected to the Macintosh.
• To edit images, first transfer them to your Macintosh.
Product Registration on the Internet
Please click [Product Registration] on the software selection
screen in Step 3 ( Step 2 for Macintosh).
A world map for Internet Product Registration is displayed.
If your PC is connected to the Internet, click the displayed
country or region and then follow the instructions to register
your product.
Thank you very much for your cooperation.
Only customers in displayed countries and regions can register their products on the
Internet Product Registration.