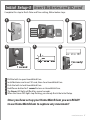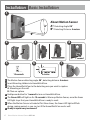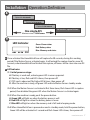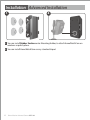
1
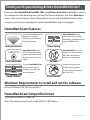
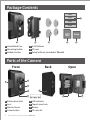
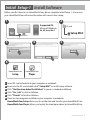
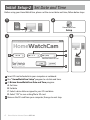
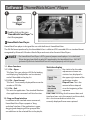
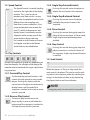
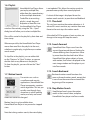
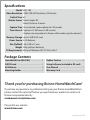
HomeWatchCam
Motion Activated
Portable
User Manual
MAC 100
www.brinno.com
Brinno Motion Activated Camera MAC100
Thank you for purchasing Brinno HomeWatchCam!
Brinno portable HomeWatchCam(MAC 100) using Motion Activated technology to capture
any movement in the detecting area, and turn the thousands photos into short time-lapse
video, it will save lots time to review those photos! You can use HomeWatchCam for home
security, or put it on your backyard to capture beautiful birds and tricky doggie!
HomeWatchCam Features
HomeWatchCam come
with unique Power control
technology, 4 AA batteries can
capture 50,000 frames .
Passive Infrared Red motion
detection system can
capture any movement in
the detecting area.
Motion Activated
1280x720
Time Lapse Video
A756944
Power Saving
HomeWatchCam buildin Time Lapse technology,
convert thousands photos
become a several minutes
video.
HomeWatchCam use 4 AA
batteries, so you can place
MAC100 in anywhere to
capture any movement!
Portable
Put your HomeWatchCam
to aim to front door or
windows, to capture the
uninvited guest!
Home Security
Universal design, easy to
install! You only need to
Install batteries and power
on it, that’s all!
Easy to install
Minimum Requirements to install and run the software
Microsoft Windows 98, XP, Vista and Win 7
HomeWatchCam Output file format
AVI format, resolution is 1280x 720.
Note: The maximum size of each single AVI file is 1024 frames.
www.brinno.com 1
Package Contents
AA
AA
AA
AA
1
2
1 HomeWatchCam
2 Mounting Holder
3 Rubber Suction
3
4
SD
Setup
5
6
4 4 AA Batteries
5 SD card
6 Setup Software (included in SD card)
Parts of the Camera
Front
Back
Open
2
1
3
6
4
5
1
2
3
4
2
Battery door latch
Lens
Motion Sensor
Power button
7
5
6
7
8
LED indicator
Tripod screw hole
Battery
SD card slot
Brinno Motion Activated Camera MAC100
8
Initial Setup-1 Install Software
Before your first time to use HomeWatchCam, please complete Initial Setup 1~3 to ensure
your HomeWatchCam will record the video with correct time stamp.
1
2
Supported OS:
Microsoft Windows
98, XP, Vista, Win 7
SD
3
SD card
4
Setup MAC
5
6
HomeWatchCam
Setup
1
2
3
4
5
6
HomeWatchCam
Player
Insert SD card included into your computer or notebook.
Browse to the SD card, double click " Setup MAC" to install setup software.
Click " No-Question-Asked Installation" to process standard installation.
Click " Yes, I do" to start installation.
Click " Thanks" to finish installation.
There are two programs installed on your computer or notebook:
HomeWatchCam Setup allows you to set the date and time for your HomeWatchCam.
HomeWatchCam Player allows you to play the time lapse videos by HomeWatchCam.
www.brinno.com 3
Initial Setup-2 Set Date and Time
Before using your HomeWatchCam, please set the correct date and time, follow below steps:
2
1
SD
HomeWatchCam
Setup
4
3
B
A
C
D
1 Insert SD card included into your computer or notebook.
2 Run " HomeWatchCam Setup" program to set date and time.
3 At Brinno HomeWatchCam Date and Time program:
A. Set time
B. Set date
C. Select a drive letter assigned to your SD card drive.
D. Select "OK" to save setting file to SD card.
4 Remove the SD card from your computer, then go to next step.
4
Brinno Motion Activated Camera MAC100
SD
Initial Setup-3 Insert Batteries and SD card
Complete this step to finish Date and Time setting, follow below steps:
1
2
3
AA
AA
AA
AA
4
5
SD
6
I'm ready!
1 second
1
2
3
4
5
6
Pull the latch to open HomeWatchCam.
Install batteries and insert SD card, then close HomeWatchCam.
Push the latch to lock HomeWatchCam.
Hold Power button for 1 second to turn on HomeWatchCam.
The Green LED light will flash for several seconds.
When the Green LED light stop flashing, you already finish the Initial Setup.
Once you have set up your HomeWatchCam you are READY
to use HomeWatchCam to capture any movement!
www.brinno.com 5
Installation Basic Installation
1
A°
About Motion Sensor
A°: Detecting Angle: 98°
B°: Detecting Distance: 4 meters
B°
3
2
4
1 second
5
6
15 seconds
7
3 circles
1 The Motion Sensor detecting angle: 98°, detecting distance: 4 meters.
2 Insert Mounting Holder into HomeWatchCam.
3 Place the HomeWatchCam to the detecting area you want to capture:
A. Mounting on the wall.
B. Place on a plane.
4 Hold power button for 1 second to turn on HomeWatchCam.
5 The Green LED will light on for 15 seconds to Warm up Motion Sensor, once the Green
LED light stops that your HomeWatchCam is ready to work.
6 When the Motion Sensor activated at first three times, the Green LED light will flash
during capture period, so you can test if the HomeWatchCam works well.
7 Ready to capture any movement!
6
Brinno Motion Activated Camera MAC100
Installation Operation Definition
8
Motion Sensor Activated
Capture for 30 seconds
Motion Sensor Activated
Capture for 30 seconds
Motion Sensor Activated
Capture for 30 seconds
One single AVI.
No Activities, capture finished.
Maximum size is 1024 frames
9
LED Indicator
Green: Power status
Red: Battery status
Blue: Memory card status
8 Once activated the HomeWatchCam will capture for 30 seconds, during this working
period if the Motion Sensor activated again, it will extend the capture time for more 30
seconds, whenHomeWatchCam finished the capture, all frames will be store into one AVI
file.
9 LED Indicator:
9-1. Initial power on stage:
A. If battery is work well, activate green LED in warm up period.
B. If battery is low, flash red LED 6 times, then power off.
C. If SD card is abnormal, flash blue LED 6 times, then power off.
D. After the machine is ready, off green LED and into Motion Sensor standby mode.
9-2. When the Motion Sensor is activated at first three times, flash Green LED in capture
period, then disabled the green LED when the Motion Sensor is activated again.
9-3. When the machine is ready, push the power button:
A. Green LED will light on when the battery power is well.
B. Red LED will light on when the battery power is lower.
C. Blue LED will light on when the memory card is full and in looping mode.
9-4. When HomeWatchCam is powered on and in standby mode, hold the power button,
Green LED will be activated in 3 second and flash Green LED 6 times, then power off.
www.brinno.com 7
Installation Advanced Installation
1
2
1 You can install Rubber Suctions onto Mounting Holder, to attach HomeWatchCam on
windows or polish plane.
2 You can install HomeWatchCam on any standard tripod.
8
Brinno Motion Activated Camera MAC100
Software "HomeWatchCam" Player
1
2
HomeWatchCam
Player
1 Double click on the icon
"HomeWatchCam Player" to
start the program.
2 HomeWatchCam Player:
HomeWatchCam player is designed for use with the Brinno’s HomeWatchCam.
The AVI file format produced by the HomeWatchCam is a Motion JPEG-encoded AVI in a standard format
recognized by Microsoft’s Windows Media Player and most other Generic Video Players.
NOTE
• The HomeWatchCam Player is NOT a general-purpose media player. It is a dedicated
Player designed specifically to play AVI’s produced by the HomeWatchCam. AVI’s NOT
generated by Brinno’s HomeWatchCam will not play properly with this player
1.1. Menu Functions
1.1.1. File – Open
“File Open” lets you select an AVI file for loading
and displaying. Multiple files can be selected,
and will be added to the play list.
1.1.2. File – Save Current
“File Save” .The currently-displayed frame can be
saved as a JPEG file.
1.1.3. File – Exit
This exits the application. The standard Windows
close application commands will also function.
1.2. Drag and Drop Interface
In addition to the standard menu commands,
HomeWatchCam Player supports a “dragand-drop” interface. If the application is open,
dragging and dropping a file or group of files
can add them to the selected files to the playlist.
Statistics display
Key statistics for the video
sequence are shown in a
statistics box, displayed in
the upper-right corner of the
application window.
Elapsed Time: This is the
amount of time elapsed
since the beginning of the
sequence.
Date/Time: Assuming that the correct date and
time have been set in the camera’s real time clock,
this is the time and date at which the
currently-displayed frame were captured.
www.brinno.com 9
1.3. Speed Control
The Speed Control is a vertical tracking
control on the right side of the display
window. This is used to set the
playback rate. Because this is a timelapse video, the playback rate has to be
different from the recording rate.
Note that in some installations, if the
requested playback rate exceeds the
host PC’s ability to decompress and
display frames, some frames may be
skipped in order to keep up with the
requested time-lapse video rate.
For a mode in which frames will never
be skipped, read about the Motion
Search feature, described below.
1.4. Play Controls
Controls are enabled or grayed-out, depending on
their functionality. For example, while playing the
video forward or backward the single-step buttons
are grayed out.
1.4.1. Forward Play Control
The forward play control functions is the
same as the play control on most media
players. Pressing this button with the
mouse causes the player to continuously
display frames until the end of the
sequence is reached, or the stop or pause
control is pressed.
1.4.2. Reverse Play Control
The reverse play control causes the
player to play in reverse until either the
beginning of the sequence is reached, or
the stop or pause control is pressed.
10 Brinno Motion Activated Camera MAC100
1.4.3. Single Step Forward Control
Pressing this control causes the player to
display the next frame in the sequence.
1.4.4. Single Step Backward Control
Pressing this control causes the player
to display the previous frame in the
sequence.
1.4.5. Pause Control
Pressing this control during play stops the
player at the current frame. In Pause mode,
single step forward and backward are
enabled.
1.4.6. Stop Control
Pressing this control during play stops the
player, and returns it to the first frame of
the sequence. Single-step forward function
is enabled.
1.5. Seek Control
When the player is in Pause or Stop mode, the
seek control is displayed. This can be used to seek
any point in the sequence, either by watching the
images in the display window, or by monitoring
the elapsed time or real-time indicators.
NOTE
• During play mode, the seek control is concealed.
1.6. Playlist
HomeWatchCam Player allows
you to play multiple files,
either from the same directory
or from multiple directories.
To add files to an existing
playlist, simply drag and
drop one or more files into
the HomeWatchCam Player
window. Alternatively, using the “File – Open”
dialog box will allow you to select multiple files.
Files will be sorted in the playlist by their date and
time stamp.
Wherever possible, the HomeWatchCam Player
moves from one file in the playlist to the next,
whether in regular play, single-frame, or motion
search mode.
To skip files in the playlist, you can either click
on the “Previous” or “Next”: buttons, or you can
double-click on any filename in the playlist.
To clear the playlist, you can click on the “Clear”
button.
is not updated. This allows the motion search to
proceed more quickly than normal playback.
A subset of the image is displayed above the
motion search controls, to provide visual feedback.
1.7.1. Threshold
This sets how sensitive the motion detection is. A
value of 0 is most sensitive; any variation from one
frame to the next stops the motion search.
A threshold of 255 or greater is least sensitive; no
change in the image will stop the search.
1.7.2. Search Forward
HomeWatchCam Player scans from the
current frame toward the end, looking for
a frame differing from the previous frame
by more than the threshold value. When
HomeWatchCam player detects a frame
with motion, that frame is displayed in the
main image window and the player is put
into Pause mode.
1.7.3. Search Backward
1.7. Motion Search
For certain uses such as
surveillance and security
applications, HomeWatchCam
Player incorporates a motion
search algorithm. This lets you
quickly scan through long
sequences in which nothing
moves, and only see frames
where the scene has changed.
Backward motion search functions the
same as forward motion search, except that
it scans from the current frame toward the
beginning of the sequence.
1.7.4. Stop Motion Search
Stop Motion Search stops the motion
search at the current frame, and place
HomeWatchCam player into Pause mode.
Motion Search is only available when
HomeWatchCam Player is in a paused or stopped
state.
Note that during motion search, the main display
www.brinno.com 11
Note
12 Brinno Motion Activated Camera MAC100
Specifications
Model
Video Resolution
Field of View
Motion Sensor
Capture Time
Time Interval
Memory Storage
Power Source
Size (DxWxH)
Weight
OS Requirements
MAC 100
1280x 720 (HD Resolution, AVI format)
61º
Detect Angle: 98º
Detect Distance: 4 meters
One activated capture photos for 30 seconds
Captures 10~30 frames in 30 seconds.
(Capture rate may reduce its frames while media capacity reduced.)
Up to 16GB SDHC card
4 AA Batteries
160 x 108 x 57 mm
305g (without batteries)
Microsoft Windows 98/ XP/ Vista/ Win 7
Package Contents
HomeWatchCam (MAC100) ........................ 1
2GB SD card ........................................................ 1
AA Batteries ........................................................ 4
Mounting Holder ............................................... 1
Rubber Suction ............................................... 4
Setup Software (included in SD card)
User Manual ...................................................... 1
Warranty Card .................................................. 1
Thank you for purchasing Brinno HomeWatchCam!
If you have any questions or problems setting up your Brinno HomeWatchCam
please contact the sales staff where you purchased our product or email us at
Brinno Incorporated directly
[email protected]
Please Visit our website
www.brinno.com
www.brinno.com 13
www.brinno.com
7F, No. 75, Zhou Zi St., Taipei City 11493, Taiwan
Phone: +886-2-8751-0306 Fax: +886-2-8751-0549
Email: [email protected]
301-0012-00
EN-A2