1
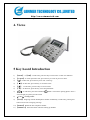
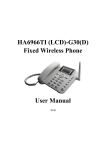
http://www.aimmertech.com AM-FWP980 GSM Fixed Wireless Phone User Manual V1.0 http://www.aimmertech.com AM-FWP980 GSM Fixed Wireless Phone ....................................................................................1 User Manual ....................................................................................................................................1 1. Introduction...................................................................................................................................3 2. Important Information...................................................................................................................3 3. Dos & Don’ts ................................................................................................................................3 4. Views ............................................................................................................................................5 5 Key board Introduction ..................................................................................................................5 6. Installation.....................................................................................................................................6 6.1 SIM card installation...........................................................................................................6 6.2 Using introduction ..............................................................................................................6 7 Menu function................................................................................................................................7 7.1 Short Message .....................................................................................................................7 7.2 Phonebook...........................................................................................................................8 7.3 Calls Log .............................................................................................................................9 7.4 Setting ...............................................................................................................................10 7.5 Clock .................................................................................................................................11 Appendix A: Accessories List .........................................................................................................11 Appendix B: Technology Standard .................................................................................................11 http://www.aimmertech.com 1. Introduction Congratulations on your purchase of the GSM Fixed Wireless Phone (Hereinafter referred to as Phone). The Phone has been designed to operate with the latest digital communication technology which has many advanced features and provides an excellent voice quality. The Phone has advanced features as follows: Large, easy to read, backlight LCD with status icons; Choice ring sounds, Power On/Off; Two Way SMS, Voice Mail and caller ID; Support limited outgoing or incoming; Show or hide called numbers Lock card, lock national call, lock phone; Large ergonomically designed Keyboard; Long Battery stand-by and talk time; Menu driven interface for easy operation and configuration; Last Number Redial; Adjustable ring and voice volume; AC Power Supply; Speaker Phone; Optional accessories available for greater convenience and enhanced functionality; Easy Service and Repair. 2. Important Information This user guide provides information on the use and operation of your phone. Kindly read all the information contained in this user guide carefully prior to using the phone. This will help you in getting the best performance and shall prevent any unintended damage to the phone. Check the contents of the box as per the packing list and report any discrepancies immediately to the store from where phone has been purchased. 3. Dos & Don’ts Do not clean the phone while in operation. Before attempting to clean the Phone, turn the Phone off, disconnect the external power adapter and take out the battery or disconnect the external power supply if used. Before moving the Phone, disconnect the external power http://www.aimmertech.com adapter or power supply in use. Use a Damp cloth for cleaning. Do not use liquid or aerosol cleaners. Do not hold the antenna. This may affect call quality and cause telephone to operate at unintended power levels. Keep the antenna free from obstructions and position the antenna straight up. This will ensure best call quality. Do not use a damaged antenna. Have this replaced through a qualified technician. Use only antenna approved by the manufacturer. Unapproved antenna may impair the call quality as well as cause damage to the phone. Only use the battery and the power adapter or the Power Supply provided with the Instrument. The instrument might get damaged if any other accessories are used. This will also void the warranty. It is highly recommended to charge the battery before initial use. The battery might have been discharged during storage and delivery. Do not use with car battery. It may lead to electric shock or breakdown. Do not throw battery. Batteries are not to be disposed off by putting them in fire. It may explode or catch fire. Do not attempt to change the security codes or components. User is responsible for any consequences arising out of such attempt. Avoid Shock or Impact. Rough handling can cause damage to the body as well as internal circuits. Do not paint. During lightening, do not touch power plug or phone line. This can cause electric shock or death. Do not touch the external antenna. Your phone is to work with 100-240 V AC. Check the voltage before connecting. Do not plug many power cords in the outlet. Do not touch the plug with wet hands. Always grasp and pull the plug, not the cord. Do not put heavy things on the power cord or bend it too much. Do not take out the backup battery without the guide of qualified service personnel. If the unit is not working for any reason, do not attempt to repair the instrument. Only qualified service personnel been permitted to service the instrument. Place the Instrument and the power supply in a properly ventilated place. Do not place the Instrument near high temperature objects, under direct sunlight, near source of water, near fire or near inflammable and explosive materials. Do not place any articles over the instrument. Place the Instrument in a dry place and do not expose to moisture. Place the Instrument away from other electronic devices like TV and Radio to avoid interference. For a better reception, do not place the Instrument in a building with iron or metal roof. Hospitals or health care facilities may be using equipment sensitive to Radio Frequencies. Please ensure that your phone is turned off while in the vicinity of such facilities. http://www.aimmertech.com Do not use the unit in designated “No Service” area. 4. Views 5 Key board Introduction 1) 【Menu】 or【OK】:In idle state, press this key to select item or enter into submenu. 2) 【Cancel】:In menu operation state, press this key to return to previous menu. 3) 【 】:In idle state, press this key to be into “Call Log”. 4) 【 】:In idle state, press this key to set alarm clock. 5) 【▲】:. In idle state, press this key to be into inbox. 6) 【▼】:In idle state, press this key to be into phonebook. 7) 【 】:In idle state, press this red button about 3 seconds for opening phone. Press 3 seconds again, the phone will be closed. 8) 【Audio】:Setting audio. 9) 【Send】:Outgoing with the dialed phone number immediately. In idle state, pressing this button will be into “Outgoing Call log”. 10) 【Redial】:Redial the last call phone number. 11) 【Handfree】 :Press this button instead of taking up handset. http://www.aimmertech.com 6. Installation 6.1 SIM card installation Open underside of battery cover and take off battery, then the SIM slot can be seen. Please insert SIM card in here. 6.2 Using introduction 6.2.1 Turn On FWP At first, install SIM card and battery. Press red button 3 seconds, the phone will be opened. The screen shows operator name, time, signal and capacity of battery. When the FWP (Fixed Wireless Phone) register over, the user can make call. 6.2.2 Turn Off FWP When FWP works normally, FWP will be closes by pressing red button 3 seconds. 6.2.3 Make call Dial numbers: dial numbers and the numbers will be show in the screen. If the numbers that user dialed is wrong, please press “Cancel” in order to clear the number. After dialed phone number, please press key “Send” to call out at once. If not press key “Send”, it will delay several seconds, then call out automatically. In making call, user can adjust volume by press left button or right button. 6.2.4 Receive call When there is incoming, FWP ring and the screen shows call ID.(need network support) In making call, user can adjust volume by press left button or right button. http://www.aimmertech.com 7 Menu function All menu can be operated in idle state. Press “Menu” be into submenu and press “Cancel” back function menu. 7.1 Short Message 7.1.1 Inbox Choose SMS in inbox and press “OK” for reading. User can browse SMS by press up or down button. SMS can be deleted, replay, forward, edit, call sender and get numbers. 7.1.2 New On selecting “New”, user can first edit message contents, then press [OK] and select “send” to enter the phone number. It can choose only send, only save, send and save, send group, insert name, insert numbers. The max length is 140 characters for one piece SMS. Note: Change input method Press [#] key to switch between different text input method: “ABC” for Uppercase letter input, “abc” for lowercase letter input and “123” for number input. 7.1.3 Sentbox On selecting “Sentbox”, user can see the messages that have been saved. Saved messages are arranged according to date, and the most recent message is arranged at the top. When viewing the content of the message, User can do operations: delete, read, copy to phone, remove to phone, delete all, copy all, remove all and using numbers. 7.1.4 Outbox Check failed message. http://www.aimmertech.com 7.1.5 DraftBox Edit message in advance and save it in draft box. 7.1.6 Voice Mail This function can set: listen to voice message can voice message no. 7.1.7 Setting Setting includes Service Center, validity Period, Status Report, Replay Path, Storage Medium, and Storage Status. 7.1.8 Delete all Delete all messages, delete messages of inbox, delete messages of sentbox, delete messages of Outbox, delete messages of drafts. 7.2 Phonebook Phonebook can save a lot of important numbers. When the phone is in idle-state, please press [menu] or [Phonebook] key to inter into phone book. 7.2.1 Browse User can look through the contacts records in phone book by pressing the [▲] or [▼] key. Press [OK] key to select current phone number. Then you can press [OK] to call this phone number. 7.2.2 Create User can store a new record to phone book, including phone number and name. It can be saved in phone or SIM card. http://www.aimmertech.com 7.2.3 SIM Phonebook Check record in SIM card. 7.2.4 Me Phonebook Check record in FWP. 7.2.5 Storage status Can check saving state about FWP and SIM card. 7.2.6 Abbr. dial Set numbers for one-key dial. 7.2.7 Delete all Entries It can delete all record of FWP or SIM card. 7.3 Calls Log 7.3.1 Incoming Call On selecting received calls, the incoming calls’ information, including date, time, duration and phone number or name of person (if the number exists in the contact list) of incoming call, shall be displayed on the screen. Last 10 calls can be viewed. 7.3.2 Outgoing Call On selecting dialed call, the screen will display the outgoing calls’ information, including date, duration, time and phone number or name of person (if the number exists in the contact list). Last 10 calls can be viewed. 7.3.3 Missed Calls On selecting missed calls, the screen will display the missed calls’ information, including date, http://www.aimmertech.com phone number or name of person (if the number exists in the contact list). Last 10 calls can be viewed. 7.3.4 Call duration Press [OK] to enter into all calls menu, then press [▲] or [▼] key to look through all call records. Press [ ] for reading detail information. Press [OK] key to call the phone number. 7.4 Setting 7.4.1 Phone Settings z Display Setting: Setting the contrast of the screen, backlight, date and time. z Security Setting: It requires input phone code (password, the default password is 1234). Can set that checking PIN code, lock national call, lock phone and lock keypad. z Keypad locking setting: can set locking time after making call. z Factory Default: Do all setting by factory reset. 7.4.2 Network Setting You can select network at here. Call waiting: Can check the present state and can do “ON” or “OFF”. Call Forwarding: All calls are forwarded. Call Barring: Can limit all calls and the result of limitation do “Check”, “ON” or “OFF”. Network Select Mode: Choose network by automatic or manual. 7.4.3 Call Settings It can set Speaker volume, Calling line identification restriction, Auto redial automatically or Any key Answer (receive call by press any key). 7.4.4 Audio Setting Setting ring tone, volume, Ringing type, ring mode, and so on. http://www.aimmertech.com 7.5 Clock 7.5.1 Date and time Setting Setting time and date (year, month and day). 7.5.2 Date Format Setting date mode: day, month and year, or year, month and day. 7.5.3 Time Format Setting time mode by 12 hours or 24 hours mode. 7.5.4 Alarm Setting Setting the alarm time, alarm ways. Appendix A: Accessories List Name Number Fixed Wireless Phone 1 Handset 1 Handle line 1 User Manual 1 Appendix B: Technology Standard z z z z z Environment Temperature: -10 ~+40°C Atmospheric Pressure: 86 ~ 106KPa Relative Humidity: 10% ~ 95% Environment Noise: ≤60dB(A) Transmit Power: 2W http://www.aimmertech.com z Receiving sensitivity: -104 dBm