1
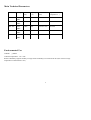
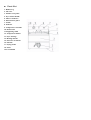
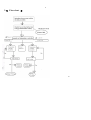
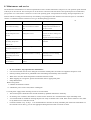
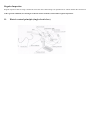
PRF-10V PRF-16V PRF-18v PRF-20v PRF-36v ...................................................................... ELECTRIC FRYER USER MANUAL INSTALLATION INSTRUCTIONS To avoid the risk of accidents or damage to the appliance It's essential to read these instruction before it is installed or used for the first time Attention! Installation and repair of this product must be performed by a qualified person - or someone authorized by the manufacturer. When installing, or performing maintenance, please follow instructions carefully. Please keep this Instruction Manual for future reference. Check that none of the parts is missing or damaged. If there is any doubt about the product, please do not use and seek expert advice. Item requires a requires a dedicated mains power feed Keep packing material out of reach of children to avoid accident. This appliance should only operated by a competent, trained person. When not using the appliance, or the operator is absent, turn off to avoid any accidental injury or damage. If there need for repair, please seek expert advice and use only original manufacturer spare parts. It is dangerous to not follow the above requirements. This appliance is for commercial use only. Do not rinse the equipment with water directly. Clean the surface of stainless steel periodically with appropriate method to prevent any damage brought by oxidization or any other chemical interference. 1. Overview The PRF series electric fryer is aperfect kitchen appliance for commercial use. The body is made of high quality stainless steel, luxurious and stylish and it has been fitted with electrical elements that have been designed to be energy-saving and safe. The PRF series electric fryer can be used to cook, fry and warm food in any commercial food operation – including Coffee Shops, Pubs, Hotels and restaurants. 2 Main Technical Parameters Model Voltage Power (kW) Capacity (L) Dimension (mm) Adjustable temperature ( ) PRF-10V 220V 50HZ 2.5Kw 10L 280*490*370 50-200c PRF-16V 220V 50HZ 2.5Kw 13L 280*490*392 50-200c PRF-18V 220V 50HZ 2.5Kw 18L 330*615*439 50-200c PRF-20V 220V 50HZ 2.5Kw 10L+10L 557*460*370 50-200c PRF-36V 220V 50HZ 2.5Kw 18L+18L 650*615*439 50-200c Environmental Use Altitude: ≤3000m Ambient temperature: -15c~+40c Relative humidity: highest monthly average relative humidity is not more than 90% (the lowest average temperature of that month is 25c) 3 Parts List 1. Rubber Leg 2. Oil Valve 3. Stainless steel panel 4. Fryer basket handle 5. Oil lever indicator 6. Electrical box panel 7. Switch 8. Indicator 9. Temperature controller 10. Electric Box 11.Supporting stand 12. Temperature limiter 13. Fryer fuselage 14. Heating element 15. Protector of element 16. Oil tank 17. Frying basket 18. Panel 19.Coverhandle 4 3.◆ Flow chart ◆ 5 4. Product performance • With ultra temperature protect function, the highest temperature is 230c • Electric box and body of the fryer are separable so that it is easy to clean the electric heating tube and oil tank • With adjustable temperature device, adjustable range is 50c~ 200c • Easy to operate and convenient to use. 5. Installing requirement • The oven cabinet should be no less than 200mm from a wall for wiring from the cabinet back and for necessary heat loss. If the cabinet is combined with other kitchen cabinets, the distance between the two cabinets must be no less than 200mm. • Keep the oven cabinet level. • There is a 1.5m long power cord for connecting single-phase 220v/50Hz power. • The grounding wire PE shall be connected to the external grounding. • To replace the power cord, please remove the back of electric box. Power cord is fixed on the back of electric box with the cable locking head. • If the cabinet is combined with other kitchen ovens, connection is optional on the cabinet back (with M6 bolt). 6. Operation 1. Check if the power supply is properly fixed and make sure that the supplied voltage conforms to requirement. 2. There is an oil level mark inside the tank. Quantity of oil in tank should be kept within “MAX” and “MIN”. Users can adjust quantity of oil according to need. 3. If the green indicator is on, current is flowing to the machine. Revolve the temperature controller clockwise till pointing to the needed temperature. It’ll show if the electric heating tube stops working. Oil temperature in tank will rise after the red indicator is on and the green indicator is off. 4. Temperature controller will automatically regulate the temperature of the oil. 5. The cover of tank is designed for keeping unit warm and clean. Make sure that there is no water on the cover before fitting. 6. Please revolve the temperature controller anticlockwise to the limited position and then cut off power supply for safety. 7. Only pour the old oil out of tank when oil temperature cools to room temperature – please use valve provided. 8. For safe and enduring use, users should often clear oil tank and dirt on electric heating tube. 9. The partition board is designed for protecting the electric heating board. Put the partition board into oil tank when frying. there is a temperature limiter in the electric box. The limited temperature is 230c - reset temperature is 170c. 10. There is “reset button for over-heating” on the body of fryer. When temperature is over high, the protection device works. Depress the reset button to restart. 11. There is micro-limit switch in the electric box. 12. Please use fresh cooking oil in case of over boiling. Do not use old oil because it has a reduced flash-point and can be more prone to surge boiling. 13. Start: When unit is working power indicator on the operation panel will be on. 14. Temperature regulation: The operation panel has temperature controllers which control one electric heater respectively. 15. Adjustable temperature of the controller ranges 50c~200c 16. The electric heater will automatically stop working when oil temperature reaches the setting value, if the temperature drops, it will automatically restart. 17. When element is working, heating indicator light is on (green). 18. To Stop: Turn temperature control knob to the “stop” position, electric heaters will then stop working. Turn off power switch and cut off power supply. (Power indicator will be off) 7. Attention • Do not drop water into hot oil during operation as this will cause hot oil splash hazard. • In operation, don’t touch the fryer except the operation panel, so as to avoid scalding • In operation avoid scratching on the cabinet surface with sharp implements. • Don’t conduct maintenance with unit turned on. Disconnect mains power before conducting maintenance. • Don’t flush the unit with water. Don’t put the unit into water for cleaning • Avoid over-filling fryers as this will cause oil to over-flow. • Avoid frying food that is over-wet this will lead to oil over boil. • Do not empty oil from unit until oil has cooled to room temperature. • 8 8. Maintenance and service The maintenance staff shall have an electrician qualification. Don’t conduct maintenance with power-on. The operation panel and back of the fryer can be removed. The electric parts are in the electric control box and at the back of the operation panel. For maintenance, just open the cover of the electric control box or remove the operating panel. Transportation and storage: during transportation, the machine shall be carefully protected and away from shaking. The packaged machine shall not be stored in the open air. It should be stored in a ventilated warehouse without corrosive gas. Prohibit putting upside down. Failures Cause Solutions 1. Power indicator is not No Power to machine. 1.Check power supply on and unit not heating Micro switch does not contact 2.Adjust the limited distance of well the micro-switch 2.heating indicator is on 1.connection of the electric 1.fasten the two terminals but the temperature dose heating tube is loose between the electric heating tube not rise 9 and the screw 2.replace the electric heating tube 3.power indicator is on but 1.temperature controller damaged the setting temperature 1.replace the temperature controller will not rise 4.temperature controller is 1.indicator damaged 1.replace indicator 1.temperature limiter is working 1.manualy re-set over-heating normal but indicator is not on 5.electric heating tube is not working after circuit protection button heating 6.temperature controller is 1.temerature limiter is out of out of control control 1.replace temperature limiter • In case of failure, stop operation for maintenance. • Use wet towel with non-corrosive detergent to clean the module plate, the surface of equipment and power cord. • Directly washing with water is prohibited as this will damage functionality of the machine. • When not in use turn off the temperature controller and main switch. • When stopping for a long time, please clean and then store in appropriate place. • Daily Maintenance Before using check 1)whether the machine is tilted? 2)whether the power cord is old ,broken or damaged? • Cut off power supply before cleaning in order to avoid accident. • The electrical parts should be removed and mounted by qualified maintenance staff only. • In cleaning case or cabinet, don’t flush or wet the electric elements. It is recommended to wipe with damp cloth. • A non-metal brush is needed for cleaning the parts not easily accessible with a cloth. If the electric element is wet, allow to dry before use to avoid short circuit. • Clean the oil filter every 15 days. It is recommended to clean the not easily cleanable parts with a non-metal brush. If the oil stains are too heavy, you can use appropriate detergent mixed with cool water to clean. Regular Inspection Regular inspection and servicing is needed to ensure the unit is functioning at an optimum level. Check whether the connections Under general conditions, no clearing is needed of electric elements, but needed in regular inspections. 11. Electric control principle (single electric box)