1
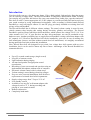
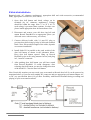
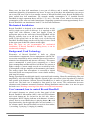
Record DoorBell RDB-01LE
Limited edition
Installation and User’s manual
Rev. 0.5, by VVKU in August 2007
Internet: http: \\www.vvku.eu\rdb01le
e-mail: [email protected]
Content:
INTRODUCTION .................................................................................1
SPECIFICATION .................................................................................2
Electrical specification ..............................................................2
Environmental specification ......................................................2
Others ........................................................................................2
CONTENT OF RDB-01LE DELIVERY .................................................2
ELEKTRICKÁ INŠTALÁCIA .................................................................3
MECHANICAL INSTALLATION ...........................................................4
BACKGROUND, USED TECHNOLOGY .................................................4
USER’S MANUAL, HOW TO CONTROL RECORD DOORBELL................4
Recording...................................................................................5
Playing.......................................................................................5
Ringing.......................................................................................5
Volume control...........................................................................5
Indication of shorted doorbell button. .......................................5
USING WALL MOUNT ADAPTER .........................................................5
Introduction
Your door bells can say a lot about your home. If it's a high-pitched, light and airy ding that means
you are entering a happy home. The Record DoorBell is completely customizable chime, meaning
you can play any your door bell desires like your own sound effects, audio clips, speeches and more.
How does it work? Connect appropriate AC or DC adapter to your Record Door Bell and record your
own sound creation by using implemented microphone. After recording is finished attach Record
DoorBell to a wall and simple connect 2.1 mm DC plug, previously installed on existing door bell
wiring, to Record DoorBell.
The Record DoorBell has 8 different volume settings. The actual volume setting is stored in nonvolatile memory thus keeping this setting during electricity glitches and outages. The Record
DoorBell is powered from central door bell transformer, which reduces line voltage 230 V (110 V) to
value around 8-16 V AC. If your flat does not have this transformer, one can be purchased at any
hardware store. Another possibility how to supply Record DoorBell is using wall mount adapter with
AC output 8-16 V. However Record Door bell can be installed by your own, in case of missing doo
rbell transformer (houses, and flats without central door bell transformer) we straightly recommend
having qualified electrician perform this installation.
Note: Record Door bell was designed for pre-wired, low voltage door bell systems with two wire
installation, but it can be used in almost any flat or house. Advantages of the Record DoorBell are
summarized below.
•
•
•
•
•
•
•
•
•
•
•
•
•
Up to 25 seconds sound storage (single record)
Long life of custom records
Light indication during ringing
100 mm laud speaker for appropriate sound
reproduction
Recording of your own sounds and speeches using an
implemented microphone without need of computer
Electronic volume control with 8 volume steps
Volume setting is stored during electricity outages
Easy two wire electrical installation, ideal for direct
replacement of solenoid door bells in apartments
Supply voltage range from 7.5 up to 22 V AC
Low standby current
Available to use any DC wall mount adapter with
voltages from 9 to 27 V, during recording and
playing of your sound creations
Robust construction
Completely hand made
www.vvku.eu\rdb01le
1/5
Specification
Electrical specification
Supply voltage
7-16V AC, single 2,1 mm DC plug (supplied)
Warning: supplying voltages higher than 22V (AC) or 27 V (DC) may
destroy Record DoorBell.
Standby current
< 1000 uA (typically < 500 uA)
Supply current (average)
< 250 mA @ 7.5 V, < 150 mA @ 22 V
MIC gain control
Pre-amplifier with AGC (Automatic Gain Control)
Record duration
up to 25 seconds, 8 kHz sampling frequency with antialiasing filter
Recording indication
RED LED 3 mm
Record storage time
Over 50 years estimated
Output audio power
~1.5 W max
Volume control
Electronic, 8 steps with non-volatile storage
Ringing indication
BLUE LED 10 mm
Control buttons
REC, PLAY/STOP, VOL+, VOL- (micro-switches)
Ringing button fail
Detection and indication of shorted ring bell button
Environmental specification
Operating Temperature
0-50°C
Storage Temperature
-10 to 65°C
Relative humidity
Up to 90%
Others
Color
Oak, light
Dimensions (max)
155x190x50 mm
Weight
0,6 kg
Warranty period
2 Years (Note: Warranty broken if back seal removed)
Content of RDB-01LE delivery
RDB-01LE is delivered in OEM with printed manual. Before
installation please check all delivered items, regarding
following list:
o Record DoorBell RDB-01LE,
o ~ 1.5 m two core cable (2x0.35 mm) with DC 2,1 mm
plug on one side,
o Silicon diode (1A/60V) with flexible leads for
installation into a ring bell button,
o Screw (3,5x35) with accessory for wall mounting,
o Terminal block for electrical interconnection with
original door bell wiring
o Manual in English language.
Note: DC adapter and ring bell transformer are not part of
delivery.
www.vvku.eu\rdb01le
2/5
Elektrická inštalácia
Required tools: AC voltmeter (multimeter), appropriate drill tool with accessories (recommended
SDS), appropriate screwdrivers, wire-cutters.
1. Open door bell button and check voltage on its
terminals (by AC voltmeter, multimeter). Voltage
should be within the range from 7.5 to 22 V AC. If
such voltage is presented then continue. In other case
please install appropriate door bell transformer first.
2. Disconnect and remove your old door ring bell and
mount Record DoorBell to an appropriate place (use
delivered screw with accessory, see below).
3. Connect delivered cable with 2,1 mm DC plug to
previous door bell wiring by help of delivered terminal
block. Note: Please adjust length of the cable, depends
on concrete installation.
4. Install diode D1 in parallel to the push switch of the
door bell button as shown in the schematic below.
Keep door bell button opened. Hang up Record
DoorBell on the wall (using mounted screw) and plug
in 2,1 mm DC connector.
5. After pushing door bell button you will hear sound
from Record DoorBell. If sound disappears after
releasing door bell button you need to change direction
of the diode D1. Close the door bell button.
Note: Practically anytime you can record your own sounds to Record door bell. It can be powered as
mentioned above or you can easily unplug DC connector and use appropriate wall mount adapter AC
or DC (see specification above) to get more flexibility with Record DoorBell during recording and
playing of your own sound creations.
www.vvku.eu\rdb01le
3/5
Please note, the door bell transformer is not part of delivery and is usually installed as central
transformer shared by all apartments in a house. In case you do not have this transformer you can get
one at any HW store. Due to low standby current of Record DoorBell, many Record DoorBels may
share central door bell transformer. For example standby consumption of 15 installed Record
DoorBells in single apartment house will be 15 x 1 mA = less than 15 mA, what is less than power
consumption of the own not loaded transformer. Regarding operational current approximately 4 to 6
Record DoorBells can simultaneous load 15 VA door bell transformer.
Mechanical Installation
Record DoorBell is designed to be mounted in-door on the
wall by single screw (part of delivery). It is required to drill
single hole with diameter 6 mm and length 35 mm in
appropriate place on the wall where Record DoorBell will be
hang up (usually close to an old door bell). The screw fits
inside of the special hole on the back cover of the Record
DoorBell. DoorBell hangs on the wall by help of screw fixed
in the upper part of this hole (shown on the right).
Both side tapes are not recommended for mechanical
installation! If Record DoorBell is falling down, it can be
mechanically damaged.
Background, Used Technology
Electronics of Record DoorBell is built on silicon
semiconductor components. Power management with DC/DC
conversion controlled by micro controller was used in order to
minimize heat dissipation and increase efficiency. This means
power consumption is much lower comparing to a linear
power management and Record Door bell draws less current at
higher voltages. Custom sound records are recorded by builtin microphone with pre-amplifier with automatic gain control.
The analog signal from microphone is converted to digital
form and stored non-compressed into a non-volatile memory
with long life storage.
During reproduction stored digital signal is converted back to analog, filtered by antialiasing filter and
amplified by AB class full bridge amplifier. Result of this conversion is then reproduced by built-in
laud speaker with diameter 100 mm. Record DoorBell box is made of plywood plates formed into
curved case. The back case is attached to front panel by four screws. This construction increases
robustness and eliminates unwanted vibrations. During installation and use there is no need to open
the back cover. Warning: removing of the back cover will break warranty.
User’s manual, how to control Record DoorBell
All control elements are placed on the front panel of the
Record DoorBell. Microphone (MIC) with red LED indicator
and record button (●) are located on the left side. Above
microphone, BLUE ringing indicator with diameter 10 mm is
placed. Next to record button there is playing button (►) with
stop functionality. On the right side there are two buttons (+/-)
for volume control. Record DoorBell can work in four modes;
1) recording, 2) playing, 3) ringing, 4) standby.
www.vvku.eu\rdb01le
4/5
Recording
Source of sound, from which you would like to record, must be close to microphone 10-20 cm. Push
record button (●) and keep it pushed for duration or required record (1-25 seconds). The record button
is aligned with front panel in order to prevent unwanted accidental record activation, therefore please
use appropriate stick, e.g. pen, pencil etc to push the record button. Active recording is signalized by
red LED indicator next to microphone. After releasing of record button recording will be immediately
stopped. If you reach maximum storage duration (~25 seconds) then Record Door bell will
automatically stop recording. 0.5 sec after finishing of recording, Record DoorBell will automatically
start playing. This can be stopped by play button (►) or record button (●), but in this case new
recording sequence will be started. Note: during recording volume control is inactive.
Playing
Can be activated by play button (►) and stopped by re-pushing this button. During playing volume
control is active, ring indicator above microphone is off. If during playing door bell button is activated
then ring indicator will go on.
Ringing
Operates same as playing just with difference that is activated by door bell button and ringing is
followed by ringing indication (BLUE LED above microphone). Ringing is possible to stop by
pushing play button (►). Note: Volume control is active during ringing.
Volume control
As was mentioned above volume control is active only during playing and ringing. It has 8 steps,
where reaching of minimum and maximum settings is indicated by flashing of ringing indicator
(BLUE LED above microphone). The set volume is stored at the end of playing respectively ringing
and it is signalized by single flash of ringing indicator.
Indication of shorted door bell button.
If door bell button is broken (permanently shorted) it will be indicated by short flashing of ringing
indicator. In this case ringing mode is out of work but playing and recording modes are fully
functional.
Using wall mount adapter
Due to used DC connector it is simple to disconnect Record
DoorBell from door bell wiring and connect it to the wall
mount alternate current (AC) or direct current (DC) adapter.
This adapter should has voltage within the range 7,5-22 V
(AC) or 9-27 V (DC) with minimum current of 250 mA and it
must be ended by DC 2,1 mm connector with positive pole in
the middle. This mode is appropriate to use during recording
and playing of your sound creations, it gives flexibility to the
Record DoorBell, which can be used anywhere you need.
Note: In order to use Record DoorBell in ringing mode it must
be supplied by AC from door bell wiring, wall mount adapter
is not part of delivery and can be purchased separately.
Producer: WEB: http:\\www.vvku.eu\rdb01le, e-mail: [email protected]
Your questions and suggestions are welcome, please let us know. e-mail: [email protected]
www.vvku.eu\rdb01le
5/5