1
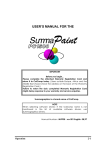
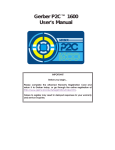
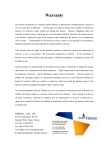
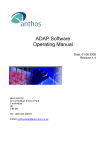
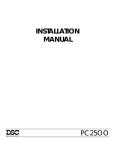
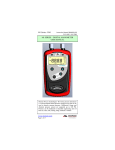
ADDENDUM
New features in Rev 002
1.
INTRODUCTION
All Summapaints manufactured from 02/97 on or with ROM revision 002
or higher are equipped with additional features. An overview:
♦ Opos can be fine tuned on user level to perform even better on
a wide range of materials.
♦ The firmware has been changed to use the new service station
that has been developed to meet
the requirements of
pigmented inks.
♦ An improved printer-controller module almost doubles the
printing speed of the SummaPaint.
Furthermore there is a short explanation of the new ‘cleaning tool’.
2.
OPOS
2.1.
General
The principle of OPOS is based on the principle of registering black
printed markers around the design to know the exact position of the
printout. The registration of the markers is done by a sensor that is
mounted at the bottom of the cutting head. To make sure that the
sensor is able to recognise the markers, a media calibration can be
performed.
The OPOS is calibrated to work on a wide range of materials. However
certain types of material will not work with the default set-up (high
glossy materials). The media calibration test will change the sensor
value in such a way that it is more reliable to sense the markers.
For this purpose, there is a new menu point under “INTERNAL TESTS’
called ‘CAL. MEDIA’
2.2.
MEDIA CALIBRATION
Î To calibrate the media, proceed as follows:
• Print a black square of at least 4x4cm on the media with the ink that
will be used with OPOS.
• Power up the cutter and load the piece of media. The load
procedure is described in the SummaSign User’s Manual.
• Press the
key (MENU) key until the message ‘INTERNAL TESTS’ is
displayed on the LCD.
↑
SYSTEM SETUP
↵
1
SummaPaint PC1500
• Press the
displayed.
Addendum
jogging key until the message ‘ CAL MEDIA’ is
INTERNAL TESTS
↑
↓
CAL. MEDIA
• Press the
displayed.
↵
key to confirm the selection. The following message is
1= SET
2 = MEASURE
↵
• With the 1 option, the value can be set manually. This is useful when
you have already calibrated this kind of media and you know the
value, when the default needs to be set value back again.
Otherwise choose 2 to proceed.
PUT ON WHITE
AREA
• Click the sensor down and use the arrow keys to place the sensor on
key. The cutter will now sense
top of a white area. Press on the
the white area and display the following message:
PUT ON BLACK
PRINTED AREA
• Use the arrow keys to place the sensor in the lower right part of the
key. The cutter will now sense
black printed square. Press on the
the black area.
• Normally a value will be displayed on the LCD:
VALUE : 38
This value is a specific value for this kind of media. It is advisable to
memorise this value. Later on, you can calibrate the media quickly
by setting this value manually instead of measuring it.
2
SummaPaint PC1500
Addendum
• An error message may appear. In this case the sensor is not able to
differentiate black and white. Make sure that the test has been
performed correctly. If OPOS in not able to sense the markers, the
manual alignment methods can be used.
3.
NEW SERVICE STATION
3.1.
General
When using pigmented inks on the SummaPaint with the standard
service station, the nozzles of the cartridges may block within a couple
of minutes. The new service station has small water reservoirs and
cotton pieces that keep the nozzles wet. So depending on the
environmental conditions and the type of pigmented ink, the
cartridges can be kept in the service station for a couple of days. Refer
to the ink supplier for correct details
The wiping happens only in one direction. This improves the cleanliness
of the cartridge and the quality of the print-out.
Repositioning of capping and wiping improves the cleanliness of the
cartridge and the quality of the print-out.
The partnumber to order it is 400-372
3.2.
Installing the new Service station.
To install the service station proceed as follows:
• Power off the SummaPaint.
• Move the printing carriage manually away from the service station.
• Lift the service station and move it a little so that it comes free from
the machine body.
3
SummaPaint PC1500
Addendum
• Take the service station and place it in position with the three
cylindrical shafts to the front. Move the service station as far as
possible to the left.
• Power on the machine. If the service station is correctly installed, the
unit will automatically detect the new service station and position
the print heads exactly above the cotton.
3.3.
Use of the Service station
• Power on the unit and wait until the load procedure has finished.
• When the unit is online, press on the knife up/down button so that
the print carriage moves away from the service station.
• Take the Service station out of the unit and flush the station with
water (Do this daily). Dry the service station. The cotton may stay
quite wet.
Æ It is good to use a lot of water to get the cartridge
running (at the beginning of a day). But, while printing,
it is advised that the cottons are not made too wet.
• Place the service station back.
• Press any key to move the print carriage back in position.
• Wait a few minutes so that the water can penetrate the nozzles.
• Perform a nozzle test. It may be necessary to print a strip of each
colour to get the cartridge started.
• If necessary, put a few drops of water on the cottons. DON’T PUT
TOO MUCH WATER ON THEM.
• If the cartridges will not be used for a while it is advised to put some
extra water on the cotton.
• If the cartridges will not be used for several days, however, it is
advised to put them back in the clamp.
NOTES:
» If you do not use pigmented inks it is advised not to use this service
station.
» Never use two different types of ink without flushing the cottons.
» When using pigmented inks and when the unit is not used
continuously, the tubes need to be flushed regularly (once a week).
4
SummaPaint PC1500
4.
Addendum
FASTER PRINTING SPEED
4.1.
General
The printing speed has been increased with 80%. A high quality, photo
realistic print will take 33 min / m2 .
Draft :
Normal :
High :
min/m2
m2/hour
ft2/hour
A0
14
16
33
4,3
3,8
1,8
46
40
20
15 min
17 min
34 min
Firing Rate : High; Print direction : Bi-directional
A new 2 pass print mode is available now. This means that the new
SummaPaint has three print qualities now:
DRAFT :
Draft is the fastest print mode (<14 min/m2 ). This mode is
best used for line drawings. When printing photo’s in this
mode, the print time difference is small compared to the
normal print mode. Also the print quality of pictures is in
many applications not acceptable in this mode.
NORMAL : This new two pass mode produces high quality line
drawings. When printing photo’s, this mode is just a little
slower than the draft mode (16 min/m2 ). The quality of
the printout depends mainly of the media and ink.
Generally this mode can be used for proofing and for
printouts that are viewed from a distance.
HIGH :
4.2.
The high quality mode is a four pass mode and produces
photo realistic pictures (33 min/m2).
Use of the new menu points
In section 2.8 are the printer parameters described. The only thing that
changed there is in paragraph 2.8.3 were the ‘PRINT MODE” is
described. There are now 3 different print modes to choose from. The
choice is now ‘DRAFT’, ‘NORMAL’ or ‘HIGH’ in stead of ‘DRAFT’ or
‘ENHANCED’.
The choice made there can overwritten with certain software’s. To be
sure the printer uses its new features, make sure the software either
send no printer mode command, or send the right printer mode
command. Contact you supplier of the software for more details.
5
SummaPaint PC1500
5.
Addendum
CLEANING TOOL
5.1.
General
Since November 97 our Summapaints are also equipped with an extra
cleaning tool in order to clean the tubes more easily.
It is advised to clean the tubes of the ink delivery system :
• When a set of tubes will not be used for a couple of days.
• Weekly or monthly, depending on the type of ink. When using
pigmented ink a weekly flush will prevent clogging.
5.2.
use of the cleaning tool
ÎTo clean the tubes, proceed as follows:
Plug
clips
Cartridge
Clamp
1.
Close the tubes of the
ink supply system by means
of the clips. Take the
cartridge out of the carriage
and place it in the clamp.
Disconnect the cartridge
and put a plug on the tube
coming
out
of
the
cartridge.
6
SummaPaint PC1500
1.
Addendum
Connect the prime bulb to the
print carriage.
Open the clips,
and press a few
times on the
prime bulb to
flush the ink
back into the
reservoir.
2.
When all
the
ink
has
been removed,
close the clips
again. Remove
the prime bulb,
and disconnect
the
reservoir.
Place
the
reservoir in a
safe place.
3.
Connect the cleaning tube there where the reservoir was
connected. Place the other end of the tube in a container.
400-557
1.
Fill the syringe with distilled water and connect it to the print carriage.
Gently inject the water through the tubes.
2.
Disconnect the syringe, reconnect the prime bulb and blow all
the water into the container.
7
SummaPaint PC1500
Addendum
3.
Reconnect the ink reservoir and install the cartridges as described
in the User’s Manual.
8