
1
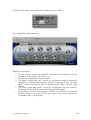
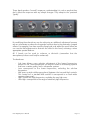
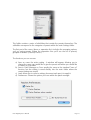
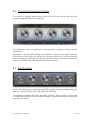
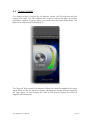
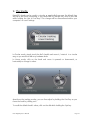
DUY
MagicEQ
1.0
USER’S MANUAL
INDEX
1.
Quick start
page 2
2.
Inserting DUY MagicEQ in an audio or Aux track
page 3
3.
Quick-use guide
page 5
4.
What is MagicEQ?
page 6
5.
The technology behind DUY MagicEQ
page 7
5.1 OFIR technology
5.2 ASM technology
5.3 HAS technology
6.
Why MagicEQ is not a conventional equalizer
7.
Using DUY MagicEQ
page 9
page 10
7.1 Learn your audio
7.2 Adjusting to taste
7.2.1 Using the factory presets
7.2.2 Modifying the EQ by “colours” or “Spectral Atmospheres”
7.2.3 Modifying the EQ by bands
8.
Product description
page 14
8.1 Edition bar
8.1.1 Patch Manager button
8.1.2 Edit Buttons
8.1.3 Memory buttons
8.1.4 Help
8.2 Learn, Clear & LCD Display
8.3 Input Section
8.4 “Spectral Atmospheres” section
8.5 Bands section
8.6 Output section
9.
The knobs
DUY MagicEQ User’s Manual
page 22
Page 1
1. Quick start
Please read DUY MagicEQ’s installation guide to install the software. You will find it
included both in the Downloaded version or in the CD you purchased, according to
the version you chose when you purchased the software.
If you have purchased DUY MagicEQ as an online download, make sure that the
software has been downloaded correctly. Once you uncompressed the downloaded
file, it should look like this:
If your installer doesn’t appear as in the image above, please contact DUY Customer
Service at [email protected] in order to get access to the download again.
To install the software, double-click on the Install icon. Read the License Agreement
very carefully and click on the “Agree” button only if you agree to accept the terms
and conditions of the provided license agreement.
You will be asked to enter your serial number. Please enter it. Make sure the serial
number is inserted in capital letters, with no spaces and looking similar to this:
XXXXX-XXXXX-XXXXX-XXXXX, where “X” can be a capital letter or a number. The serial
number will be provided at the top of your registration card, if you have purchased a
boxed CD, or in the email we provided if you have purchased the software as an
online download.
You must also install DUY MagicEQ’s settings, included in a separate installer, using
the same procedure as detailed above.
DUY MagicEQ User’s Manual
Page 2
2. Inserting DUY MagicEQ in an audio or Aux track
DUY MagicEQ is presented as a Mono to Mono equalization effect. Depending on
your version of ProTools or other DAE-aware application, the process of inserting the
plug-in is done in one way or another. Look for DUY MagicEQ either in the list of
Mono to Mono plug-ins or, if they’re arranged by categories/families, you will find it
in the “EQ” section:
If you want to use DUY MagicEQ as a Stereo or Multichannel process, you must
insert the plug-in as “Multi Mono”.
DUY MagicEQ User’s Manual
Page 3
In this last case, make sure that the “Link” edition button is active:
This is MagicEQ’s edition window:
MagicEQ is formed by:
•
•
•
•
•
An LCD Display section that provides information and instructions on the
operations of the plug-in and its basic use.
A Input Gain control with a level visualizer.
The upper central part has 4 knobs to accentuate complex frequential
spectrums or “Spectral Atmospheres” (Ouhm, Boog, Haxx & Sizz). You also
have 5 knobs to control the level of specific bands (SubL, Low, Mid, High,
UltraHi).
The lower central part shows a dynamic spectrogram that will show the
information relative to the current state of the spectral analysis.
At the right hand side of the plug-in’s interface, you will find the “Amount”
knob to control the amount of effect you want to add, and an output level
visualization with a Clip indicator.
DUY MagicEQ User’s Manual
Page 4
3. Quick-use guide
We sincerely recommend reading Chapter 7 of this manual (“DUY MagicEQ in
depth”).
To process audio with DUY MagicEQ, insert it in a track and press Play on your host
system.
Click on the LEARN button within DUY MagicEQ. Your audio will be analysed. You
can stop the analysis at any time by clicking on the same LEARN button. We advise
you to process your audio track through those parts where the instrumentation is at
its richest stage, and therefore the frequency content is the greatest.
Once you have started the LEARNING process, you will be able to modify any
parameter and also select any of the available settings. When the PROCESS bar is
complete, this will mean that DUY MagicEQ has already enough information to make
the appropriate spectral adjustments to your audio.
In order to achieve these manual adjustments, we advise you to use the dials related
to the complex Spectral Atmospheres (Ouhm, Boog, Haxx & Sizz). After this, you can
still adjust the specific bands (SubL, Low, Mid, High, UltraHi).
The “AMOUNT” adjustment is very important. If the amount value is 0%, then the
output signal will be the original audio (there have been no changes made to the
signal), whereas for a 100% value, the transformation curve is applied fully to the
original signal. Normally, the best choice is to have the amount value set to 0% and
once the LEARN process is complete, gradually increase the Amount value slowly, to
choose exactly how much effect you want to add.
DUY MagicEQ User’s Manual
Page 5
4. What is DUY MagicEQ?
MagicEQ is a mastering tool, based on a new equalization concept that can be
resumed in 4 words: Statistically-adaptative automatic equalization.
With a previously unknown precision and processing complexity, DUY MagicEQ must
not be mistaken with a standard EQ, and it must not be used as such. To understand
why, you should know that MagicEQ will not equalize in the same way any musical
piece of audio. Or, in other words, depending on the music we’re processing, the
type of equalization calculated by MagicEQ will vary completely. This is one of the
main features (though not the only one, as explained further on) that makes DUY
MagicEQ so different from classic EQs.
The engineer simply has to decide how he would like MagicEQ to finish the
equalization of his mix. MagicEQ will do the rest. Of course, MagicEQ will not make
decisions in the name of the engineer, but it will certainly do the “dirty job” of having
to move thousands of faders up and down. Therefore, the engineer DECIDES. This,
on the other hand, is not an easy job either, since MagicEQ offers vast possibilities,
unimaginable until now.
MagicEQ lets the engineer’s mind free from the usual troubles in traditional mixing
and mastering, such as lack of precision and errors in the mixes, due to
inconsistencies or monitoring and room non-linearities, acoustic resonances, certain
equipment’s undesired effects, differences in the sound levels, or simply due to
human hearing fatigue.
If a mix is already very good, MagicEQ will make it sound even better. But if the mix
has any deficiencies, MagicEQ will thin them out and will correct them automatically.
DUY MagicEQ User’s Manual
Page 6
5. The technology behind DUY MagicEQ
Until today, it hasn’t been commercialy profitable to create automatic mastering
tools, because the cost of the technology was too high.
DUY has made this possible, thanks to the simultaneous use of 3 technologies, as a
result of 4 years of intense investigation:
1) OFIR (Optimal Frequency Impulse Renderer) Technology
DUY’s new OFIR (Optimal Frequency Impulse Renderer) technology, to render
audio with zero-latency, allows the processing of amazingly complex equalizations.
The great advantage of the OFIR technology is its great resolution and definition,
preserving a virtually zero delay.
2) Adaptative Spectral Matching (ASM) technology.
This technology statistically analyses the input signal in realtime. By combining this
analysis with the OFIR technology, we can achieve an adaptative spectral match.
Therefore, we can make the overall mix of a certain piece of musical audio sound
like that of another one.
But these two technologies would be close to useless if we didn’t know what mix
we want to use as references for our mixes. This is the target of our third amazing
technology:
3) Historical Audio Statistics (HAS) Technology
MagicEQ includes the HAS system (Historical Audio Statistics). This technology,
developed by DUY, has allowed us to make a complete statistical analysis of the
spectral contents of the best and most successful productions in the history of
recorded Music. The result of this study has allowed us to define objectively which
are the “colours” or Spectral Atmospheres that can be found in all the successful
music pieces of a certain style, throughout history. It has also allowed us to
analyse the way how mixes have evolved, and even better: we can analyse where
this evolution is leading to!
These statistical analysis are implemented within MagicEQ in the way of “colours”
or “spectral atmospheres” which we have specifically implemented in the control
knobs tagged as “Ouhm”, “Boog”, “Haxx” and “Sizz”. We have named these
“Spectral Atmospheres” with totally new onomatopoeia, because these controls
don’t correspond to any similar existing “colour”. They are totally new colours, and
therefore they have totally new names.
DUY MagicEQ User’s Manual
Page 7
Regarding the SubL, Low, Mid, High & UltraHi controls, these don’t correspond to
any Spectral Atmosphere, but to standard frequential bands. The main difference
between the frequential bands and the spectral atmospheres is that the bands
have a minimum colouring, because they have no resonant peaks. The other
difference is that the bands are complementary between them: if you set all their
controls to zero, you’ll have as a result a theoretic flat response, so each one of
these bands overlaps with the 2 contiguous bands, with the exception of the SubL
and UltraHi bands, which have the limits of the audible spectrum on one of their
sides.
The ASM and HAS technologies turn DUY MagicEQ into a totally different audio
processor in comparison to any other in the market. At the same time, the
spectral bands and colours produced by MagicEQ can’t be found in any other
existing audio processing device.
The result of the 3 described technologies allows us to implement a totally
exclusive system.
DUY MagicEQ User’s Manual
Page 8
6. Why MagicEQ is not a conventional equalizer
Normally, an EQ is blindfolded when it gets to processing. It doesn’t “listen” to what
it’s equalizing. A traditional EQ lowers or enhances the level of a certain frequency
without knowing what signal it’s processing, and obviously without knowing the final
result.
We can use a normal equalizer to increase the level at 1.2 KHz with a certain
bandwidth of a Q=6, for example. It will be the engineer’s responsibility to know if
that particular band will allow us to obtain, for example, more “punch”. The engineer
will also have to experimentally check if he obtained the desired result.
With DUY’s technology, you can tell MagicEQ how you would like your music to
sound, and the software will take care of all the rest. When you press the LEARN
button, a detailed analysis of the sound to process will begin. The result is
immediately passed onto the OFIR technology with zero latency. These details are
equal to thousands of equalization bands, which will start adapting themselves
without the engineer having to do anything at all. In the meantime, you can visualize
on the lower display if your bands are pushed up or down with precision as the
musical analysis is in process. If you wanted to do this with standard methods, it
would take hours or maybe days, and the result would never be comparable to the
precision achieved with DUY MagicEQ.
Once the LEARN analysis is over we can polish the result, either by selecting any of
the many provided responses, or by modifying them at our choice with the spectral
band controls, the Spectral Atmospheres and the amount of effect.
MagicEQ can forecast the engineer’s desires without him having to take part in the
process, and with a unique precision. This can be done thanks to intermediate
processes within the analysis.
The design of MagicEQ removes all complexity in the equalizing process, by reducing
the procedure to moving a few knobs, making it very easy to use.
MagicEQ functions creating the FINAL response curve. The user is to determine what
this curve should be like.
MagicEQ also allows to accentuate the result by bands or also by “colours” /
”spectral atmospheres”, by using one dial for each “colour”. These “colours” can also
be combined, to have an optimal result with an unprecedented control in known
audio hardware and software devices.
DUY MagicEQ User’s Manual
Page 9
7. Using MagicEQ
The equalizing process of MagicEQ can be separated in two parts: “Learn” and
“Adjust”.
7.1 Learn your audio
MagicEQ must have information on the audio to process. In order to let MagicEQ
capture all this data, you must press the LEARN button. To stop ‘teaching’ MagicEQ
what your original audio mix sounds like, click the LEARN button again, and it will
stop processing the information.
We advise you to listen to your audio before starting the LEARN process, in order to
make sure you are aware of the sections in your audio with the greatest frequential
content.
In pop music it’s usually in the chorus that you’ll find the full instrumentation, with
rhytmic instruments and voices. It’s advisable that while you’re in the Learn process,
you play these sections multiple times, even in loop mode if necessary, so that the
full power of the statistics can be applied with greater precision.
In orchestral music we advise you to use the “tutti” parts of the audio, with low and
high percussion (timpani and cymbals), and the different sections (strings, winds,
etc...)
When the Progress bar has completed, you can still go on “learning”. As a matter of
fact, we advise you to perform additional auditions and repeating the Learn process
in order to have more complete and detailed statistics about your audio.
As well as seeing the progress bar move forward towards its completion, you can
also visualize the result of the analysis in the response curve that appears in the
lower part of the display window. This curve shows us a summary of the bands we
have obtained after the analysis. It’s the corrective curve that includes the differences
between the sound of the unprocessed mix and the desired sound. The colour
intensity of this curve indicates the level of learning of the input music. Therefore, a
curve in black and white indicates that the proper EQ has not yet been learnt. A
totally coloured curve means that the learning process has been fully completed.
DUY MagicEQ User’s Manual
Page 10
7.2 Adjusting to your taste
Once the learning process is over and the Progress bar is complete, MagicEQ will
have calculated milions of frequential micro-bands to obtain a unique statistical
response of your audio and then be able to make... MAGIC.
In order to adjust the optimal curve, you can change the result to your taste, using
these three methods:
7.2.1 Using the factory presets
By selecting a preset, the selected preset’s EQ curve will be applied. The presets
included with DUY MagicEQ are classified according to the music style, and also by
age (60s, 70s, 80s...), which makes it very simple to select the desired preset.
It’s convenient to modify the Amount knob to enhance or reduce the effect of each
setting.
You must consider that the effect of the EQ will vary depending on the type of audio
you apply it on, because the final result depends both on the preset and the
statistical information that results from the Learn process.
It may also be interesting for you to try combinations such as applying a response
like “2000’s Rock” to an acoustic song. The result may be valid depending on the
type of sound you’re after.
DUY MagicEQ User’s Manual
Page 11
7.2.2 Modifying the EQ by “colours” or “Spectral Atmospheres”
There are 4 knobs that define “colours” or “spectral atmospheres”: Ouhm, Boog,
Haxx & Sizz. Each one of them spans a wide spectral region where there are many
complex frequencies. These “colours” are the result of the complex and detailed
statistical analysis of the “colours” or spectral atmospheres that can be found in the
most successful music pieces, throughout the history of recorded music. Each knob
represents by itself a certain ambience, in an additive way, since colours are always
desired, and there would be no point in removing them from a recording.
The Ouhm, Boog, Haxx and Sizz bands represent extremely complex bands, and they
can’t be described or categorized in any specific way to make their meaning more
understandable. However, their names give you a slight idea of what they sound like.
The best you can do is experiment with them and you’ll be amazed at what you can
achieve.
All these spectral atmospheres controls produce an increase in the perceived
auditive power, higher than the real energy increase, delivering as a result a
psychoacoustic increase of the power. This is especially noticeable in the Haxx and
Sizz controls, both in the higher side of the spectrum.
This setup of 4 carefully-calculated bands allows you to mix spectral atmospheres to
create a vast range of spectral combinations. We advise you to combine this
technique with modifying the bands (explained in section 7.2.3).
7.2.3 Modifying the EQ by bands
The third way to achieve the sound you’re after is to modify the bands directly: Sub
Low, Low, Mid, High, Ultra High. These controls don’t correspond exactly to “colours”
or atmospheres but to frequential bands. These 5 bands are contiguous. Therefore, if
they are all set to zero, the response is theoretically flat. Each one of these bands
overlaps with the adjacent bands, with the exception of the SubL and UltraHi bands,
limited by the sides of the audible spectrum.
DUY MagicEQ User’s Manual
Page 12
These bands produce “smooth” responses, understanding it in such a way that they
don’t affect the response with any abrupt changes. They adapt to the spectrum
“gently”.
By modifying these bands we are also achieving an additional adjustment because
we can accentuate or reduce the frequential contents due to the previously changed
effects. For example, if we have used the Boog knob, and added too much effect, we
can use the Mid adjustment to diminish the effect in this band, achieving a more
appropriate spectral balance.
All 5 bands can be used to enhance or diminish (remember that the
atmospheres/colours could only be enhanced).
The bands are:
-
Sub Low: allows a very selective adjustment of the lowest frequencies,
around 40 Hz. These frequencies can only be heard on monitoring systems
that have a certain quality, and in sub-woofer systems.
Low: corresponds to the lower frequencies, excluding the sub-low
frequencies.
Mid: spans a wide mid-frequency band, between the Low and High controls.
This control isn’t a standard Mid control!! It corresponds to a much wider
spectrum than usual.
High: controls the high frequencies, excluding the very high ones.
Ultra High: corresponds to the range of extremely high frequencies
DUY MagicEQ User’s Manual
Page 13
8. Product description
8.1 The Edition Bar
The Edition Bar allows to access rapidly the fast-edition functions and the edition,
organization and search of settings/presets.
8.1.1 Patch Manager Button
The Patch Manager arranges the presets/settings documents. During the installation
process, the presets will be placed in a folder named “MagicEQ patches” in the
Preferences directory. Note that with all DUY products, we also name “presets” as
“patches” or “settings”.
DUY MagicEQ User’s Manual
Page 14
This folder contains a series of subfolders that contain the presets themselves. The
subfolders correspond to the categories of presets within the main Settings folder.
The first part of the menu (above a separation line) includes the managing options,
such as saving presets. Below the separation line you’ll see the list of presets,
grouped in families (Classical, Dance...)
The functions you can use are:
a) Save as: saves the active setting . A window will appear, allowing you to
change the name you would like to give the preset and where you would like
to store it on your drive.
b) Save in Patch Manager as: Does exactly the same as the standard “save as”
function, but the setting is saved directly into the main folder where the
current settings are stored.
c) Load: allows you to select a settings document and open it to apply it.
d) Preferences: Shows the options you have within the patch manager.
DUY MagicEQ User’s Manual
Page 15
-
Cache On: allows you to activate the loading of all the presets in
memory, so that the system doesn’t have to read from disk each time
a setting is used. This is helpful to reduce the time of reading to disk.
Cache Patches: When the “cache on” is active, if you select this option,
all the presets will be loaded when you use MagicEQ for the first time.
Cache Patches when needed: If you select this option, only the
presets that are called or used during a session will be saved in the
cache.
Select Root Folder: allows you to choose the folder that contains the
structure of subfolders that holds the presets. You can have an infinite
presets folders in your hard disk, but only one can be active at a time.
So, if you prefer to change the name of the folder or where it is stored
in your hard drive, you can manually move it and then select the
position where it’s located by using this option. Once you have done
this, click on the “Re-build Patches List” when you click OK if you
would like the list of presets to be refreshed.
8.1.2 Edit Buttons
These buttons allow you to copy, paste, undo or redo. If it’s not possible to use a
certain function, the button will be tagged in lighter grey. This will occur, for example,
if there is nothing to Paste (which would mean you haven’t clicked “Copy” first).
“Copy” will copy the state of a whole screen. This information can then be pasted
using the “Paste” button in this instance of MagicEQ or in another. The “Undo” and
“Redo” buttons allow you to return to the “previous” or “next” state after your last
edition. A history of the last 10 editions is stored. Therefore, you have 10 levels of
Undo or Redo. If you would like to clean the history or stored states, click on the
Copy button while holding the Opt key.
DUY MagicEQ User’s Manual
Page 16
8.1.3 Memory Buttons
The A, B, C, D, E, F buttons are temporary memories which can be used in many
cases. For example, if you would like to compare several settings.
To save a screen state to one of these memories, simply click on the memory button
(A, B, C, D, E,or F). If the memory is empty, the button will be highlighted in gray.
Once you click on the button and save the content of the screen, the lettering will
turn black. If you want to empty a memory, click on the button while holding the Opt
key.
If you would like to load all the memories in a circular way, click on the Rotate
button. If you only have memories A and B full, the sequence in rotation from one
memory to another will be A, B, A, B...
8.1.4 Help
MagicEQ has Help Balloons and also Spoken Help (you will need the Speech
Manager in your system for Spoken Help to function). To use any of these two, click
the respective icons.
DUY MagicEQ User’s Manual
Page 17
8.2 Learn, Clear & LCD Display
Click the LEARN button to start and end the analysis of your audio. This is the most
important function in the process of using DUY MagicEQ’s capabilities. We advise
you to click the LEARN button only while the audio is playing with the highest
possible frequential content. Sections such as bridges, mutes, fades or fill-ins should
not be used for the LEARN process. Therefore, chorus are generally the most
appropriate parts of songs that should be used.
If, at any time, we’re not happy with the accumulated information that has been
provided to DUY MagicEQ while the Learn button was active, simply click the Clear
button to delete all the information processed by MagicEQ until that moment, for
that particular audio.
The LCD display shows the status of the progress in learning, and the messages or
important suggestions/instructions that the system may need to give you.
Once the Learn process is over, the Learning system will be automatically stopped
and you will be able to start adjusting the sound with the provided knobs. However,
you can still continue giving information to the system by clicking the Learn button
again. The more information you enter in the system, the more accurate the
prediction of the EQ curve will be.
DUY MagicEQ User’s Manual
Page 18
8.3 Input Section
The input section is formed by an Input slider control, a level display and a Mastering
button.
It’s important to check the system’s internal overflow process state. For this reason,
MagicEQ has a clipping led at the output. If the led lights up, it’s advisable that you
reduce the input level to avoid having unwanted distortion.
The Mastering button (active unless you click on it) determines that you’re looking
for the ideal frequency response for Mastering. If you’re working on a live project, we
advise you to switch this option off, so that a phase optimization algorithm comes
into place, sacrificing a 20-27 Hz range (which is hardly ever audible). This may
result in having an added noise when the knobs are being tweakened.
DUY MagicEQ User’s Manual
Page 19
8.4 “Spectral Atmospheres” Section
The colours or Spectral Atmospheres knobs are the Ouhm, Boog, Haxx and Sizz
controls, explained earlier in this manual.
The dials/knobs can be combined in any proportion, creating a unique spectral
combination.
By using the Cmd key while clicking on the knobs to adjust, you are able to perform
a fine-tuning of the value. We remind you that you should not use these controls
without having gone through the Learn process first. Please read all the information
in this manual about the meaning of these Colours controls.
8.5 Bands Section
These knobs allow you to adjust the overall EQ curve by increasing or decreasing the
levels in 5 bands: SubLow, Low, Mid, High and Ultra High.
The transitions between the bands are totally “smooth”. These controls can be used
in combination with the Colours controls in order to adjust the unique and exclusive
curve that you desire.
DUY MagicEQ User’s Manual
Page 20
8.6 Output Section
The output section is formed by the Amount control, the Clip indicator and the
output level value. The Clip indicator will show us if there has been an internal
calculation overflow. If it goes alight, you should move the input slider down. The
light can be switched off by clicking on it.
The “Amount” knob controls the amount of effect that should be applied to the input
signal. When at 0%, the signal is a bypass (ignoring the change of level caused by
the Gain slider). As you increase the value of the Amount control, the effect of
MagicEQ will increase too.
DUY MagicEQ User’s Manual
Page 21
9. The knobs
MagicEQ’s knobs can be used in a circular or graphically-linear way. By default, they
are set to be linear functioning. If you would like to change this, click on the dial
while holding the Opt & Cmd keys. This change will be remembered within your
computer’s or user’s settings.
In Circular mode, simply touch the dial’s handle and move it / rotate it in a circular
way, as you would do with any hardware knob.
In Linear mode, click on the knob and move it upwards or downwards, or
horizontally to change its value.
Apart from the tracking modes, you can fine-adjust by holding the Cmd key as you
move the knob by clicking on it.
To recall the default knob’s values, click on the dial while holding the Opt key.
DUY MagicEQ User’s Manual
Page 22
This guide is copyrighted ©2005 by DUY Research,
a division of Iris Multimedia, S.L. (hereafter “DUY”), with all rights reserved.
Following copyright laws, this installation guide may not be duplicated
in whole or in part without the written consent of DUY.
All trademarks are the property of their respective owners.
Features and specifications may be subject to change without notice.
DUY MagicEQ User’s Manual
Page 23


![[U1.05.00] Exemple simple d`utilisation](http://vs1.manualzilla.com/store/data/006354696_1-13ae16bef45f04fcaebd35a7bd1d1d64-150x150.png)