1
VITALBODIES.COM
INSTALLATION AND USER MANUAL
THANK YOU FOR CHOOSING VITALBODIES.COM:
MODEL:
TM
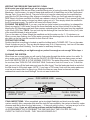
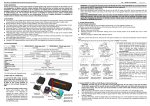
VITAL H20
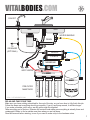
POINT OF USE FILTER SYSTEM V3
VITALBODIES.COM
FAUCET
SINK
SINK
WATER SADDLE
DRAIN
TO
ICE MAKER
(OPTIONAL)
FILTER 6
FILTER 5
MEMBRANE
AS
INPUT WATER
VITALBODIES.COM
PRE-FILTER
MANIFOLDS
3
2
1
F
I
L
T
E
R
F
I
L
T
E
R
F
I
L
T
E
R
3
2
1
VITALBODIES.COM
2006 © VITALBODIES.COM
RELAX AND TAKE YOUR TIME:
Make sure you have nothing scheduled for the rest of the day, so you have time to fully finish this job.
Follow the steps and everything should go smoothly. If you try and jump around, it will take longer.
If you make a mistake, don't worry, we will get through this together.
Take everything out of the box. Examine the contents and make sure everything is actually there and
undamaged. Better to find a mistake now than when you are half done.
Read this manual before starting, to see if you need to make a trip to the hardware store.
1
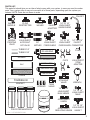
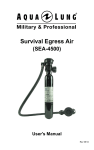
PARTS LIST:
This parts list should give you an idea of what comes with your system, in case you need to reorder
parts. Your system may or may not come with all of these parts, depending upon the system you
ordered. NOTE: Parts are not drawn to scale.
FAUCET
WATER
SADDLE
FLOW
RESTRICTER
NEEDLE
PIERCING
VALVE
1/4”
JOHN GUEST
AUTO SHUT
OFF VALVE
TUBING 1/4”
1/4” TO 1/4”
JOHN GUEST
FAUCET
ADAPTER UNION ELBOW
CHECK
VALVES
3/8”
NIPPLES
3/8” TO 3/8”
JOHN GUEST
FIXED ELBOW
1/4” TO 1/4” 1/4” TO 7/16”
JOHN GUEST
FAUCET
FIXED ELBOW CONNECTOR
PLUG
RO HOUSING
TUBING 3/8”
SEDIMENT
RO MEMBRANE
CLIPS
POST-FILTER
GAC
JOHN GUEST
STEM
ADAPTER
DEIONIZATION
PRE-FILTER
CARBON
VITALBODIES.COM
BRACKET
SCREWS
1
2
TANK
VALVE
1/4” OR 3/8”
JOHN GUEST
BULK HEADS
3
VITALBODIES.COM
PRE-FILTER MANIFOLDS
STRAIGHT
VALVE
WRENCH
1/4” TO 1/4”
JOHN GUEST
MALE
JOHN GUEST
UNION
1/4” TO 1/4”
JOHN GUEST JOHN GUEST
REDUCING UNION UNION T
2006 © VITALBODIES.COM
2
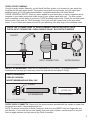
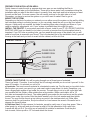
CHECK YOUR PLUMBING:
Your job is pretty simple. Basically, you will install the filter system so it connects to your water line,
the drain and the pure water faucet. This system comes with universal parts, but you might need
additional parts for YOUR particular installation. Installation instructions will follow below.
THREE UNIVERSAL PARTS: There is a water saddle for your drain pipe, an input connection which
connects to your water source and a little faucet (if your system came with one). The filter system
itself is complete, but it's ability to connect to YOUR plumbing might not be. Check the universal parts
below to see if they work for YOUR plumbing. See if you have the correct hole for the pure water
faucet. If one of these parts does not work for your plumbing, then plan to go to the hardware store.
CHECK THE 3 CONNECTIONS TO YOUR PLUMBING. CHECK FOR FAUCET HOLE
CHECK INPUT CONNECTION. CHECK SADDLE VALVE. BUY PARTS IF NEEDED
FAUCET
INPUT CONNECTION
WATER SADDLE
2006 © VITALBODIES.COM
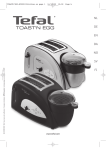
INSTALL RO MEMBRANE: Insert the RO Membrane into it’s housing. It is shipped sealed for
freshness and can only go in one way. (Insert the end with the two small O-Rings).
UNSEAL MEMBRANE
OPEN RO HOUSING
INSERT MEMBRANE AND SEAL CAP
O RING
MEMBRANE
RO LID
RO MEMBRANE
RO HOUSING
2006 © VITALBODIES.COM
CHECK QUICK CONNECTS: Check all of the quick connects provided with the system to make sure
the inserts are inside... they sometimes fall out.
NOTE: To remove a tube from a Quick Connector, push in on the INSERT with two fingernails and
pull the hose. If your nails are not user friendly, then use a pair of pliers, a small wrench or any tool
that can apply pressure on both sides of the Quick Connector.
3
INSTALL THE PLASTIC CONNECTORS: Take the elbow connectors, and screw in where the
System diagram shows them. Do not over tighten. This fitting seldom develops a drip. If one occurs,
or if you simply want to ensure against drips, Teflon Tape works pretty well and we would recommend
having some handy before you begin. Pull it tightly around and work it in to the threads.
CHECK THAT ALL CONNECTORS HAVE INSERTS
INSTALL CONNECTORS INTO FILTER SYSTEM
PUSH IN INSERTS, PULL TUBING TO DISCONNECT, RECONNECT TO FIX LEAKS
INSERT
CONNECTOR
TEFLON TAPE THREADS IF NEEDED
2006 © VITALBODIES.COM
TUBING
PUSH
INSERT
TO DISCONNECT
TUBING
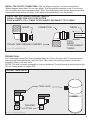
PREPARE TANK:
The Pressurized Holding Tank has a threaded fitting on it. Put on the tank valve. It is recommended
that some anti-leak materials be used, like Teflon Tape. Attach the hose by pushing it in the quick
disconnect fitting of the tank valve.
NOTES: The tank can stand up straight or it can lay horizontal. The tank should be with ten feet of the
RO unit. Tank pressure is usually 7PSI
INSTALL TANK VALVE
TANK VALVE
VITALBODIES.COM
THREADED
FITTING
2006 © VITALBODIES.COM
4
PREPARE YOUR INSTALLATION AREA:
Totally clean out under the sink or prepare what ever area you are installing the filter in.
Get some rags and wipe up the floor/bottom. There will be some water from somewhere during the
installation and you want to be able to wipe it up easily. Now, step back and look at where you want
the unit and the tank. For some reason, the unit usually ends up on the right side or in front.
Remember, you have to service the system so you don't want to make it hard to get at.
MOUNT THE SYSTEM:
Depending on the kind of system you ordered you can either mount the system on the wall by drilling
two holes and putting in mounting screws, or you can simply stand the unit up on the floor inside a
drip pan. A drip pan is not required, but helps for catching drips when changing out filters or if you
need to make any adjustments, etc. If your system is portable then this might not apply...
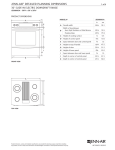
INSTALL THE FAUCET: If your system came with a faucet, install it now. IF YOU DO NOT HAVE AN
EXISTING HOLE and you need to cut a hole in your sink or counter then the information below is
important. If you DO have an existing hole, you can weed through some of the details, but you will
need to know how to assemble your faucet. This is the hardest part of the installation since it goes all
the way at the back and you have to crawl into the cabinet, so let's do it first.
INSTALL FAUCET
COVER PLATE
RUBBER SEAL
COUNTER
PLASTIC RING
METAL WASHER
NUT
TUBING
2006 © VITALBODIES.COM
CREATE FAUCET HOLE: You will be going through one of three types of materials.
There is a fourth - Porcelain. It can be done, but it is strongly advised you do not do it yourself. In the
case of Porcelain, it is advised you call a Pro.
a) Laminate: The most common material is a laminated counter top. Find the spot on top which looks
like the place you want your spout to go, and crawl under to see where it is clear. Remember, you
have a large plastic washer to put under the counter. The safe thing to do is to drill a pilot hole with
your smallest bit first. Better a little mistake than a big mistake. When comfortable, drill a 1/2
inch hole and assemble the faucet. The rubber gasket goes under the chrome faucet and the plastic
washer goes under the counter. After the plastic washer, put in the lock washer and then tighten
the nut. You may find the faucet up top turning as you turn the stainless steel nut. Either have
someone hold it or get inventive, like put a wrench on it and secure the wrench. Be careful not to
damage the faucet surface.
b) Stainless Steel: Do the same as for laminate, except be really sure of your clear space. Take a
metal punch (or a big nail) and give the spot a solid hit. At this indentation, drill a pilot hole.
A wood drill will not do it. You must use a metal drill bit suitable for stainless. Once the pilot
hole is made, follow up with a 1/2" hole and attach the faucet.
5
C) Marble or Granite: This is not that hard, but it takes a long time. You need a diamond tipped drill
and about 15-20 minutes of standing there. The price of a 1/2" diamond tipped drill is around $75 and
they are not in every store. Since you will probably never use it again, you would probably be better
off calling in a Pro. Most glass installers have diamond drills and all vendors of stone have them.
Some will rent them out. If you insist on doing it yourself, you will need to call around for where you
can get a diamond drill bit. Start the hole by drilling a 1/2" hole into a piece of scrap wood. This will
serve as a guide. Hold the piece of wood and let the diamond drill bit do the work. DO NOT push
down or apply pressure. Keep the hole filled with water and wipe out the hole often. It is important to
let the weight of the drill be the pressure and to let it just grind away at its on pace (which is slow).
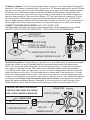
CONNECT THE FEED (INPUT) WATER: SHUT OFF WATER FIRST!
The water feed is the water that will go into and feed the filter. It is the water that is to be purified.
DO NOT ATTACH TO THE HOT WATER PIPE - IT WILL RUIN YOUR RO MEMBRANE.
JOHN GUEST
SHUT OFF VALVE
SCREW OFF HOSE
SCREW ON VALVE
SCREW ON HOSE TO VALVE
UNDER SINK STOP VALVE
INSERT
NEEDLE PIERCING VALVE
2006 © VITALBODIES.COM
Needle-Piercing Valve: Position where you can get to it. It is normally best to have the valve handle
on the right (unless you are left-handed) and the connection facing towards the cabinet doors.
NOTE: If you have soft rubber tubing that you will be piercing though, you might what to replace it
with copper or rigid plastic tubing. This creates a more solid and reliable valve tube connection.
If you DO have soft rubber, you can give it a try first. You almost always need to drill out a hole and
center the piercer over the hole. The soft rubber tends to expand and fill the needle hole. It is tricky,
but we have always gotten them to work. Fit the insert to the pipe size - turn the adjusting screw all
the way out and place the unit around the pipe and then slide the insert in. Then, tighten the adjusting
nut fairly well and double check the insert to make sure it is flush. If everything looks right, then
tighten the handle and pierce the pipe. Remember, the insert must be flush with the pipe, or the
needle will be off center. Take the clamp off after piercing, and drill out the hole with a 1/8" bit.
CHOOSE THE PLACE FOR SADDLE
DRAIN PIPE
POSITION AND CLAMP THE SADDLE
DRILL THRU RUBBER & DRAIN PIPE
WATER SADDLE
DRAIN TUBE
COMPRESSION NUT
2006 © VITALBODIES.COM
DRILL BIT
RUBBER GASKET
6
THE DISCHARGE WATER:
If the system you ordered is an RO system then you need a place for the discharge water to drain.
Water is used to flush the RO Membrane, which keeps it from getting all caked up with particles. This
is flushed away through the discharge tube. If your system is portable then direct the water into a
drain etc. INSTALLING THE WATER SADDLE: Find a place on the drain pipe under the sink and
clamp it on. Try to have the clamp positioned where the tubing coming into the drain pipe will not
block anything you will be storing under the sink, like where you want to put the tank. Try to have the
clamp positioned where when water is flowing though it, the water does not fall a far distance and
make a lot of noise which will echo out the drain into the room. Make sure it is above the trap!
INSERT TUBING THRU NUT
DRAIN PIPE
INSERT TUBING INTO CLAMP
TIGHTEN NUT
WATER SADDLE
DRAIN TUBE
COMPRESSION NUT
2006 © VITALBODIES.COM
RUBBER GASKET
POSITION, DRILL AND INSTALL: Attach the rubber gasket to the pipe. Position the saddle over that
spot and screw it on. Drill it out with a 1/4" drill bit. Put the compression nut on the yellow line and
push the yellow line into the discharge pipe. It is okay to force it in. Screw the compression nut on
fairly firmly. This is usually a no problem area. If you have a double sink it is ok to place the saddle on
the horizontal portion of the piping. Remove drill bit before installing tubing!
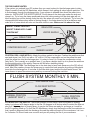
FLOW RESTRICTION: The discharge line to the drain has to have back pressure or the RO will not
work. Most filter vendors choose the cheap way to create this back pressure by putting a little plastic
insert into the discharge line. It is similar to the little white insert used at the feed water faucet. We
have chosen to spend the extra money and buy a manual flushing flow restrictor.
FLUSH SYSTEM MONTHLY 5 MIN.
DISCHARGE LINE
FLOW RESTRICTER
NORMAL POSITION
(ALMOST SHUT)
2006 © VITALBODIES.COM
FLUSH POSITION
(WIDE OPEN)
FLOW RESTRICTOR SWITCH: The normal position for this switch, when the system is making
water, is at almost a 90-degree angle to the line. 90 degrees is off and we what to restrict the flow not
shut it off. If your system is slowing down, it may be the filters are ready for a change or it could be
the RO is getting silted up. To flush the RO Membrane, simply turn the handle on the flow restrictor so
that it points in alignment with the discharge line and the water will wash off the membrane. Let it run
for 5 minutes. Do this at least once a month and you will prolong the life of your membrane.
7
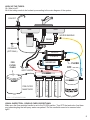
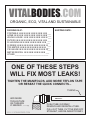
HOOK UP THE TUBES:
Ok, What is left?
All of the tubing needs to be hooked up according to the main diagram of the system.
FAUCET
SINK
SINK
WATER SADDLE
DRAIN
TO
ICE MAKER
(OPTIONAL)
FILTER 6
FILTER 5
MEMBRANE
FOR
FILTER
FLUSH
FLUSH
OFF
AS
INPUT WATER
VITALBODIES.COM
PRE-FILTER
MANIFOLDS
3
2
1
F
I
L
T
E
R
F
I
L
T
E
R
F
I
L
T
E
R
3
2
1
VITALBODIES.COM
2006 © VITALBODIES.COM
VISUAL INSPECTION - DOUBLE CHECK EVERYTHING:
Make sure the flow restricter handle is set to the FLUSH position. Turn OFF the tank valve. Are there
any tubes dangling that will spray water everywhere? Do the manifolds seem to be screwed shut
tight?
8
KEEPING THE PRESSURE TANK AND RO CLEAN:
At this point you might want to get out a sponge or towel.
It is a smart idea to flush the pre-filters (manifold filters) prior to having the water flow through the RO
Membrane. Just the same, you want to keep what washes off of these filters out of the Pressurized
Storage Tank. So we shut that off. The point of this is to keep the charcoal from the manifolds from
going into the RO filter during a filter change or installation. When you first flush water through the
NEW filters in the three manifolds, the filters can release a cloud of charcoal. This is normal, just flush
the manifold until the water no longer has black coming out of it. Then simply attach the manifold to
the RO membrane again. The tank is left turned off to keep it clean.
FLUSHING THE MANIFOLD: If you can, now that you have hooked up everything, (or changed the
filters) we need to FLUSH water through the three manifolds and out into a bucket or to the drain.
Keeping the RO Membrane and tank clean requires unhooking the line that goes from the manifolds
to the fourth (RO) filter. TRICK: You can hook up the discharge line from the drain to the ("out") side
of the manifold instead of using a bucket.
Turn on the water so it flows though the manifolds and let the water run for 5 - 10 minutes or so.
When you are done flushing, turn off the water reconnect the discharge tube to the flow restricter and
also hook up the line from the manifold to Auto Shut-off Valve.
TESTING THE SYSTEM:
Double check that everything is hooked up and the holding tank is TURNED OFF. Turn on the water.
Check for leaks as you go. They are almost always easy to fix, if there are any. Just turn off the water
again and tighten what is leaking. Turn the water on and keep checking.
> Usually something is not tight enough or pushed in enough or not enough Teflon tape. <
FLUSHING THE SYSTEM:
When there are no more leaks you will need to flush water through the whole system for a while. To
do so make sure the WATER IS ON and the FAUCET IS OPEN that the pure water comes out and
the FLOW RESTRICTOR IS IN THE NORMAL POSITION. The water flows slowly! Flush the system
for one hour, then TURN ON THE HOLDING TANK. Continue to flush for 6 hours or so. To flush the
tank you must turn off the feed water and open the little faucet. Turn the feed water back on and shut
the little faucet to fill the tank again. NOTE: If you have a TDS meter, flush until the meter reads zero
or as low as it seems like it is going to go. When the filters are new, there is charcoal and other
residues that need to be rinsed through. You do not want to drink this.
DISCHARGE LINE
FLOW RESTRICTER
NORMAL POSITION
(ALMOST SHUT)
2006 © VITALBODIES.COM
FLUSH POSITION
(WIDE OPEN)
FINAL INSPECTIONS: When completed, get a nice bright flashlight and check over the entire
system carefully. Also, remember that when the tank fills up completely, the system is then fully under
pressure and that is when the tiny leaks occur --- if they are going to occur --- so keep an eye on it for
a couple of days. If you are still having problems see the troubleshooting guide.
ALSO REMEMBER THIS IS PROBABLY THE ONE AND ONLY TIME YOU WILL DO THIS...
EXPECT A COUPLE OF BUGS...THEY WILL BE WORKED OUT.
9
CONGRATULATIONS!:
You now have pure water for your pets, plants and people!
Don’t forget to consider running a tube over to the ice maker so you have pure ice.
MONTHLY MAINTENANCE:
FLUSH THE RO MEMBRANE: Use the manual flow restrictor to flush the RO membrane. The normal
position for this switch, when the system is making water, is at almost a 90-degree angle to the line.
90 degrees is off and we what to restrict the flow not shut it off. it may be the filters are ready for a
change or it could be the RO is getting silted up. To flush the RO Membrane, simply turn the handle
on the flow restrictor so that it points in alignment with the discharge line and the water will wash off
the membrane. Let it run for 5 minutes. Do this at least once a month and you will prolong the life of
your membrane.
FLUSH SYSTEM MONTHLY 5 MIN.
DISCHARGE LINE
FLOW RESTRICTER
NORMAL POSITION
(ALMOST SHUT)
2006 © VITALBODIES.COM
FLUSH POSITION
(WIDE OPEN)
FILTER CHANGES AND MAINTENANCE:
Filters will need to be changed every 6 months to a year, depending on the quality of your incoming
water and how many gallons you use per day. We recommend getting a TDS meter, so you can get a
real idea of how your filter system is doing. This will save you the wonder of how pure your water
really is, how are your filters doing, etc. Order replacement filters at VitalBodies.com.
TURN OFF THE WATER: First step is to make sure you turn the water off to the filter. There is a little
brass faucet (needle piercing valve) that is attached to the cold water line (under the sink) that needs
to be turned off so water stops going into the filter.
Let out what ever water you can from the filter faucet (at the sink top) to relieve pressure from the
filter system.
Make a note, on paper, of what filter goes where as you proceed.
If you have a digital camera take a picture of the system where you have all your hoses in view.
The water comes in to the filter from the tap. The water goes through the filter to be purified and
comes out the little faucet by the sink. Some water comes out the waste line (from the RO
Membrane) into the drain pipe. The water starts it’s journey into the filter and goes through the three
manifolds.
THE PRESSURE TANK: There is a big tank called the pressure tank. It is metal and is huge
compared to all other parts of the filter. Turn off the pressure tank with a twist of the little valve at the
top of it.
10
THE MANIFOLDS: The three large, main manifolds simply need to be unscrewed. Think of them like
big caps. The filter wrench will make this easy - it has a round end with a handle. Just slide the round
opening around the manifold and twist counter clockwise. The manifolds will be REALLY full of water,
so plan for some dripping/spilling. If you unscrew them somewhat carefully it shouldn't make too
much of a mess. A pan or big bowl and some towels should be all you need. When you take the
manifolds off, dump out the water, dump out the old filter (without touching it) and clean the manifold.
Then slide in a new filter. EACH FILTER LOOKS DIFFERENT so simply replace them in order. Refer
to your notes as needed. Then simply screw the manifold back on.
RO MEMBRANE: You should not need to change the RO MEMBRANE at this time. It gets changed
about once every three years or when it fails to perform properly. This can help be determined with a
TDS Meter.
THE DI FILTER AND FINAL TASTE FILTER: The fifth filter is the de-ionizer (DI) and the final 6th
filter is for taste and odors. These come off in a slightly different way. There is a fitting on each end
that screws into the filter. Take the tubes out of the fittings - to do this you press the ring that is around
the tube end (and inside the fitting) down into the fitting, this will allow the tube to easily pull straight
out. Then unscrew the fittings, discard the old filter and screw the fittings into the new filter. Finally,
plug your tubes back in - just be sure to press them in firmly until they seat. If you system came with a
DI housing that is filled with resin, discard the resin not the housing.
Double check that everything is hooked up and the pressure tank is STILL OFF.
KEEPING THE PRESSURE TANK AND RO CLEAN: If you can, now that you have changed the
filters and hooked up everything, it is helpful to FLUSH water through the three manifolds and out into
a bucket or the drain. To keep the RO membrane and tank clean will require unhooking the line that
goes from the manifolds to the fourth (RO) filter. This tube is what should be put in the sink or bucket
to allow water to flush through. The point of this is to keep the charcoal from the new filters from going
into the RO filter during a filter change or installation. When you first flush water through the NEW
filters in the three manifolds, the filters release a cloud of charcoal. This is normal, just flush the
manifold until the water no longer has black coming out of it. Then simply connect the manifold to the
RO Membrane again. The tank is left turned off to keep it clean. Now that you have routed all
charcoal away from the tank and RO you need to re-connect the water line that comes from the
manifolds to the fourth (RO) filter.
TESTING AND FLUSHING: Double check that everything is hooked up and the pressure tank is
TURNED ON. Check for leaks as you go. They are almost always easy to fix, if there are any. Just
turn off the water again and tighten what is leaking. Usually something is not tight enough or pushed
in enough. Turn the water on and check it again. Next you will need to flush water through the whole
system. To do so make sure the water going to the filter system is on and the little sink faucet is open.
Flush the system for three hours or, if you have a TDS meter, until the meter reads zero or as low as
it seems like it is going to go. When the filters are new there is charcoal and other residues that need
to be rinsed through and you do not want to drink this. Once the systems is flushed flush the tank. To
flush the tank you must turn off the feed water and open the little faucet. The tank pressure will make
the water flow even if the feed water is off. Turn the feed water back on and shut the little faucet to fill
the tank again.
NOTE: You should not need to change the RO Membrane until the TDS meter lets you know the filter
is no longer filtering. You may want to print this page so you can have these instructions at hand. Let
us know if you need any other information.
VITALBODIES.COM
11
HAI KU:
TANK:
When the tank is full
the water stops
and no sound is heard
VALVE:
When valve is off
no flow will happen
the water stops
EMPTY:
when tank is empty
the pressure is low
and the water trickles
PIERCED TUBE:
when hole is small
the water trembles
and little is seen
MEMBRANE SEDIMENT:
when sediment is high
the flow valve is adjusted
or the water slows
SOUND:
when drain tube is high
sound is heard
of water across the room
FILTER CHANGE:
when TDS is high
and the flow recedes
filters change
THE WATER:
when TDS is not
the water is drunk
and bodies smile
LEAKS:
when tape is lacking
tube or connector loose
water drips
TROUBLE SHOOTING:
It's okay to email us but you might get instant results by trying the suggestions below. All
problems are fixable and they all will show up in the first 24-48 hours after the system is
fully charged. We can also call you if you need more extensive help over the phone.
"I have leakage from a push-in fitting” The push-ins almost never leak. Try pushing
the line in harder. Take the line out and check the end of the tube. Is it a clean cut? If not,
take a pair of sharp scissors (or a sharp knife) and cut it cleanly. Push in again... firmly.
"The system is not making water" This is almost always a psi problem. First question...
"Are you on well water?" If so, then kick the regulator up. Check the psi of the house by
the tank method (described above). 40 psi is about as low as you can go. If the psi is low
it often is a poor hole on the feed water pipe. Drill it out. If you have sufficient psi to the IN
side of the pre-filters, then check the following:
a) Check to see if the flow restrictor is at a 90 degree to the line ("normal position").
b) Check to see if the water is flowing out the yellow discharge line...if so, then the
membrane is getting water.
c) Disconnect the blue line from the in side of the auto shut-off valve (that thing with
four connectors). If water is coming out, the RO is producing and the problem is between
there and the faucet. Maybe a defective auto shut-off valve.
d) If the yellow line is flowing and the blue is not, maybe blocked - check valve at RO
housing. There are two outlets on the out end of the RO Membrane. One goes to the
discharge saddle and the other is purified water.
e) If unit has been in service for a while, the problem is probably clogged filters. Pull
the filters. Test them one at a time by putting them into the first filter position and see if it
flows. Clogged filters are usually only associated with well water or with really turbid
water.
f) The RO Membrane has silted up. Very rare unless very poor feed water. The RO
Membrane is self-flushing. Try flushing the membrane by putting the Flow Restrictor in
the "open" position. This will allow all of the flow to wash the membrane off.
"My filters are leaking" Loose O-Ring. Take housing off and make sure they are
properly aligned. Housing not tight enough...tighten. DO NOT use plumbers gunk here...
the housings are supposed to seal.
"I have leakage from a screw-in connector"
a) Not tight enough...gently apply pressure...too much and you will strip the threads.
b) If that does not work, remove and apply Teflon Tape or Plumber's Joint
Compound.
“I have some leakage coming from the tank valve"
a) If from the top: tighten screw at the top
B) If from the middle: tighten the compression nut all the way
C) If from the bottom: tighten gently, or remove and apply Joint Compound or Teflon
tape the re-install the fitting.
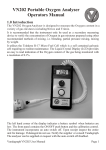
ONE OF THESE STEPS WILL FIX MOST LEAKS
TUBING
ADD MORE
TEFLON TAPE
ON THREADS
IF NEEDED
2006 © VITALBODIES.COM
PUSH TUBE IN FIRMLY.
REMOVE AND REINSTALL TUBE.
PULL OUT TUBE, CUT THE END OFF
STRAIGHT, AND RE-INSERT FIRMLY
12
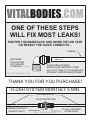
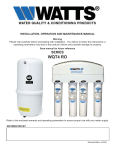
VITALBODIES.COM
ONE OF THESE STEPS
WILL FIX MOST LEAKS!
TIGHTEN THE MANIFOLDS, ADD MORE TEFLON TAPE
OR RESEAT THE QUICK CONNECTS...
TUBING
ADD MORE
TEFLON TAPE
ON THREADS
IF NEEDED
2006 © VITALBODIES.COM
PUSH TUBE IN FIRMLY.
REMOVE AND REINSTALL TUBE.
PULL OUT TUBE, CUT THE END OFF
STRAIGHT, AND RE-INSERT FIRMLY
THANK YOU FOR YOU PURCHASE!
FLUSH SYSTEM MONTHLY 5 MIN.
DISCHARGE LINE
FLOW RESTRICTER
NORMAL POSITION
(ALMOST SHUT)
2006 © VITALBODIES.COM
FLUSH POSITION
(WIDE OPEN)
EARN A CHANGE OF FILTERS* IF YOU REFER A FRIEND!
HOW TO PARTICIPATE:
1.
2.
2.
3.
Give your friend the coupon below.
Refer VitalBodies.com as the place to buy an RO SYSTEM.
Let your friend know they can MENTION your name and email address.
Soon after your friend's completed satisfied purchase, we will email you a coupon for a free
filter change*! We do not send junk mail.
*NOTE: FREE pre and post filters. Does not include RO membrane or DI resin. Shipping not included.
VITALBODIES.COM
[email protected]
MENTION THIS COUPON AND RECEIVE $10.00 OFF OF A WATER FILTER SYSTEM!
$10.00 OFF WITH THIS COUPON
MENTION YOUR FRIEND’S NAME AND THEIR EMAIL ADDRESS AND EARN $10.00!
YOUR FRIEND WILL RECEIVE A FREE SET OF FILTERS!
VITALBODIES.COM
[email protected]
EMAIL US AN ORDER FOR A 2ND SYSTEM!
$15.00 OFF WITH THIS COUPON
MENTION THIS COUPON BY EMAIL AND RECEIVE $15.00 OFF OF A SYSTEM!
EARN $15.00 OFF ON A SECOND SYSTEM!
Order another RO System for yourself or for a gift and we will give you $15.00 OFF*.
HOW TO PARTICIPATE:
1. Email us your order.
2. MENTION the coupon below within the email and get $15.00 off!
3. Send a money order or we can send you a Paypal invoice for you to purchase your system.
*NOTE: Available on email orders paid with a CONFIRMED ADDRESS within Paypal, ask for details.
VITALBODIES.COM
ORGANIC, ECO, VITAL AND SUSTAINABLE
PACKING SLIP:
PORTABLE ___
HOME ___
WHOLE HOUSE ___
FILTERS ___
DI HOUSING ___
DI RESIN ___
TDS METER ___
PSI GAUGE ___
METER RENTAL ___
OTHER _____________________________
SHIPPING DATE:
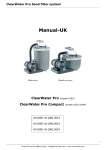
ONE OF THESE STEPS
WILL FIX MOST LEAKS!
TIGHTEN THE MANIFOLDS, ADD MORE TEFLON TAPE
OR RESEAT THE QUICK CONNECTS...
TUBING
ADD MORE
TEFLON TAPE
ON THREADS
IF NEEDED
2006 © VITALBODIES.COM
PUSH TUBE IN FIRMLY.
REMOVE AND REINSTALL TUBE.
PULL OUT TUBE, CUT THE END OFF
STRAIGHT, AND RE-INSERT FIRMLY