1
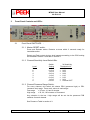
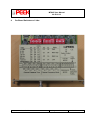
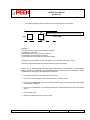
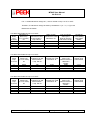
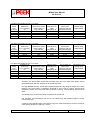
DOCUMENT INFORMATION Number 99-5016 Issue 1C Status Approved MTS4E Inductive Loop Detector MTS4E User Manual Date 19/02/2007 Page 1 of 26 Originator(s) Sam Ilyat Approver(s) Andrew Hodge Ian Smith Distribution Summary User This User Manual describes the input & output functions and switch setting of the MTS4E. Also, a general guide is provided to site installation and testing in compliance with the Highways Agency’s TR2512A and MCH1540 specifications documents. Peek Traffic Limited Hazelwood House, Lime Tree Way, Chineham Business Park, Basingstoke, Hampshire RG24 8WZ, UK Telephone +44 (0)1256 891800, facsimile +44 (0)1256 891870 e-mail [email protected], www.peek-traffic.co.uk MTS4E User Manual 99-5016-1C CHANGE RECORD Issue Date Change Description ECR No. 1A 13-11-2006 Initial based on 99-231-2 MTS4E Handbook CN5240 1B 01-02-2007 Text update to all sections. Original design specifications are not modified. CN5240 1C 19-02-2007 Final update for this change note CN5240 AUTHORISATION This document is originated and approved by Originator: Date: Sam Ilyat Senior Design & Development Engineer Approver: Date: Andrew Hodge Approver: Date: Ian Smith 2006, 2007 Peek Traffic Limited Page 2 of 26 19/02/2007 MTS4E User Manual 99-5016-1C CONTENTS CHANGE RECORD ................................................................................................................................ 2 AUTHORISATION .................................................................................................................................. 2 CONTENTS............................................................................................................................................. 3 1 OVERVIEW OF THE MTS4E DETECTOR MODULE: ................................................................ 5 1.1 Main Features ..................................................................................................................... 5 1.2 MTS4E Approvals: .............................................................................................................. 5 2 INPUT AND OUTPUT INTERFACE:............................................................................................ 6 2.1 Input & Output Connector: .................................................................................................. 6 2.2 DC or AC Input Supply: ...................................................................................................... 6 2.2.1 DC Supply ................................................................................................................ 6 2.2.2 Isolated 11 to 26 vac Supply .................................................................................... 6 2.3 Loop Input ........................................................................................................................... 6 2.4 External Detector Address {IDENT} ................................................................................... 7 2.5 External Reset .................................................................................................................... 7 2.6 Channel Output and Status Device: ................................................................................... 8 2.6.1 Detect Output and Type Selection: .......................................................................... 8 2.7 Channel Status (Fault) Output: ........................................................................................... 9 2.7.1 Fault Type and Fault Output Mechanism: ............................................................... 9 2.7.2 Status Output Device, per channel: ....................................................................... 10 2.8 No Detect or Fault OUTPUT Device: ............................................................................... 10 3 FRONT PANEL CONTROLS AND LEDS: ................................................................................ 11 3.1 Front Panel SWITCHES : ................................................................................................. 11 3.1.1 Master RESET switch: ........................................................................................... 11 3.1.2 Channel Sensitivity Level Switch Bits: ................................................................... 11 3.1.3 Channel Presence Range Switch: ......................................................................... 11 3.2 Front Panel LEDs: ............................................................................................................ 12 3.2.1 Channel Detect LED: ............................................................................................. 12 3.2.2 Channel STATUS (Fault) LED: .............................................................................. 12 3.3 Front Panel LEDs ON/OFF Input: .................................................................................... 12 4 ON-BOARD SWITCHES OR LINKS: ......................................................................................... 13 4.1 Switch / Link Designation: ................................................................................................ 14 4.1.1 Normally Fitted Switches: ...................................................................................... 14 4.2 Channel Frequency Range Switch: .................................................................................. 14 4.2.1 2-bit switch setting: f1f2, f0f2, f1f0, or f0f0 range. ...................................................... 14 4.3 Channel Presence Switches ............................................................................................ 15 4.4 Switch for Output-In- Presence or Pulse Mode: ............................................................... 16 4.5 EOS Switch: ..................................................................................................................... 16 4.6 Response Time with Filter In/Filter Out Switch (Intersection / Motorway applications) ... 17 2006, 2007 Peek Traffic Limited Page 3 of 26 19/02/2007 MTS4E User Manual 99-5016-1C 5 STANDARD HARDWARE BUILD VERSIONS: ........................................................................ 18 5.1 Directional / Long Vehicle Logic: ...................................................................................... 18 6 CONNECTOR INTERFACE ....................................................................................................... 19 7 LOOP INSTALLATION GUIDE: ................................................................................................. 20 7.1 Road-Loop Pair in one lane: ............................................................................................. 20 7.2 Loop Testing: .................................................................................................................... 22 8 DETECTION LEVEL AND THE ACCURACY IN MEASURING VEHICLE TRANSITIONS: .... 23 8.1 The Ratio of the Loop Inductance to the Total Inductive Circuit of Loop & Feeder: ........ 23 9 REFERENCE: ............................................................................................................................. 26 2006, 2007 Peek Traffic Limited Page 4 of 26 19/02/2007 MTS4E User Manual 99-5016-1C 1 Overview of the MTS4E Detector Module: 1.1 Main Features • The MTS4E vehicle detector is an enhanced version of the earlier MTS series of vehicle detector products such as the MTS38Z. • The MTS4E scanning detector hardware provides 4 independent loop channels. Each channel incorporates a loop transformer to isolate the inductive road-loop from the internal circuit to maintain independent operation. • Front Panel Sensitivity and Presence range switches are provided. • The channel Presence time, Frequency mode and Pulse mode switches are fitted on the PCB. • Detect and fault outputs operate in fail-safe mode. • The detector tuning cycle (per channel or all channels) is activated upon powerup, reset or when loop inductance changes beyond the tuning range. • Backplane serial communications in half-duplex transmit & receive data lines that can be used to monitor detector operation and loop frequency. 1.2 MTS4E Approvals: The MTS4E module assembly complies with RoHS specifications EMC / CE Marking: This Product complies with the Highways Agency’s and European specifications TR2512A:2005 encompassing the EMC specification for Road Traffic Systems – EN50293, including EN55022 Class B, and the Environmental specifications TR3120C. 2006, 2007 Peek Traffic Limited Page 5 of 26 19/02/2007 MTS4E User Manual 99-5016-1C 2 Input and Output Interface: 2.1 Input & Output Connector: Euro-card format : Rear mounted DIN41612 edge connector, 2 x 32 pins. International format: Card Gold Edge Fingers, 2 x 22 fingers. 2.2 DC or AC Input Supply: 2.2.1 DC Supply Range: 10.3 to 40 VDC Input Current with Opto-Isolated Outputs for 4-Channel Detector: Current : At 12VDC : 051mA.nominal. Current : At 24VDC : 033mA.nominal. Current : At 35VDC : 028mA.nominal. Input Current with Relay Outputs for 4-Channel Detector: Current : At 12VDC : 085mA.nominal. Current : At 24VDC : 053mA.nominal. Current : At 35VDC : 042mA.nominal. Supply’s Maximum Ripple Voltage : 700mV pk to pk. OR 2.2.2 Isolated 11 to 26 vac Supply 2.3 Loop Input Loop frequency range is between 20 and 117 KHz, nominal. This will be dependant on mode selection and total inductance of loop + feeder cable. 2006, 2007 Peek Traffic Limited Page 6 of 26 19/02/2007 MTS4E User Manual 99-5016-1C 2.4 External Detector Address {IDENT} European detector card: 5 Bit IDENT giving 0 to 31 addresses Module’s address, in Binary format representation, is set on the Backplane in single or multi-detector system. 2.5 • Logical 0 is defined when the bit is connected to 0V rail • Logical 1 is defined when the bit is not connected to any voltage rail. External Reset This input provides a master detector reset when the terminal is pulsed to logical 0V for a minimum period of 30 milliseconds. Each channel shall auto-retune upon power up or Reset. It can, also, auto retune as soon as Loop fault is cleared unless this action is inhibited according to the specified module configuration. 2006, 2007 Peek Traffic Limited Page 7 of 26 19/02/2007 MTS4E User Manual 99-5016-1C 2.6 Channel Output and Status Device: 2.6.1 Detect Output and Type Selection: 2.6.1.1 FAIL-SAFE Opto-Isolated Output: Output device conducts in DETECT condition. Upon failure of the input supply, the output device is enabled via the load supply and continues to conduct accordingly. If EOS is ON, Output will conduct during start-up and Fault condition, otherwise it remains OFF. Device Type and Rating: (a) Each channel output shall be optically isolated to 22000 vac. Each channel shall have a VCE, ON voltage ≤ +1.5 volts at 50mA VCE and an open collector output that can be pulled to ≥ +40 volts DC. (b) This output may conduct a maximum of 400 µA in the OFF State at a collector-emitter voltage of +40 VDC. OR 2.6.1.2 FAIL-SAFE Relay Output: Relay is energised in the quiescent condition (i.e. Loop and detector are operating correctly, but not in detect). Relay contacts close in the detect condition. When Input Supply is OFF, relay is de-energised and its contacts will be closed. If EOS is ON, Output will conduct during start-up and Fault condition, otherwise it remains OFF. Device Type and Rating: Maximum current is 0.3A at 50 volts. 2006, 2007 Peek Traffic Limited Page 8 of 26 19/02/2007 MTS4E User Manual 99-5016-1C 2.7 Channel Status (Fault) Output: 2.7.1 Fault Type and Fault Output Mechanism: Fault Type: Open Circuit Loop Fault: O/C Fault is established when the Loop connections are open-circuited or the loop inductance goes below the tuning range. Short Circuit Loop Fault: S/C Fault is established when the Loop connections are short-circuited or the loop inductance goes above the tuning range. Loop Fault in Excess of +/- 25% Change in Inductance: A change in loop inductance, e.g. fast loop drift or a large change exceeding 25% limit, will automatically, retune the detector channel to the new inductance and a new quiescent condition is set. Fault Classification Data will be outputted in the transparent mode serial protocol via front or rear comms port. Fault Output Mechanism: Non Latched Fault: Fault Output will go OFF (Fail Safe mode action). LED indication, according to setup configuration, goes OFF or ON. Default setup, as in TR2512A; the LED will be OFF during loop fault condition. When Loop fault occurs an On-Delay-Timer of 3 seconds will be activated during which the Fault Output remains ON and LED flashes at 1 Hz. If fault persisted beyond the 3 sec, the Output goes OFF and LED, say, goes OFF for the duration. When Loop is in working order, the loop is re-tuned automatically, Fault-ReleaseDelay –Timer of 3 seconds will count down to Zero. At that time, Fault Output goes back to ON and LED goes back to, say, ON to indicate healthy status. Latched Fault (TR2512A): Fault Output will go OFF (Fail Safe mode action). LED indication, according to setup configuration, goes OFF or ON. Default setup, as in TR2512A; the LED will be OFF during loop fault condition. When Loop fault occurs, an On-Latch-Delay-Timer of 70 seconds will be activated. If the loop fault is cleared before the 70 seconds count is completed, the Loop is retuned automatically. If the fault persisted beyond the 70 seconds, the Output remains OFF and LED, say, remains OFF, i.e. Fault is latched. Reset or Power-up will remove latched conditions. 2006, 2007 Peek Traffic Limited Page 9 of 26 19/02/2007 MTS4E User Manual 99-5016-1C 2.7.2 Status Output Device, per channel: Individual Opto-Isolated Fault Output Fail Safe Opto-isolated / Non-isolated NPN Collector – Emitter transistor (ON in no fault condition) ON- state ; VCE = 1.5 VDC, max, at 50 mA. OFF-state ; VCE = 50 VDC at << 5uA. OR Master Fault Change-over Relay Fail - Safe Fault Output Relay for all channels. (Relay is normally energised in no fault condition) Contacts rated to 50 vac and maximum current of 0.3 Amps. Relay drive is connected to Channel 1 fault output. 2.8 No Detect or Fault OUTPUT Device: Serial Port is used in conjunction with Peek’s data acquisition systems. 2006, 2007 Peek Traffic Limited Page 10 of 26 19/02/2007 MTS4E User Manual 99-5016-1C 3 Front Panel Controls and LEDs: 3.1 Front Panel SWITCHES : 3.1.1 Master RESET switch: Press and Release action: Detector re-tunes within 2 seconds ready for immediate action. Detect and Fault output devices shall operate according to the EOS setting as indicated in section 1 and later in section 6. 3.1.2 Channel Sensitivity Level Switch Bits: Level 7 6 5 4 3 2 1 0 Switch Setting 1+2+4 0+2+4 1+0+4 0+0+4 1+2+0 0+2+0 1+0+0 0+0+0 % Sensitivity Threshold ∆L/L = 0.01 = 0.02 = 0.04 = 0.08 = 0.16 = 0.32 = 0.64 = Channel OFF. 3.1.3 Channel Presence Range Switch: For every channel, this switch bit selects PRH (presence high) or PRL (presence low) range. There are 4 values in each range: Low range = 3.5 sec, 4, 8 or 16 minutes. High range = 35, 60, 120 minutes or Permanent. Any selection in the low / high range will be set via the presence PCB switches for each channel. See Presence Table in section 4.3. 2006, 2007 Peek Traffic Limited Page 11 of 26 19/02/2007 MTS4E User Manual 99-5016-1C 3.2 Front Panel LEDs: 3.2.1 Channel Detect LED: High brightness (in excess of 12 mcd) 3mm, clear lens Red LED, wide viewing angle of 50 degrees when lights. LED is ON for detect and OFF in quiescent conditions. 3.2.2 Channel STATUS (Fault) LED: High brightness (in excess of 12 mcd) 3mm, clear lens Red LED, wide viewing angle of 50 degrees, clear lens Red when lights. 3.2.2.1 Fault Status LED Operation: LED indication can be configured, in the EEProm, to operate in one of the following patterns: LED is ON in quiescent, OFF when in fault (standard). OR LED is OFF in quiescent, ON when in fault (optional). 3.2.2.2 Status LED Flashing Operation: LED will flash at 1 Hz during the fault delay timer of 3 seconds. If the loop fault persisted beyond the 3 seconds, LED will be set continuously on or off, as selected in the configuration. When fault is eliminated, LED will return to quiescent condition as soon as the current fault bit in the register is cleared. This will normally be after the 3-second delay count down is cleared. 3.3 Front Panel LEDs ON/OFF Input: Input Terminal 31a is provided to switch the LEDs OFF for minimising input supply current. If terminal pin 31a is Open Circuit, then LEDs are ON If terminal pin 31a is connected to 0 volt, then LEDs are OFF Note: See section 5 for EOS switch control on LED’s during Start-up / Reset 2006, 2007 Peek Traffic Limited Page 12 of 26 19/02/2007 MTS4E User Manual 99-5016-1C 4 On-Board Switches or Links: 2006, 2007 Peek Traffic Limited Page 13 of 26 19/02/2007 MTS4E User Manual 99-5016-1C 4.1 Switch / Link Designation: Loop Oscillator Frequency Range 2-Bit Switch per Channel: Bit 1 = Bit 2 = • • • • f1 or f0 f2 or f0 Presence Switch, or Link, Bit 1 and 2, per Channel. Output in Pulse mode Switch Bit per Channel. EOS (Event on Status) Switch, or Link, Bit. Filter-In (Intersection) or Filter-Out (Freeway) Switch Bit. 4.1.1 Normally Fitted Switches: Presence, Frequency Range, & Presence/Pulse +EOS and Filter In/Out 6-bit switch. 4.2 Channel Frequency Range Switch: 4.2.1 2-bit switch setting: f1f2, f0f2, f1f0, or f0f0 range. Tuning Range with a Q-factor > 4 & < 12, is as follows: f1 f2 mode: 46 to 2000 uH nominal, f0 f2 mode: 38 to 1400 uH nominal, f1 f0 mode: 26 to 1100 uH nominal, f0 f0 mode: 18 to 500 uH nominal. Twisted Pair-Loop Feeder can extend upto 300 metres using multistrand-insulated cable with cross sectional area of 1.5 or 2.5-sq-mm. Loop Frequency range: 20 to 117 kHz. Loop Amplitude Range: 3 to 14 V pk to pk. If frequency range to one or more channels is altered, the detector should be RESET or reset the altered channel by switching its Sensitivity OFF (000) and the ON to avoid long detection or lock-up. 2006, 2007 Peek Traffic Limited Page 14 of 26 19/02/2007 MTS4E User Manual 99-5016-1C 4.3 Channel Presence Switches Front Panel Switch LO/HI Presence range Bit 2 Bit 1 Second PCB switch bit Bit 0 First PCB switch bit Presence Time Switch is set to PLo Switch is ON, “0” ON, “0” ON, “0” 3.5 sec Switch is set to PLo Switch is ON, “0 ” ON, “0” OFF, “1” 4 min Switch is set to PLo Switch is ON, “0” OFF “1” ON, “0” 8 min Switch is set to PLo Switch is ON, “0” OFF, “1” OFF, “1” 16min Switch is set to PHi Switch is OFF, “1” ON, “0” ON, “0” 35 min Switch is set to PHi Switch is OFF, “1” ON, “0” OFF, “1” 60 min Switch is set to PHi Switch is OFF, “1” OFF, “1” ON, “0” 120 min Switch is set to PHi Switch is OFF, “1” OFF, “1” OFF, “1” Permanent 2006, 2007 Peek Traffic Limited Page 15 of 26 19/02/2007 MTS4E User Manual 99-5016-1C 4.4 4.5 Switch for Output-In- Presence or Pulse Mode: • One bit per channel selects pulse or presence mode. • PRESENCE mode is the default i.e. Switch is OFF. • PULSE mode is selected when switch is ON. • Standard Output Pulse Width = 125ms + 20ms. • Pulse width duration of 250 can be programmed, using the software override facility. EOS Switch: EVENT ON Status Switch controls the Detect Output and LED. • EOS is set to ON : Detect Output and Detect LED will switch ON during detector initialisation, after start-up, and during active loop fault condition (after the 3- second delay). • EOS is set to OFF: Detect Output and Detect LED will switch OFF during detector initialisation, after start-up, and during loop fault condition (after the 3-second delay). 2006, 2007 Peek Traffic Limited Page 16 of 26 19/02/2007 MTS4E User Manual 99-5016-1C 4.6 Response Time with Filter In/Filter Out Switch (Intersection / Motorway applications) This switch extends Operate / Release Delays for Detection sequence in applications where electrical noise is abnormal. Generally, Freeway, with low electrical noise, demands shorter delays to detect fast moving vehicles and, in particular, motorcycles. Therefore, recommended default time delay values are as follows: Operate / Release Delay for 2 Channel version Channel x % Sensitivity Other Channels can be set to % Sensitivity With Filter Out ( Motorway) With Filter In (Intersection) i.e. switch ON i.e. switch OFF 0.01 to 0.039 ( Long SCAN ) 0.01 to 0.039 35 ms ≤ ± 2 ms 35 ms ≤ ± 2 ms 0.04 to 0.16 ( Short SCAN ) 0.04 & above 20 ms ≤± 1.1 ms 35 ms ≤± 1.5 ms 0.16 & above ( Short SCAN ) 0.04 & above 5 ms ≤ ± 1 ms 20 ms ≤± 1.5 ms ( Scan Mode ) Operate / Release Delay for 4 Channel version Channel x Sensitivity % Other Channels can be set to Sensitivity % With Filter Out ( Motorway ) With Filter In (Intersection) 0.01 to 0.039 ( Long SCAN ) 0.01 to 0.039 35 ms ≤ ± 3 ms 35 ms ≤ ± 3 ms 0.04 to 0.16 ( Short SCAN ) 0.04 & above 20 ms ≤± 1.5 ms 20 ms ≤ ± 2 ms 0.16 & above ( Short SCAN ) 0.04 & above 5 ms ≤ ± 1 ms 20 ms ≤ ± 2 ms ( Scan Mode ) {The MTS4E Detector’s Short SCAN Mode is automatically Enabled, only, when all Channels are at Sensitivity level => 0.04%, otherwise, channels will operate in Long Scan mode}. 2006, 2007 Peek Traffic Limited Page 17 of 26 19/02/2007 MTS4E User Manual 99-5016-1C 5 Standard Hardware Build Versions: Standard versions 82-5113-01 Part number is 82-5125 Detect: changeover relay per channel Fault: master fault changeover relay - all channels 82-5113-02 Part number is 82-5129 Detect: Opto-isolated transistor, normally open, per channel Fault: Opto-isolated transistor, normally closed, per channel 82-5113-03 Part number is 82-5132 Detect: Opto-isolated transistor, normally open, per channel Fault: master fault changeover relay - all channels 82-5113-04 Part number is 82-5137 No Detect or Fault Outputs are fitted. The Serial Port transmits detect & fault data and transition times. 5.1 Directional / Long Vehicle Logic: The hardware build used is the 82-5113-01 The Part number for the configured directional logic module is 82-5143 Operation is based on loop 1 & 2 being the directional loops in the lane ⇒ ⇒ Detect on Loop 1 then on Loop 2 gives an output on Channel 2 Detect on Loop 2 then on Loop 1 gives an output on Channel 1 Similarly for loops 3 & 4 ⇒ Detect on Loop 3 then on Loop 4 gives an output on Channel 4 ⇒ Detect on Loop 4 then on Loop 3 gives an output on Channel 3 Example: Detect is outputted when Vehicle enters loop 1 and then loop 2, i.e. occupying both loops. Detect will remain active after loop 1 is cleared and will finally switch off when vehicle clears loop 2. 2006, 2007 Peek Traffic Limited Page 18 of 26 19/02/2007 MTS4E User Manual 99-5016-1C 6 Connector Interface Rear mounted DIN41612 edge connector Row A Pin 1a 2a 3a 4a 5a 6b 7a 8a 9a Row B Pin 1b 2b 3b 4b 5b O/P CH1 relay N/C or (ss) +ve Future use: RS485 RX full duplex Detect O/P CH1 relay N/O or (ss) +ve Not connected Loop CH1 Loop CH1 Master fault O/P relay N/O or (ss) +ve * CH2 i/f output +ve Detect O/P CH2 relay 10a 11a 12a 13a 14a 15a 16a 17a 18a 19a 20a 21a 22a 23a * CH2 i/f output –ve Master fault O/P relay common Not connected Loop CH2 OV reference for RS232 Detect O/P CH3 relay N/C or (ss) +ve Future use: RS485 RX full duplex Detect O/P CH3 relay N/O or (ss) +ve Not connected Loop CH3 Not connected 24V AC supply * CH4 i/f output +ve Detect O/P CH4 relay 10b 11b 12b 13b 14b 15b 16b 17b 18b 19b 20b 21b 22b 23b 24a 25a 26a 27a 28a 29a 30a 31a 32a * CH4 i/f output –ve Serial comms TDO Not connected Loop CH4 Not connected Reset input IDENT bit 3 LED ON/OFF (OFF pin to 0V) control IDENT bit 5 24b 25b 26b 27b 28b 29b 30b 31b 32b 7b 8b 9b * CH1 i/f output +ve Detect O/P CH1 relay common or (ss) –ve * CH1 i/f output -ve Master fault O/P relay N/C or (ss) +ve Not connected Not connected Detect O/P CH2 relay N/C or (ss) – ve Future use: RS485 RX full duplex common or (ss) ve Detect O/P CH2 relay N/O or (ss) +ve Not connected Loop CH2 Not connected Chassis ground * CH3 i/f output +ve Detect O/P CH3 relay common or (ss) –ve * CH3 i/f output -ve 24V AC supply Not connected Loop CH3 IDENT bit 1 Detect O/P CH4 relay N/C or (ss) +ve Future use: RS485 RX full duplex common or (ss) – ve Detect O/P CH4 relay N/O or (ss) +ve Not connected Loop CH4 Not connected Serial comms RDI IDENT bit 2 24V DC supply IDENT bit 4 0V DC supply and serial comms (common) * Connections with individual channel Opto-isolated fault output. Notes i. The outputs are in the normal condition when the detector is powered, no vehicle is on the loop and no failsafe condition exists. ii. The power supply to all detectors in a rack must be switched off whilst any detector is being fitted to or removed from the rack. 2006, 2007 Peek Traffic Limited Page 19 of 26 19/02/2007 MTS4E User Manual 99-5016-1C 7 Loop Installation Guide: Loops must be installed to the requirements of both this document and the latest issue of Department of Transport Specification MCH1540. Where installation guidelines are given by both documents for the same procedure, precedence must always be given to the procedure that defines the highest level of performance, accuracy or reliability. Loop installation will require that the cabinet and plinth have already been installed so that the loop cables may be terminated in the cabinet. 7.1 Road-Loop Pair in one lane: Road Loops should be installed according to the following guidelines: 1. One pair of matching loops per lane (N configuration) 2. Rectangular loop with 3 turns per loop 3. Standard length for each loop is 2 metres in the direction of travel. This dimension may be varied if trying to match an existing loop 4. Standard gap between the two loops is 2 metres (i.e. 4 metres leading edge to leading edge). This dimension may be varied if trying to match an existing loop 5. Loop width variable, depending on the lane width, leaving a minimum gap of 0.75 metre w.r.t. each edge of the lane. It is important that the loops are positioned centrally within each lane. This dimension may be varied if trying to match an existing loop. On some roads the edges of the carriageway are marked with a solid white line which may be some distance in from the physical edge of the road surface. Providing that the traffic in a lane is seen to drive centrally between this solid white line and the lane dividing markings and then the loop position should be measured from the solid white line rather than from the physical road edge. On roads where there are no markings at the edge of the carriageway, the positioning of traffic driving within each lane should be observed. A practical judgement must be made to determine the best loop position from the edge of the carriageway such that normal traffic flow will pass over the centre of the loop. 6. To achieve comparable measurements, it is preferable that all loop pairs on a multi-lane carriageway are positioned on the same axis right across the lanes. 2006, 2007 Peek Traffic Limited Page 20 of 26 19/02/2007 MTS4E User Manual 99-5016-1C 7. The following drawing shows a typical loop configuration for a 2 lane site: Minimum distance away from the kerb or centre line is 0.5 metre Example 1: Loop size is 2 x 2 metres in the direction of travel Loop width is 1.8 metre The gap between the two loops is 2 metres Lane width is approximately 3.6 metres. Loop clearance is 0.9 metre from the lane borders. Example 2: If Lane width is 3.0 m, loop width can be 1.8 and clearance is 0.6 m. Generally, loop width should not be less than 51% of the lane width. If there is any doubt regarding the loop size or its location it is advisable to consult Peek’s Project Engineer immediately for clarification before commencing any installation. Advice should also be obtained in the following circumstances: • The width of the lane is much less than 3.6 metres. • There is no clear indication of lane boundaries (i.e. no white lines). • There is a possibility that 2 (or more) vehicles could occupy a loop at the same time during normal traffic conditions. • There is a hard shoulder. Loop drawings attached to the MCH1540 document show typical layout. • here are slip roads. • Other unconventional Lane / Lanes Layout. 2006, 2007 Peek Traffic Limited Page 21 of 26 19/02/2007 MTS4E User Manual 99-5016-1C 7.2 Loop Testing: The tests defined in the section should be performed on every loop at the site. Each loop should be tested immediately after it has been installed before backfilling the slot so that any problems may be rectified straight away. All measurements should be made with no vehicles traversing the loop and with no other loop energised in any way. Record loop measurements, in the site log book, as follows: a) Impedance to Ground: Using the Megger on the 500v DC test range, check the impedance of the loop to ground by applying the test for at least 1 minute. This would normally be expected to be well in excess of 100Mohms. Any reading lower than this indicates a problem. b) Series resistance - Using the Multimeter, check that the series DC resistance of the loop is not greater than 13 ohms. This should normally be less than 1ohm for a loop directly adjacent to the cabinet. Total series resistance (including feeder) MUST not exceed 5 ohms. c) Inductance - Using the Multimeter, check the inductance of the loop. This should normally be in the range of 80-110 micro-Henries for a loop directly adjacent to the cabinet. The loop tail will add approximately 0.59 micro-Henries per metre. The feeder cable will add approximately 0.7 micro-Henries per metre. Loops in a pair in the same lane should have virtually identical inductance values. Any loop which does not pass all of the above tests should have the loop, joint or feeder replaced as necessary. Each loop must be tested again once backfilling of the slots is complete. 2006, 2007 Peek Traffic Limited Page 22 of 26 19/02/2007 MTS4E User Manual 99-5016-1C 8 Detection Level and the accuracy in measuring Vehicle transitions: If Road Loop inductance is less than that of the Loop Feeder, the amount of dilution in the detect signal strength given by the vehicle transition over the road loop is decreased to give marginal detection levels or no-detection at all. Please note that vehicle transition induces a change of inductance in the road loop, only, and not in that of the feeder cable. For practical installation, typical inductive loop detectors with sensitivity boost and medium sensitivity threshold setting, the tolerated dilution in the detect signal strength is 50%. Conventional installations with 3-turn road loop and a maximum feeder length of 200 metres have always given reliable accuracy in traffic measurements. If feeder length had to be increased due to the site location, compensation to minimise dilution of detection signals can be implemented adopting the following method: (a) Detector Sensitivity threshold is increased to an acceptable level such that accuracy of traffic measurement is not degraded. (b) If the amount of dilution due to extra long feeders was high, the number of loop turns can be increased to match or exceed the inductance of the feeder. (c) A combined corrective action using (a) & (b) can be implemented. 8.1 The Ratio of the Loop Inductance to the Total Inductive Circuit of Loop & Feeder: L p = Road Loop Inductance = (0.2 x P x N x N x L n D/A) uH Where N = number of turns P = perimeter of loop in metres D = distance between longest sides of loop in metres A = 3.0 mm (i.e. 0.0030 m) for standard 3 turn rectangular loop A = 3.5 mm (i.e. 0.0035 m) for standard 4 turn rectangular loop A = 3.6 mm (i.e. 0.0036 m) for standard 5 turn rectangular loop A = 3.8 mm (i.e. 0.0038 m) for standard 6 turn rectangular loop L n = Naperian or normal log Feeder Inductance factor is between 0.64 & 0.79 uH per metre for twisted pair cable. Inductance factor for feeder cable with cross sectional area of 2.5 sq. mm is estimated to be around 0.66 uH/m. L f = Inductance of (twisted loop tail + twisted feeder cable) L T = Total Loop Inductance = L p + L f The average Feeder Inductance factor is 0.7 uH/metre. For a 10 metre loop tail inductance is 7 uH. 2006, 2007 Peek Traffic Limited Page 23 of 26 19/02/2007 MTS4E User Manual 99-5016-1C If ∆L = actual inductance change in L p due to vehicle on loop = 0.3% or 0.2% Therefore, % inductance change as seen by the detector = (∆L / L p + Lf)) x 100 Results are as follows: For 200 metre Feeder & Loop ∆L of 0.3% Inductance of Inductance of 200 Road Loop Road metre Feeder + (1.8 x 2 metre) Loop Loop Tail uH uH N Turns 3 88.95 147 4 154.38 147 5 240.16 147 6 342.87 147 For 250 metre Feeder & Loop ∆L of 0.3% Inductance of Inductance of 250 Road Loop Road metre Feeder + (1.8 x 2 metre) Loop Loop Tail uH uH N Turns 3 4 5 6 88.95 154.38 240.16 342.87 182 182 182 182 For 300 metre Feeder & Loop ∆L of 0.3% Inductance of Road Inductance of 300 Road Loop Loop metre Feeder + (1.8 x 2 metre) N Turns Loop Tail uH uH 3 4 5 6 88.95 154.38 240.16 342.87 2006, 2007 Peek Traffic Limited 217 217 217 217 Ratio of Loop Inductance to Total Inductance “R” 0.377 0.512 0.620 0.699 Ratio of Loop Inductance to Total Inductance “R” 0.328 0.459 0.569 0.653 Ratio of Loop Inductance to Total Inductance “R” 0.291 0.415 0.525 0.612 %∆L of 0.3% as seen by the Detector with the 200 metre Feeder 0.113 0.154 0.186 0.21 Sensitivity Level Setting using 200m feeder 4 or 5 4 or 5 4 or 5 4 or 5 %∆L of 0.3% as seen by the Detector with the 250 metre Feeder 0.098 0.138 0.171 0.196 Sensitivity Level Setting using 250m feeder %∆L of 0.3% as seen by the Detector with the 300 metre Feeder 0.0872 0.125 0.157 0.184 Sensitivity Level Setting using 300m feeder Page 24 of 26 4 or 5 4 or 5 4 or 5 4 or 5 5 5 or 4 5 or 4 5 or 4 19/02/2007 MTS4E User Manual 99-5016-1C For 200 metre Feeder & Loop ∆L of 0.2% Inductance of Inductance of 200 Road Loop Road metre Feeder + (1.8 x 2 metre) Loop Loop Tail uH uH N Turns 3 88.95 147 4 154.38 147 5 240.16 147 6 342.87 147 Ratio of Loop Inductance to Total Inductance “R” 0.377 0.512 0.620 0.699 %∆L of 0.2% as seen by the Detector with the 200 metre Feeder 0.075 0.102 0.124 0.14 Sensitivity Level Setting using 200m feeder For 250 metre Feeder & Loop ∆L of 0.2% Inductance of Inductance of 250 Road Loop Road metre Feeder + (1.8 x 2 metre) Loop Loop Tail uH uH N Turns 3 88.95 182 4 154.38 182 5 240.16 182 6 342.87 182 Ratio of Loop Inductance to Total Inductance “R” 0.328 0.459 0.569 0.653 %∆L of 0.2% as seen by the Detector with the 250 metre Feeder 0.065 0.092 0.114 0.13 Sensitivity Level Setting using 250m feeder For 300 metre Feeder & Loop ∆L of 0.2% Inductance of Inductance of 300 Road Loop Road metre Feeder + (1.8 x 2 metre) Loop Loop Tail uH uH N Turns 3 88.95 217 4 154.38 217 5 240.16 217 6 342.87 217 Ratio of Loop Inductance to Total Inductance “R” 0.291 0.415 0.525 0.612 %∆L of 0.2% as seen by the Detector with the 300 metre Feeder 0.06 0.083 0.11 0.122 Sensitivity Level Setting using 300m feeder 5 5 or 4 4 or 5 4 or 5 5 5 5 or 4 4 or 5 5 5 5 or 4 5 or 4 Therefore, the above table shows that the Road loops with up to 300 metre feeder should work satisfactorily with the detector set to Sensitivity level 5. For High-Bedded vehicles, actual detect signal strength can vary along the length of the body between 1.6% and 0.08%. If Sensitivity threshold is set to level 5 (=0.04% and its boost threshold is 0.02% at the fast scan rate to maintain accuracy), vehicles will be detected at all times. The MTS4E Loop circuit tuning range is between 25 & 2000 uH. It is, therefore, recommended to use 5 or 6 Turns Road Loop with Feeder lengths in excess of 300 metre long. It must be noted that the Ratio of the Road Loop to the Total Inductance must be in excess of 0.291 {being (88.95/ (217+88.95)) = 0.291}. 2006, 2007 Peek Traffic Limited Page 25 of 26 19/02/2007 MTS4E User Manual 99-5016-1C 9 Reference: Highways Agency documents TR2512A, MCH1540, MCH1589, MCH1532D and TR2031. MTS4E Handbook 99-231-issue 2 2006, 2007 Peek Traffic Limited Page 26 of 26 19/02/2007