1
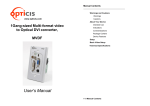
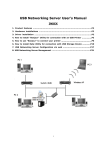
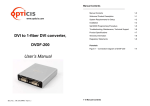
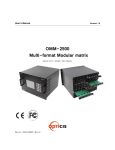
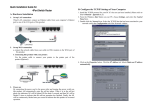
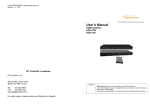
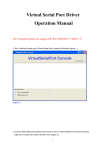
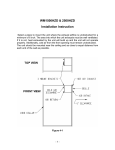
Contents
SPIDER
TM
1x4/1x8 HDMI Distributor
(25-0334/25-0336)
Contents
1-1
Introduction
1-2
Specification
1-3
Product picture(25-0334)
1-4
Product picture(25-0336)
1-5
Features
1-6
Installation
1-7
Installation(25-0334)
1-8
Warranty Information
1-9
Trouble shooting
1-10
User’s Manual
1-1 Contents
Package Includes
Each SPIDER
TM
HDMI Distributor package includes the following items;
25-0334 or 36 HDMI Distributor Unit
One (25-0334) 5V, 2.6A Power Supply Universal adapter or
One (25-0336) 5V, 6A Power Supply adapter
User manual
Introduction
TM
SPIDER 25-0334 and 25-0336, HDMI Distributors, allow one digital video
sources to be spilt into multiple digital displays. The built-in amplification function
enables HDMI signal distribution without signal loss.
High Quality Picture - No Signal Loss and Digital Noise Free
Our HDMI distributors are built to deliver the highest quality picture preserving
the native resolutions of the video sources without any signal loss. At the same
time, the digital noises that may affect the picture quality will be eliminated.
Due to the nature of the digital signals and passing through multiple stages of
connection when using distribution amplifiers, it is important to eliminate the
digital noises and boost the signal strength to preserve/enhance the video
signal quality.
Signal Distribution
transmission.
Safety Precautions
1. To prevent fire or shock hazard, do not expose the unit to rain, moisture or
install this product near water.
2. Never spill liquid of any kind on or into this product.
for
signal
reliability
and
long
length
signal
Our 5V power adapter supplies adequate power to amplify the video signals
from the video source. This is necessary as the overall length from the video
source to the displays is longer when using the HDMI distributors (distance
from the video source to the distribution amplifier + distance from the
distribution amplifier to the display). In most cases, the overall distance that the
HDMI signal will need to travel is over 15ft. Due to the nature of HDMI signals,
distribution is necessary to warrant the video quality and reliability. (Without
distribution, there may be occasional blackouts or blinking effects) With this
distribution feature, your video display can be extended using our fiber optical
HDMI cables.
3. Do not attach the power supply cabling to building surfaces.
4. To protect the equipment from overheating, do not block the slots and
openings in the module housing that provide ventilation.
1-2 Introduction
Product picture (25-0334)
Specification
.
[Dimensions] 200 x 104 x 25 mm
Model Name
Input Signal
Output Signal
Resolution
HDMI (TMDS),Single Link
HDMI Single Link, 8port
HDMI Single Link , 4port,
VGA to WUXGA , 480p to 1080i/p
Receptacle
DC Power Jack
Input TMDS Signal
1.2V
Input DDC Signal
5V
Power Supply
DC +5V , 2.6A
DC +5V ,6.0A
Dimension(mm)
200 x 104 x 25
436 x 120 x 44
Weight(kg)
0.28
0.68
Operating Temp.
0℃~40℃
Storage Temp.
-20℃~60℃
Operating Humidity
30%~80%
Storage Humidity
60%
Power
Consumption
5.5W
18W
<REAR>
1-3 Specification
1-4 Product picture(OHD14)
Product picture (25-0336)
Features
[Dimensions] 436 X 120 X 44 mm
▶ Deep color video up to 12bit, 1080p@(24/60)Hz
▶ Simultaneously displays one HDMI source on four displays.
▶ HDCP keys that allow each output to work independently when connected
to an HDMI display
▶ Splits a single HDMI source into four(eight) outputs without signal loss
▶ Supports DVI source and display via an HDMI to/from DVI adaptor cable
▶ Supports a wide range of PC and HDTV resolutions from VGA to WUXGA
and 480p to 1080i/p
Note:
Supports Int. EDID feature for Deep Color and color space. When EDID is
switched to Ext mode, the system will automatically detect Deep Color (8bits or
12bits) and color space (RGB or Y/Cb/Cr) settings from the source’s EDID and
record it into the unit. (
Only)
▶ System standby only will be active once the last TV is switched to standby
<REAR>
1-5 Product picture(25-0336)
1-6 Features
Installation
Installation (
)
Front Panel
1. Connect your video source’s HDMI output port to the HDMI input port using
standard HDMI cables (not included). Make sure all your HDMI sources and
the displays are turned off before connecting the cables.
2. Connect your HDMI display’s HDMI input port to OHD14/18 HDMI output port.
Make sure your HDMI display is turned off before connecting the cables.
3.
Plug the 5V power supply into the power input port.
4.
Plug the 5V wall mount power supply into the wall outlet.
5.
Turn on the power switch, your displays, and video source.
6.
Turn on your video source.
Note:
1) Power LED indicator: This Led is green/red when power is on/off
2) Sync LED: When a HDMI source is connected to the input port, this LED will
be turned on only when the distributor has established a link.
① CEC button & LED: Press this button to switch the CEC function on/off. The
LED will be turned yellow when it is switched on. The factory default setting is on.
Note:
1) In order to perform the CEC function, both source and display must have
CEC support.
2) The Standby mode only will be active when the last display has been
switched to standby
② Output LED: When the HDMI display has been connected to the outputs, the
LED will be turned on.
③ EDID switch Int/Ext: When switched to Int, EDID’s manual settings of Deep
Color(12 or 8bits) and color space (RGB or YCbCr) are allowed. When switched
to Ext, the distributor will use the external EDID. If the EDID is switched to Int,
users can change the EDID’s Deep Color value between 8 and 12bits, under the
condition that all outputs support same color bits. For example, if the EDID is
switched to 12bits but only 3 output displays support 12bits and one supports
8bits, the 8bits display will not be able to display any media.
1-8 Installation )
1-7 Installation
Warranty Information
Therefore it is recommended to choose settings compatible with all connected
displays. Users can also switch between RGB or YCbCr for the EDID’s color
space. But again, all output displays need to comply with the selected settings.
Most TV monitors support both RGB and YCbCr but some monitors only
support RGB. When the EDID color space is set to YCbCr some monitors may
not display any image and/or display a “reddish” image. In this case, switching
the EDID to RGB is a must. Factory default is set as YCbCr.
When the EDID is switched to Ext, the unit will detect the first HDMI output
EDID and record/save it in the unit. If the attached display to the first output
source is DVI, it will skip to next output until the first HDMI is detected.
1 (One) Year Warranty
TM
Opticis Co., Ltd warrants SPIDER OHD14/18, HDMI Distributors to be free
from defects in workmanship and materials, under normal use and service, for a
period of one (1) year from the date of purchase from Opticis Co., Ltd or its
authorized resellers.
If a product does not work as warranted during the applicable warranty period,
Opticis Co., Ltd shall, at its option and expense, repair the defective product or
part, deliver to customer an equivalent product or part to replace the defective
item.
All products that are replaced will become the property of Opticis Co., Ltd.
④ Reset switch: It’s always suggested to turn this setting OFF, unless
performing a system reset. By turning it to on, the system will reset all
connected displays to HDMI input 1 once every 8~10 minutes. Factory default is
set as OFF.
Replacement products may be new or reconditioned.
Any replaced or repaired product or part has a ninety (90) day warranty or the
reminder of the initial warranty period, whichever is longer.
Opticis Co., Ltd shall not be responsible for any software, firmware, information,
or memory data of customer contained in, stored on, or integrated with any
products returned to Opticis Co., Ltd for repair under warranty or not.
Warranty Limitation and Exclusion
Opticis Co., Ltd shall have no further obligation under the foregoing limited
warranty if the product has been damaged due to abuse, misuse, neglect,
accident, unusual physical or electrical stress, unauthorized modifications,
tampering, alterations, or service other than by Opticis Co., Ltd or its authorized
agents, causes other than from ordinary use or failure to properly use the
Product in the application for which said Product is intended.
1-8 Installation (OHD14)
1-9 Warranty Information
Troubleshooting
Problem
Distributor not operate
No picture (or signal)
Or Poor picture
Incorrectly sized picture /
resolution or No picture
1-10 Troubleshooting
© 2011 Opticis Co., Ltd All Rights Reserved
Solution
Make sure the 5V power is plugged in the
back of the unit.
Check to see if the power LED light is on.
1. If you are using copper based HDMI
cable, overall length of the cables (length of
the cable from video source to switch and
length of the cable from switch to display)
should not exceed 15ft. Exceeding 15ft. with
copper based cables will result in no or poor
picture quality. To extend beyond 15ft,
please use fiber optical HDMI extension
cables such as Opticis OC cables.
2. Use high quality HDMI cables.
3. If you are using computers, try other
refresh rate settings. Most HDTVs have
refresh rate of 60Hz and computer’s video
cards are usually set at higher refresh rate.
Try lower refresh rates.
4. Make sure all HDMI connectors are
tightly secured to all HDMI ports. Loose
screws on the HDMI connectors will result
in no or poor picture.
5. Turn off all equipment (video source,
switch and HDTV) and restart all
equipments.
Please remember that your video source
will only support one resolution setting. To
connect 1600x1200 resolution display and
800x600 resolution display, the resolution
setting of your video source must be set to
the lower resolution setting (800x600)