1
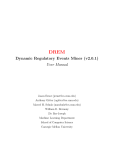
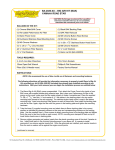
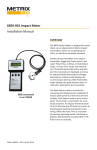
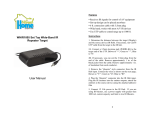
VANGUARD PLATINUM 2X 120V PACKING LIST 1 - Vanguard Platinum Dust Collector (10330) 1 - Adapter 1½” Accessory x 2½” Hose End (VMC-1036) 1 - 2½” x 6’ Hose (VMC-1023B) IMPORTANT SERVICE INFORMATION: 1 - Power Cord SAVE SHIPPING BOX AND FOAM FOR FUTURE SERVICE. SHIPPING WITHOUT PROPER FOAM MAY CAUSE DAMAGE TO UNIT ASSEMBLY INSTRUCTIONS for VANIMAN VANGUARD 1. Remove the unit and other parts from the box; check against the packing list. 2. Plug the power cord into a standard wall socket. Flip the black switch to “MANUAL.” Try the unit by turning the switch to the “ON” position. The speed may be varied between low and high with the “SPEED” control slider. Speed selected depends on the job being performed and user preference. 3. The vacuum hose supplied slips onto the vacuum connection on top of the unit and the other end connects to the collection device desired. The ideal location for the unit is under the bench where the user works. The hose supplied is 2½” x 6’ long. The hose cuff threads onto the hose with a lefthand thread. Longer hoses and adapters are available from your dealer. We recommend that you try to keep the total length of hose less than six feet between the unit and the dust collection point. Longer hose will reduce suction. See the accessories section for collection device details. SETTING UP THE AUTOPILOT Introduction: The AutoPilot allows you to control your dust collector from a micromotor or lathe. When you start your micromotor, the dust collector will start automatically. When you stop your micromotor, the dust collector will continue for a short period of time to allow for the residual dust to be cleared. WARNING: The Autopilot will accommodate a micromotor, electric handpiece, or lathe that does not exceed 6 amps, 115VAC, total 1. Turn the unit on at the main power switch. The green switch should illuminate. Flip the black switch to “AUTOMATIC”, the dust collector should go off. 2. Plug one micromotor into the receptacle on the top of the dust collector. If the dust collector comes on, the sensitivity is set too high for your micromotor; we will adjust it in a moment. If the dust collector did not start when first plugged in; start the micromotor now. If the dust collector starts, then the sensitivity is set correctly. The dust collector will continue to run for about 10 seconds after you stop using the micromotor. 140 N. Brandon P.O. Box 74, Fallbrook, CA 92028 1-800-VANIMAN (826-4626) www.vaniman.com [email protected] V-P-2X-I-9/14 Page 1 VANGUARD PLATINUM 2X 120V 3. If the sensitivity is not set correctly, it can be adjusted by the screw located on the top of the unit to the left of the bag indicator located by the arrow in Figure I. To increase the sensitivity, turn the screw counter-clockwise (to the left). If your dust collector did not start when you started the micromotor, then increase the sensitivity by turning the screw slightly counter-clockwise waiting two seconds after each adjustment. Try the micromotor again. If the dust collector does not start, then increase sensitivity a little more. Repeat this process until the dust collector starts when the micromotor is running. Figure I - Adjustment Screw Location If the dust collector starts when the micromotor is plugged in but not running, then the sensitivity is set too high and you need to decrease it by turning the screw slowly clockwise (to the right). Allow at least 10 seconds between adjustments for the time delay. When you reach the point where the dust collector stays off; try the micromotor and the dust collector should start automatically. If it does not, then you may have decreased the sensitivity too much. Increase the sensitivity as described in the paragraph above. NSK Z500 Series Handpiece Users From the NSK Z500 User’s manual: “Vacuum-coupled Mode On some dental tables with vacuum dust collector, the motor may be used while being coupled with a dust collector. When such a dust collector is used, power consumption of the Z500 can be regulated so that the vacuumcoupled function can work. If you need coupling with a vacuum dust collector, select the mode as follows: How to select the mode While pressing Forward/Reverse Selector Switch (button), turn on the Power Switch, and the mode can be selected. A long beep indicates vacuum-coupled mode and 2 short beeps indicate non-coupled mode. Each time the switch selection is made, the mode changes between vacuum-coupled mode and non-coupled mode.” 140 N. Brandon P.O. Box 74, Fallbrook, CA 92028 1-800-VANIMAN (826-4626) www.vaniman.com [email protected] V-P-2X-I-9/14 Page 2 VANGUARD PLATINUM 2X 120V MAINTENANCE 1. Filter Bag Replacement - When a noticeable drop in suction occurs with the unit or it shuts down, it may be time to replace the filter bag. DO NOT attempt to clean out the filter bag. Replace with a new Vaniman filter bag. Change the filter bag by unscrewing the two thumb screws located on the side panel and remove the cover plate. The filter bag will now be exposed. Remove the used filter bag by sliding it off the inlet tube. The front of the cardboard reinforcement may need to be tilted downward slightly to remove bag easily. Once removed, check the inside of the filter bag compartment, if dust is present please clean the compartment. Cause for residual dust may be the filter bag was improperly installed. Vacuum out any dust before putting in a new bag. This will increase the life of the unit. Filter bag re-order number is VMC-A400-5, which can be ordered through your supplier. 2. Installing a new filter bag - slip the cardboard reinforcement, with rubber seal, over the inlet tube. You may need to tilt the front of the cardboard downward and slip the back edge up past the tube end, then rotate upward over the tube end. Carefully tuck the edges of the filter bag into the filter bag cavity. Replace the cover plate and gently tighten the thumb screws. Only gentle pressure needs to be used to make the gasket seal; the vacuum pressure will draw the cover tight. 3. Circuit Breaker - The unit is protected by a circuit breaker on the right side of the unit. In the unlikely event there is an overload condition the breaker may trip. If this happens reset the breaker by pushing on the white button until it clicks into place. 4. Motor Protection - If the motor becomes too hot it will automatically shutoff to prevent damage. To reset the thermal gauge, turn off or unplug the unit and allow the motor to cool down. Once it has cooled you may turn it back on and continue use. 5. Motor Brushes - This long life motor does not have replaceable brushes. Replacement motors can be ordered as P/N 97037. 6. Secondary filter - the unit is equipped with a Post Filter which should be checked periodically and replaced when it is worn or soiled. See Accessories for the replacement part number and other filters available. RECOMMENDED USAGE 1. Individual work station (2½” hose) or two station (1½” hoses) dust collection for cutting, grinding and polishing of metal, porcelain, plastic and stone. 2. The unit may be used alone or in conjunction with the Large Vaniman Pre-Filter Accumulator. The Accumulator will trap 90-95% of the dust in the collection trap, extending the life of the Filter Bag by up to 10 times. P/N VMC-A300 3. The unit is NOT RECOMMENDED for use with aluminum oxide abrasive blasting. The fine abrasive particles will cause motor damage; such use will immediately void the warranty. Vaniman offers a SAND VAC, P/N 10211 which is designed specifically for abrasive blasters. Contact your dealer for availability. 140 N. Brandon P.O. Box 74, Fallbrook, CA 92028 1-800-VANIMAN (826-4626) www.vaniman.com [email protected] V-P-2X-I-9/14 Page 3 VANGUARD PLATINUM 2X 120V REPLACEMENT PARTS The following items are offered to enhance the usage of your quality Vaniman unit. These items can be order through your supplier using the following part numbers. Please feel free to contact Vaniman Mfg. Co. with questions regarding our products. Fig. # 1 2 3 4 Description Red Dot Motor Motor Mount Gold Motor Clip Replacement Filter Bag 3-pack Part Number 97037 2921 3273 VMC-A400-3 5 6 7 8 Not Shown 9 10 11 12 13 14 Not Shown Replacement Filter Bag 5-pack Front Cover Thumbscrew Remote Plug Switch MANUAL/AUTO Power Switch ON/OFF Protective Switch Cover Power Connector Outlet Receptacle Slide Potentiometer Circuit Breaker, 15Amp Back Cover Screw 6-32 x 3/8” FHSMS Secondary Filter Power Cord VMC-A400-5 1449 1427 1480A 2904 1003B 3010 1832 2909 2869 1448A 96014 3006 8 7 9 6 10 5 11 4 12 3 2 14 1 13 140 N. Brandon P.O. Box 74, Fallbrook, CA 92028 1-800-VANIMAN (826-4626) www.vaniman.com [email protected] V-P-2X-I-9/14 Page 4