1
GYSPOT Software
The software allows the user to edit and save the weld reports made by a GYSPOT equipped with a SD drive.
The GYSPOT software can be installed from files present on the SD card. In the \GYSPOT V X.XX directory, double click on
the INSTALL.EXE file, and follow the instructions to install the software on your PC. A GYSPOT icon is automatically created
on the desktop of your PC.
1/ Language selection
The software contains several languages: French, English, German, Spanish, Dutch, Danish, Finnish, Italian, Swedish,
Russian and Turkish. To choose a language, in the menu, select Options, and then click Languages.
Attention: once a language is selected, shut down and re-start the GYSPOT software in order to apply the change.
2/ User identification
In order to personalise the reports with your company information, the required fields will need to be completed. In the
menu, click on Options and select Identity. A new screen is displayed with the following information:
Company name
Address / Post code / City
Phone / Fax / Email / Website
Logo
This information will be displayed on your print-outs.
3/ Traceability
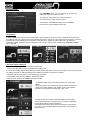
As a default, the GYSPOT software opens in « Traceability » mode. In the « Welding spot programming » module, click on
«Traceability» in the « Options » menu.
3.1/ Import the spot reports made from an SD card
To import the spot reports made with your GYSPOT to your PC, insert the SD card into the PC card drive, or use a card
reader, and start up the GYSPOT software.
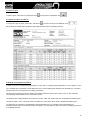
Select the drive and click on the Import
icon. When the import is complete, the spot reports will be grouped by the
identifier of the repair order. The identifier matches up with the report name established on the welding machine, and is
displayed in the tab «In progress». Once the reports have been imported, it is possible to search, edit or archive them. To
view the spots made in a report, select a report and the spots will be displayed in the table.
To search for a report, fill the field and click on the icon
To edit a report, select it and click on the icon
To archive a report, select it and click on the icon
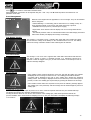
Attention! The imported reports cannot be cancelled until they are archived.
3.2/ Consult archived spot reports
To consult the report archives, click on the tab “Archives”. The files are grouped by year and month. To view the spot
information, select a report and they will appear in the table. For archived reports, it is possible to search, edit or to erase a
report.
Attention! When a report is archived or erased, the SD card must then be formatted to prevent the report from being
imported again.
To search for a report, fill the field and click on the icon
To edit a report, select it and click on the icon
To erase a report, select a report and click on the icon
.
3.3/ Purge the SD card.
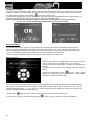
A purge operation will erase all the reports saved on the SD card.
To purge and SD card, insert the SD card into your PC card drive or a card reader and, in the menu, click on Options and
Purge the SD card .
Attention : any reports stored on the SD card that have not already been imported, will be imported automatically before
purging.
3.4/ Entering the report information
Each report can include the following information:
User
Car model
Repair order
Registration number
Put into circulation
Intervention
Comments
To enter this data, select a report and enter the information in the report header.
18