1
Á Quick start guide
Register your product and get support at
CEM5100
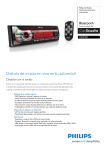
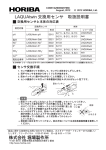
What’s in the box
a
Turn on
Store stations automatically
Receive call
To turn the unit on
press .
1
2
1
*
if the incoming call has no phone number [PHONE IN] is displayed.
2
Press
press and hold
Remote
control
Main unit
(with a sleeve)
ISO male connector
Trim plate
Front panel
b
EN
ES-AR
18
Screw
x 1 pc
Rubber cushion
User manual
Disassembly tools
x 2 pcs
Press to turn the unit on.
» [SELECT OPERATING REGION] is displayed.
2
Rotate to select an option:
[USA] (United States)
[LATIN] (Latin America)
[EUROPE] (Western Europe)
[RUS] (Russia)
[M-EAST] (Middle East)
[ASIA] (Asia Pacic)
[JAP] (Japan)
[AUST] (Australia)
Quick start
guide
53mm
Quick start guide
Guía de inicio rápida
1
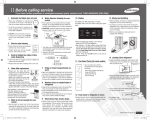
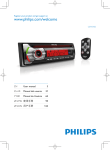
Connect the supplied male connector to the unit.
3
2
Check the car’s wiring carefully and connect them
to the supplied male connector.
Set clock
1
Green/black strip Left speaker (Rear)
White/black strip Left speaker (Front)
PT-BR
Guia de início rápido
2
3
Gray/black strip
=+7:
҄ઢ͂ڲܞ
4
Purple/black strip Right speaker (Rear)
e
Red
Ignition key +12V DC when
ON/ACC
f
Blue
Motor/electric antenna relay
control lead
g
Blue/white
h
Black
Ground
i
Yellow
To the +12V car battery
which is energized at all times
=+&1
ॽිగႬᆻଶ
c
g
f
R RE AR AUX
Right speaker (Front)
L
L
R
FRONT
REAR
1
2
Select country/region
1
3
1
2
3
4
5
Press
1
2
3
4
Press
applicable.
Press
Turn on bluetooth function on your device.
Search for other bluetooth devices that can pair with your device.
to set hour.
1
2
to set minute.
/
or
Press
or
to tune to a radio station manually.
» The radio station is broadcast.
To search for a radio station automatically press
or
1
2
3
1
Press .
» [REDIAL] is displayed.
2
Press / again.
» [CALLING] is displayed and the unit starts dialing the number dialed last time.
Press
to release the panel.
Insert the card into the card slot.
Close the front panel.
» The unit starts playing from the
card automatically.
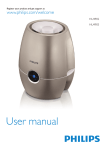
Play from iPod/iPhone
1
2
Slide the USB socket cover marked
3
Insert the other end of the iPod/iPhone cable
to the iPod/iPhone socket.
» The unit starts playing from the USB
device automatically.
Press and hold until [TRANSFER] is displayed.
» Voice transfers from loudspeaker to mobile phone.
.
to the left.
Insert the USB device into the USB socket.
» The unit starts playing from the USB
device automatically.
Insert a card
Use the Mobile Phone to dial and make an outgoing call.
Call transfer
Slide the USB socket cover marked
[CALLING] is displayed.
To redial number.
repeatedly to select band: [FM1]
[FM2]
[FM3]
[AM1]
[AM2] .
Press and hold
1
2
Enter default password “0000”.
» [PAIR OK] is displayed on the panel if pairing is successful.
Press SOURCE repeatedly to select radio mode.
Press
to terminate call.
Play from USB
Select “Philips” in the pairing list.
To make call through the mobile phone.
Listen to radio
1
2
3
4
Press a numeric button for three seconds.
» The station is saved in the selected channel.
» The paired device connect to the car audio system automatically.
Rotate
Terminate call
Make a call
Press MENU
Press
to answer/accept the call.
Tune to a station that you want to store.
Pairing bluetooth devices
Rotate
Press » The six strongest stations of the selected band are saved in the preset channel automatically.
Store stations manually
Carrying case
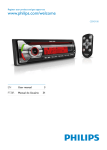
Connect wires: ISO male connectors
3mm
until the unit is turned off.
DBB until [STORE - - -] is displayed.
to the left.
Insert USB adaptor on one end of iPod/iPhone
cable to the USB socket on the main unit.
ih
Á Guía de inicio rápida
d
Contenido de la caja
2
Encendido
!
mantenga pulsado
Control remoto
Unidad principal
(con manga de montaje)
Conector
ISO macho
e
Almohadilla de
goma
Panel frontal
1 tornillo
Marco del tablero
2 herramientas
de desmontaje
Manual del
usuario
Funda de
transporte
Selecciona el país o región
1
Pulse para encender la unidad.
» Aparecerá [SELECT OPERATING REGION].
2
Pulse para seleccionar una opción:
[USA] (Estados Unidos)
[LATIN] (América Latina)
[EUROPE] (Europa occidental)
[RUS] (Rusia)
[M-EAST] (Medio Oriente)
[ASIA] (Pacíco asiático)
[JAP] (Japón)
[AUST] (Australia)
Guía de inicio
rápida
Conexión de los cables: conectores ISO macho
1
Conecte el conector macho suministrado a la
unidad.
3
2
Controle cuidadosamente el cableado del vehículo
y conecte los cables en el conector macho
suministrado.
Ajuste del reloj
1
Banda verde / negra
Parlante izquierdo (posterior)
2
Terminal blanco /
negro
Parlante izquierdo (frontal)
3
Terminal gris / negro
Parlante derecho (frontal)
4
Terminal violeta /
negro
Parlante derecho (posterior)
e
Rojo
Llave de encendido +12 V de
CC en ON / ACC
f
Azul
Cable de control del relé de la
antena eléctrica / del motor
f
g
f
R RE AR AUX
L
g
Azul / blanco
L
R
REAR
FRONT
Cable de control del relé del
h
Negro
Tierra
i
Amarillo
A la batería del auto de +12
V que recibe alimentación
constante
hasta que la unidad se apague.
Pulse
,
'
&
6
%
Si la llamada entrante no tiene número telefónico aparecerá [PHONE IN] en la pantalla.
2
Pulse
1
2
Finalización de llamadas
CEM5100_QSG_00_V2.0
3
ih
Mantenga pulsado un botón numérico durante 3 segundos.
» La emisora se guardará en el canal seleccionado.
Pulse
1
2
3
4
Active la función Bluetooth en su dispositivo.
Busque otros dispositivos Bluetooth que puedan conectarse con su unidad.
Seleccione “Philips” en la lista de sincronización.
Realización de llamadas
Pulse
Gire
Pulse
Deslice la cubierta de la toma USB
hacia la izquierda.
2
Introduzca el dispositivo USB en el puerto USB.
» La unidad comenzará a reproducir el
contenido del dispositivo USB automáticamente.
1
2
Use el teléfono móvil para marcar un número y realizar una llamada saliente.
1
Pulse .
» Aparecerá [REDIAL].
2
Pulse / nuevamente.
» Aparecerá [CALLING] en la pantalla y la unidad comenzará a marcar el último número al que se
llamó.
Introducción de una tarjeta
1
2
3
#
$%
&
'
[CALLING] en la pantalla.
Rellamadas:
Pulse
/
varias veces para seleccionar una banda: [FM1]
[FM2]
[FM3]
[AM1] o [AM2].
Mantenga pulsado
o
Para buscar una emisora de radio automáticamente pulse
o
.
Guarde las emisoras automáticamente
"
DBB hasta que [STORE - - -] aparezca en la pantalla.
para liberar el panel.
Introduzca la tarjeta en la ranura para tarjetas.
Cierre el panel frontal.
» La unidad comenzará a reproducir el
contenido de la tarjeta automáticamente.
1
Deslice la cubierta de la toma USB
hacia la izquierda.
Transferencia de llamadas
2
Mantenga pulsado varias veces hasta que aparezca [TRANSFER] en la pantalla.
» La voz se transferirá desde los parlantes al teléfono móvil.
Inserte el adaptador USB de uno de los extremos
del cable del iPod / iPhone en el puerto USB de
la unidad principal.
3
Conecte el otro extremo del cable en la toma
del iPod / iPhone.
» La unidad comenzará a reproducir el
contenido del dispositivo USB automáticamente.
hasta que aparezca el dígito de frecuencia.
Pulse
o
para sintonizar una emisora de radio manualmente.
» Se emitirá la estación de radio.
Pulse
Conexión del iPod / iPhone
Pulse SOURCE varias veces para seleccionar el modo de radio.
1
1
Introduzca la contraseña predeterminada: “0000”.
» Aparecerá [PAIR OK] en la pantalla si la sincronización se realiza correctamente.
Cómo escuchar la radio
1
2
3
4
para nalizar la llamada.
Reproducción desde un dispositivo USB
» El dispositivo emparejado se conecta con el sistema de audio del automóvil automáticamente.
Pulse MENU varias veces hasta que la hora actual aparezca en la pantalla.
Gire
para contestar / aceptar la llamada.
Sintonice la emisora que desea almacenar.
Realización de llamadas desde el teléfono móvil:
1
2
3
4
5
Recepción de llamadas
1
Emparejamiento de dispositivos Bluetooth
© 2011 Koninklijke Philips Electronics N.V.
All rights reserved.
Pulse » Se guardarán automáticamente las seis emisoras más potentes de la banda seleccionada en el
canal presintonizado.
Guarde las emisoras manualmente
Para encender la unidad
pulse .
Á Guia de início rápido
Á ॽිగႬᆻଶ
!
"
#
Ligar
Conteúdo da caixa
Para ligar o aparelho
pressione .
!
Mantenha pressionado
Unidade principal
Controle
remoto
Painel frontal
Moldura
Estojo para
transporte
Suporte de
borracha
1 parafuso
2 ferramentas de
desmontagem
Manual do
usuário
2
7
9;
conecte-a ao conector macho fornecido.
1
Faixa verde/preta
Alto-falante esquerdo (traseiro)
2
Faixa branca/preta
Alto-falante esquerdo (frontal)
3
Faixa cinza/preta
Alto-falante direito (frontal)
4
Faixa roxa/preta
Alto-falante direito (traseiro)
e
Vrm
$
9;
<=>
7
?
9;
@H
f
L
3
Pressione
Gire
Insira o dispositivo USB na entrada USB.
Pressione
Ouvir rádio
1
2
3
4
9;
'$
;
\]]]]^
» [PAIR OK] (Emparelhamento OK) será exibido no painel se o emparelhamento for bemsucedido.
1
2
Use o telefone celular para discar e fazer uma chamada.
1
Pressione .
» [REDIAL] é exibido.
Pressione SOURCE várias vezes para selecionar o modo de rádio.
Pressione
/
várias vezes para selecionar a frequência: [FM1]
[FM2]
[FM3]
[AM1] ou [AM2] .
Pressione e segure
ou
2
até que o número da freqüência seja exibido.
Pressione
ou %
9;
'
» 9;
'
Q
Para procurar uma esta9;o de rádio automaticamente pressione
ou
.
1
2
3
`
[CALLING] (Chamando) será exibido.
Para rediscar o número.
לᆠ
ѐཾދ
1
2
Pressione / novamente.
» [CALLING]
{|
Q
}*
9
&
&
Transferência de chamada
Pressione
ཡೌ
ઈקIJ1 ॖij һ྅܁ऒIJ2 ࡵij
Feche o painel frontal.
» O aparelho inicia automaticamente a
9;
;
g
f
2
Insira o adaptador USB localizado em uma
das extremidades do cabo do iPod/iPhone na
entrada USB da unidade principal.
ॽිೊᆻଶ
1
2
3
4
para liberar o painel.
Deslize a tampa da entrada USB com o
símbolo
para a esquerda.
Ⴌ߀൱Ҭ
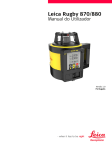
৹ࢨཐńISO ܈५৹ࢨచ
;
;
1
3
غሢྺ႓և؇تd (ೊӷ࣐ ؝138 ႜ؇ oغሢتp)
СበንСை 3 ሴd
» تࣞևᅿ๐ာ؇శሱd
னؗথഥХ
,62܈५৹ࢨచ
Reproduzir conteúdo do iPod/iPhone
Você pode transferir a voz do alto-falante para o telefone celular durante uma chamada.
Pressione e segure até que [TRANSFER] (Transferir) seja exibido.
» Transferências de voz do alto-falante para o celular.
ih
ఱ૯ϴ
Para fazer a chamada pelo telefone celular.
ီ३చ
» O aparelho inicia automaticamente a
9;
$
#,[
Selecione “Philips” na lista de emparelhamento.
Fazer uma chamada
para ajustar os minutos.
Aterramento
3
2
Pesquise outros dispositivos Bluetooth que possam ser emparelhados com o seu dispositivo.
» O dispositivo emparelhado é conectado automaticamente ao sistema de áudio para carros.
para ajustar a hora.
Fio de controle do relé do
Para bateria de carro de +12 V
ativada ininterruptamente
1
2
3
4
Deslize a tampa da entrada USB com o
símbolo
para a esquerda.
Pressione várias vezes MENU até que a hora atual seja exibida.
Gire
Azul/branco
Amarelo
1
$
9;
[
$
С ഌd
» ๐ာశٯሱߞክಞ؇ 6 تݓࣞናِѮᅿᅉඃశሱd
para encerrar uma chamada.
Reproduzir a partir de um dispositivo USB
Preto
i
!
*;
Q
Z
» 9;
Q
$
ᅿოࡱ୨බྑĩСበ DBB ሒሢྣභ [STORE - - -]d
൱ײխԩ
,%
9;
$Z
%
Emparelhar dispositivos Bluetooth
Ajustar o relógio
1
2
3
4
5
1
2
ᇺሑᇆIJտࠓฮij
Gire 9;K
[USA] (Estados Unidos)
[LATIN] (América Latina)
[EUROPE] (Europa Ocidental)
[RUS] (Rússia)
[M-EAST] (Oriente Médio)
[ASIA] (Pacíco Asiático)
[JAP] (Jap;o)
[AUST] (Austrália)
Pressione
ስײխԩ
Ћሑୁދ༂
para atender/aceitar a chamada.
Pressione
h
FRONT
Pressione
Encerra uma chamada
g
L
2
1
2
Fio de controle do relé da antena
elétrica/automática
R
REAR
,
$Z
$
*
&
'
}*
Se você estiver recebendo uma chamada sem número de telefone [PHONE IN] (Recebendo
chamada) será exibido.
até desligar o aparelho.
Pressione para ligar o aparelho.
» [SELECT OPERATING REGION] é exibido.
Azul
g
f
R RE AR AUX
Pressione » 9X
Z
;
$
pré-sintonizados.
!
"
#
Insira o conector macho fornecido no aparelho.
1
2
1
Guia de início
rápido
1
@
'
DBB até que [STORE - - -] (Armazenamento) seja
exibido.
2
Conector macho ISO
Atender a uma chamada
1
R RE AR AUX
L
1
ࣞܚ؇ݦआ౸आሢ҉ቯሤd
2
྇ࣁԒ౼Լ؇ྮĩࠌࣞआሢܚ؇ݦ
आ౸d
חঙඃ҃؇ਃ။ݡd
ศ๎ݶᄲி؇ඃ҃ఇٵ؇๒ਃ။ඃ҃d
ာᆖఇٵҸሱ؇qPhilipsrd
ෝനୱഌୃq0000rd
» തఇٵՐݡĩࣞྣභ [PAIR OK]d
» Ⴚఇٵ؇ඃ҃ࡘናِआሢԼᅽოྻ྄ໆd
չ߉
െ/߳െྮ
ኲၺඔ౸ĥࠌሤĦ
фെ/߳െྮ
ኲၺඔ౸ĥಏሤĦ
ࡉെ/߳െྮ
ᄙၺඔ౸ĥಏሤĦ
െ/߳െྮ
ᄙၺඔ౸ĥࠌሤĦ
1
2
ᄊාࡱӏߞࡩӏսࠧتd
H
ࠅെ
״ᄡ ON/ACC ඪĩࡧئᅤ
՞༛ +12V ሒઢ
1
С d
» ࣞྣභ [REDIAL]d
I
ਃെ
ה/ِتມྮሱࢡেሧྮ
2
J
ਃെ/фെ
৶ო౸ሱࢡেሧྮ
ᅾֳС / d
» ࣞྣභ [CALLING]ĩְඪቯሤঙඵӏח൪ֳӏս؇ߞd
K
߳െ
आ؛
L
࠽െ
आඵሶসتݤ؇ +12V ౼
Լت՟
L
ဵݚ൱ࠓѱչ߉
Րӏߞࠌĩࣞྣභ [CALLING]d
ဵᇛྑѱހ
ޯࢥላၑ
R
REAR
FRONT
3
Insira a outra extremidade do cabo do iPod/iPhone
na entrada do iPod/iPhone.
» 9;
do dispositivo USB.
ത๐භĩआມྮߦ৶ო౸ĥതසᄊĦd
ᅿົࠧඪĩிসႽࣞᄶოָၺඔ౸ෝሢාࡱd
Сበ ሒሢྣභ [TRANSFER]d
» ᄶოָࣞၺඔ౸ෝሢාࡱd
ih
Á ҄ઢ͂ڲܞ
ઢ
˳ʑࢀذ
ߗ߬ઢສw
ܘy
ߗ߬ᗐஶສw
ܘϾ قԷສᗐஶy
˚ສфᙶࡨ
Ⴍઁኂ
ࠍک
ཚ
ኼᇒྌ
ᑓ 1
זՃɮԮ 2 ͧ
Ԛّ͂ʹ˫
1
ܘɎ ˿ઢສy
» ೋࠍᛷ͐ [SELECT OPERATING REGION]y
2
ܘ
҄Ƀڲܞپ
டઅཋᇃ}ISO ʔઅ
1
ੀ፭ؿڃʔઅடઅϭສy
2
ˠୀᏎ݅ӁӹЗᇃwԎੀᇃҥடઅϭ፭ؿڃ
ʔઅy
3
g
f
R RE AR AUX
L
L
၆ϳ/ඣϳᇃҢ
̞ᐰኂ (܃ʿ)
͉ϳ/ඣϳᇃҢ
̞ᐰኂ (کʿ)
Ϙϳ/ඣϳᇃҢ
ϳ/ඣϳᇃҢ
́ᐰኂ (܃ʿ)
H
ϳ
ᒨˌᗐ +12V DCw୮כ
ON/ACC ࣂྸر
I
ᔂϳ
༠/ཋ৽ʨᇃᘗཋኂઁԹ
ʵᇃ
J
ᔂϳ/͉ϳ
ᒷɣዀᘗཋኂઁԹʵᇃ
K
ඣϳ
અΔ
L
ඡϳ
டઅϭ +12V Ӂӹཋϑw፭
ࣂ൬Ϸ˨ཋ
R
REAR
́ᐰኂ (کʿ)
FRONT
3
ܘ๑႓עடઅʨᇃၤᒷɣዀΣሬ͂y
1
2
3
4
5
ऻࠓ
ࢨ๔߉
1
ΣτԞཋwੀผᛷ͐ཋ໔ᆦy
ΣԞཋӀτཋ໔ᆦwੀผᛷ͐ [PHONE IN]y
႓חঙቯሤĩ
С d
1
തᄗਁتĩࣞྣභߞࠧتd
തਁتଢᄗߞࠧتĩࣞྣභ [PHONE IN]d
2
ܘ
႓ޓҠቯሤĩ
Сበ
2
С
1
2
1
2
3
4
ᆢႏy
ܘᆢႏy
» ፕցؐݒɻ໔ੜؿʒཋ̎wผϬ৽Φιݯདஉ፼༞y
˞உցɩࣂy
ᇼܘ
ᆢႏy
ફᔝ
˞உցʗᘸy
࿎ᄸࡉݗ/ֽ౹
ᇘᆼ߉
ܘϾᅕΥܘ൶ɍެᘸy
» ϊཋ̎ੀΦܞכցؿ፼༞y
ܘ
1
С չऻሑᇆ
» ࣞྣභ [SELECT OPERATING REGION]d
С
2
ဪቩ ာᆖႤݓာķ
[USA]ĥଧĦ
[LATIN]ĥ৺قଧሿĦ
[EUROPE]ĥཨĦ
[RUS]ĥڎ૧ฐĦ
[M-EAST]ĥሱٌĦ
[ASIA]ĥၒĦ
[JAP]ĥഒ҉Ħ
[AUST]ĥбੈטၒĦ
՚ USB Ѱ٦
ઢສɐؿᔂ٣˲ॶy
ชఖԯˢ˿˞།੬ؿᔂ٣ສྦྷؿສy
ᇼܘ
ᆢႏy
νᚹᄤᅌ
1
2
ࠇᇲ ܘSOURCE ፕእνࠑዀᅡβy
3
4
ܘϾ
ࠇᇲܘ
/
உցؐ[}ݒFM1]x
[FM2]x[FM3]x[AM1] ֶ [AM2]y
wقԷ፼ଅᅕΥᕷy
ֶ
1
ᇼ ܘy
» ೋࠍᛷ͐ [REDIAL]y
2
ʹܘȹω / y
» ᛷ͐ [CALLING]wສնᅆ̨ɐȹᅆˮؿ໔ᆦy
੬˿˞Ε౨ංੀᐰࠑᐰኂᔝઅϭʹዀy
ܘϾ wقԷᛷ͐ [TRANSFER]y
» ᐰࠑᐰኂᔝઅϭʹዀy
y
ੀᅟ͐
ؿUSB ైᅠ̔ၰΉ̞ไ৽y
ੀ USB ສైɃ USB ైᅠy
» ສੀϬ৽ USB ສᅌיy
ైɃতኙ˺
3
1
2
3
ഥᇆൌᇖ
ܘ
С
1
2
ᗐɐࠍکy
» ສϬ৽նতኙ˺ᅌיy
1
2
3
ᅌ יiPod/iPhone ʑࢀ
1
2
ੀᅟ͐
ੀ iPod/iPhone ᇃȹဲ ؿUSB ᔝઅైɃ
˚ສɐ ؿUSB ైᅠy
൰๔݀Ѱ
3
ੀ iPod/iPhone ᇃ̊ؿȹဲైɃ iPod/iPhone
ైᅠy
» ສੀϬ৽ USB ສᅌיy
1
2
3
4
ܑڳС MENU ሒሢ״ಏඪࢹ൜ฏd
ဪቩ
С
ࣞם
ҵ࢜؇ USB Ԏࠣܤ࿁ኲԉd
ࣞ USB ඃ҃Ԏന USB आd
Ұೊխԩह
ഌd
1
2
3
4
5
औົࠧd
» ҉ቯሤࣞናِঙඵӎ ۄUSB ඃ҃ሱ؇டചd
˞ᕌࠍy
ੀতኙ˺ైɃতኙ˺ైᅠy
Ԛ͂ʹዀᅆ໔Ԏᅆˮཋy
ᅆ໔ѧι܃wੀᛷ͐ [CALLING]y
ߗ߬ࠇณᅆ໔y
ᔝઅ
ܘ
ֶ
ʹ৽ሁϭᄤᅌཋ̎y
» ᄤᅌཋ̎Щܞᄤᅌy
ߗ߬Ϭ৽ชఖᄤᅌཋ̎wᇼܘ
1
2
Εྦྷ௰ɻፕእ§Philips¨y
ፏɃདஉᆦ§0000¨y
» Σྦྷι˲wࠍɐผᛷ͐ [PAIR OK]y
Ңy
ᅌ יUSB ສ
߬༦ʹዀ̨ཋy
1
2
आາਁتd
ሒሢቯሤޓҠd
Ң
ᅆ̨ཋ
ફᔝ
અᚹཋy
ሁϭ੬߬Φؿཋ̎y (ᇼӮ 112 ࠒ ؿfνᚹᄤᅌཋ̎g)
» ྦྷؿສผϬ৽டᇃϭӁӹࠑᚊӡy
ࠇᇲ ܘMENU قԷ͌ࣂؿکංᕷy
ֶ
ΕνࠑዀᅡβɻwܘϾ DBB قԷᛷ͐ [STORE - - -]y
ᔂ٣ສྦྷ
உցࣂᘸ
ih
ፕእፕඖ}
[USA] (ਝ)
[LATIN] (ּȻ)ݘ
[EUROPE] (Ϲᅩ)
[RUS]ڜᖓ
[M-EAST] (ɻΔਂ)
[ASIA] (ԓʪΔਂ)
[JAP] (ˀ̯)
[AUST] (ዌ)ݘ
ᇼܘ
અᚹཋ
1
2
ʹ৽Φཋ̎
ᙙଝ
ፕእਝࡼ/Δਂ
ISO ʔઅ
Ϭ৽Φཋ̎
С
חঙ୍ђd
ࣞևগԎനগԎԄd
ޓҠಏ୍ђd
» ҉ቯሤࣞናِঙඵӎۄևগሱ؇டചd
ඃሤ࿎ඪd
ഌd
ဪቩ
С
ඃሤەሴd
ഌd
՚ iPod/iPhone Ѱ٦
ؿUSB ైᅠ̔ၰΉ̞ไ৽y
ܑڳС SOURCEIJྔހ჻ij ာᆖოࡱ୨බd
ܑڳС
Сበ
/
ࡩ
ာᆖశٯķ[FM1]c[FM2]c[FM3]c[AM1] ࡩ [AM2]d
ሒሢశን൜ฏd
С
ࡩ
ĩාِغሢتd
» تঙඵޞӎd
႓ናِศ๎تĩೊС
ࡩ
d
1
2
ࣞם
3
ࣞ iPod/iPhone تਏઘႤ٬आሢ
iPod/iPhone Ԏd
» ҉ቯሤࣞናِঙඵӎ ۄUSB ඃ҃ሱ؇டചd
ҵ࢜؇ USB Ԏࠣܤ࿁ኲԉd
ࣞ iPod/iPhone تਏႤ٬൪؇ USB සఇ౸आ
ሢቘቯሤ൪؇ USB Ԏd