1
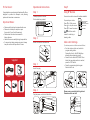
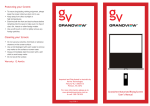
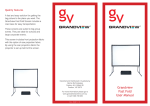
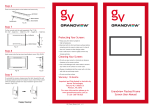
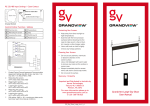
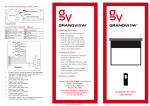
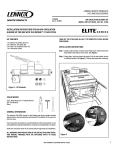
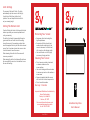
Limit Settings
The screen is fitted with 2 limits. The limits
automatically stop the screen in the fully Up
(top limit) and fully Down (bottom limit)
positions. You can adjust the bottom limit to
set your viewing height.
Setting The Bottom Limit
Caution: Setting the bottom limit beyond the black
leader may render your screen inoperable and
void your warranty
The bottom limit switch is accessible through a
grommeted hole on the left side of the casing.
Lower the screen to the operating position then
insert the supplied Hex key into the white coloured
screw. Turn it clockwise to raise the screen or turn
it anti-clockwise to lower the screen.
When lowering the bottom limit the screen will
move as you adjust it.
When raising the bottom limit please lift and lower
the screen with the remote or side buttons to see
the new limit setting.
Protecting Your Screen:
•
•
•
Keep away from direct sunlight or
high temperatures.
Examine both the front and back surfaces before retracting into the case to make sure it is free of dust, dirt, insects or other foreign matter.
Use a soft brush or cloth to lightly remove any foreign particles.
Cleaning Your Screen:
• Do not use any solvents, chemicals or abrasive cleaners on the
screen surface.
• Use a mild detergent with warm water to remove any marks on the surface or screen case.
• Always immediately dab the screen with a soft cloth to avoid soap marks.
• Do not scrub the surface.
Warranty: 12 Months
Imported and Distributed in Australia by
Herma Technologies
Factory 4A, 6 Albert St
Preston, VIC 3072
For more information please go to
www.grandviewscreens.com.au
or call 1300 730 025
Nov 2008 v1
Grandview Sky-Show
User’s Manual
To the Owner:
Operational Instructions
Step 5
Congratulations on purchasing a Grandview Sky-Show,
designed to produce the sharpest, most pleasing
pictures with maximum convenience.
Step 1
Using RF Remote
Carefully unpack the screen.
Fix the cable box provided.
Your remote control comes with batteries installed.
To operate your remote:
Press to lift the screen
Press to stop the screen
Press to lower the screen
The Micro switch
is used for retracting or
lowering cable.
Important Notes:
• Please read this instruction manual before use.
• Please do not attempt to adjust or repair
the product. You will void the warranty.
• Please retain this instruction manual for
future reference.
• Handle the screen carefully during transportation.
• To ensure long lasting viewing enjoyment, always keep the screen rolled up when not in use.
Step 2
UP for screen fabric
STOP for both
Down for screen fabric
Down for cable
Up for cable
Cable Limit Settings
Mount the screen as shown below.
(The limits are preset at min 300mm and max 4950mm)
• Turn the remote control over, locate the program setting button.
Press with a fine tip, the LED will light up indicating the programming mode.
• Press the micro switch UP/DOWN. When
button the new cable position is reached,
press the STOP button.
• Press the programming button again.
Now the limit is set.
Cable
Supplied
Step 3
Insert the plug.
Down for cable
Power
Cable Box
Up for cable
Step 4
Allen Key
Cable Lock
RF Remote
Please secure your safety limit lug at least
10mm above the new limit
Plug the power cord into the Cable Box.
Ceiling
Cable
(Drop 5m)
Plug
Plug Socket
Cable
Secure
positioning piece