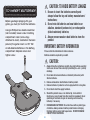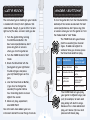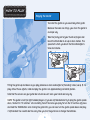
1
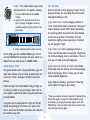
Thank you for purchasing the Power Tour™ Electric Guitar!
Feel free to celebrate
your graduation into
higher levels of rocking
by tossing your air guitar
into the trash. Trust
us, you won’t want it
anymore.
To fully enjoy everything
this guitar can do
– and everything you
can do with it – please
read these instructions
carefully and completely.
x4
1.5V AA or LR6 size
NOT INCLUDED
ALKALINE BATTERIES REQUIRED
Phillips/cross head screwdriver (not included) needed to insert batteries.
IC
TR
C
E
L
R
A
T
I
GU
E
1
GOUCPO
GOUCP
O
GOUCPO
TM
GOUCPO
USER’S GUIDE
77116
GET TO KNOW YOUR GUITAR
Output Jack
(for external amp
or headphones)*
Frets LED display
Strum Bar
Strum Bar LEDs
Palm Sensor
Tone Knob
Tone Button
Mode Knob
Mode Button
Speaker
Input Jack
(for personal
music player)**
ON / Volume
1
NOTE: When you connect your guitar
to an external device through the
output jack, the speaker on the guitar
shuts off, and the guitar’s volume knob
controls the volume of the guitar to the
external device.
* Amp sold separately
** Headphones and personal music player not included
TO INSERT BATTERIES
Before you begin playing with your
guitar, you must first install the batteries.
Using a Phillips/cross head screwdriver
(not included), loosen screw in battery
compartment cover (screw stays
attached to cover), located on the back
panel of the guitar. Insert 4 x 1.5V “AA”
or LR6 alkaline batteries in the battery
compartment. Replace cover and
tighten screw.
CAUTION: TO AVOID BATTERY LEAKAGE
1. Be sure to insert the batteries correctly and
always follow the toy and battery manufacturers’
instructions;
2. Do not mix old batteries and new batteries or
alkaline, standard (carbon-zinc) or rechargeable
(nickel-cadmium) batteries;
3. Always remove weak or dead batteries from the
product.
IMPORTANT: BATTERY INFORMATION
Please retain this information for future reference.
Batteries should be replaced by an adult.
CAUTION:
1. Always follow the instructions carefully. Use only batteries specified
and be sure to insert item correctly by matching the + and – polarity
markings.
2. Do not mix old and new batteries or standard (carbon-zinc) with
alkaline batteries.
3. Remove exhausted or dead batteries from the product.
4. Remove batteries if product is not to be played with for a long time.
5. Do not short-circuit the supply terminals.
6. Should this product cause, or be affected by, local electrical
interference, move it away from other electrical equipment. Reset
(switching off and back on again or removing and re-inserting
batteries) if necessary.
7. RECHARGEABLE BATTERIES: Do not mix these with any other types
of batteries. Always remove from the product before recharging.
Recharge batteries under adult supervision. DO NOT RECHARGE
OTHER TYPES OF BATTERIES.
21
LET’S ROCK!
KNOBS / BUTTONS
To turn the guitar ON, turn the Volume Button
and adjust the volume as desired. For best
sensor performance, don’t press any frets
or sensors when you turn the guitar on. Turn
the Mode knob to “Jam” Mode.
The TONE Knob lets you choose
from the sound of four musical
styles. To add cool effects to
whatever tone you choose, press
the Tone Knob and then play.
The instrument you’re holding in your hands
is loaded with lots of hi-tech features! We
understand, though, if you’re itchin’ to rock
right out of the box, so here’s what you do:
1. Turn the guitar ON by turning
the ON/Volume Button. For
best sensor performance, don’t
press any frets or sensors
when you turn the guitar on.
2. Turn the MODE Knob to “Jam”
Mode.
3. Brush the Strum Bar with the
fleshy part of your right-hand
thumb or finger, and press
your left-hand fingers on the
frets.
4. Use the Tone Knob or Button,
if you like, to change the
sound of the guitar. Notice
how strumming faster or slower
affects the sound.
5. Rock out, play, experiment,
and HAVE FUN!
Now let’s learn more about your new
instrument and all the cool things it can do.
Style
Sounds like
Press TONE
Button to add
Metal
Heavy distortion
Echo
Punk
Moderate distortion
Rock
Guitar plus
synthesizer
Indie
Clean sound
Distortion without
echo
A sound like
notes played
backward
Depth of sound
The MODE Knob lets you play
your guitar in different ways (see
p.6): for example, to learn and
play along with built-in songs.
Because this is more advanced
play, we’ll leave it for now and
proceed with basic play.
31
HOW TO PLAY
Playing the Guitar
You hold this guitar as you would any other guitar.
Because there are no strings, you strum this guitar in
a unique way.
Take the fleshy part of your thumb or fingers and
brush the Strum Bar in an up or down motion. The
speed with which you brush the Strum Bar affects
tone and volume.
Tilting the guitar up and down as you play produces a cool audio effect of “bending” notes (see p. 5): to
play without these effects, hold and play the guitar in an approximately horizontal fashion.
Note that the sensors on your guitar do not work as well when your hands are very dry.
NOTE: This guitar is built for right-handed players. If you are left-handed and try to play the guitar upside
down, the built-in “tilt switches” will constantly “bend” the notes you play. To turn the tilt switches off, press
and hold the TONE Button while turning the guitar ON: you can now turn the guitar upside down and play
it left-handed. You need to do this every time you turn the guitar on or change the batteries.
41
Frets
Special Ways to Play
To produce different notes, either
touch and hold or press the frets on
the neck of the guitar, then strum. You
don’t have to press the frets hard. The
frets are chromatically arranged:
FRET #
MUSICAL NOTE
Open (strum with
no frets pressed)
A
1
A sharp/B flat
2
B
3
C
4
C sharp/D flat
5
D
6
D sharp/E flat
7
E
8
F
9
F sharp/G flat
10
G
11
G sharp/A flat
12
A
Palming
“Palming” means using the edge of your strumming
hand to mute or stop guitar sound. This guitar has
a Palm Sensor that produces an effect similar to
“palming” on a stringed guitar.
Here’s how you do it:
1. Brush the Strum Bar to
produce a sound.
2. Depress the edge of
your palm on the Palm
Sensor to stop the
sound; or
3. Brush the Strum Bar with
the fleshy part of your
palm holding down the
Palm Sensor to play
palm-muted notes.
Play around and have fun: you’ll get it.
And the Palm Sensor won’t work through your sleeve, so
keep your strumming arm’s sleeve out of the way!
Bending Notes
When you are playing a note, tilt your guitar’s
neck upward or downward: this produces an effect
similar to “bending” strings/notes on a real guitar.
51
Hammer-Ons
MODES
Your guitar also lets you play “hammer-ons”: that
is, pressing a fret, without strumming, to produce
a higher note than the one being played. To do
what’s called a one-handed hammer-on:
There’s more than one way to play with
your new guitar!
Speaker With Lights – Take the enclosed
cable and connect your personal music
player (mp3 player, stereo, CD player, etc.*)
to the guitar through the Input Jack. Control
the volume through your music player.
1. Brush the Strum Bar to play a note.
2. While that note is sounding: if you are already
pressing a fret, press any fret between your left
hand and the Strum Bar; or just press a fret on
an “open” strum.
As music plays through the guitar’s speaker, a light
show appears on the neck. Touch the neck to get
different light patterns.
Hear how the note changes?
You can also do two-handed hammer-ons:
1. As you play with
your finger on
a fret, brush the
Strum Bar to play
that note.
2. While the note is
sounding, keep the first finger depressed
and, with your strumming hand, touch a fret
between your left hand and the Strum Bar.
If you leave music playing through the guitar for
about an hour – let’s say you step away to sign
autographs – the guitar will “go to sleep.” To “wake it
up,” press the Mode button.
If no music is detected in about 3 minutes, the
guitar will “go to sleep.”
Jam – This mode allows you to play your
guitar one of two ways:
• By yourself, with no accompaniment
• With a PMP (personal music player*)
connected to the Input Jack and music
playing through the guitar’s speaker. Your
playing will be layered over the music
coming through the speaker. Adjust the
volume of your PMP* so it is compatible
with your guitar’s volume.
Pull-Offs
Your guitar also lets you play what are called
“pull-offs”; the opposite of a “hammer-on.” A
pull-off means you remove your finger from an
already-pressed fret while the note is sounding,
producing a new, lower note.
Experiment with different settings, styles, and tones: have fun!
61
* Not included
Now You Play
Once the phrase is done playing, it’s your turn to
play the phrase. You must play the correct notes
and approximately in time:
Learn – This mode teaches you songs
GOUCPO
that are stored in the guitar’s memory.
1. Turn the MODE Knob to the LEARN
setting.
2. Lights on the fret board will blink: 12
frets, 12 songs, arranged in order of
increasing difficulty. The first fret is the
first lesson.
If you make three mistakes playing a phrase, a
“clink” sound marks each missed note. Then you’ll
hear a “booing” sound. (Don’t take it personally:
the world’s greatest musicians have been booed,
at one time or another.) The phrase will then
repeat at a slightly slower speed: give it another
try until you get it right.*
12 11 10 9 8 7 6 5 4 3 2 1
If you make two mistakes playing a phrase, a
“clink” sound marks each missed note. The phrase
will continue playing, and so should you. When it’s
over, you will hear some light applause.
3. Press a blinking fret to select a lesson
NOTE: When you are in LEARN MODE, you cannot
use the TONE Button to change the tone. There is a
default tone for each lesson in LEARN MODE.
If you make one mistake, a “clink” sound marks
the missed note. The phrase will continue playing,
and so should you. When it’s over, you will hear
some moderate applause.
Guitar Plays Phrase
Your guitar divides each song into phrases: you will
learn each phrase, one at a time. A metronome will
count four “clicks,” and you will hear the musical
phrase.
PO
C
U
GO
If you make no mistakes, you hear a “cheering”
sound. (Don’t let it go to your head.)
Watch the lights on the fret board: they will light up
to show you where to put your fingers and when to
strum (green), palm mute (red) or play a hammer-on/
pull-off (amber).
* When you make a mistake, the guitar will demonstrate
the phrase again; to cancel this demonstration and
immediately try to play the phrase again, touch the
TONE Button. You will hear the four-click count-in to the
song, and you can try again.
If a guitar note is playing and no lights on the fret
board are lighting up, this means an “open strum”:
that is, brush the Strum Bar to produce the note and
do not press any frets.
71
Once you have played the phrase well enough to
get applause (2 mistakes or less), the guitar will
then play the phrase you have learned plus the
next phrase of the song: you must play the longer
phrase correctly, to advance. You must make fewer
than 3 mistakes to advance.
If you want to add more notes than the ones
LEARN Mode requires you to play, feel free!
LEARN Mode is testing your ability to play certain
notes, in a certain order, at the right time. (There
is a small “window of opportunity” in time to play
the correct note – you can be very slightly offtime, but not much!)
Once you’ve learned all the phrases, you will get
a big cheer and the guitar will return to the 12-fret
blinking menu. You now know all you need to know
to play the complete version of the song (available
in “BAND ACCOMPANIMENT” mode).
To return to the main menu of lessons at any
time, press the MODE Button.
To exit LEARN Mode, turn the MODE Knob. If
your guitar is in this mode and you don’t press
any frets for about 3 minutes, the guitar “goes to
sleep.” Press the MODE Button to reactivate.
Other Ways to Play
If you want to hear one of the songs all the way
through – that is, not hear it one phrase at a
time – press the MODE Button to return to the
main menu (all the lights on the neck blinking).
Then, while you press and hold down the MODE
Button, press a fret to select a song. That song
will play all the way through, and you will have a
chance to play it entirely.
Dude, What’s That Light?
The first few lessons on your guitar are at a beginner
level. As you proceed, the lessons become more
advanced and require you to play “hammer-ons,”
“pull-offs” and “palming.” For a definition of these
terms, see p. 5-6.
During your lesson, watch the Strum Bar LED light:
• A green light shows you when to brush the
Strum Bar.
• An amber light shows you if a note is a “hammeron” or “pull-off.” (See p. 6)
• A red light shows you if a note is to be “palmed.”
Listen to the demonstration to hear if the note is
being stopped or muted with palming. (See p. 5)
If you press the TONE button while selecting a
blinking fret from the main menu, you will hear
the selected song all the way through, and when
it’s your turn, you are allowed to make infinite
mistakes. You’ll still hear a “clink” to let you know
when you hit wrong notes, but you won’t get
booed or cheered, and the song plays all the
way through.
81
Be patient, as you learn! They don’t call
them “advanced” lessons for nothing!
Band Accompaniment – In this
mode, you can play along with
one of 12 songs stored in your
guitar’s memory. These songs are
complete versions of the songs in
LEARN mode.
SONG
NUMBER
1
2
1. Turn the MODE Knob to the BAND
ACCOMPANIMENT setting.
2. You will see all the lights on the fret board
blink: 12 frets, 12 songs, arranged in order of
increasing difficulty.
3. Press a blinking fret to select a song. (You
might want to select a song you already
learned in LEARN Mode, dude.)
Following the count-in, you may proceed to rock
out. Use the TONE Knob to play in any tone
you want.
3
4
5
6
7
8
9
10
11
12
To stop the song, press the MODE Button. Press
the MODE Button again, and the song starts from
the beginning.
If your guitar is in this mode and you don’t press
any frets for about 3 minutes, the guitar “goes
to sleep.” Press the MODE Button again, to
reactivate.
SONG TITLE
“Basic Strumming Blues”
“Wild Thing”
(made famous by The Troggs)*
“Punkitude”
Intro to Hammer-Ons
“Smoke on the Water”
(made famous by Deep Purple)*
Intro to Palm Mute/Stops
“My Own Worst Enemy”
(made famous by Lit)*
Intro to Palm Strum
“Breaking the Law”
(made famous by Judas Priest)*
“Ace of Spades”
(made famous by Motörhead)*
“Hard Rock Blues”
“Frankenstein”
(made famous by The Edgar Winter Group)*
* ALL MUSIC IS DIGITALLY RECREATED AND NOT RECORDED BY
THE ORIGINAL ARTISTS, WHO HAVE NO CONNECTION TO OR
SPONSORSHIP OF THIS PRODUCT.
Remember: with great rock comes great
responsibility – the responsibility to enjoy
music, love life, and have fun.
These lessons are only the beginning: with time
and practice, you’ll teach yourself new songs and
new ways to play your new guitar.
91
FACE PLATES
TIPS
You can remove the Face Plate of your guitar: for
example, if you want to replace it with a new Power
Tour™ Face Plate (sold separately).
It’s easy:
U
GO
2. With your
fingernail, lift
up the Face
Plate and gently
remove it.
C
O
O
P
C
UP
1. Press in on the
tabs on either
side of the
Strum Bar.
1. If you are not playing
with your guitar for an
extended period of time,
turn the Volume Button
down to turn the guitar
OFF. Doing so will help
conserve battery life.
2. If your guitar starts acting erratically, try
turning it OFF, wait a few seconds, and turn
it ON again, or change the batteries.
3. Do not expose your guitar to areas of high
or low temperature, dusty or humid areas,
or direct sunlight.
4. Your guitar is an electrical device. Do
not play it in a bathtub full of water, on a
flotation device in a swimming pool, or in
concert in the rain.
If you have a replacement Face Plate (sold
separately), position it over the Face Plate area and
click it into place.
10
1
FCC STATEMENT
This equipment has been tested and found to comply with the limits for a Class B digital
device, pursuant to Part 15 of the FCC Rules. These limits are designed to provide reasonable
protection against harmful interference in a residential installation. This equipment generates,
uses and can radiate radio frequency energy, and, if not installed and used in accordance with
the instructions, may cause harmful interference to radio communications. However, there is
no guarantee that interference will not occur in a particular installation. If this equipment does
cause harmful interference to radio or television reception, which can be determined by turning
the equipment off and on, the user is encouraged to try to correct the interference by one or
more of the following measures:
• Reorient or relocate the receiving antenna.
• Increase the separation between the equipment and the receiver.
• Consult the dealer or an experienced radio/TV technician for help.
Questions? Call 1-800-327-8264
All Gibson marks, logos, trade dress, guitar models and related
rights provided pursuant to license from Gibson Guitar Corp.
Rights used with permission.
Sold under license from Kid Group LLC
Product and colors may vary. © 2007 Hasbro. All Rights
Reserved. TM & ® denote U.S Trademarks. Patent Pending.
77116
1
PN 6688120000