1
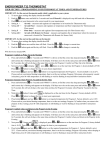
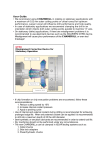
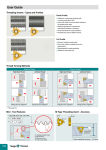
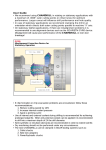
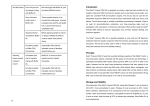
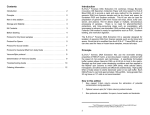
Woosoung Chemical Floor Tile Specifications
1. General Information
1.1 Scope
This article is subject to the area where the PVC vinyl flooring is required, and the flooring range
is subject to the PVC vinyl tile flooring completion to which the architectural drawings assign.
.
1.2 Conveyance, Storage and Handling
1.2.1 The materials should be carried to the site as wrapped in packaging and stored undamaged
in a clean and well ventilated area.
1.2.2 The materials should be carried and handled with care not to be damaged, and the
damaged ones should be taken out in no time.
1.3 Requirements for the Conditions of the Flooring Site
1.3.1 There should be proper lights at the flooring site.
1.3.2 Installation of tile-flooring should come only after the completion of walls, ceilings, windows
and so forth.
1.3.3 Tiles and adhesives should be stored at the site, 24 hours prior to the flooring. Maintain the
site at a room temperature (18~22oC) in the winter. In case of a site that needs floor heating,
heating should be off 3 hours before commencing tile-flooring.
1.3.4 Flooring sites should be maintained to be well ventilated.
.
2. Materials
2.1 Material Details
2.1.1 Specifications and Properties
Item
Woosoung Floor Tiles
Thickness
3.0± 0.15
Remarks
455X455± 0.1%
920X100± 0.1%
Size(mm)
920X180± 0.1%
455X227.5± 0.1%
Pressure(mm)
20oC
0.25 or/and more
45oC
1.20 or/and less
Remaining Pressure Rate (%)
8.0 or/and less
Length Variation Rate by Heating (%)
0.25 or/and less
Heating Loss Rate (%)
0.5 or/and less
KS M 3802
3. Tile-flooring
3.1 Flooring Steps
(1) Clean the existing floor thoroughly → (2) Line up the boxes of tile by lot → (3) Snapping the
ink line in the center → (4) Spread the adhesive → (5) Start laying down the tiles lining them up
with the lines → (6) Finish up by mudding and taping the joint of the wall → (7) Press each tile
gently → (8) Remove the access and all the haze left over on the tile and clean up the site
3.2 Preparation before Commencing Tile-flooring
3.2.1 Check the Floors
(1) Check the followings with the flooring drawings of the site
(2) Before tile proceeding, the floor should be sufficiently and properly dried up to be under 4.5%
of water content.
(3) Check the hardness of the floor and if there is any spot that is too soft or dust, make up the
surface with mortar and wait until the water content rate goes down less than 4.5% before
proceeding.
(4) Clean up the contaminants on the floor such as varnish, paint, lacquer, wax, and the like before
commencing tile flooring. Cover up with the contamination preventing tape should there be any
surface with no further cleaning up is possible.
(5) Remove the existing floor and the adhesive in order to prevent the products from possible
contraction and expansion in case of laying up tiles to wood (plywood) and existing PVC tiles
(tiles / light, heavy weight bearing linoleum).
(6) Make sure before proceeding that the floor is flat with no unevenness or curves.
(7) It is important that the concrete and the mortar on the floor is hard enough and that the floor
made of artificial marble for watering tools (artificial marble) should be sufficiently dried up with
mortar as the adhesiveness could not be strong enough particularly due to its dampness.
(8) Fill up the crack on the floor if any with proper substance.
(9) The floor repair substance of Epoxy may migrate the hardener to the product surface.
Therefore, it is crucial to finish the area with contamination preventing tapes.
3.2.2 Material Check and Storage
(1) The materials should be carried in the site prior to tile flooring. Through inspections over the
packaging, carry out the damaged ones if any.
(2) In order to prevent the bicoloration, Tiles should be arranged by same lot number prior to tile
flooring and the builder should use the tiles from the same lot.
(3) In winter, a room temperature (18~22℃) should be maintained. The tiles and the adhesive
should be carried in the site 24 hours prior to flooring for adaptation to the conditions of the site.
In the area with heating, stop heating at least 3 hours prior to the commencement of flooring.
(4) Supplementary materials should be ready before the commencement of flooring and should
be used after the completion of flooring.
3.3 Rules in Tile-flooring
(1) Draw chalk lines according to the construction drawings and the approval of the supervisor
should advance to tile flooring.
(2) No other adhesive should be used than the applicable adhesives. User manual should be
carefully studied before tile flooring.
(3) Install the square tiles in the same direction according to the mark on the back to prevent the
bicoloration and maintain the dimensional stability.
(4) Make sure that tiles are tight to the floor at all time with no gaps. Check them frequently and
press down for any gap found.
(5) Remove the adhesive left over on tiles at once.
(6) During the winter, the supervisor or the manager at the site should prevent lights from coming
directly down to the tiles that may cause expanding and swelling of tiles.
3.4. How to Install Floor Tiles
(1) Set up the ink line in the center of the floor.
(2) How to Mark the Center Line
- Length of one side of the room ÷ Length of one side of the tile = An odd number, which makes
the central spot the center line.
- Length of one side of the room ÷ Length of one side of the tile = An even number, which
makes the spot 1/2 of the length of the tile away from the center line.
(3) Spray the adhesive appropriately considering the work speed due to time limit.
(4) Press onto the outer edges of tiles with hands and feet after having the tiles bonded onto the
floor. After flooring, finish up with 50Kg roller to press down with no gaps allowed.
3.5 Watch points after Tile-flooring
(1) Keep the room temperature for at least 48 hours at least to prevent the swelling of the outer
edges of tiles that may happen due to possible changes in the nature of the adhesive caused by
air conditioning and heating before the adhesive gets hardened enough.
(2) Carefully keep the tiles from any damages that can be done during heavy-carries by being
dragged or dipped.
(3) Do not use strong solvent such as acetone or thinner but alcohol to remove contaminants on
the surface of tiles.
(4) Take special care against contamination that may occur after flooring on the surface of
products as contaminants (acid substances) might drop on.
(5) Neither moving household stuff nor heating rooms is allowed until 48 hours after flooring,
except for walking after 24 hours, as it takes 48 hours for the oil-based adhesive to get
completely hardened.
(6) After flooring, install supplementary components and fix the floor by taping the area that is
over-layered in order to prevent them from being shoved.
(7) After flooring, regularly coat the tiles with wax for on-going maintenance and durability
increase of Woosoung floor tiles.
3.6 Floor Maintenance, Warnings in flooring and Watch points
3.6.1 Warnings
(1) Remove water, oil and sand that may cause the floor slippery. Do not use any polish that may
cause the floor slippery.
(2) Neither a rough handling nor a high-stacking of the products is allowed. It may cause injuries
and property damages as well as products break downs due to the heavy weight.
3.6.2 Watch points
(1) Do not use strong solvent such as acetone or thinner but alcohol to remove contaminants on
the surface of tiles.
(2) Clean up the drops of chemical agents like bleach and dyeing in no time because it may cause
spots and speckles to accelerate changing colors as the transparent chemical substances
penetrate into the floors.
(3) Burning the left over after construction would cause the noxious fumes. Entrust industrial
waste treatment companies to handle such disposal.
(4) Do not wrap off boxes and keep them in a flat area. Staking tiles on layers for a long term or
standing tiles up may cause them distorted in shapes. Direct sunlight and being wet may also
cause distortion of the quality and colors.
(5) Avoid furniture paint, insecticide and preservatives that may cause tiles contaminated. Take a
special care when using them not to stain tiles.
(6) Woosoung floor tiles are only for floors.
3.7 Adhesive of Woosoung floor tiles
3.7.1 Adhesive Types and Application Scope
Item
Oil-based Adhesive
Water-based Adhesive
Basic Component
Polyurethane (Oil-based)
Acryl (water-based)
Winter season
Summer season
New construction(winter,summer)
Renovations
Basement
(cureable floors with little
Under floor heating
damp)
Water-cleaning area
No under floor heating
Balcony or Extended area
No water-cleaning area
Package unit
4kg, 20kg
10kg
Std. Coating
0.3 ~ 0.4 kg/m2
0.3 ~ 0.4 kg/m2
Scope of Use
3.7.2 How to Use the Adhesive
(1) Place the adhesive case upside down for 20 minutes and then shake before using adhesive for
coating.
(2) Spray only the instructed amount of the adhesive over an appropriate area of the floor for one
time work. (It is important to use a proper amount of adhesive as instructed for quality bonding
to avoid defect that may occur by using adhesive on a larger area at once for one time work as it
gets hardened fast.)
(3) Pay attention and keep the open-time because the open time and the pot life depend on the
season and weather.
(4) Neither moving household stuff nor heating rooms is allowed until 48 hours after flooring,
except for walking after 24 hours, as it takes 48 hours for the oil-based adhesive to get
completely hardened.
3.7.3 Warning and Watch point When Using the Adhesive
(1) Warning: The adhesive for tiles installation contains organic solvents harmful to human body
and may cause an addiction or a hallucination once inhaled over certain amount. Wearing a
protective gear is mandatory. Frequently ventilate the area and inhale fresh air.
(2) Watch point: Right after the construction, there could be peculiar smell of the adhesive
remained. Sufficient ventilation is required about 2~3days after installation.