1
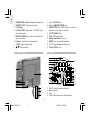
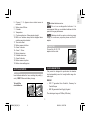
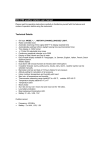
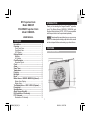
EN
RF Projection Clock
Model: RM939P
INTRODUCTION
Thank you for selecting the Oregon ScientificTM projection
clock. The Motion Sensor (MSR939 / MSR939A) and
Vibration Wake-Up Alarm (VR101 / VR101A) are compatible
with this product and can be purchased separately.
POLERMO Projection Clock
Model: RM939PA
USER MANUAL
Please keep this manual handy as you use your new
product. It contains practical step-by-step instructions, as well
as technical specifications and warnings you should know.
CONTENTS
Introduction ..............................................................
Overview ...................................................................
Clock Front View ...................................................
Clock Back View ...................................................
LCD Display ..........................................................
Getting Started .........................................................
Batteries ................................................................
AC Adapter ............................................................
Clock Reception .......................................................
Reception Signal ...................................................
Clock..........................................................................
Alarm..........................................................................
Sleep Timer ...............................................................
Temperature .............................................................
Projector ...................................................................
Backlight ...................................................................
Reset .........................................................................
Motion Sensor – MSR939 / MSR939A (Optional) ......
Motion Alarm Display ............................................
Motion Alarm .........................................................
The Vibrating Device – VR101 / VR101A (Optional) ......
Precautions ..............................................................
Specifications ..........................................................
About Oregon Scientific .........................................
EU-Declaration of Conformity ................................
FCC Statement .........................................................
Declaration of Conformity ....................................
RM939P_M_EN_R1
1
1
1
1
2
2
3
3
3
3
4
4
4
5
6
6
6
6
6
6
6
7
7
8
8
9
9
9
OVERVIEW
CLOCK FRONT VIEW
1
2006.3.16, 5:25 PM
EN
1.
2.
3.
4.
SOUND / SLEEP: Activate soothing sound; set sleep time
SNOOZE / LIGHT: Activate snooze / light
LCD display
CLOCK ALARM: Toggle alarm 1 / 2 ON/OFF; enter
alarm setting mode
MOTION ALARM: Enter Motion Alarm Mode; set
motion alarm time
Projector: Projects time and alarm status
CLOCK: Toggle display modes
/ : Change settings
5.
6.
7.
8.
1. Projector FOCUS knob
2. Projector IMAGE ROTATION knob
3. PROJECTION ON / OFF: Enables continuous
projection with AC adapter connected
4. 180o ROTATION button
5. 6V AC / DC adapter socket
6. Battery compartment (cover on)
7. RESET: Press to reset default settings
8. °C / °F: Toggle temperature display unit
9. UK / EU (RM939P only)
CLOCK BACK VIEW
LCD DISPLAY
1
2
10
3
4
5
6
1
12
13
7
6
2
3
4
5
11
1.
2.
3.
4.
7
8
9
8
14
15
16
9
17
18
19
SOUND: Soothing sound function set
Battery low icon
Time
ZONE: Indicates time zone offset displayed
2
RM939P_M_EN_R1
2
2006.3.16, 5:25 PM
EN
5. Channel 1 / 2: Appears when related sensor is
activated
6. Motion alarm ON icon
7. Calendar
8. Temperature
9. Clock reception icon: Shows signal strength
10. MIN icon: Indicates sleep time is displayed when
soothing sound is activated
11. Time zone offset
12. Motion sensor start time
13. Alarm 1 indicator
14. Alarm 1 / 2 time
15. Melody alarm icon
16. Vibration alarm icon
17. Alarm 2 indicator
18. Motion sensor stop time
19. Motion alarm settings icon
indicates batteries are low.
Do not use rechargeable batteries. It is
recommended that you use alkaline batteries with this
product for longer performance.
Batteries should be used as a back-up power
supply, for continuous projection please use the AC
adapter.
AC ADAPTER
To insert the 6V AC / DC
adapter into the clock:
CLOCK RECEPTION
GETTING STARTED
This product is designed to synchronize its calendar
clock automatically once it is brought within range of a
radio signal:
BATTERIES
Insert batteries before first use, matching the polarity (+
and -). RESET after each battery change.
RM939P:
• DCF-77 generated from Frankfurt, Germany for
Central Europe
• MSF-60 generated from Rugby, England.
To install the
clock batteries:
The radio signal range is 1500km (932 miles).
3
RM939P_M_EN_R1
3
2006.3.16, 5:25 PM
EN
RM939PA
• WWVB-60 generated from the atomic clock in Fort
Collins, Colorado.
2. Use / to change the setting.
3. Press CLOCK to confirm.
4. Repeat steps 2 and 3 to set the time zone offset, 12 /
24 hour format, hour, minute, year, day-month format,
month, day and language.
5. Press CLOCK ALARM or MOTION ALARM to exit
settings mode.
The radio signal range is 3219km (2000 miles).
For RM939P slide the UK / EU switch to the
appropriate setting for your location. RESET whenever
you change the selected setting.
For the RM939PA, the time zone options are (-8)
Pacific, (-7) Mountain, (-6) Central, and (-5) Eastern.
RECEPTION SIGNAL
Once batteries have been installed
it is searching for a signal.
STRONG
WEAK
The language options are: English (E) French (F),
German (D), Italian (I), and Spanish (S).
will flash to indicate
To change the clock display:
NO SIGNAL
Press CLOCK to toggle between: Clock with Seconds,
Clock with Day and Clock with Time Zone Offset.
To force a signal search and enable / disable the clock
radio signal reception, press / and hold for 2 seconds.
will then disappear from the display.
ALARM
Two daily alarms can be activated. The alarm sound
can be a melody, beeping tone or vibration. (Vibration
wake-up device VR101 / VR101A must be purchased
separately).
CLOCK
You only need to do this if you have disabled the clock
radio reception, or if you are too far from the radio
signal.
To manually set the clock:
1. Press and hold CLOCK for 2 seconds. The setting
will blink.
RM939P_M_EN_R1
4
4
2006.3.16, 5:25 PM
ICON
• Press SNOOZE / LIGHT to silence it for 8 minutes
OR
• Press any key except SNOOZE / LIGHT to turn the
alarm off and activate it again after 24 hours.
MEANING
Melody alarm is set. (There are 5 melodies
and 1 beep alarm to choose from)
Vibration alarm is set
If no button is pressed the alarm will automatically
silence after 2 minutes and sound again after 24 hours.
Melody and vibration alarms are set
No
icons
No alarm is set
SLEEP TIMER
There is a choice of 6 soothing sounds to play while you
fall asleep:
To set the alarm:
1.
2.
3.
4.
5.
Press and hold CLOCK ALARM for 2 seconds.
Use and to toggle between alarm 1 and 2.
Press CLOCK ALARM to select alarm 1 or 2.
Press or to change the hour setting.
Press CLOCK ALARM to confirm the hour setting
and move to the next setting.
6. The settings appear in the following order: hour,
minute, alarm type, alarm sound and alarm volume
(if melody alarm has been selected).
• Bird
• Raindrop
• Wind
• Waterfall
• River
• Ocean Wave
To turn the sleep timer ON:
1. Press SOUND / SLEEP once to activate the last
setting used.
2. Press SOUND / SLEEP to set soothing sound duration
(120, 90, 60, 30, 15 or 0 minutes).
3. Press
or
to change the soothing sound
volume.
Press CLOCK ALARM at any time to exit Alarm
setting mode.
SOUND will flash on the LCD display to indicate
that the sleep timer is activated.
To toggle alarm 1 and alarm 2 ON / OFF:
•
EN
To silence the alarm:
See the table below for alarm icons:
Press CLOCK ALARM.
5
RM939P_M_EN_R1
5
2006.3.16, 5:25 PM
EN
To change soothing sound:
RESET
1. Press and hold SOUND / SLEEP for 2 seconds while
the soothing sound is on.
2. Press or to change the soothing sound.
3. Press SOUND / SLEEP to confirm.
To return the unit to the default settings, insert a thin blunt
object into the RESET hole.
MOTION SENSOR – MSR939 / MSR939A
(OPTIONAL)
TEMPERATURE
This product can support up to two motion sensors. To
enable the motion alarm you must purchase this device
separately.
To select indoor temperature unit press °C / °F.
PROJECTOR
Please refer to the motion sensor (MSR939 /
MSR939A) user manual for further information.
Press SNOOZE / LIGHT to project the time and alarm
for 5 seconds.
To use the projector continuously, you MUST plug in the
adapter and slide the PROJECTION switch to ON.
MOTION ALARM DISPLAY
ICON
You can also:
•
•
•
MEANING
Motion sensor alarm icon
Adjust the FOCUS knob to make the image clearer.
Adjust the IMAGE ROTATION knob to rotate the
image clockwise or counter-clockwise.
Manually tilt the projection unit to position the image
or press 180° ROTATION to reverse the image and
turn it upside down.
Code icons
MOTION ALARM
To set the motion alarm:
1. Press and hold MOTION ALARM for 2 seconds.
2. Use
and
to select a code setting that matches
the CODE switch on the rear of the sensor.
3. Press MOTION ALARM to confirm.
4. Press or to select the motion sensor start time.
BACKLIGHT
Press SNOOZE / LIGHT to activate the backlight for 5
seconds.
6
RM939P_M_EN_R1
6
2006.3.16, 5:25 PM
•
Press CLOCK or CLOCK ALARM at any time to
exit Alarm setting mode.
•
To silence the motion alarm:
•
•
Press any button. It will sound again if any motion is
detected.
•
THE VIBRATING DEVICE – VR101 / VR101A
(OPTIONAL)
The vibrating wake-up device can be placed under your
pillow and will wake you up by gently vibrating. All you
need to do is activate the vibrating alarm option on the
clock and switch the vibrating device to alarm 1, alarm
2 or both.
•
•
You can purchase this device separately.
•
Please refer to the vibrating wake-up alarm
(VR101 / VR101A) user manual for further information.
•
PRECAUTIONS
•
This product is engineered to give you years of
satisfactory service if you handle it carefully. Here are a
few precautions:
Placement of this product on wood surfaces with
certain types of finishes, such as clear varnish, may
result in damage to the finish. Consult the furniture
manufacturer’s care instructions for direction as to the
types of objects that may safely be placed on the wood
surface. Oregon Scientific shall not be responsible for
any damage to wood surfaces from contact with this
product.
Do not immerse the unit in water. If you spill liquid
over it, dry it immediately with a soft, lint-free cloth.
Do not clean the unit with abrasive or corrosive
materials.
Do not subject the unit to excessive force, shock,
dust, temperature or humidity, which may result in
malfunction, shorter electronic life span, damaged
battery and distorted parts.
Do not tamper with the unit’s internal components.
Doing so will invalidate the warranty on the unit and
may cause unnecessary damage. The unit contains
no user-serviceable parts.
Only use fresh batteries as specified in the user’s
instructions. Do not mix new and old batteries.
Due to printing limitations, the displays shown in this
manual may differ from the actual display.
The contents of this manual may not be reproduced
without the permission of the manufacturer.
Do not dispose this product as unsorted municipal
waste. Collection of such waste separately for special
treatment is necessary.
7
RM939P_M_EN_R1
7
2006.3.16, 5:25 PM
EN
5. Press MOTION ALARM to confirm.
6. Repeat steps 4 and 5 to set the motion sensor stop
time, beep / melody and volume.
7. The motion alarm is automatically turned on after
setting.
EN
The technical specifications for this product and
the contents of the user manual are subject to change
without notice.
SPECIFICATIONS
TYPE
DESCRIPTION
MAIN UNIT
Hour format
12 / 24 hour format
Calendar
MM / DD or DD / MM
Language: E, F, D, I, ES
Alarm duration
Daily alarm: 2 minutes
Motion alarm: 5 minutes
Snooze
8 minutes
Power
4 x UM-3 (AA) 1.5V batteries
or 6V AC / DC adapter
LxWxH
161 x 30 x 103 mm
(6.34 x 1.18 x 4.06 inches)
Weight
268 g (0.59 lbs)
ABOUT OREGON SCIENTIFIC
Temp. unit
°C / °F
Operating range
0°C to 50°C (32°F to 122°F)
Indoor temp.
-5°C to 50°C (23°F to 122°F)
Resolution
0.1°C (0.2°F)
Clock frequency
DCF-77(EU), MSF-60(UK) or
WWVB-60 (US)
Visit our website (www.oregonscientific.com) to learn more
about Oregon Scientific products such as digital cameras;
MP3 players; children’s electronic learning products and
games; projection clocks; health and fitness gear; weather
stations; and digital and conference phones. The website
also includes contact information for our Customer Care
department in case you need to reach us, as well as
frequently asked questions and customer downloads.
Synchronization
Auto or disabled
Signal frequency
433MHz
Clock
Auto or manual (disabled)
Reception range
30 meters (98 feet)
with no obstructions
Clock display
HH:MM:SS
HH:MM:Day of Week
HH:MM:Time Zone Offset
We hope you will find all the information you need on our
website, however if you’re in the US and would like to
contact the Oregon Scientific Customer Care department
directly, please visit:
www2.oregonscientific.com/service/default.asp
OR
Call 1-800-853-8883.
For international inquiries, please visit: www2.oregonsci
entific.com/about/international.asp
8
RM939P_M_EN_R1
8
2006.3.16, 5:25 PM
to Part 15 of the FCC Rules. These limits are designed to
provide reasonable protection against harmful interference
in a residential installation.
Hereby, Oregon Scientific, declares that the Projection
Clock (RM939P) is in compliance with the essential
requirements and other relevant provisions of Directive
1999/5/EC.
This equipment generates, uses and can radiate radio
frequency energy and, if not installed and used in
accordance with the instructions, may cause harmful
interference to radio communications. However, there
is no guarantee that interference will not occur in a
particular installation. If this equipment does cause harmful
interference to radio or television reception, which can be
determined by turning the equipment off and on, the user
is encouraged to try to correct the interference by one or
more of the following measures:
A copy of the signed and dated Declaration of Conformity
is available on request via our Oregon Scientific Customer
Service.
COUNTRIES RTTE APPROVAL COMPLIED
•
•
All EU countries, Switzerland CH
and Norway
N
•
FCC STATEMENT
This device complies with Part 15 of the FCC Rules.
Operation is subject to the following two conditions: (1) This
device may not cause harmful interference, and (2) This
device must accept any interference received, including
interference that may cause undesired operation.
•
Reorient or relocate the receiving antenna.
Increase the separation between the equipment and
receiver.
Connect the equipment into an outlet on a
circuit different from that to which the receiver is
connected.
Consult the dealer or an experienced radio / TV
technician for help.
DECLARATION OF CONFORMITY
The following information is not to be used as contact for
support or sales. Please call our customer service number
(listed on our website at www.oregonscientific.com), or
on the warranty card for this product) for all inquiries
instead.
WARNING Changes or modifications not expressly
approved by the party responsible for compliance could
void the user’s authority to operate the equipment.
NOTE This equipment has been tested and found to
comply with the limits for a Class B digital device, pursuant
9
RM939P_M_EN_R1
9
2006.3.16, 5:25 PM
EN
EU- DECLARATION OF CONFORMITY
EN
We
Name:
Oregon Scientific, Inc.
Address:
19861 SW 95th Ave.,Tualatin,
Oregon 97062 USA
Telephone No.:
1-800-853-8883
declare that the product
Product No.:
RM939PA
Product Name:
Projection Clock
Manufacturer:
IDT Technology Limited
Address:
Block C, 9/F, Kaiser Estate,
Phase 1,41 Man Yue St.,
Hung Hom, Kowloon,
Hong Kong
is in conformity with Part 15 of the FCC Rules. Operation
is subject to the following two conditions: 1) This device
may not cause harmful interference. 2) This device must
accept any interference received, including interference
that may cause undesired operation.
10
RM939P_M_EN_R1
10
2006.3.16, 5:25 PM