1
Full-Motion
Flat Screen TV Mount
UP TO
User Manual
42"
55 lbs. Max
Easy to install,
mounts in minutes
Questions? Call 1-800-654-8483
M-F, 8-5pm CST
or visit www.jascoproducts.com
Model 23151
8/12 vers1
2
Thank you for purchasing this GE product! The GE Flat Panel Wall Mount
allows you to easily, quickly and securely mount your flat screen display to a
wall. Please review these instructions carefully before beginning installation.
Please verify the mounting hole locations (VESA compatibility) of your display
to ensure proper installation. For further detailed instructions, please visit our
web site at www.jascoproducts.com.
SPECIFICATIONS
• Display Size: 13–42”
• Maximum Load: 55 lbs (25 kg)
• VESA Mounting Pattern:
200 mm x 200 mm Max
• Tilt Range: +/- 13.8°
• Pan/Swivel Range: up to 180°
• Horizontal Rotation: 360°
• Profile: 3.1” to 10.8” (7.9 cm to 27.4 cm)
TOOLS REQUIRED
• Philips Screw Driver
• Pliers
• Drill & Drill Bit (1/8” (3mm) drywall;
5/16” (8mm) concrete)
• Wall Stud Locator (drywall installation)
*Tools not included
WARNINGS
1. Read these instructions carefully before
you begin. If you are unsure of any part
of the process, contact a professional
contractor or installer for assistance.
Improper installation can result in injury or
damage.
2. Use with products heavier than 25kg
(55lbs.) may result in instability and
possible injury.
3. The wall or mounting surface must be
capable of supporting the combined weight
of the mount and the display; if not, the
structure must be reinforced.
4. Safety gear and proper tools must be used.
Failure to do so can result in injury and/or
damage.
5. A minimum of two people are required for
installation. Do not attempt to install this
mount alone under any circumstances.
6. Follow all instructions and
recommendations regarding adequate
ventilation and suitable locations for
mounting your display. Consult the owner’s
manual for your particular display for more
information.
7. Seller/manufacturer is not liable for
damages or injury caused by incorrect
mounting, assembly or use.
8. This product contains small items that
could be a choking hazard if swallowed.
Keep these items away from children.
**This wall mount is for indoor
oo
installation only**
HARDWARE KIT
A - Drywall screw (x3)
B - Concrete anchor (x3)
C - M4 x 12 screw (x4)
D - M4 Locknut (x4)
E - M4 x 12 screw (x4)
F - M4 x 20 screw (x4)
G - M6 x 12 screw (x4)
H - M6 x 20 screw (x4)
I - M6 washer (x4)
J - Spacer (x4)
K - S4 Allen key (x1)
3
DRYWALL INSTALLATION
INSTRUCTIONS
CONCRETE INSTALLATION
INSTRUCTIONS
**IMPORTANT** For safety reasons, this
mount must be secured to a wood stud
capable of supporting the combined weight
of the mount and display. **DO NOT MOUNT
TO DRYWALL ALONE**
**IMPORTANT** For safety reasons, the
concrete wall must be capable of supporting
the combined weight of the mount and the
display. The seller/manufacturer takes no
responsibility for the failure caused by walls
or insufficient strength.
1. Use a high quality stud finder to locate the
stud where you wish to install your mount.
Mark both edges of the stud to help identify
the exact center.
**NOTE**: You must use the center of each
stud to avoid cracking or splitting the wood
during installation.
2. Place the wall plate against the wall and
level it using the integrated bubble level.
3. While another person holds the wall plate in
position, mark three locations for securing
the mount to the wall (See Fig. 1).
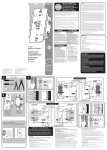
FIG. 1
4. Drill a 1/8” (3mm) pilot hole at each
marked location.
5. Place the wall plate back against the wall
and attach it using the drywall screws (A)
provided in the hardware kit (see Fig. 2)
FIG. 2
Do not overtighten these
screws.
Ensure that
the wall plate
remains level
after all screws
are secured.
**IMPORTANT** If installing the mount into
a concrete block or brick surface, never drill
into the mortar between blocks or bricks.
YOU MUST SECURE THE MOUNT TO THE
CONCRETE BLOCK OR BRICK.
1. Place the wall plate against the wall in
the desired location and level it using the
integrated bubble level.
2. While another person holds the wall plate in
place, mark three evenly spaced locations
on the wall for securing the mount
(see Fig. 3).
3. Drill an 5/16”
(8mm) hole at
FIG. 3
each marked
location.
Remove any
excess dust
from the holes.
4. Insert a concrete
anchor (B) into each
hole so that it is
flush with the concrete
surface (see fig. 4).
A hammer can be
used to lightly
tap the anchors
FIG. 4
into place if
necessary.
4
**Note** If the concrete wall is covered by
a layer of plaster or drywall, the concrete
anchor mush pass completely through the
layer to sit flush with the concrete surface.
FIG. 2
5. Place the wall plate back
against the wall and
attach it using the
drywall screws (A)
provided in the hardware
kit (See Fig. 2). Do not
over-tighten these bolts
and do not release the
wall plate until all bolts
are in place. Ensure that the wall plate
remains level after all bolts are secured.
ATTACHING THE MOUNT TO
THE DISPLAY
**IMPORTANT** Use extra care during this
part of the installation. If possible, avoid
placing your display facedown as it may
damage the viewing surface.
**NOTE** This mount comes with a selection
of different screw diameters and lengths
to accommodate a wide variety of display/
monitor/television models. Not all of the
hardware in the kit will be used. If you
cannot find the appropriate screw size in the
kit provided, consult the manufacturer of
your display for more information.
1. Examine the mounting holes on the back of
your display:
A. If the mounting holes are spaced 75mm x
75mm or 100mm x 100mm apart, skip
this section and proceed with Step 2.
B. If the mounting holes are spaced 100mm
x 200mm or 200mm x 200mm apart, you
will need to use the adaptor plates
included with your mount. Attach these to
the mount according to the illustration
(see Fig. 5). Use the M4 x 12 screws (C), and
M4 Locking Nuts (D) from the hardware kit.
FIG. 5
Countersunk
Holes
**Note** You must attach the adaptor
plates using the four countersunk holes
located on the adaptor plates.
2. Determine the correct length of screw to
use by examining the back of your display.
A. If the back of your display is flat and the
mounting holes are flush with the
surface, you will use the shorter screws
from the hardware kit.
B. If the back of your display is curved,
has a protrusion, or if the mounting
holes are recessed, you will need to use
the longer screws and the spacers
provided in the hardware kit.
3. Determine the correct diameter of screw to
use by carefully trying one of each size (M4
and M6) from the hardware kit.
**Note** Do not force any of the screws – if
you feel resistance stop immediately and try
a smaller diameter screw.
4. Attach the mount to the back of your
display using the screws identified in Steps
2 and 3. If you are using the longer screws
on a display with a curved or recessed
back, you may also need to use the spacers
(J) provided in the hardware kit. Only use a
spacer if necessary.
5
FINAL ASSEMBLY
1. To complete the installation, carefully slide
the mount with your display attached into
the wall plate (See Fig. 6). Do not release
the display until the mount is securely
placed in the wall plate. If you need to
remove the mount from the wall, carefully
slide the mount upwards and out of the
wall plate.
OPERATION AND
ADJUSTMENT
1. To adjust the tilt angle or rotate your
screen, firmly grasp the sides of you display
and carefully move it into position. If you
find the mount is too difficult to move or is
too loose to hold your display in position,
adjust the three screws located directly
behind the head of the mount using the S4
Allen Key provided in the hardware kit (See
Fig. 8). Adjust all three screws evenly.
FIG. 6
FIG. 8
2. Tighten the set screw located on the upper
front portion of the wall plate using the S4
Allen Key (K) provided in the hardware kit
(See Fig. 7). Remember to remove the set
screw before attempting to remove the
mount from the wall plate.
**IMPORTANT**
The set screw should
be used at all times to
prevent the mount from
being accidentally lifted
FIG. 7
from the wall.
3. Cables can be routed
through the hook
located at the bottom
of the wall plate to keep
them organized and
out of the way.
2. Swivel adjustments can be made simply by
moving your display to the desired position.
If any of the swivel joints are too tight or
too loose, they can be adjusted using the
S4 Allen Key provided in the hardware kit
(See Fig. 9).
FIG. 9
3. Periodically clean your mount with a dry
cloth. Inspect all screws and hardware
at regular intervals to ensure that no
connections have become loose over time.
Re-tighten as needed.
6
ONE-YEAR LIMITED
WARRANTY
Jasco Products Company warrants this
product to be free from manufacturing
defects for a period of one year from
the original date of consumer purchase.
This warranty is limited to the repair or
replacement of this product only and does
not extend to consequential or incidental
damage to other products that may be
used with this unit. This warranty is in lieu
of all other warranties express or implied.
Some states do not allow limitations on how
long an implied warranty lasts or permit
the exclusion or limitation of incidental
or consequential damages, so the above
limitations may not apply to you. This
warranty gives you specific rights, and you
may also have other rights which vary from
state to state. If unit appears to be defective
within the warranty period, please contact
out technical support team for assistance
(‘Technical Support’ section in the manual).
TECHNICAL SUPPORT:
For additional assistance:
Online: www.jascoproducts.com/support
Email: [email protected]
Our in-house call center is open M-F, 8-5pm
central (except holidays and special events).
For product information, troubleshooting and
warranty calls:
800-654-8483, option 1
For consumer/business sales:
800-654-8483, option 2
Mailing Address:
Jasco Products Company, Attn: CIC,
10 E Memorial Rd, Bldg B,
Oklahoma City, OK 73114
Please contact technical support (using one
of the above options) before attempting to
ship product returns or warranty requests.
Failure to do so may delay processing times
considerably.
is a trademark of General Electric Company
and is under license by Jasco Products Company LLC,
10 E. Memorial Road, Oklahoma City, OK 73114
www.jascoproducts.com
7