1
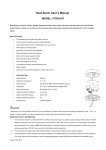
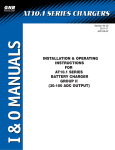
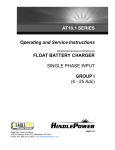
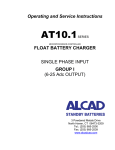
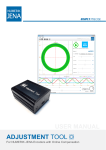
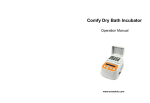
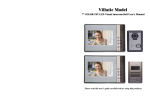
version 1.7
LightDome 575
LightDome 1200
Table of contents
1. Introduction...................................................................................................................... 3
2. Safety instructions.......................................................................................................... 3
3. Operating determinations............................................................................................... 3
4.The LightDome - description........................................................................................... 4
5. Installing and operating.................................................................................................. 4
5.1 AC power.................................................................................................................... 4
5.2 Placing the LightDome on a plain surface................................................................... 4
5.3 Truss mounting........................................................................................................... 5
5.4 Inflating the LightDome .............................................................................................. 6
5.5 Deflating the LightDome . ........................................................................................... 6
6.Cleaning and maintenance.............................................................................................. 7
7.Technical Specifications................................................................................................. 8
1. Introduction
Thank you for having chosen a LightDome.You acquired a versatile,light weight and inflatable trasparent housing
for protection of moving head against weather influances in temporary outdoor applications.
The LightDome 575 was designed to be operated with moving heads of ROBE 575/250 AT series.
The LightDome 1200 was designed to be operated with moving heads of ROBE 1200/700 AT series .
FOR YOUR OWN SAFETY, PLEASE READ THIS USER MANUAL CAREFULLY
BEFORE YOU INITIAL START - UP!
2. Safety instructions
Every person involved with installation and maintenance of this product has to:
- be qualified
- follow the instructions of the manual
CAUTION!
Use only the luminaire enables remote on/off the lamp.
This product has left our premises in absolutely perfect condition. In order to maintain this condition and to
ensure a safe operation, it is absolutely necessary for the user to follow the safety instructions and warning
notes written in this manual.
Important:
The manufacturer will not accept liability for any resulting damages caused by the non-observance of this
manual or any unauthorized modification to the product.
Always ground the unit electrically.
The electric connection, repairs and servicing must be carried out by a qualified employee.
Do not cover the transparent envelope.
Do not block the air vents.
Do not sit or lean on the unit.
Do not use this device in very dusty area.
Do not operate this unit in big winds.
Use a source of AC power that complies with local building and electrical rules.AC power has to have both
overload and short circuit protection
3. Operating determinations
This product was designed for protection of moving heads against weather influences in temporary outdoor
applications.
Avoid brute force when installing or operating the unit.
When choosing the installation-spot, please make sure that the unit is not exposed to extreme heat or dust.
Only operate the unit after having checked that the housing is firmly closed and all screws are tightly fastened.
The maximum ambient temperature 30° C must never be exceeded.
Operate the unit only after having familiarized with its functions. Do not permit operation by persons not qualified for operating the unit. Most damages are the result of unprofessional operation!
Please use the original packaging if the product is to be transported.
Please consider that unauthorized modifications on the unit are forbidden due to safety reasons.
Store the fold plastic dome at least 1 hour at room temperature before first installing it on the base.
Before first operation of the LightDome connect it to the mains (without plastic dome) for 5 hours to
recharge inbuilt accumulator.
To ensure long lifetime of the accumulator, the LightDome has to be in operation once in 6 months (
at minimum) for 5 hours.
Never store the LightDome with exhausted accumulator (after back-up operation). Let it recharge!
4.The LightDome - description
4
5
Top side of the base
8
1
7
11
6
Bottom side of the base
9
2
3
10
1 - Plastic dome
2 - Base
3 - Handles
4 - Mounting plate
5 - Air vent
6 - Seal belt and strip of Velcro fastener
7 - Safety loops
8 - Power outlet for fixture
9 - Fan grid
10 - Power cable
11 - Omega holders
5. Installing and operating
5.1 AC power
Power supply.
The LightDome is equipped with an auto-ranging power supply for AC 180-250V or 90-125V at 47-63Hz.
Power connection.
The LightDome is supplied with a 2.5-meter length of 3-conductor electrical cable for connection to the AC
power.Installl a 3-prong grounding-type plug on the electrical cable. The earth has to be connected!
If you have any doubts about proper installation, consult a qualified electrician.
Cord plug connections:
Cable (EU)
Cable (US)
Pin
International
Brown
Black
Live L
Light blue
White
Neutral
N
Yellow/Green
Green
Earth
5.2 Placing the LightDome on a plain surface
1.Set fixture´s parameters (DMX address,operating mode,e.t.c. and activate function "Lamp Off via DMX").
2.Place the LightDome on a plain surface that will support more than weight of the LightDome and the fixture.
If the surface is above floor height, thread the safety cable (11) through the safety loop on the bottom side of
the base and fasten to the surface.
3.Thread the safety cable (2) through the two apertures in the fixture base and through the safety loop on the
top side of the LightDome base.
4.Fasten the mounting plate (1) on the bottom side of the fixture base using four quick-lock fasteners (3).
4
1
3
3
2
4
5.Put the fixture with the fixed mounting plate on the base of the LightDome in the right position and fasten it
using four quick-lock fasteners (4).
6.Set the power switch of the fixture to the ON position,fixture power is disabled until the LightDome is fully
inflated.Connect the fixture power cord (5) to the outlet of the LightDome base.
7.Lead the data cables (6) through an air vent and connect them to the fixture.
5
7
6
8.Choicely unfold the new plastic dome before fitting on the base.Bend down the seal belt (7) around the base
and fasten the plastic dome over the base by means of the Velcro fastener.
9.Bend the rubber belt (7) back to cover the Velcro fastener.
5.3 Truss mounting
If you mounting the LighDome on a truss or another type of support,verify that the truss or support will handle
the combined weight of LightDome and its fixture.
1.Set fixture´s parameters (DMX address,operating mode,e.t.c. and activate function "Lamp Off via DMX").
2.Bolt clamps (10) to the two omega holders (9) with M12 bolts and lock nuts.
3.Attach the omega holders to the base of the LightDome using the quick-lock fasteners (8)
10
9
8
4.Mount the LightDome with clamps on a truss system
5.Thread the safety cable (11) through the safety loop on the bottom side of the base and fasten to the truss.
6.Fasten the fixture holder (1) on the bottom side of the fixture base using four quick-lock fasteners (3).Thread
the safety cable (2) through the two apertures in the fixture base.
7.Place the fixture with the fixed holder on the base of the LightDome in the right position and fasten it using
four quick-lock fasteners (4).Thread the safety cabel (2) hrough the safety loop on the top side of the LightDome base.
8.Set the power switch of the fixture to the ON position,fixture power is disabled until the LightDome is fully
inf.lated.Connect the fixture power cord (5) to the outlet of the LightDome base.
9.Lead the data cables (6) through an air vent and connect them to the fixture.
10.Choicely unfold the new plastic dome before fitting on the base.Bend down the seal belt (7) around the base
and fasten the plastic dome over the base by means of the Velcro fastener.
11.Bend the rubber belt (7) back to cover the Velcro fastener.
11
7
6
5
Water-protection during upside-down operation
For upside-down mounting is necessary to install the rain-protective cover (12) on the base of the LightDome.Place
this cover over the inflow and outflow aperture and fix it with the 7 screws (13).
13
12
13
5.4 Inflating the LightDome
Apply power to the LightDome and the one automatically inf.lates when power is applied.Power to the fixture
is switched on when the LightDome is fully inflated .
Pressure-activated switch automatically switches off power to the luminaire in the event of deflation.
5.5 Deflating the LightDome
1.Switch OFF the lamp by sending a lamp-off command from the DMX controller.
2.Allow the fixture to cool for at least 10 minutes before disconnecting the LightDome power!
If the fixture lamp is on (at least 9 minutes) and power cut occurs ,the back-UPS (accumulator) will hold the
dome inf.lated 8 minutes. It is a partial protection against falling-down the plastic dome on the hot fixture.
Note:
There is one way how to interrupt the running back-up process before than the back-up period elapsing - to
take the plastic dome off.
To ensure the correct back-up of the LightDome fan,you have to keep the follow rules:
1.Do not change the fixture if the LightDome is connected to the mains.
2.Switch off the fixture lamp at least 5 minutes before disconnecting the LightDome from the mains.
3.If the LightDome is inflated,switch on the lamp for at least 2 minutes.
4.Only use fixtures which have difference betwen power consumption with lamp on and off at least 30%.
If you do not keep the rules, the operating life of the accumulator will be reducing.The accumulator needs 5
operating hours for recharge after one 8 minutes back-up.The totally exhausted accumulator needs 15 operating hours for full recharge.
Note:If the LightDome is operated at 90-125 voltage range and the accumulator is exhausted, an inflation of
dome may start a minute after connecting power.
6.Cleaning and maintenance
A soft lint-free damp cloth and soapy water is recommended for cleaning the plastic dome, under no circumstances should solvents be used.
Maintenance and service operations (including replacing the load fuse) of the LightDome´s base have to be
carried out by authorized distributors or skilled persons.
Replacing the load fuse
Before replacing the load fuse ( which protects installed moving head),1)unplug mains lead!
1) Uncover the top cover of the base by unscrewing the 8 fastening screws (the operation should execute 2 workers,the
first is holding top cover and the second is changing the load fuse).
2) Unscrew the fuseholder in the base by a flat-tip screwdriver (anticlockwise).
3) Remove the old fuse from the fuseholder.
4) Install the new fuse in the fuseholder.Only replace the fuse by a fuse of the same type and rating.
6. Replace the fuseholder in the housing and screw it fully clockwise.
6.Place the top cover back and screw it up.
Load fuse
Changing the accumulator
If you need to change the accumulator,proceed in the following way:
1) Unplug mains lead(remove both the plastic dome and the fixture if it is installed)
2) Uncover the top cover of the base by unscrewing the 8 fastening screws (the operation should execute 2 workers,the
first is holding top cover and the second is changing the accumulator).
3) Disconect the red wire from the positive terminal of the accumulator (red marked) and insulate this positive terminal (e.g. by using insulating tape).
4) Disconect the blue wire from the negative terminal of the accumulator (black marked), and insulate this terminal.
5) Unscrew the "U" holder which holds the accumulator and remove accumulator from the base.
6) Insulate the terminals of the new accumulator - use only the lead accumulator of the type: CT5-12L.
7) Put the accumulator to the base and tighten the "U" holder with the 2 screws to the base.
8) Strip off the negative terminal of the accumulator and connect it with the blue wire.
9) Strip off the positive terminal of the accumulator and connect it with the red wire.
10) Place the top cover back and screw it up.
Note: The scrapped accumulator falls into hazardous wastes and on this account the treating with it has to be
according to the relevant national directives.
Location of the accumulator in the LightDome´s base:
accumulator
"U" holder
7.Technical Specifications
Power supply:
90-125V/47-63Hz or 180-250V/47-63 Hz
Power consumption:
125 VA
Fuse for load:
16 A
Dimensions and weight:
LightDome 575 Base diameter 630 mm
Base height
130 mm
Dome height 1290 mm
Total height
1380 mm
Total weight
17.5 kg
20 kg
LightDome 1200
800 mm
130 mm
1690 mm
1796 mm
LightDome 1200
L=1796 mm
D=800 mm
300
180
D
261
130
331
L
LightDome 575
L=1380 mm
D=630 mm
Construction:
Base: 3 mm aluminium
Base finish: black
Dome: transparent non-flammable PVC-P film,thickness 0.2 mm
Protection factor:IP 43 (with PVC dome)
IP 20 (without PVC dome)
Type of accumulator: CT5-12L
Environmental:
Maximum ambient temperature:30°C
Maximum wind speed:17m/s
Accessories:
Mounting bracket Omega CL assembled (No. 99010420).....2 pieces
LightDome 575:
Mounting plate (No. 99011434).............1 piece (for moving heads of 250 AT and 575 ATseries]
Plastic dome (No.10980025)..................1 piece
Rain-protective cover for LightDome 575 (No.99011437).......1piece
LightDome 1200:
Mounting plate (No. 99011387).............1 piece (for moving heads of 700/1200 AT series]
Plastic dome (No.10980024).................1 piece
Rain-protective cover for LightDome 1200 (No.99011436).....1piece
Specifications are subject to change without notice.
July 1, 2009