1
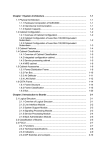
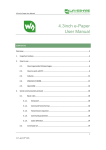
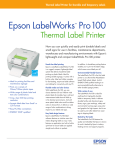
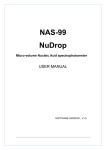
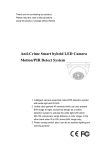
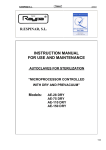
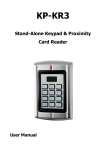
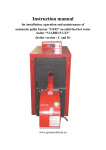
Comfy Dry Bath Incubator Operation Manual www.avansbio.com PACKING LIST PREFACE Thanks for choosing Comfy Dry Bath Incubator. This operation manual describes functions of the instrument. To ensure that you could operate the instrument in a correct way, please read the manual carefully before using it. OUT OF BOX AUDIT At the first time of opening the packing, please check the instrument and appendix with the packing list. If anything does not match with the packing list, please contact with the supplier. serial description type quantity 1 Instrument CDBI-24 2 Power Adapter DC24V/120W 3 Operation Manual 1 piece 4 Warranty Card 1 piece 12 1 set 1 piece Appendix 1 CONTENTS Wiring Diagram of Comfy Dry Bath Incubator 1. Introduction……………………………………….......................1 100-240V~ 1.1 Instrument Content……………………………………………..1 1.2 Structure.………………………………………………………..2 1.3 Installation..……………………………………………………..3 Power Adapter 2. Specification………………………………………………….......4 24V 120W 3. Safety Warning……..………………………............................5 Power Switch 4. Operation Guide………………………………………………....6 4.1 Key Function……….…………………………………………..6 4.2 Programming..…………………….........................………….6 4.3 Time Unit Changing…………………………………………….6 J4 J7 4.4 Program Start and Stop……………………………..……......7 Sensor J5 Controller J3 Heater 4.5 Temperature Calibration……………………………………...8 5. Maintenance……………………………………………………10 J1 J2 6. Failure Analysis and Trouble Shooting….............................10 Appendix 1 Wiring Diagram of Comfy Dry Bath……………….………11 Packing List………………………………………………………..12 Display Panel Key Board 11 5 Maintenance 1 Introduction Comfy Dry Bath Incubator is best designed instrument which is microprocessor-controlled. It is widespread used for samples of the preservation and reaction, DNA amplification, foreseeability of electrophoresis and so on. Please do read this operation manual carefully before using the instrument. Please make periodic cleaning for wells in block and the surface of the instrument with alcohol mull. Power off before cleaning the instrument. It is forbidden to decant cleaning fluid into the well of block. 6 Failure Analysis and Trouble Shooting 1.1 Instrument Content Comfy Dry Bath Incubator 1 set Power Adapter 1 piece Operation Manual 1 piece Certificate of Quality 1piece 1 Phenomenon Possible Causes Processing Procedure No Signals on the display when power on No power Broken switch Broken Controller Check the power Exchange the switch Contact with the seller “open1” or “open2” in the temperature display with the alarm of beep “open1”: block temperature sensor is broken “open2”: lid temperature sensor is broken Contact with the seller “short1” or “short2” in the temperature display with the alarm of beep “short1”: block sensor is broken “short2”: lid sensor is broken Contact with the seller “err1” or “err2” in the temperature display with the alarm of beep “err1”: block sensor is broken “err2”: lid sensor is broken Contact with the seller Press invalid Broken film switch Contact with the seller 10 4.5.3 Press “” and “” simultaneously under no operating status. The program turns to the right interface. The program auto controls temp. to 40C, the sign“” flickers ceaselessly. When it achieves 40C, cursor arises under decimal, “Adj” and “” flicker ceaselessly together. 4.5.4 After 20 minutes, the temperature value of thermometer is 38.8C, press “”or “” to amend the display value to 38.8. Press “Start” to confirm. Program saves the value and temperature rises to 100C automatically. The sign “” flickers ceaselessly. 1.2 Structure 40.0 Adj Block “” 38.8 Adj Display Panel Press “start” 4.5.5 When temperature achieves 100C, cursor arises under decimal, “Adj” and “” flicker ceaselessly together. Keyboard 100.0 Adj “” 4.5.6 After 20 minutes, the temperature value of thermometer is 99.0C, press “”or “” to amend the display value to 99.0. Press “Start” to confirm. 99.0 Adj Press “start” 4.5.7 Program turns to interface for operating as the right chart. Power Connector P1 94.5 ℃ XX After temperature calibration, the temperature display is the same as the practical temperature of block. Power Switch NOTICE: To ensure temperature accuracy, keep the temperature 20 minutes when it achieves adjusted temperature. During temperature calibration, press “” and “” simultaneously to cancel the calibration. The system keeps the former calibration. Do not press “” and “” simultaneously unless necessary. 9 2 4.5 Temperature Calibration If there is deviation between the actual temperature and the display temperature due to some reasons, you can do as follows to calibrate it. 1.3 Installation 1.3.1 Put the instrument on the working table steady. 1.3.2 Connect power and instrument through the power adapter. Power voltage should during 100-240V~ Notice: The instrument uses two temperature adjustments to ensure its accuracy. It is linearly adjusted on 40C, and 100C. The temperature precision will be within ± 0.5C after the double temperature adjustments. Both the environmental and the block temperature should be lower than 35C when calibration. The temperature of the instrument has been adjusted well in the factory. Please do seriously consider before you use this function. 100-240V~ DC 24V Adjustment Methods: 4.5.1 Start up the instrument, it enters waiting interface. 1.3.3 Turn on the power switch on the right side. The incubator runs the program to the set temperature automatically. 1.3.4 When it achieves the set temperature, put the tubes into the 4.5.2 Inject olefin oil into one of the cone-shaped wells. Put a thermometer into this well (the precision of the thermometer should be 0.1. The temperature ball should be absolutely immerged into the cone-shaped well). Heat insulation material is needed on the block to separate it from the circumstance. Refer to Figure A Thermometer block, close the thermo lid. Adiabatic Board Tube Olefin Oil Block Well 3 Figure A 8 2 Specification 4.4 Program Start and Stop 4.4.1 Press “PROG.”, nine preset programs P1,P2,P3,P4,P5,P6,P7,P8, P9 could be selected. 4.4.2 When power on, the temperature rises to set temperature of segment 1 automatically. It displays “Going…” when heating; it displays “OK” when it achieves the set temperature. P2 35.5 C Going… P2 37.0 C OK 4.4.3 Press “START” to run the segment 1. “ ” which indicates segment 1 flickers. When segment 1 finishes, the program starts segment 2. “ “ which indicates segment 2 flickers, and it begins to count down. P2 37.0 020min P2 45.0 020min 4.4.4 Buzzer alarm when it counts to 0 at segment 2. “PROGRAM END” displays on LCD. The incubator keeps the temperature of segment 2. PROGRAM END Press any key to return P2 43.3 Going…. Model Comfy Dry Bath Incubator Power Input DC24V Maximum Power 120 W Temperature Range -10 ℃ - 100 ℃ Timing Range 1min - 999min or 1sec - 999 sec Temp. Control Accuracy ≤± 0.5℃ Display Accuracy 0.1℃ Heating Time (from 20 ℃ to 100 ℃) ≤15min Ambient Temperature 5℃ ~ 35℃ Dimension(W× D× H) 110mm× 156mm× 100mm Net Weight 1.4Kg Press any key to return to the operating interface. It turns to the set temperature of the current segment. When it achieves, “OK” is displayed on LCD. Press “START” to run the program again. 4.4.5 Press “START/STOP” continuously for 1 second, program stops, timing ends. 7 4 4. Operation Guide 3 Safety Warning 4.1 Key Function The incubator is a normal and an indoor using instrument. START/STOP----Start or stop the operation program PROG.-------------Select operation program Read operation manual carefully before operation. Only the expert of wiring equipment can operate this instrument. ----------------Set Temperature or Timing value ----------------Enter value set or move cursor The operator should not open or repair the instrument by himself. Otherwise, the instrument will lose the qualification of repair guarantee or cause accidents. The company will repair the instrument based on warranty description. The instrument should be put in the place where of low temperature, little dust, no water, no sunshine or hard light, a nd of good aeration, no corrosively gas or strong disturbing magnetic field, and far away from central heating, camp stove and other hot resource. Do not put the instrument in wet and dusty place. Main switch is on the rear of the device. Push “I” to power on the device, and push “O” to power off the device. Power input interface is on the rear of the instrument. Power voltage input is DC24V. Input is anode, outer ring is cathode. Power off when operation finished. If long period do not use the instrument, pull off the connector plug, cover a cloth on the instrument to prevent from dust. 5 4.2 Programming Press “PROG.”, select option program, e.g. P2. Press “” to enter temp setting. Press “” to move cursor. Press “” or “” to set timing. Two segments could be set in each program. “ ” indicates temp. or timing of segment 1. “ ” indicates temp. or timing of segment 2. P2 37.0 003min Temp. and Timing of Segment 1 P2 45.0 006min Temp. and Timing of Segment 2 4.3 Time Unit Changing Press “ " 2 seconds under timing setting, timing unit alternatively changes between min and sec. Timer unit : min Press to select min or sec. Press “ 6 Timer unit : sec ” to confirm.