1
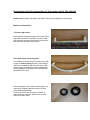
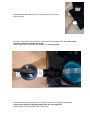
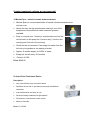
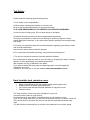
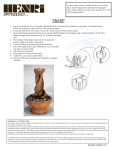
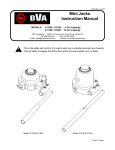
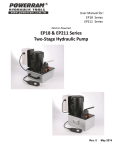
GAS HEATED
HOT TUB INSTRUCTIONS
Introduction
Firstly, thank you for selecting a CEDAR WOOD TUBS LTD hot tub.
Your tub will provide many years of soaking and we are sure it will be immensely
enjoyed for years to come.
Please feel free to contact us anytime for any back-up and support.
Any comments, feedback and photos we welcome thank you.
Warranty Information
The tub has a limited warranty for five years against defects in material and
workmanship.
This warranty excludes damage caused by errors in assembly, normal wear and tear
and any modifications made to the tub.
Pump and gas heater has a limited warranty of 2 years.
Cedar Wood Tubs Ltd
53d Porana Rd
Wairau Valley
North Shore City 0627
[email protected]
Section 1: Site preparation and location
Before assembling your tub, prepare a suitable spot for it.
Work out the best position for the burner, location of pump (if you have this option),
steps for entry/exit and best position for drain hose underneath the tub.
Hot tubs will weigh from 1 to 2.5 tonnes depending on size of tub when full of water
so a stable, level and solid foundation is essential.
Concrete pad
A concrete pad forms an excellent base for your tub.
Make the size of the pad so that the sides are about as long as the
diameter of the tub.
Example: for a tub 1.65m in diameter, pour a 1.7m x 1.7m pad.
If your tub comes with a pump and filter, allow a small area around 1m x
1m for this.
Gravel pad
A gravel pad can be a simple and easy foundation for a tub.
If the ground on the site is compact and has stable ground underneath,
then a layer of scoria stones or crushed rock on top can be used to
establish a level foundation for your tub.
However if the soil is unstable or soft underneath, a gravel pad will
settle unevenly under the weight of the tub and is not a good choice.
If you choose a gravel pad, make it slightly larger than the diameter of
the tub.
The thickness can vary depending on how much gravel is needed to level the site.
Paving blocks
Another alternative is to use paving blocks as a foundation.
Blocks can be set into the ground to make a solid foundation for the tub.
This method involves building a small wooden frame or cribbing to
support your tub.
Place some sand and level out with pavers on top.
Wooden deck pad
Another option is to install the tub on a wooden deck pad.
Be sure that your deck is able to support the weight of a full tub which
can be 1 to 2.5 tonnes depending on tub size.
If surrounded by a deck, the deck can hide the any plumbing for the
pump.
Use screws and not nails when building your deck just in case you need
to gain access to your hot tub at a later date.
If placing your tub on top of your deck, the beauty of the tub can be better
appreciated.
Tightening the compression bands
The bands have been fully tightened before leaving the workshop but may need retightening if the tub has been left unfilled with water for a period of time.
Follow this procedure to tighten the bands:
1/ If you have some lubricant/grease, apply on the threaded rods between the nuts
(clamps) before tightening.
2/ Re-tighten each band a little starting with one of the bottom clamp then working
your way around the tub.
3/ If wanting to change the position of the clamps, the best way is to screw 4 screws
evenly around the tub underneath each band which holds them in position. Loosen
off the 2 clamps on each band a little then slide the band around to your desired
position. Re-tighten the band a little so that it doesn’t fall down, remove the screws
then move the band slightly down to cover the holes left by the screws.
You may want to re-oil around the bands.
Don’t fully tighten one clamp then move on. Tighten a little then move onto the next
clamp working your way around the tub several times.
4/ Now do a final tightening but don’t over do it. Your can tighten to a point where it
becomes difficult.
Gas heater
Raypack (Rheem) Spartan 24kW Gas Heater
•
Australian made
•
Easy to use digital display pad
•
Choice of either natural gas or LPG
•
Super fast and efficient heating times
Please refer to the user manual and instructions that are included with the gas heater
Instructions for the connection of the pump unit to the hot tub
Please note; all pipe and fittings have NOT been glued together so need gluing.
Method of installation:
1/ Suction pipe work:
Glue together all parts and pipe like in the photo.
Important to make sure that the 2 open ended
pipes (facing upward in the photo) are glued so
that they line up at the same angle.
2/ Flexible hose connecting jets:
The flexible hose has been purposely cut a little
longer so before gluing this part, push fittings
and hose all together and trim the hose to the
correct length to enable the open ended pipes
(facing upward in the photo) to fit correctly into
the back of the 2 jets.
3/ Screw tightly in the 2 Mac-union fittings onto
each of the exposed pipes coming out of the
pump and cartridge filter.
There may be an option to have a 50mm or
40mm size-you want the 40mm size so take
away the 50mm piece.
4/ Glue into the Mac-unions the 2, 70mm long PVC connector
pieces of pipe
5/ Glue a 2 way valve into the 70mm connector PVC pipe piece with the arrow of the
water flow pointing towards the pump.
Water flows from the skimmer and suction cup into the pump.
6/ Glue the other 2-way valve into the 70mm connector PVC pipe piece with the
arrow of the water flow pointing away from the cartridge filter.
Water flows from the cartridge filter to the 2 jets.
6/ Photo on right shows the valve in the
open position which allows water through.
7/ Photo on right shows the valve in the
closed position which shuts off the water
supply.
Pump instructions
Included:
Pump: New Zealand made energy efficient and quiet 1hp electric pump.
Filter: New Zealand made 50sqft cartridge filter with pressure gauge.
Also included:
•
•
•
•
•
•
2 x therapeutic massage jets
Top PVC suction skimmer and bottom PVC suction drain
Flexible hose between jets and PVC pipe between suction fittings. Also
PVC fittings connecting jets and suction fittings
24hr time clock
2-way and 3-way shut off valves
2 yr warranty (return to base) on pump, filter and heater unit
NOT included:
•
Because every site is different, no pipe-work connecting pump unit to
hot tub is included. You will need a pool serviceman or plumber to
plumb everything up or do it yourself if your able to
The pump unit has been tested and run with water (date of test written on
base).
The pump unit should be protected from the weather.
Fill the hot tub so that the water line is in between the top and bottom
‘grooves’ on the top suction skimmer fitting on the tub wall.
The jets can be directionally adjusted by unscrewing the jet a little then repositioning the ‘eyeball’ of the jet to your desired direction then re-screwing up
again.
Pump:
•
•
•
A pool serviceman or plumber is required to connect the hot tub to the
pump unit. Standard PVC 40mm pressure pipe is used
Ideally, it’s best to run the pump for 4 hours a day. Set the pump timer
to run for 2 hours in the morning then for 2 hours just before use later
on in the day.
The pump costs approx. 20 cents an hour to ru
Cartridge filter:
•
•
•
•
•
•
•
Always check the pressure gauge on top of the cartridge filter and
when the needle is close to or is within the red range, it’s time to clean
the cartridge
Initially with a new cedar tub, the cartridge will require more frequent
cleaning
Close off the 2 shut-off valves then unscrew the top of the filter undoing
the side latch to fully unscrew. Then lift off the head of the filter. It may
be quite difficult to lift off so some silicon spray may be required to
make it easier for the next time
The cartridge can be cleaned with a cartridge cleaning solution (or
napisan) and soaked for a few hours
A second cartridge can be bought from us which enables continued
use of your hot tub by rotating the cartridges during cleaning
A cleaning wand attachment can be bought through us or your local
pool shop which attaches to your garden hose to clean the cartridge
It’s important to regularly check you cartridge for clean, clear water and
efficient operation of the water heater
Cedar sawdust method
•
•
•
All cedar wood tubs initially leak but slowly swell up and generally seal
up over time with possibly just a few small drips here and there
Hot water greatly helps with the swelling process
If your finding your hot tub is still leaking after a couple weeks or if you
just want to seal up first (kit-set delivered tubs), try the sawdust method
below.
Method:
1. Shut off the 2 valves
2. Sprinkle in the whole bag of cedar sawdust in
3. Start to fill the tub up stirring occasionally
4. Normally it’s only necessary to fill as high as the seat level
5. Leave for a couple of days stirring the water occasionally
6. Empty the water, wash away the sawdust, hose down then refill
7. It’s important to regularly clean the cartridge in the filter when running
after the sawdust treatment (watch the pressure gauge and clean when
the needle hits the red zone)
2 water treatment options we recommend:
1/ Mineral Spa – natural volcanic water treatment
•
Mineral Spa is a concentrated bottle of natural minerals extracted from
volcanic rock
•
Allows for easy hot tub maintenance making it one of the
simplest and most effective water treatment systems
available
•
Easy to use-just pour 1 bottle (or required amount) into the
hot tub and run the pump for 4 hours a day, 2 hours in the
morning and 2 hours in the evening
•
Gentle on the environment. Can empty the water from the
tub onto your garden so no wasting of water
•
Approx. 8 months supply for 1900L of water
•
Empty the hot tub every 6-8 months
•
Product of USA
Price: $295.00
2/ Auto-Chlor Chlorinator Device
Description:
•
Very cost effective way to treat the water
•
Sanitizes the hot tub or spa without the need of additional
chemicals
•
Low maintenance and easy to use
•
Small and easily installed into tight spaces
•
Powered by a transformer power supply
•
Made in Australia
Price: $1,150.00
Filling your hot tub for the first time
You are now ready to fill your tub with water for the first time.
A new tub is like a new wooden boat.
It will leak until the wood swells and the tub becomes tight.
Be prepared for a few leaks-this is perfectly normal for the tub to leak like a sieve
initially so don’t be alarmed!
The leaks will slow and stop as the wood swells.
Be sure that the area around the tub drains well.
Begin filling the tub.
Don’t try to tighten the compression bands or hit the staves with the mallet
when the tub is full of water.
Warm water accelerates the swelling of wood.
If the tub is holding water well then you can heat up the tub.
The swelling process continues for at least a few weeks.
It is normal for a wood tub to drip a small amount of water.
Included with your tub is a bag of fine cedar sawdust.
Try to wait for at least 1 week before using the ‘sawdust method’.
If there is a certain area where water is dripping out fast, grab a hand-full of sawdust
in your hand and add a small amount of water to make a peanut butter like paste
then rub up and down along the groove on the inside of the tub.
If the tub is leaking generally all around, then sprinkle 2-3 cups in over the entire
area.
As the water is added, the sawdust will naturally be drawn to places where the water
is seeping out and accelerate the swelling and sealing of the tub.
The sawdust is harmless and the excess will be flushed out the first time you drain
and rinse the tub.
Refill the tub.
Important: if your tub comes with a pump and filter unit, remove the filter from the
filter cartridge during this procedure, otherwise it will clog up.
The natural oils and tannins in cedar (especially red cedar) will cause the water to
turn tea-coloured when the tub is new.
This is normal and harmless.
The sweet aroma of cedar is due to these oils.
You may want to change the water frequently at first to help clarify the water.
This effect will diminish with time, possibly after 5-10 refills.
Tub Safety
Please note the following general safety points:
1. Tub safety is your responsibility.
2. Never allow unsupervised children to use your tub.
Be sure that a responsible adult is in control at all times.
IT IS YOUR RESPONSIBILITY TO PREVENT ACCIDENTAL DROWNING.
3. Hot tubs are for sitting only. Do not allow diving or horseplay.
4. Children should use the tub at lower temperatures than adults.
Consult your physician for advice on hot tubbing for children, pregnant women,
people with heart conditions, or you have other specific questions concerning health
and safety.
5. Consult your physician about his recommendations regarding your ability to soak
and at what temperature.
Never soak in water warmer than 42 degrees.
6. To avoid risk of accidental drowning, never allow hot tubbing alone.
7. Do not use excessive amounts of alcohol while hot tubbing.
8. It is important to keep the water in your tub clean by changing the water, cleaning
the tub, or using disinfecting and sanitizing chemicals.
Skin irritation is a sign of bacteria in the water.
If you need to add a filter and water conditioning system, we can supply the
equipment you need.
Contact us for more info or visit our website www.cedarwoodtubs.co.nz.
Hard lockable heat retention cover
•
•
•
•
Made in New Zealand with the highest quality marine grade vinyl
Supplied with 6 tie downs and keyed locks
Our covers meet the New Zealand standard for spa pool covers
Charcoal colour
The vinyl and foam cover is the main insulation for your tub.
It should provide years of good service.
Avoid punctures or tears which could allow water to get inside the cover.
If you live in a high wind area, you will need to secure the cover so it doesn’t blow off.
This can be done by screwing into the hot tub wall the attached hold-down strap
clips.
You will find the screws and key to lock the cover attached to one of the straps.
Tub maintenance
Your tub should last for many years and require little maintenance.
Here are a few recommendations:
1. Keep the tub filled whenever possible.
2. Remember that a wooden tub is a dynamic object and the wood will swell and
shrink with exposure to water or lack of it.
3. Like a wooden boat, it will seep water at first, then swell shut.
NEVER tighten the bands when the tub is full of water!
Freezing: Never let the tub freeze solid when full of water!!!!
Since water expands when frozen, this will put enormous strain on the bottom, sides,
hardware and heating system.
If you are going to be away during freezing weather, or you want to shut your tub
down when away for long periods, follow these steps:
1. Drain the tub leaving about 3 inches in the bottom.
This amount of water will not cause freeze damage and will keep the floor seam tight.
2. Drain all parts of the heating system.
This includes pump, filter, heater and pipes.
3. If practical, disconnect and store the pump in a warm dry place.
Preserving the beauty of cedar: You can prolong the beautiful colour of the tub by
treating the outside only with natural teak oil, a product that is available from
Bunnings or Mitre 10 for example.
Apply when the tub is dry with a brush or roller and allow to soak in.
Do this annually to maintain the beauty of the cedar.
Take care not to get any inside the tub.
If your tub develops a significant leak. Follow these steps in order:
If the first one doesn’t work go on to the
second and so on.
1. If your tub develops a leak (not just a drip) that it didn’t have before, something has
changed. Do some investigation to discover the cause.
The most common causes are the tub drying out after being empty for a period of
time, or the support for the tub has settled causing the tub to have an uneven base.
2. If the tub has dried out from being left empty, check the compression bands for
tightness.
If the wood has dried enough to show signs of shrinkage, it is a good idea to take up
the slack with the tightening bolts.
3. Check the floor of the tub with a level and inspect the foundation and chine joists
under the tub. If the foundation is uneven, the tub will need to be drained and moved,
and the foundation problem fixed.
4. Wood sawdust is one of the simplest and most effective ways to stop leaks.
This is a technique borrowed from wooden boat builders.
The wood dust will find its way into the leak because of the water movement, and
help to stop the leak.