1
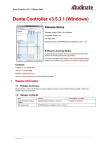
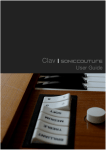
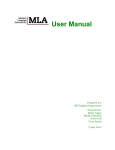
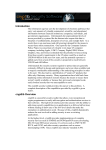
Krypcak
Password Tool
USER MANUAL
version 1.0
“passwords are the worst form of authentication, except for all the others ”
Peter Gutmann in “Security Engineering”, paraphrasing Winston Churchill
Zerosum Security
www.zerosumsecurity.nl
Page 1 of 18
Contents
1 Overview
1.1 Design goals
1.2 Document history
1.3 References
2 Getting started
3 Main window
4 Notebook
4.1 Load
4.2 New
4.3 Change password
4.4 Export
4.5 Managing passwords in notebook
4.5.1 Copy
4.5.2 Edit
4.5.3 Delete
4.5.4 Add
4.5.5 Share
5 Generate password
6 Krypt
6.1 Files
6.1.1 Encrypt
6.1.2 Decrypt
6.2 Messages
6.2.1 Encrypt
6.2.2 Decrypt
3
3
3
3
4
5
6
6
6
7
7
7
8
8
8
8
9
9
11
11
11
12
13
13
15
Page 2 of 18
1 Overview
Krypcak is a Windows application that can be used to protect files and messages, plus generate and
manage your passwords. This document describes how to use the Krypcak tool.
1.1
Design goals
Krypcak was designed with the following goals in mind:
1. Easy to use. The user interface should be such that it is easy to use for anyone. The user
should not have to worry about any technical configuration, such as the choice for
cryptographic algorithms;
2. Auditable. The source code for Krypcak should be freely available for anyone to see and
audit;
3. Well documented. The Krypcak application should be well documented – both describing the
general working as well as describing the cryptographic working;
4. Windows platform first. Krypcak will be targeted for the Windows platform first, since there
are way too few auditable cryptographic software tools for this platform;
5. Stand-alone application. Krypcak should be able to run with minimal dependency or
requirements for already installed third-party libraries or components.
6. State-of-the-art cryptography. Krypcak should provide cryptographic primitives which are as
strong as possible (authenticated encryption with associated data, forwards-secure pseuorandom generator, no padding, memory- and cpu-expensive password hashing etc.).
7. Promote sponge functions. From a user perspective an irrelevant design goal. All
cryptography in Krypcak is done by Keccak – the best-known example of a cryptographic
primitive called a sponge function. Sponge functions are very very cool and adopting sponge
functions make multiple cryptographic constructions more elegant.
1.2
Document history
Version
Date
Comments
1.0
2013-12-26
Initial release
1.3
References
[RFC2289]
N. Haller et. al. - A One-Time Password Sysytem. Dated February 1998.
[ZS13a]
Zerosum Security – Krypcak Source code. Available at
https://github.com/zerosumsecurity/Krypcak-for-windows
[ZS13b]
Zerosum Security – Krypcak Password Tool / Cryptographic Specification. Available
at www.zerosumsecurity.nl/krypcak.
[ZS13c]
Zerosum Security – Krypcak Password Tool / File Format Specification. Available
at www.zerosumsecurity.nl/krypcak.
Page 3 of 18
2 Getting started
Krypcak uses dedicated Notebooks to store passwords. Notebooks are simple password-encrypted
files. Hence with a single password you have access to all passwords securely stored in a notebook.
2.1
Installation
Krypcak requires no installation. You can just run the .exe file and everything should work. For
example, you could run the Krypcak executable from a removable USB token.
2.2
Integrity checking
The Krypcak executable is signed with our own local code signing key. You can verify this by
checking the “Properties → Digital Signatures” tab. Selecting the (single) signature in the signature
list and clicking "Details" followed by "View certificate" should show the same thumbprint as below.
We have deliberately chosen not to use an Authenticode keypair signed by a trusted CA for two
reasons:
Page 4 of 18
1. We believe the Authenticode code signing PKI is just as flawed as the global SSL PKI. There
are too many CA's to be trusted out there;
2. Too many trusted codesigning or (intermediate) CA's keys have been compromised in the
past to fully trust the automated Authenticode codesigning signatures.
In light of this we decided not to sponsor this flawed system with our money but instead still offer
you the possibility to manually verify the integrity of the Krypcak application.
2.3
Launching Krypcak
When starting up the Krypcak application, Krypcak will try to locate the last used notebook. If it can
not find it (for example when no notebook has been created yet), you will be shown the main
window of Krypcak with the header stating “No notebook loaded” (see Illustration 1).
Illustration 1: Starting Krypcak without loading a notebook
When Krypcak is able to locate the last used notebook, you will be shown the dialog as presented in
Illustration 2.
From this dialog you have three options:
1. Enter the password protecting the last used notebook and hit “Enter” to load the last used
notebook;
2. Click on “Skip” and staring using Krypcak without having a notebook loaded;
3. Click on “Load other notebook” to choose another notebook to load. You will be asked to
select a notebook and provide the password protecting it.
Page 5 of 18
The “Show password” box controls whether the password in this window is displayed or masked.
The default setting is that they are masked. When manually entering long complex passwords it
might be helpful to display the password on screen (providing of course no on can read he
password from over your shoulder).
Illustration 2: Starting Krypcak by loading a notebook
Page 6 of 18
3 Main window
Illustration 3: Main window of Krypcak
The main window (see Illustration 3) is divided in two parts (separated by the name of the loaded
notebook – or “No notebook loaded” in case no notebook is loaded):
1. At the top the menu is shown with the following sub-menu's:
1. Notebook. Allows you to manage your notebook (see §4.1 - §4.4);
2. Password. Use this to quickly generate a password (see §5);
3. Krypt. Allows you to encrypt/decrypt files (see §6.1) or messages (see §6.2).
4. About. Just general information on the version of the application.
2. The lower (and major) part of the window displays the content (stored in so called password
notes) of the currently loaded notebook. This content is divided in the following sections
(each section has its own tab):
1. Files. This section contains passwords used to encrypt and/or decrypt files;
2. Messages. This section contains passwords used to encrypt and/or decrypt messages;
3. Shared. This section contains passwords that have been marked as being shared with
others;
4. Accounts. This section contains passwords for accounts (on e.g. websites or local
domains).
Page 7 of 18
How to manage the individual passwords in your notebook is described in §4.5.
4 Notebook
As said before, your notebook is where all your passwords are stored.
4.1
Load
To load an(other) existing notebook, go to the “Notebook” menu item and select “Load”.
If you have a notebook loaded, you will be warned that the current notebook will be unloaded.
After this you will be asked to select a notebook and provide the password protecting the notebook.
If the correct password was provided, and the notebook was not damaged, the notebook will be
loaded into the Krypcak application. The notebook is ready to be used and/or managed.
4.2
New
To create a new notebook, go to the “Notebook” menu item and select “New”.
You will be asked to provide a filename for the new notebook. After this, you will be asked to provide
the password to protect the notebook (see Illustration 4).
Illustration 4: Enter password for new notebook
Note: You have the option to let Krypcak generate the password for you via the button “Generate”. In
case you do this, we advise you to use the passphrase option (as explained in §5), since this will
generate easy-to-remember passwords.
4.3
Change password
To change the password of your notebook, go to the “Notebook” menu item and select “Change
password”.
Note: This option is only available if the notebook of which you want to change the password is
loaded.
Page 8 of 18
You will first have to re-enter the current password.
After this you can choose and enter the new password.
Note: You have the option to let Krypcak generate the password for you via the button “Generate”. In
case you do this, we advise you to use the passphrase option (as explained in §5), since this will
generate easy-to-remember passwords.
4.4
Export
You can export the content of your loaded notebook into a comma separated file. Do do this, go to
the “Notebook” menu item and select “Export”.
Note: This option is only available if the notebook of which you want export the passwords is
loaded.
You will be asked to select a filename for the text file in which the password notes will be stored.
The password notes will be stored on a line per note, with the different entries separated by colons.
4.5
Managing passwords in notebook
You can manage the content of your loaded notebook by clicking the right mouse button when the
mouse is over the content of the notebook. A pop-up menu (see Illustration 5) will appear, allowing
you to copy, edit, delete, add or share a password note.
Illustration 5: Pop- up menu for managing passwords
These options are described in the following sections.
4.5.1 Copy
When you have selected a (single) item from the list of passwords shown in the window, the pop-up
menu will show the option to copy the password to the clipboard.
Note: this will only copy the password and not the context data (such as the corresponding date and
domain information). The password will be available for 10 seconds at the clipboard – after this the
clipboard will automatically be erased.
Page 9 of 18
4.5.2 Edit
When you have selected a (single) item from the list of passwords shown in the window, the pop-up
menu will show the option to edit the password note. This will allow you to alter any field of the
password note.
4.5.3 Delete
When you have selected a (single) item from the list of passwords shown in the window, the pop-up
menu will show the option to delete the password note. This will allow you to remove the password
note from the notebook.
Note: this action can not be undone. You will be warned about this.
4.5.4 Add
Via the pop-up menu you can add a new password-note. You will be asked to fill in all the details of
the password. Which details need to be filled in depends on current the selected section of
passwords in your notebook.
Illustration 6: Manually add a password for the "Files" section
Note: there are other ways to get passwords in your notebook. When encrypting or decrypting files
or messages, you have the option to save the password in your notebook. When you have a
notebook loaded, storing the password s the default option.
4.5.5 Share
When you have selected a (single) item from the list of passwords shown in the window, the pop-up
menu will show the option to mark the password note as being a shared password. You will be
asked to provide the name of the person you are sharing this password with, after which a new
entry in he “Shared” section will be generated.
Note: Krypcak does not distribute or share the password. It only stores the password marking it as a
shared password.
Page 10 of 18
5 Generate password
One of the main functionalities of Krypcak is the generation of tunable secure passwords. This can
be done in three different ways:
1. Directly from the main menu under “Passwords” → “Generate”. This will allow you to
generate a password without storing it in your notebook.
2. If you want to generate a password and store them in your notebook (provided you loaded it)
in one of the four sections (“Files”, “Messages”, “Shared” or “Accounts”), then go the
corresponding tab. Then, right-click to display the context menu and select the option “Add”
(as described in §4.5.4);
3. When encrypting a file or a message, you will be asked to enter the password to protect the
file or message. By pressing the “Generate” button a password will be generated. By
checking the “custom” box before pressing “Generate”, you will be able to tune the kind of
password that will be generated (as described in §6.1.1 and §6.2.1).
When generating a password with Krypcak in any of the three ways described above, you will be
shown the window as shown in Illustration 7.
Illustration 7: Generate a password
Page 11 of 18
There are two types of passwords you can have Krypcak generate:
1. Passwords. Check the upper left radio button for this option. With the four check boxes on
the right you can control which types of characters are to be used (numbers, lower case,
upper case and specials), and whether the presence of these character sets is optional or
mandatory (with the “may” and “should” radio button). Also the length of the desired
password can be entered. This length should be no larger than 2551 and in line with the
requirements of the different character sets.
2. Passphrases. Check the lower left radio button for this option. A passphrase consists of a
number of words, where the number of words can be set by you. Krypcak holds a set of
words (containing 2048 words) for each supported language. Currently three wordlists are
available:
1. Dutch (consisting of 2048 common words);
2. English (consisting of 2048 common words);
3. English (the set of words from Appendix D of [RFC2289]).
Tip: when generating passwords that you do not have to remember yourself (e.g. those that are
stored in your notebook) you may just as well generate a long hard-to-remember password. With 16
characters, the default setting for generating passwords for file or message encryption with
Krypcak falls in this category.
When generating passwords you do have to remember (e.g. the password with which you protect
your Krypcak notebook) you may want to generate a passphrase, as famously argued by the
following xkcd cartoon:
1
No, you do not require a longer password. Ever.
Page 12 of 18
Illustration 8: xkcd on password strength
(image source: http://xkcd.com/936/)
6 Krypt
Krypcak can be used to protect files and messages with passwords, while also taking care of the
management of the passwords involved.
6.1
Files
Krypcak offers the possibility to encrypt and decrypt files. This encryption takes place under control
of a password. See [ZS13b] and [ZS13c] for more technical and cryptographic details.
6.1.1 Encrypt
To encrypt a file, go the “Krypt → Encrypt file” menu item. You will be asked to select a file for
encryption and provide a filename for the resulting encrypted file. The encrypted file will get the .kef
file extension. The default filename for the encrypted file is the original filename followed by the .kef
extension.
After this you will be asked to enter the password used to encrypt the file with (see Illustration 9).
Page 13 of 18
Illustration 9: Enter password for encryption
Here you have three options:
1. You can choose a password yourself, and enter this twice – both in the “Password” field and
the “Confirm” field;
2. You can choose to use a password from your notebook by clicking on the ”Load” button.
This can be especially helpful if you have shared a password with someone else and use this
password whenever you exchange encrypted files;
3. You can choose to let Krypcak generate a password for you by clicking “Generate”. By
default Krypcak will generate a random 16-character password containing lower case, upper
case and numerical characters. If you would like a different type of password, check the
“Custom” box before clicking on “Generate”. This will allow you to finetune the password
generation as described in §5.
Note there are two check boxes at the bottom of this window:
1. The “Show password” box controls whether the password(s) in this window are displayed or
masked. The default setting is that they are masked. When manually entering long complex
passwords it might be helpful to display the password on screen (providing of course no on
can read he password from over your shoulder);
2. The ”Store password in loaded notebook” box controls whether the password will be stored.
If a notebook is loaded, this box is ticked by default. If no notebook is loaded, this box can
not be checked.
6.1.2 Decrypt
To decrypt a file, go the “Krypt → Decrypt file” menu item. You will be asked to select a file for
decryption. Note a file that can be decrypted with Krypcak will have the .kef extension.
After a file has been selected, you will be asked to provide the password for file decryption.
Page 14 of 18
Illustration 10: Enter password for decryption
Here you have two options:
1. You can enter the password manually;
2. You can choose to use a password from your notebook by clicking on the ”Load” button.
This can be especially helpful if you have shared the password with someone else.
Note there are two check boxes at the bottom of this window. The functionality of these boxes is
described in §6.1.1.
Note: when the file you want to decrypt was encrypted by yourself, and at the time of encryption the
password was stored in your notebook, Krypcak is able to recognize this and automatically retrieve
the correct password from your notebook. In this case, you will not be asked to provide the
password, but decryption starts automagically.
After you have provided a password, Krypcak will ask you to provide a filename for the decrypted
file.
After this, decryption will start.
6.2
Messages
Krypcak can also be used to encrypt (and decrypt) messages. Cryptographically, Krypcak encrypts
messages in the same way as it encrypts files (see [ZS13b] and [ZS13c]). The difference is that
Krypcak offers an easy copy/paste interface for messages, and encodes encrypted messages in
printable characters tot facilitate easy incorporation in e.g. email messages.
6.2.1 Encrypt
To encrypt a message, go the “Krypt → Encrypt message” menu item. You will be shown the
following window:
Page 15 of 18
Illustration 11: Window for message encryption
In the upper field you can enter the text you want to encrypt.
Tip: to enter a newline, press CTRL + ENTER simultaneously.
Alternatively, you can copy-and-paste text from a text editor into the upper field.
When you have entered the text you want to encrypt, click “Encrypt”. You will be asked to provide a
password for encryption, exactly as described in §6.1.1.
After this, encryption will start and the encrypted text will appear in the lower field. This text can
then be copied to e.g. your mail client. This copying can be done by clicking on “Copy to clipboard”.
Note: when sending an encrypted message to someone else, we advise to include the “BEGIN
KRYPCAK ENCRYPTED MESSAGE” header and “END KRYPCAK ENCRYPTED MESSAGE” footer.
This because it will make it clear for the recipient what to do (i.e. decrypt with Krypcak). However,
for correct decryption this header and footer are not needed and they may be removed. At a bare
minimum, the text staring with “KRYPT>” up until the last text before the footer is required (and
sufficient) to allow decryption.
Page 16 of 18
Illustration 12: Encrypted message
6.2.2 Decrypt
To decrypt a message, go the “Krypt → Decrypt message” menu item. You will be shown a window
similar to that of Illustration 11.
In the upper field you can enter the text you want to decrypt. For example, you can copy-and-paste
the encrypted message from he body of the email message that contained it.
When you have entered the text you want to decrypt, click “Decrypt”. You will be asked to provide a
password for encryption, exactly as described in §6.1.2.
After this, decryption will start and the decrypted text will appear in the lower field. This text can
then be copied to e.g. a text editor. This copying can be done by clicking on “Copy to clipboard”.
Note: the decrypted text will only be available for 10 seconds on the clipboard. After this time, the
clipboard will be erased.
Page 17 of 18
Illustration 13: Decrypted message
Page 18 of 18