1
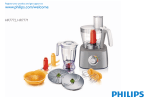
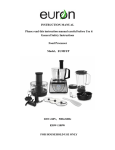
HR7772,HR7771
HR7771
1
HR7772
2
3
HR7772
4
5
8
9
P
0
HR7771
1
Q
A
6
7
R
B
0
1
2
S
H
10
11
12
HR7772
13
T
N
U
C
0
1
2
3
HR7771
O
I
D
HR7772
15
HR7771
0
20
21
HR7772
18
19
HR7772
L
HR7771
0
1
2
HR7771
3
0
1
1
2
2
3
M
1
3
K
0
17
2
W
X
F
G
16
V
J
E
14
English
Introduction
Congratulations on your purchase and welcome to Philips! To fully benefit
from the support that Philips offers, register your product at www.philips.
com/welcome.
General description (Fig. 1)
A Fine slicing/shredding disc, yellow (one side shredding/one side slicing)
(HR7771 only)
B Emulsifying disc (HR7771 only)
C Kneading accessory
D Blade unit
E Protective cover
F Motor unit
G Speed selector
H Inner pusher
I Lid of food processor bowl
J Tool holder
K Bowl
L Safety lock
M Pulse button
N Outer pusher
O Feeding tube
P Fine slicing/shredding disc, green (one side shredding/one side
slicing) (HR7772 only)
Q Balloon beater (HR7772 only)
R Citrus press cone (HR7772 only)
S Citrus press sieve (HR7772 only)
T Stopper
U Lid of blender jar
V Jar
W Rubber ring
X Blade unit
Important
Read this user manual carefully before you use the appliance and save it
for future reference.
General
-
-
-
Danger
Never immerse the motor unit in water or any other liquid, nor rinse
it under the tap. Use only a moist cloth to clean the motor unit.
Warning
Check if the voltage indicated on the appliance corresponds to the
local mains voltage before you connect the appliance.
Never connect this appliance to a timer switch in order to avoid a
hazardous situation.
Do not use the appliance if the plug, the mains cord or other parts
are damaged.
If the mains cord is damaged, you must have it replaced by Philips, a
service centre authorised by Philips or similarly qualified persons in
order to avoid a hazard.
This appliance is not intended for use by persons (including children)
with reduced physical, sensory or mental capabilities, or lack of
experience and knowledge, unless they have been given supervision
or instruction concerning use of the appliance by a person
responsible for their safety.
Children should be supervised to ensure that they do not play with
the appliance.
Never let the appliance run unattended.
If food sticks to the wall of the blender jar or bowl, switch off the
appliance and unplug it. Then use a spatula to remove the food from
the wall.
Never use your fingers or an object (e.g. a spatula) to push
ingredients down the feeding tube while the appliance is running.
Only use the pusher for this purpose.
Be very careful when you handle the slicing/shredding disc, blender
blade unit or food processor blade unit. Be especially careful when
you remove them from the bowl or blender jar, when you empty the
English
bowl or jar and when you clean them. Their cutting edges are very
sharp.
-
Caution
Never switch off the appliance by turning the blender jar, the bowl or
their lids. Always switch off the appliance by turning the speed
selector to 0.
Switch off the appliance before you detach any accessory.
Unplug the appliance immediately after use.
Always unplug the appliance before you reach into the blender jar
with your fingers or an object (e.g. a spatula).
Wait until moving parts stop running before you remove the lid of
the bowl or jar.
Never use any accessories or parts from other manufacturers or that
Philips does not specifically recommend. If you use such accessories
or parts, your guarantee becomes invalid.
Do not exceed the maximum level indication on the jar and the bowl.
Consult the table in this user manual for the correct quantities and
processing times.
Certain ingredients may cause discolourations on the surface of the
parts. This does not have a negative effect on the parts. The
discolourations usually disappear after some time.
Never fill the blender jar or food processor bowl with ingredients
hotter than 80ºC.
This appliance is intended for household use only.
Noise level: Lc= 87.5 dB [A]
Electromagnetic fields (EMF)
This Philips appliance complies with all standards regarding
electromagnetic fields (EMF). If handled properly and according to the
instructions in this user manual, the appliance is safe to use based on
scientific evidence available today.
Safety lock
Built-in safety lock
This feature ensures that you can only switch on the appliance if you
have assembled the blender jar or the bowl correctly on the motor unit
and the lid correctly on the blender jar or bowl. If the blender jar or bowl
and its lid are assembled correctly (see chapter ‘Using the appliance’), the
built-in safety lock will be unlocked.
Before first use
Thoroughly clean the parts that come into contact with food before you
use the appliance for the first time (see chapter ‘Cleaning’).
Using the appliance
General
-
The appliance is equipped with a built-in safety lock that prevents it
from functioning if the blender or food processor is not assembled
properly.
Food processor
1 Put the bowl on the motor unit (1) and turn it clockwise to fix it
(2) (Fig. 2).
Note:The bowl is assembled correctly when the handle is directly above the
closed lock symbol.
2 Put the tool holder with the desired accessory in the bowl (blade
unit, kneading accessory, emulsifying disc, balloon beater, citrus
press or slicing/shredding disc). See the appropriate section below.
3 When you use the blade unit, the kneading accessory or the
balloon beater, put the ingredients to be processed in the bowl.
Note: Do not fill the bowl beyond the MAX indication.
4 Put the lid on the bowl (1). Turn the lid clockwise (2) to fix it
(‘click’) (Fig. 3).
Note: Make sure the projection on the lid locks into the slot of the bowl
handle
5 When you use the disc, add the ingredients through the feeding
tube and push them down with the pusher.
English
6 Select the speed setting that corresponds with the colour of the
accessory in the bowl. See the appropriate section below.
8 When you have finished processing, turn the speed selector to 0
and unplug the appliance (Fig. 4).
7 When you have finished processing, turn the speed selector to
0 (Fig. 4).
-
-
Feeding tube and pusher
Use the feeding tube to add liquid and/or solid ingredients. (Fig. 5)
Use the outer pusher to push solid ingredients down the feeding
tube. (Fig. 6)
If the ingredients you are going to shred or slice have a small
diameter, put the outer pusher in the feeding tube to make the
feeding tube smaller. Then use the inner pusher to push the
ingredients down the feeding tube. (Fig. 7)
Tip:You can also use the inner and outer pusher to close the feeding tube.
This prevents ingredients from escaping through the feeding tube.
Blade unit
You can use the blade unit to chop, mix, blend or puree ingredients.
1 Remove the protective cover from the blade (Fig. 8).
The cutting edges are very sharp. Do not touch them.
2 Put the tool holder in the bowl. (Fig. 9)
3 Put the blade unit on the tool holder in the bowl (Fig. 10).
4 Put the ingredients in the bowl. Pre-cut large pieces of food into
pieces of approx. 3 x 3 x 3cm (Fig. 11).
Note: Always put the tool holder with the blade unit in the bowl before you
add the ingredients. 5 Put the lid on the bowl (1). Turn the lid clockwise (2) to fix it
(‘click’) (Fig. 12).
6 Put the pusher in the feeding tube.
7 Select the speed that corresponds with the colour of the
accessory (Fig. 13).
-
Tips
When you chop onions, press the pulse button a few times to
prevent the onions from becoming too finely chopped (Fig. 14).
Do not let the appliance run too long when you chop (hard) cheese
or chocolate. Otherwise these ingredients become too hot, start to
melt and turn lumpy.
Do not use the blade unit to chop very hard ingredients like coffee
beans, turmeric, nutmeg and ice cubes, as this may cause the blade to
get blunt.
The standard processing time for all chopping jobs is 30-60 seconds.
If food sticks to the blade or to the wall of the bowl, switch off the
appliance and unplug it. Then use a spatula to remove the food from
the blade or from the wall of the bowl.
Kneading accessory
You can use the kneading accessory to knead yeast dough for bread and
pizzas.
The standard processing time for all kneading jobs is 30-180 seconds.
1 Put the tool holder in the bowl (Fig. 9).
2 Put the kneading accessory on the tool holder. (Fig. 15)
Note: Always put the tool holder with the kneading accessory in the bowl
before you add the ingredients. 3 Put the ingredients in the bowl (Fig. 16).
4 Put the lid on the bowl (1). Turn the lid clockwise (2) to fix it
(‘click) (Fig. 17).
5 Put the pusher in the feeding tube.
6 Select the speed that corresponds with the colour of the
accessory (Fig. 18).
7 When you have finished processing, turn the speed selector to 0
and unplug the appliance (Fig. 4).
English
Slicing/shredding disc
Never process hard ingredients like ice cubes with the disc.
The cutting edges of the disc are very sharp. Do not touch them.
Emulsifying disc (HR7771 only)
You can use the emulsifying disc to whip cream and to whisk eggs, egg
whites, instant pudding, mayonnaise and sponge cake mixtures.
1 Put the tool holder in the bowl (Fig. 9).
1 Put the tool holder in the bowl (Fig. 9).
2 Place the emulsifying disc on the tool holder (Fig. 23).
2 Place the disc on the tool holder with the slicing or shredding side
facing up, depending on the result you want (Fig. 19).
3 Put the ingredients in the bowl. (Fig. 24)
3 Put the lid on the bowl (1). Turn the lid clockwise (2) to fix it
(‘click’) (Fig. 20).
4 Put the ingredients in the feeding tube. (Fig. 21)
- Pre-cut large ingredients into chunks that fit in the feeding tube.
- Fill the feeding tube evenly for the best results.
- When you have to process a large amount of ingredients,
process small batches and empty the bowl between batches.
- If the ingredients you are going to shred or slice have a small
diameter, put the outer pusher in the feeding tube to make the
feeding tube smaller. Then use the inner pusher to push the
ingredients down the feeding tube.
5 Select the speed that corresponds with the colour of the
accessory (Fig. 22).
6 Press the pusher lightly onto the ingredients in the feeding tube.
7 When you have finished processing, turn the speed selector to 0
and unplug the appliance (Fig. 4).
-
Tips
When you shred or granulate soft ingredients, use a low speed to
prevent the ingredients from turning into puree.
Do not let the appliance run too long when you shred (hard) cheese.
If you do, the cheese becomes too hot, starts to melt and turns
lumpy.
Do not use the disc to process chocolate. Only use the blade unit for
this purpose.
4 Put the lid on the bowl (1). Turn the lid clockwise (2) to fix it
(‘click’) (Fig. 25).
Put the pusher in the feeding tube.
5 Select the speed that corresponds with the colour of the
accessory (Fig. 26).
6 When you have finished processing, turn the speed selector to 0
and unplug the appliance (Fig. 27).
-
Tips
Do not use the emulsifying disc to prepare cake mixtures with butter
or margarine or to knead dough. Use the kneading accessory for
these jobs.
Make sure the bowl and the emulsifying disc are dry and free from
grease when you whisk egg whites. Make sure the egg whites are at
room temperature.
Balloon beater (HR7772 only)
You can use the balloon beater to whip cream and to whisk eggs, egg
whites, instant pudding, mayonnaise, sponge cake mixture and other soft
ingredients.
1 Put the tool holder in the bowl (Fig. 9).
2 Put the balloon beater on the tool holder in the bowl (Fig. 28).
3 Put the ingredients in the bowl (Fig. 29).
4 Put the lid on the bowl (1). Turn the lid clockwise (2) to fix it
(‘click’) (Fig. 30).
10
English
Put the pusher in the feeding tube.
5 Select the speed that corresponds with the colour of the
accessory (Fig. 31).
6 When you have finished processing, turn the speed selector to 0
and unplug the appliance (Fig. 32).
7 Always clean the balloon beater after use.
See chapter cleaning for instructions on how to take the balloon beater
apart and how to clean it.
-
Tips
Do not use the balloon beater to prepare cake mixtures with butter
or margarine or to knead dough. Use the kneading accessory for
these jobs.
Make sure the bowl and the balloon beater are dry and free from
grease when you whisk egg whites. Make sure the egg whites are at
room temperature.
Blender
The blender is intended for:
- Blending fluids, e.g. dairy products, sauces, fruit juices, soups, mixed
drinks, shakes.
- Mixing soft ingredients, e.g. pancake batter or mayonnaise.
- Pureeing cooked ingredients, e.g. for making baby food.
To avoid spillage, never fill the jar above the maximum level indication,
particularly not when you blend hot liquids.
5 Place the lid on the blender jar (1) and turn it clockwise to fix it
(2) (Fig. 37).
6 Select the speed that corresponds with the colour of the
accessory (Fig. 38).
Never open the lid when the blade rotates.
Never put your hand or any object in the jar while the blender is
running.
Always let the appliance cool down to room temperature after you
have processed two batches.
7 When you have finished processing, turn the speed selector to 0
and unplug the appliance (Fig. 4).
-
1 Place the rubber ring on the blade unit (Fig. 33).
-
2 Place the blade unit in the bottom of the blender jar (1) and screw
the blade unit clockwise (2) (Fig. 34).
-
3 Place the blender jar on the motor unit (1) and turn it clockwise to
fix it (2). The handle has to point to one of the four corners of the
motor unit (Fig. 35).
-
Do not exert too much pressure on the handle of the blender jar.
4 Put the ingredients in the blender jar (Fig. 36).
Never fill the blender jar with ingredients hotter than 80ºC.
-
Tips
While the appliance is running, you can put liquid or solid ingredients
in the blender jar through the opening in the lid (Fig. 39).
The longer you let the appliance run, the finer the blending result will
be.
Pre-cut solid ingredients into smaller pieces before you put them in
the blender jar. If you want to prepare a large quantity, process small
batches of ingredients instead of a large quantity at once.
To crush ice cubes, put the cubes in the jar, close the lid and use the
pulse function.
Some ingredients, e.g. fruits, are easier to blend if you add some liquid
e.g. lemon juice.
When you blend soup, use cooked ingredients.
If you are not satisfied with the results, let the appliance run briefly a
number of times by pressing the pulse button. You can also try to get
a better result by stirring the ingredients with a spatula (not while the
blender is running), or by pouring out some of the contents in order
to process a smaller amount.
When you process a liquid that is hot or tends to foam (e.g. milk), do
not put more than 1 litre in the blender jar to avoid spillage.
English 11
-
If food sticks to the wall of the blender jar, switch off the appliance
and unplug it. Then use a spatula to remove the food from the wall.
Citrus press (HR7772 only)
You can use the citrus press to squeeze fresh fruit juices. Pulp, pips and
skins are removed from the juice.
1 Put the tool holder in the bowl (Fig. 9).
-
Make sure that the cutting edges of the blades and the slicing/
shredding disc do not come into contact with hard objects. This could
cause them to become blunt.
You can pull the beaters out of the balloon beater to clean them
separately.
Quick-cleaning the blender jar
2 Put the citrus press on the tool holder in the bowl (Fig. 40).
1 Pour lukewarm water (not more than 0.5 litres) and some washingup liquid into the blender jar (Fig. 36).
Note: Make sure the projection on the sieve locks into the slot of the bowl
handle. 2 Place the lid on the blender jar (1) and turn it clockwise to fix it
(2) (Fig. 37).
3 Select the speed that corresponds with the colour of the
accessory (Fig. 31).
3 Select the speed setting that corresponds with the colour of the
accessory (Fig. 38).
4 Press the citrus fruit onto the cone (Fig. 41).
4 Let the appliance run until the blender jar is clean or for 30
seconds.
Note: Stop pressing from time to time to remove the pulp from the sieve.
Note:When you want to remove pulp from the sieve turn the speed selector
to 0 to switch off the appliance.
5 When you have finished processing, turn the speed selector to 0
and unplug the appliance (Fig. 32).
Cleaning
1 Make sure the appliance is switched off and unplugged.
2 Clean the motor unit with a moist cloth.
Never immerse the motor unit in water nor rinse it under the tap.
3 Clean the parts that have come into contact with food in hot water
with some washing-up liquid immediately after use.
Clean the blade unit of the food processor, the slicing/shredding disc,
the blade unit of the blender very carefully. The cutting edges are very
sharp.
Note: All parts, except the motor unit, can also be cleaned in the dishwasher.
5 Detach the blender jar and rinse it with clean water.
Balloon beater (HR7772)
Always clean the balloon beater immediately after use.
The balloon beater can be cleaned in the dishwasher. You can also pull the
beaters out of the balloon beater to clean them separately.
1 Pull the beaters out of the balloon beater housing. (Fig. 42)
2 To reassemble, push the beaters back into the balloon beater
housing.
Citrus press
Always clean the citrus press immediately after use.
The citrus press can be cleaned in the dishwasher. You can also pull the
cone from the sieve to clean them separately.
1 Pull the cone from the sieve (Fig. 43).
2 To reassemble, push the cone back on the sieve of the citrus press.
12
English
Storage
1 Push the cord into the cord storage compartment on the back of
the motor unit. (Fig. 44)
Environment
-
Do not throw away the appliance with the normal household waste
at the end of its life, but hand it in at an official collection point for
recycling. By doing this, you help to preserve the
environment (Fig. 45).
Problem
Solution
When I select a
speed or press the
pulse button,
appliance does not
start to operate. Make sure the food processor or blender jar and
its lid are assembled correctly (‘click’).Make sure
that the tool holder has been inserted properly if
you are using any accessory with the food
processor bowl. If you use the blender jar, make
sure that the handle of the blender points to one
of the four corners of the motor unit. Keep the lid
fixed to avoid spillage. If you use the food
processor, make sure that the bowl handle is
directly above the closed lock symbol. The bowl
lid is correctly assembled when the projection is
locked into the slot of the bowl handle. If all parts
are assembled correctly, the appliance starts to
operate when you select a speed with the speed
selector or press the pulse button.
Guarantee & service
If you need service or information or if you have a problem, please visit
the Philips website at www.philips.com or contact the Philips Consumer
Care Centre in your country (you find its phone number in the
worldwide guarantee leaflet). If there is no Consumer Care Centre in
your country, go to your local Philips dealer.
Troubleshooting
This chapter summarises the most common problems you could
encounter with the appliance. If you are unable to solve the problem with
the information below, contact the Consumer Care Centre in your
country.
The
The thermal safety cut-out has probably cut off
appliance suddenly the power supply to the appliance because the
stops running.
appliance has overheated. 1) Unplug the appliance.
2) Let the appliance cool down for 1 hour. 3) Put
the mains plug in the socket. 4) Switch on the
appliance again.
I have selected the Check the colour of the attachment and choose
wrong speed for
the corresponding speed with the speed selector.
the attachment I
want to use.
The emulsifying
disc, balloon
beater or kneading
accessory does
not turn.
Make sure the emulsifying disc, balloon beater or
kneading accessory is assembled properly onto
the tool holder. Also make sure the food
processor bowl and the lid are assembled
properly (‘click’).
English 13
Problem
Solution
When I select the
speed for the
citrus press, the
appliance does not
work.
Make sure that the tool holder has been inserted
properly. Make sure the projection on the sieve is
locked in the slot of the bowl handle. When the
projection is locked in the slot, the appliance starts
to operate when you select the correct speed. The sieve of the
citrus press is
damaged.
If the sieve is damaged, do not use the citrus
press anymore. Contact the Philips Consumer
Care Centre in your country (you find its phone
number in the worldwide guarantee leaflet) to
order a new sieve. If there is no Consumer Care
Centre in your country, go to your local Philips
dealer.
Recipes
Nourishing vegetable soup from Budapest
Ingredients
To be processed in the blender:
- 240g kohlrabi
- 240g potatoes
- 360g celery
- 120g carrots
- water (fill up to1.5-litre indication)
To be added during cooking:
- 150g dal (from can)
- 150g smoked pork
- 190g crème fraîche
- 15g parsley
- salt
- fresh pepper
- 1.5 stock cubes
- 2 bay leaves
1 Assemble the blender jar onto the motor unit. Put the kohlrabi,
potatoes, celery, carrots and water in the blender in this order.
Blend the ingredients for 10 seconds at the speed appropriate for
the blender for a coarse soup or longer for a finer soup.
2 Put the blended ingredients in a pan and bring to the boil. Add
crème fraîche, dal, pork and herbs. Cook for 30 minutes while
stirring constantly.
Always let the appliance cool down to room temperature after you
have processed two batches.
Pizza dough
Ingredients:
- 240g white flour
- 1/2 teaspoon sugar
- 1/2 teaspoon salt
- 1/2 packet of quick yeast
- 140g warm water
- 25g oil
1 Put the tool holder in the bowl and place the kneading accessory
on the tool holder.
2 Put all the dry ingredients in the bowl and add the water and the
oil.
3 Close and lock the lid (‘click’). Select the speed that corresponds to
the kneading accessory and let the appliance run until the dough
has become a well-mixed ball. This takes about 2 minutes. 4 Put the dough in a bowl, cover it with a damp cloth and let it rise
for about 40 minutes until it has doubled in volume.
5 Dust your worktop with flour, roll the dough and create two pizza
dough bases and put them on a greased baking tray.
6 Cover the pizza dough bases with tomato sauce and your favourite
topping.You can use cheese, ham, salami, bacon, mushrooms, tuna
fish, onions, artichokes, bell pepper etc. Spread some oregano and
pour olive oil over the pizzas and bake them.
14
English
Tip:You can use the slicing/shredding disc to shred about 200g cheese
(Parmesan or Gouda).Put the tool holder in the bowl and place the slicing/
shredding disc on the tool holder (with the shredding side facing up). Close
and lock the lid (‘click’). Cut the cheese into pieces that fit into the feeding
tube and shred the cheese.
Cucumber salad with yoghurt sauce Ingredients:
- 1 cucumber
- 2 cups parsley leaves
- 1 cup natural yoghurt
- 1 tablespoon mustard
- Salt and black pepper to taste
1 Put the tool holder in the bowl and place the slicing/shredding disc
on the tool holder.
2 Close and lock the lid (‘click’). Slice the cucumber. See chapter
‘Using the appliance’ under ‘Slicing/shredding disc’ for the
appropriate speed. Tip: Do not exert too much pressure on the pusher.
3 Put the sliced cucumber into a serving bowl.
4 Put the tool holder in the bowl and place the blade unit on the tool
holder.
5 Put the parsley in the bowl. Close and lock the lid (‘click’).
6 Chop the parsley. Use the pulse function to have better control
over the chopping process.
7 Add the yoghurt, mustard, salt and pepper and process for a few
more seconds until a homogeneous mixture is obtained.
8 Mix the sauce with the cucumber slices and refrigerate the
cucumber salad before serving.
Whipped cream Ingredients:
- 250ml fresh cream
1 Chill the cream for at least 2 hours before processing.
2 Put the tool holder in the bowl and place the emulsifying disc
(HR7771 only) or the balloon beater (HR7772 only) on the tool
holder.
3 Put the cream in the bowl.
4 Close and lock the lid (‘click’). Process the cream until the desired
consistency is obtained. Select the speed setting that corresponds
with the colour of the accessory. Tip: Refrigerate the whipped cream before serving.You can serve whipped
cream on cakes, ice cream, fruits, coffee, or use it as a filling for cakes, etc.
Baby food
Ingredients:
- 250g cooked chicken meat
- 250g cooked potatoes
- 250g cooked french beans
- 375ml milk
1 Assemble the blender jar onto the motor unit. Put the ingredients
in the blender. Blend the ingredients for 25 seconds at the speed
appropriate for the blender.
If you want to prepare a larger quantity of baby food, let the appliance
cool down for 60 minutes after processing the ingredients for each
batch.
158
HR7772
22
23
HR7771
0
24
25
28
29
42
43
44
45
1
2
3
26
27
0
1000 g
1
2
3
30
31
32
1000 g
33
1000 g
HR7771
200 g
3
34
35
36
750 g
37
1000 g
HR7772
HR7772
38
39
40
1
41
n.a.
HR7771
HR7772
159
HR7772
750 g
5x pulse
500 g
20 sec
100 g
10 - 15 sec
400 g
30 sec
1000 g
30 sec
1000 g
60 sec
200 g
60 sec
200 g
30 sec
1000 g
2 min
1000 g
2 min
4
4 min
2-6
3 min
350 g
20 sec
HR7771
750 ml
1 - 3 min
1500 ml
1 - 2 min
1000 ml
1 - 2 min
1500 ml
1 - 2 min
6x
6x pulse
www.philips.com
u
4222.002.7224.1