1
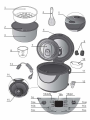
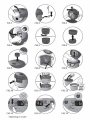
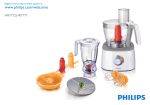
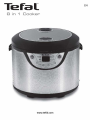
Important safeguards
Safety instructions
EN
ZH
• Read and follow the instructions for use. Keep them safe.
• This appliance is not intended to be operated using an external timer or separate remote
control system.
For your safety, this appliance complies with the safety regulations and directives in effect
at the time of manufacture (Low-voltage Directive, Electromagnetic Compatibility, Food
Contact Materials Regulations, Environment…).
• Check that the power supply voltage corresponds to that shown on the appliance
(alternating current).
• Given the diverse standards in effect, if the appliance is used in a country other than that
in which it is purchased, have it checked by an approved service centre.
• Do not place the appliance near a heat source or in a hot oven, as serious damage could
result.
• This appliance is designed for domestic use only. Any commercial use, inappropriate use
or failure to comply with the instructions, the manufacturer accepts no responsibility and
the guarantee does not apply.
• It is not intended to be used in the following applications, and the guarantee will not apply
for:
- staff kitchen areas in shops, offices and other working environments;
- farm houses;
- by clients in hotels, motels and other residential type environments;
- bed and breakfast type environments.
TH
MS
Connecting to the power supply
• Do not use the appliance if:
- the appliance or the cord is damaged.
- the appliance has fallen or shows visible damage or does not work properly.
In these cases, the appliance must be sent to your nearest approved service centre to avoid
any possible danger. Do not take the appliance apart yourself.
• Do not leave the cord hanging.
• Always plug the appliance into an earthed socket.
• Do not use an extension cord. If you accept liability for doing so, only use an extension
cord which is in good condition, has an earthed plug and is suited to the power of the
appliance.
• Do not unplug the appliance by pulling on the cord.
• Always unplug the appliance:
- immediately after use,
- when moving it,
- prior to any cleaning or maintenance,
- if it fails to function correctly.
Usage
• Use on a flat, stable, heat-resistant work surface away from any water splashes.
• Never leave the appliance in operation unattended. Keep away from children.
• This appliance is not intended for use by persons (including children) with reduced physical,
sensory or mental capabilities, or lack of experience and knowledge, unless they have been
4
Description
1.
2.
3.
4.
5.
6.
7.
8.
9.
10.
11.
12.
13.
14.
15.
16.
Steam basket
Water level marks
Removable non-stick bowl
Rice spoon
Lid opening button
Lid
Inner removable lid
Measuring cup
Micro pressure valve
Condensation collector
Handle
Spoon support
Power cord
Heating plate
Sensor
Control panel
a. "KEEP WARM/CANCEL" button (green)
b. "PRESET" button
EN
c.
d.
e.
f.
g.
h.
Decrease time button
White rice cooking indicator light
Quick rice cooking indicator light
Brown rice cooking indicator light
Grains cooking indicator light
Display of cooking finish time
(with selected programs only) or
indication the Keep Warm function
is in operation (with selected
programs only)
i. Oatmeal/Porridge cooking
indicator light
j. Slow cooking indicator light
k. Steam cooking indicator light
l. Dessert cooking indicator light
m. "START" button
n. "MENU" button
o. Increase time button
ZH
TH
MS
Before the first use
Unpack the appliance
• Remove the appliance from the packaging and unpack all
the accessories and printed documents.
• Open the lid by pressing the opening button located on the
lid – Fig.1.
• Install the spoon support: insert the plastic hook of the
support in the hole located at the base of the product, and
slide it downwards – Fig.2.
Read the instructions
and carefully follow
the operating method.
Clean the appliance
• Remove the non-stick bowl, the inner removable lid and the micro
pressure valve. To remove the inner lid, press the release clip on the right
side to release the lid – Fig.3.
• After removing the inner lid, push up the micro-pressure valve through
the hole on the underside of the lid with a finger – Fig.4. To separate the
upper and lower parts of the micro-pressure valve, rotate the valve in the
unlocking direction by turning the upper triangle until it is aligned with
the open padlock symbol then separate – Fig.5 and Fig.6.
• Clean the bowl, the inner removable lid, the micro pressure valve and all
the accessories with a sponge and washingup liquid. Wipe the outside of
the appliance and the metal parts of the lid with a damp cloth.
• Dry carefully.
• The non-stick bowl, the steam basket, the condensation collector, the
spoon and the cup are dishwasher safe.
• Replace the micro-pressure valve. Align the upper triangle with unlocked
padlock of the micropressure valve to close up the two parts, then rotate
6
in locking direction until the upper triangle is aligned with the locked
padlock which indicates the two parts are locked, then re-fit the
micropressure valve down into the lid – Fig.7. Make sure that the triangle
in the micropressure valve is aligned with the triangle on the lid and firmly
push down until it fits in place.
• Replace the inner removable lid by fitting the tab on the left side into the
slot on the lid, then push in the lid until it the tab on the right clicks into
place. The wider side of the seal must be uppermost when fitting the lid.
Using your rice cooker
For all 8 functions
• Carefully wipe the outside of the bowl (especially the
bottom). Make sure that there are no foreign residues or
liquid underneath the bowl and on the heating plate – Fig.8.
• Place the bowl into the appliance – Fig.9, making sure that
it is correctly positioned.
• Slightly rotate the bowl in both directions, so as to ensure
good contact between the bottom of the bowl and the
heating plate.
• Check that the condensation collector is correctly placed in
position, if not, please install it by pushing firmly into the
groove – Fig.10.
• Close the lid.
• Insert the power cord connector into the base of the
appliance. Check it is firmly pushed in.
• Plug in the appliance. It will make a long "Beep" sound, the
digital screen and indicator lights will flash once, then the
digital screen will display “--“. It indicates the rice cooker has
entered the standby mode and is ready for function selection.
• Do not switch on the appliance until all of the above stages
have been completed.
• Do not switch on the appliance with an empty cooking bowl.
• Do not touch the heating plate when the product is plugged.
Program
White rice
Quick rice
Brown rice
Grains
Oatmeal/Porridge
Slow cooking
Steaming
Dessert
Never place your hand
on the micro pressure
valve during cooking,
as there is a danger of
burns.
If you wish to change
the selected cooking
menu, press "CANCEL"
button and choose the
program you want.
Only use the inner
bowl provided with
the appliance.
Do not pour water or
put ingredients in the
appliance without the
bowl inside.
SUMMARY OF PROGRAMS AND FUNCTIONS
Delayed start (Preset) Simmering phase (+ simmering time)
YES
YES
YES
YES
YES
NO
YES
NO
YES - 14 min
YES - 10 min
YES - included in the cooking time
YES - 10 min
YES - 10 min
NO
NO
NO
Keep Warm*
YES
YES
YES
YES
YES
YES
YES
YES
* “Keep Warm” remains on continuously for 24 hours then the system will automatically cancel the “Keep Warm”
function and return to standby mode.
7
Rice Cooking
EN
Measuring the ingredients Max capacity of the bowl
• The graduated markings on the inside of the bowl are given in
litres and cups, these are used for measuring the amount of
water when cooking rice – Fig.11.
• The plastic cup provided with your appliance is for measuring rice
and the table states the quantity of rice required for the number
of servings. 1 level measuring cup of rice weighs about 150 g.
• For best results, we recommend using ordinary rice rather than
‘easy cook’ type rice which tends to give a stickier rice and may
adhere to the base. With other types of rice, such as brown or wild
rice, the quantities of water need adjustment see the table below.
• To cook 1 cup of white rice (serves 2 small or 1 large portion),
use 1 measuring cup of white rice and then add one and a half
measuring cup of water. With some types of rice it is normal for
a little rice to stick on the base when cooking 1 cup of rice. For
best results cook 2 or more cups of rice (refer to cooking guide
below for quantities).
• The maximum quantity of water + rice should not exceed the
5,5 or 10 cup mark inside the bowl depending on the capacity
of your model – Fig.11. Depending on the type of rice, the
quantity of water may need adjustment. See the table below.
The rice cooker itself
• The cooking times given in the tables are only approximate and
for your guidance.
determines the exact
• Place the appliance on a flat, stable, heat-resistant work surface
cooking time
away from water splashes and any other sources of heat.
depending on the
quantity of water and • Measure the rice using the plastic measuring cup provided and
rinse thoroughly in cold water before cooking.
ingredients placed in
the bowl (see cooking • Pour the rice into the bowl. Then fill with cold water up to the
table below for a guide
corresponding “CUP” mark printed in the bowl (See cooking guide
to times).
below) – Fig.12.
• Close the lid.
Note: Always add the rice first otherwise you will have too
much water.
ZH
TH
MS
COOKING GUIDE FOR WHITE RICE -10 CUPS MODEL
Measuring cups
of white rice
Weight
of white rice
Water level
in the bowl ( + the rice)
Serves
Approximative
cooking time*
2
4
6
8
10
300 g
600 g
900 g
1200 g
1500 g
2 cup mark
4 cup mark
6 cup mark
8 cup mark
10 cup mark
3-4
5-6
8-10
13-14
16-18
42 min
46 min
50 min
55 min
60 min
* The rice cooker will automatically determine the cooking time depending on the quantity
of rice and water placed in the bowl. The cooking phase is automatically followed by a
simmering phase.
8
COOKING GUIDE FOR WHITE RICE - 5,5 CUPS MODEL
Measuring cups
of white rice
Weight
of white rice
Water level
in the bowl ( + the rice)
Serves
Approximative
cooking time*
1
2
3
4
5,5
150 g
300 g
450 g
600 g
825 g
see the advice above
2 cup mark
3 cup mark
4 cup mark
5,5 cup mark
1-2
3-4
4-5
5-6
8-10
37 min
40 min
43 min
46 min
50 min
* The rice cooker will automatically determine the cooking time depending on the quantity
of rice and water placed in the bowl. The cooking phase is automatically followed by a
simmering phase.
Cooking with delayed start - “Preset” function
• It is possible to delay the cooking start time.
• Press “Menu” button until the indicator light of the required
function turns on ; then press “Preset” button, and the digital
screen will display the minimum preset time for the selected
program (the preset time flickers, indicating preset time is
not selected yet) – Fig.13. Press
to set required preset
time and then press “Start” button (preset time will include
cooking time, i.e. it will end cooking when the preset time is
over) – Fig.14. Each press will increase or decrease the preset
time of one hour.
• After cooking, the “Keep Warm” indicator light will turn on
and beep several times and the digital screen will display “b”,
indicating it’s time to open the lid and serve the food –
Fig.15.
• The maximum preset time is 15 hours. After reaching
15 hours, it will return to the default minimum preset hours.
Cooking with delayed
start is for the
following programs
only: White rice, Quick
rice, Grains, Brown rice,
Oatmeal/Porridge,
Steaming.
White rice cooking
The simmer phase is
to absorb the left
moisture.
9
• The delayed start function can be used for the "White Rice"
program, with a delayed time range of between 2 to 15 hours.
• Press “Menu” button while in standby mode until the “white
rice” indicator light turns on, the digital screen will display “--“
and the “Start” indicator light will flicker – Fig.16. Press the
“Start” button, the cooker will enter “White rice” cooking mode,
the “Start” indicator light will remain on and the digital screen
will display “-“ – Fig.17.
• When the inner bowl is dry, the buzzer will beep twice and enter
into the simmer phase for 14 minutes. The screen displays
countdown of 14 minutes.
• After the countdown, the “Keep Warm” indicator light will turn on
and the cooker will beep for several times and the digital screen
will display “b”. Open the lid ; stir the rice with the rice spoon to
seperate grains. The cooked rice can either be served immediately
or kept warm for a proper duration – Fig.15.
Quick rice cooking
EN
• The “Quick rice” Function is for cooking white rice only. The
delayed start function can be used for the "Quick Rice"
program, with a delayed time range of between 2 to 15 hours.
• Press “Menu” button while in standby mode until the “Quick
rice” indicator light turns on, the digital screen will display
“--“ and the “Start” indicator light will flicker – Fig.18. Press
the “Start” button, the cooker will enter “Quick rice” cooking
mode, the “Start” indicator light will remain on and the
digital screen will display “-“ – Fig.17.
• When the inner bowl is dry, the buzzer beeps for several times,
the digital screen will display “10”, indicating the 10 minutes
countdown for automatic simmering.
• After the countdown, the “Keep Warm” indicator light will
turn on and the cooker will beep for several times and the
digital screen will display “b”. Open the lid ; stir the rice with
paddle to avoid lumping. The cooked rice can either be served
immediately or kept warm for a proper duration – Fig.15.
• This function features a shorter cooking time and is
convenient for users who are in a hurry.
• After each use empty and clean the condensation collector.
ZH
TH
MS
Brown rice cooking
To cook brown rice
• The delayed start function can be used for the "Brown Rice"
program, with a delayed time range of between 2 to 15 hours.
• Press “Menu” button while in standby mode until the “Brown
rice” indicator light turns on, the digital screen will display “90“
and the “Start” indicator light will flicker – Fig.19. Press the
“Start” button, the cooker will enter “Brown rice” cooking model,
the “Start” indicator light will remain on and the digital screen
will display the countdown time – Fig.17.
• There is a simmering phase. The simmering time is already
included in the 90 minutes cooking time.
• After simmering, the “Keep Warm” indicator light will turn on,
the buzzer will beep several times and the digital screen will
display “b”. The cooker will enter “Keep Warm” phase – Fig.15.
Some recommendations
for best results when cooking rice
• Measure out the rice and rinse it thoroughly under running
water in a sieve for a long time (except for risotto rice which
should not be rinsed). Then place the rice in the bowl
together with the corresponding quantity of water.
• Make sure that the rice is well distributed around the whole
surface of the bowl, in order to allow even cooking.
10
• Add salt to your personal taste if required.
• Water may be substituted for stock. If using stock, there is
the risks of rice browning a bit on the bottom.
• Do not open the lid during cooking as steam will escape and
this will affect the cooking time and the taste.
Grains Cooking
To cook grains
• The delayed start function can be used for the "Grains"
program, with the delayed time range of between 2 to
15 hours.
• Press “Menu” button while in standby mode until the “Grains”
indicator light turns on, the digital screen will display “--“ and
the “Start” indicator light will flicker – Fig.20. Press the “Start”
button, the cooker will enter “Grains” cooking mode, the
“Start” indicator light will remain on and the digital screen
will display “-“ – Fig.17.
• When the inner bowl is dry, the buzzer beeps twice, the
digital screen will display “10”, indicating the 10 minutes
countdown for automatic simmering.
• After simmering, the “Keep Warm” indicator light will turn on,
the cooker will beep for several times and the digital screen
will display “b”. Open the lid ; stir the grains with paddle to
separate the grains. The cooked grains can either be served
immediately or kept warm for a proper duration – Fig.15.
This programm is
suitable for Couscous,
Bulgur Wheat, Polenta,
Quinoa, Millet…
For the 5,5 cups
model, do not exceed
3 cups of grains.
For the 10 cups model,
do not exceed 5 cups
of grains.
Put twice quantity of
water compared to the
grains you put.
Oatmeal/Porridge Cooking
To cook oatmeal or porridge
• The preset time function can be used for the
"Oatmeal/Porridge" program, with a delayed time range of
between 2 to 15 hours.
• Press “Menu” button while in standby mode until the
“Oatmeal/Porridge” cooking indicator light turns on, the digital
screen will display “--“ and the “Start” indicator light will
flicker – Fig.21. Press the “Start” button, the cooker will enter
“Oatmeal/Porridge” cooking model, the “Start” indicator light will
remain on and the digital screen will display “-“ – Fig.17.
• When the water in the inner bowl gets to boiling temperature,
the buzzer beeps for two times and the digital screen will display
“10”, indicating the cooker starts to count down from 10 minutes.
• At the end of the countdown, the “Keep Warm” indicator light
will turn on, the cooker will beep several times and the digital
screen will display “b”. The cooker will enter “Keep Warm” status
– Fig.15.
11
Slow Cooking
To slow cook
EN
• The delayed start time is not available for the “Slow Cooking”
Function.
• Press “Menu” button while in standby mode until the “Slow
cooking” indicator light turns on, the digital screen will display
“60“ and the “Start” indicator light will flicker – Fig.22. The time
can be adjusted from 60 minutes to 9 hours in hourly intervals.
• Press the “Start” button, the “Start” indicator light will remain
on and the digital screen will display the countdown time in
hourly intervals and after 60 minutes in 1 minute – Fig.17.
• At the end of the countdown, the “Keep Warm” indicator
light will turn on, the cooker will beep several times and the
digital screen will display “b”. The cooker will enter “Keep
Warm” mode – Fig.15.
ZH
TH
MS
Steaming (for vegetables, fish and fruit)
• The maximum quantity of water in the bowl should not exceed
the maximum CUP mark shown in “CUP” on the bowl – Fig.11.
Exceeding this level may cause overflows during use.
• The water should be lower than the steam basket.
• Filling with water to the 2 cup mark is sufficient for about
30 minutes cooking on steam program.
• Add the ingredients in the steam basket.
• Place the steam basket in the bowl – Fig.23.
• The delayed start function is available for the "Steam" program,
with a delayed time range of between 2 to 15 hours.
• Press “Menu” button while in standby mode until the “Steam”
indicator light turns on, the digital screen will display default
cooking time “1“ and the “Start” indicator light will flicker – Fig.24.
Press the “Start” button to enter “Steam” cooking mode if there is no
need for a delayed start, the digital screen will display “1” – Fig.25.
• If a delayed start has been selected, the digital screen will
display the countdown of the preset time in cooking mode.
• After cooking, the buzzer will beep for several times, the “Keep
Warm” indicator light will turn on and the digital screen will
display “b”, indicating the rice cooker enters “Keep Warm” mode
– Fig.15. Open the lid ; the cooked preparation can either be
served immediately or kept warm for a short time – Fig.15.
Dessert Cooking
To cook dessert
• The delayed start function time is not available for the
“Dessert” Function.
• The dessert function is suitable for cooking sponge cakes.
• Press “Menu” button while in standby mode until the
“Dessert” indicator light turns on, the digital screen will
12
display “--“ and the “Start” indicator light will flicker – Fig.26.
Press the “Start” button, the cooker will enter “Dessert”
cooking mode, the “Start” indicator light will remain on and
the digital screen will display “-“ – Fig.17.
• The dessert function remains on continuously for 45 minutes
then the ‘Keep Warm’ function will turn on. After cooking,
the buzzer will beep for several times, the “Keep Warm”
indicator light will turn on and the digital screen will display
“b”, indicating the rice cooker enters “Keep Warm” status –
Fig.15.
Automatic keep warm function
Starting your rice
cooker in keep warm
mode must only be
used for hot food.
• The preset of time is not available for the “Keep Warm/Cancel”
Function.
• Press “Keep Warm/Cancel” button while in standby mode, the
“Keep Warm/Cancel” indicator light turns on and the digital
screen will display “b”, indicating the cooker enters keep-warm
mode – Fig.15.
• Presss "Keep Warm/Cancel" button while a program is set or a
function is in working mode to cancel it and return to standby
mode.
• If the cooker remains on “Keep Warm” continuously for
24 hours, the system will automatically cancel “Keep Warm”
function and return to standby mode.
• The "Keep Warm" function should not be used for reheating
food.
Power failure backup (short memory function)
• The cooker has a "short memory" function in case of power
cuts of 3 to 10 seconds. When the power returns, the cooker
returns automatically to its original setting and continues to
cook. In case of long power cuts, the cooker will return to the
standby mode.
On completion of cooking
The escaping steam is • Open the lid.
very hot.
• Serve the food using the plastic spoon supplied with the
appliance and close the lid.
Never remove the bowl
after cooking without • The food remaining in the bowl will keep warm for any further
servings.
protective oven gloves.
• Don't forget to press "CANCEL" button after keep warm and
unplug the appliance.
Cleaning and Maintenance
Condensation collector
• The condensation collector should be emptied and cleaned after
each use.
13
• To remove the collector, press on each side of the plastic
cover and remove – Fig.27.
• To put the condensation collector back, push firmly into the seating.
EN
ZH
TH
Bowl, steam basket, condensation collector,
micro pressure valve and the steam basket
MS
• After removing the inner lid, push up the micro-pressure valve
through the lid hole with finger from underside of the lid – Fig.4,
rotate the micro-pressure valve in unlocking direction until the
upper triangle is aligned with the opened padlock and finally
separate the upper and lower parts of the micro-pressure valve –
Fig.5.
• Unplug the appliance before removing the bowl. Use hot water,
washing up liquid and a sponge to clean the bowl – Fig.28, the
condensation collector – Fig.28, the micro pressure valve –
Fig.29, the inner removable lid – Fig.30, the spoon and the cup.
Scouring powders and metal sponges are not recommended.
• If food has stuck to the bottom, allow the bowl to soak for a
while before washing it.
• The non-stick bowl, the steam basket, the condensation
collector, the spoon and the cup are dishwasher safe.
• Dry the bowl carefully.
• Do not immerse the appliance in water, or pour water into it the
interior of the appliance body.
Taking care of the bowl
• To avoid damaging the non-stick coating of the bowl do not
cut food in the it.
• Use plastic or wooden utensils and not metal ones when
stirring or serving food to avoid damaging the bowl surface.
• To avoid any risk of corrosion, do not pour vinegar into the bowl.
• The colour of the bowl surface may change after using for the
first time or after a long period of use. This change in colour
is due to the action of steam and water and does not have
any effect on the use of the Rice Cooker, nor is it dangerous
for your health. It is perfectly safe to continue using it.
• Do not use a handblender directly in the non-stick bowl to
blend foods.
Cleaning and care
of the other parts of the appliance
Let cool the product.
• Unplug the appliance before cleaning.
• Clean the outside of the Rice Cooker, the inside of the lid –
Fig.30 and the cord with a damp cloth and wipe dry. Do not use
abrasive products.
• Do not use water to clean the interior of the appliance body as
it could damage the heat sensor.
14
Technical troubleshooting guide
Malfunction description
Causes
Solution
Top major sensor open
circuit or short circuit.
Send to Authorized Service
Centre for repair.
• No bowl.
• Bottom major sensor
open circuit or short circuit.
• Place the bowl into the
appliance. Then plug in the
appliance.
• After replacing bowl is
display still shows E1 send
to Authorized Service
Centre for repair.
The indicator lights are not
illuminated and appliance
is not heating.
Rice cooker not plugged in.
Check the power cord is
firmly engaged in the rice
cooker and the appliance is
plugged in at the mains
socket.
The indicator light is not
illuminated and appliance
is heating.
A problem with the internal
connection of the indicator
light or the indicator light is
damaged.
Send to Authorized Service
Centre for repair.
Lid is badly closed.
Open and close the lid
again.
Micropressure valve not
well positioned or
assembled incorrectly.
Stop the cooking (unplug
the product) and check the
valve is assembled correctly
(2 parts locked together)
and well positioned.
Lid or micropressure valve
gasket is damaged.
Send to Authorized Service
Centre for repair.
Not enough or too much
water compared to rice
quantity.
Refer to instructions for
water quantity.
LED screen indicates « E0 ».
LED screen indicates « E1 ».
Steam leakage during use.
Rice not fully cooked
or over cooked.
Automatic Keep Warm
function fails (appliance stays
on cooking program or does
not heat on Keep Warm).
Water leakage
on the work surface.
Send to Authorized Service
Centre for repair.
Condensation collector
missing or condensation
collector overflow.
Empty the condensation
collector after each use
and check it is correctly
positioned.
Remark: if inner bowl is damaged, do not use it anymore and get a replacement from the
Authorized Service Centre for repair.
15
TEFAL / T-FAL* INTERNATIONAL LIMITED GUARANTEE
www.tefal.com
This product is repairable by TEFAL / T-FAL, during and after the guarantee period.
The Guarantee
This product is guaranteed by TEFAL / T-FAL (company address and details included in the country
list of the TEFAL/T-FAL International Guarantee) against any manufacturing defect in materials or
workmanship during the guarantee period within those countries as stated in the country list on
the last page of the user manual, starting from the initial date of purchase.
The international manufacturer's guarantee by TEFAL/T-FAL is an extra benefit which does not
affect consumer's Statutory Rights.
The international manufacturer’s guarantee covers all costs related to restoring the proven defective
product so that it conforms to its original specifications, through the repair or replacement of any
defective part and the necessary labour. At TEFAL/T-FAL’s choice, a replacement product may be
provided instead of repairing a defective product. TEFAL/ T-FAL’s sole obligation and your exclusive
resolution under this guarantee are limited to such repair or replacement.
Conditions & Exclusions
The international TEFAL/T-FAL guarantee only applies within the guarantee period and for those
countries listed in the Country List attached and is valid only on presentation of a proof of purchase.
The product can be taken directly in person to an authorised service centre or must be adequately
packaged and returned, by recorded delivery (or equivalent method of postage), to a TEFAL/T-FAL
authorised service centre. Full address details for each country’s authorised service centres are listed
on TEFAL/T-FAL website (www.tefal.com) or by calling the appropriate telephone number as set out
in the Country List to request the appropriate postal address.
TEFAL/T-FAL shall not be obliged to repair or replace any product which is not accompanied by a
valid proof of purchase.
This guarantee will not cover any damage which could occur as a result of misuse, negligence, failure
to follow TEFAL/T-FAL instructions, use on current or voltage other than as stamped on the product,
or a modification or unauthorised repair of the product. It also does not cover normal wear and
tear, maintenance or replacement of consumable parts, or the following:
- using the wrong type of water or consumable
- scaling (any de-scaling must be carried out according to the instructions for use);
- ingress of water, dust or insects into the product;
- mechanical damages, overloading
- damages or bad results due to wrong voltage or frequency
- accidents including fire, flood, thunderbolt etc
- professional or commercial use
- damage to any glass or porcelain ware in the product
- replacement of consumables
16
This guarantee does not apply to any product that has been tampered with, or to damages
incurred through improper use and care, faulty packaging by the owner or mishandling by any
carrier.
The international TEFAL/T-FAL guarantee applies only for products purchased in one of the
countries listed, and used for domestic purposes only in one of the countries listed on the Country
List. Where a product purchased in one listed country and then used in another listed country:
a) The international TEFAL/T-FAL guarantee duration is the one in the country of usage
of the product, even if the product was purchased in another listed country with
different guarantee duration.
b) The international TEFAL/T-FAL guarantee does not apply in case of non conformity of
the purchased product with the local standards, such as voltage, frequency, power
plugs, or other local technical specifications
c) The repair process for products purchased outside the country of use may require a
longer time if the product is not locally sold by TEFAL/T-FAL
d) In cases where the product is not repairable in the new country, the international
TEFAL/T-FAL guarantee is limited to a replacement by a similar product or an
alternative product at similar cost, where possible.
Consumer Statutory Rights
This international TEFAL/T-FAL guarantee does not affect the statutory rights a consumer may
have or those rights that cannot be excluded or limited, nor rights against the retailer from which
the consumer purchased the product. This guarantee gives a consumer specific legal rights, and
the consumer may also have other legal rights which vary from State to State or Country to
Country. The consumer may assert any such rights at his sole discretion.
Additional information
Accessories, Consumables and end-user replaceable parts can be purchased, if locally available,
as described on the TEFAL / T-FAL internet site.
* TEFAL household appliances appear under the T-FAL brand in some territories like America and
Japan. TEFAL/T-FAL are registered trademarks of Groupe SEB.
17
18
19
20
21
22
23
24