1
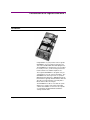
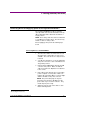
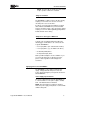
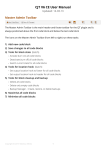
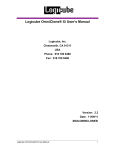
Logicube OmniWIPE™ User’s Manual
Logicube, Inc.
Chatsworth, CA 91311
USA
Phone: 818 700 8488
Fax: 818 700 8466
Version: 1.0
MAN-OMNIWIPE
Date: 11/01/05
Logicube OmniWIPE™ User Manual
I
LIMITATION OF LIABILITY
Limitation of Liability and Warranty Information
Logicube Disclaimer
LOGICUBE IS NOT LIABLE FOR ANY INCIDENTAL OR CONSEQUENTIAL DAMAGES,
INCLUDING, BUT NOT LIMITED TO PROPERTY DAMAGE, LOSS OF TIME OR DATA
FROM USE OF A LOGICUBE PRODUCT, OR ANY OTHER DAMAGES RESULTING
FROM PRODUCT MALFUNCTION OR FAILURE OF (INCLUDING WITHOUT LIMITATION,
THOSE RESULTING FROM: (1) RELIANCE ON THE MATERIALS PRESENTED, (2) COSTS
OF REPLACEMENT GOODS, (3) LOSS OF USE, DATA OR PROFITS, (4) DELAYS OR
BUSINESS INTERRUPTIONS, (5) AND ANY THEORY OF LIABILITY, ARISING OUT OF OR
IN CONNECTION WITH THE USE OR PERFORMANCE (OR FROM DELAYS IN
SERVICING OR INABILITY TO RENDER SERVICE ON ANY) LOGICUBE PRODUCT.
LOGICUBE MAKES EVERY EFFORT TO ENSURE PROPER OPERATION OF ALL
PRODUCTS. HOWEVER, THE CUSTOMER IS RESPONSIBLE TO VERIFY THAT THE
OUTPUT OF LOGICUBE PRODUCT MEETS THE CUSTOMER’S QUALITY REQUIREMENT.
THE CUSTOMER FURTHER ACKNOWLEDGES THAT IMPROPER OPERATION OF
LOGICUBE PRODUCT AND/OR SOFTWARE, OR HARDWARE PROBLEMS, CAN
CAUSE LOSS OF DATA, DEFECTIVE FORMATTING, OR DATA LOADING. LOGICUBE
WILL MAKE EFFORTS TO SOLVE OR REPAIR ANY PROBLEMS IDENTIFIED BY
CUSTOMER, EITHER UNDER WARRANTY OR ON A TIME AND MATERIALS BASIS.
Warranty
LOGICUBE PROVIDES A BASIC ONE-YEAR PARTS AND LABOR WARRANTY FOR ALL
OF ITS PRODUCTS (EXCLUDING CABLES, ADAPTERS AND OTHER “CONSUMABLE”
ITEMS). A TWO-YEAR EXTENDED WARRANTY IS ALSO AVAILABLE FOR AN ADDED
COST. TELEPHONE AND EMAIL SUPPORT IS AVAILABLE FOR THE LIFE OF THE
PRODUCT AS DEFINED BY LOGICUBE.
Logicube OmniWIPE ™ User’s Manual
- II -
Table of Contents
LOGICUBE OMNIWIPE™ USER’S MANUAL ...........................................I
LIMITATION OF LIABILITY AND WARRANTY INFORMATION ..............II
Logicube Disclaimer.........................................................................II
Warranty............................................................................................II
TABLE OF CONTENTS..............................................................................I
1. INTRODUCTION TO THE LOGICUBE OMNIWIPE™...........................1
Introduction ......................................................................................1
Features.......................................................................................2
Using this guide............................................................................2
System description .......................................................................2
2. GETTING STARTED (FAST START)....................................................4
Connecting Drives and Applying power to the Logicube
OmniWIPE™ .....................................................................................4
Connecting Drives to the OmniWIPE™.........................................4
Things to remember: ....................................................................5
Adapters for other types of IDE drives ..........................................5
Applying power to the OmniWIPE™ .............................................5
Power Supply Specificationns.......................................................5
OmniWIPE™ Overview .....................................................................6
Reset Button ................................................................................6
Power On/Off ...............................................................................6
The user interface.............................................................................7
“Shortcut” buttons (available at all times) ......................................7
“Soft” Buttons ...............................................................................8
“Navigation” (Arrow) Buttons.........................................................8
Alphanumeric Keypad ..................................................................8
Indicator Lights .............................................................................8
3. WIPING MODES AND SETTINGS .....................................................10
Logicube OmniWIPE™ User Manual
I
TABLE OF CONTENTS
Main Menu Screen ..........................................................................10
About Screen .............................................................................10
Drive Info....................................................................................10
Screen Contrast .........................................................................11
WipeOut™ Mode.............................................................................11
Introduction ................................................................................11
WipeOut™ Settings ....................................................................11
WipeOut™ Mode Step-by-Step...................................................12
Security Erase Mode ......................................................................13
Introduction ................................................................................13
Security Erase Settings ..............................................................13
Security Erase Mode Step-by-Step .............................................14
4. SOFTWARE LOADING INSTRUCTIONS ...........................................15
Logicube OmniWIPE™ Software Updating Procedures ...............15
Setting up the Software Update PC ............................................15
Loading Software With the Bootable CD-ROM............................15
Loading Software Without the Bootable CD-ROM.......................16
Loading Software from a “Windows 9.x” PC................................16
Loading Software With a Third-Party Bootdisk ............................17
Downloading Software to the OmniWIPE™ ................................18
5. FREQUENTLY ASKED QUESTIONS AND ANSWERS .....................19
6. INDEX .................................................................................................21
Logicube OmniWIPE ™ User’s Manual
- II -
1. Introduction to the Logicube OmniWIPE™
Introduction
Congratulations on your purchase of the Logicube
OmniWIPE™. You are now the proud owner of a
state-of-the-art IDE/SATA drive data wiping device.
The OmniWIPE™ is designed to be easy enough to
be used by a novice, yet offers many professional
features that are not available anywhere else.
The Logicube OmniWIPE™ is designed solely for
erasing data on one, two or three hard drives. The
OmniWIPE™ has two major modes of operation:
WipeOut and Security Erase. With WipeOut mode,
the first drive is typically called the Master, while the
other two are termed Targets. In Security Erase
Mode, all three drives are Targets.
The OmniWIPE™ is able to erase data at speeds
which are 4 to 32 times faster than comparable
software-based utilities on a PC. It is also capable
of conforming to the DoD M-2550 standard of
erasing electronic data.
Logicube OmniWIPE™ User Manual
1
INTRODUCTION
Features
• Wipes most IDE, EIDE, UDMA and SATA
drives.
• Data erasure rates in excess of 2.3 GB/min.
• Master and Target drives can be of different
size, make and model.
• Capable of conforming to Department of
Defense (DoD) specification data wiping.
• Capable of performing a standard WipeClean
operation as well as a high-speed Security
Erase.
Using this guide
This user guide is made up of 6 sections:
• Introduction
• Getting Started (Fast Start)
• Wiping Modes and Settings
• Software Loading Instructions
• Frequently Asked Questions
• Index
Please read Section 1. Introduction, and Section 2.
Getting Started before attempting a drive wiping
session. It is recommended that you practice with a
scratch drive to fully appreciate all of the features.
System description
The complete Logicube OmniWIPE™ system
includes the following:
• The Logicube OmniWIPE™ unit.
• Three (3) 5” 80-pin flat ribbon UDMA cables.
•
Three (3) 5” drive power cables.
• One (1) 25-pin parallel cable which is used to
update the unit’s embedded software.
• An AC power supply with removable AC power
cord.
• A bootable CD-ROM containing:
2
Logicube OmniWIPE™ User’s Manual
INTRODUCTION
A. A backup copy of the software that is
already pre-installed on the Logicube
OmniWIPE™.
B. Software update utilities necessary to load
the software on the unit.
C. An electronic copy of this manual.
• This manual.
NOTE: Please contact Logicube Technical Support
at (818) 700-8488 X3 if any of the above pieces are
missing.
Caution: Avoid dropping the Logicube OmniWIPE™ or subjecting it to sharp
jolts. When in use, place it on a flat surface.
Caution: Keep the unit dry. If you need to clean your Logicube OmniWIPE™,
use a lightly damp, lint free cloth. Avoid using soap or other cleaning agents
particularly those containing bleach, ammonia, alcohol or other harsh chemicals.
Caution: Do not attempt to service the Logicube OmniWIPE™ yourself! Doing
so may void the warranty.
Logicube OmniWIPE ™ User’s Manual
3
2. Getting Started (Fast Start)
Connecting Drives and Applying power to the Logicube OmniWIPE™
The Logicube OmniWIPE™ is able to detect the
capacity, C/H/S stats and other information from any
IDE or SATA drive that is attached to the Master or
Target positions.
NOTE: Never “daisy chain” more than one hard drive
to each Master or Target position. The unit can only
handle one drive on each position.
Before applying power perform the following steps
below.
Connecting Drives to the OmniWIPE™
1. The unit comes with a cover that can be closed
when the unit is copying drives to reduce noise
and EMI1. The cover can also be easily removed
if desired.
2. You will notice that there is a corresponding data
and power connector for each of the Master and
Target drive positions.
3. Plug the 80-pin UDMA ribbon cable into the IDE
socket for each position. Make sure that the
cable ends marked “To Duplicator” are attached
to the sockets.
4. Plug a drive power cable into the corresponding
power receptacle of each position. Make sure
that the clip on the black “Molex” connector aligns
with the small tab on the power connector.
NOTE: The power cable plugs are keyed to
prevent incorrect insertion. DO NOT force the
power cables if you encounter resistance. They
should snap into place easily.
5. Attach the opposite ends of the cables to each
Master and Target drive.
1
Electro-Magnetic Interference.
Logicube OmniWIPE™ User Manual
4
GETTING STARTED
NOTE: The drive will not actually be powered until
a wipe operation or Drive Info is started.
Things to remember:
The OmniWIPE™ supplies power to all drives during
a wiping session. There is no need to connect an
external power source to the drives.
It is OK to connect and disconnect Master or Target
drives while the OmniWIPE™ is powered and idle.
However, do NOT connect or disconnect drives during
a wiping session. The Status light will typically blink to
indicate that the unit is cloning.
Adapters for other types of IDE drives
Logicube sells specialized adapters that allow the
following types of IDE drives to be connected to the
Logicube OmniWIPE™:
• 2.5” Laptop Drives (also called Notebook drives).
• 1.8” Laptop drives, (e.g. Toshiba iPod™ drives).
• Serial ATA (SATA) drives.
• Compact Flash (CF) drives.
Other specialized adapters are also available. If you
are unsure about the type of drive that you have,
please contact Logicube Technical Support for
assistance.
Applying power to the OmniWIPE™
The OmniWIPE™ comes with an external power
supply. Simply attach the AC power cord to the
power supply and plug the power jack into the back of
the OmniWIPE™.
Power Supply Specificationns
The power supply that ships with the OmniWIPE™ is
5” L X 2.25” W X 1” H. The power output is 12VDC,
5.5A. The Model Number is TR70A12.
NOTE: This information is provided for situations
where the power supply is misplaced or confused with
similar looking units.
Logicube OmniWIPE ™ User’s Manual
5
GETTING STARTED
OmniWIPE™ Overview
Please refer to Figure 1 below.
Figure 1. OmniWIPE™ Overview
Reset Button
Looking at the back of the OmniWIPE, the reset
button is to the right of the vent.
When the unit needs to be soft-booted (or power
cycled), press the reset button and hold it in
momentarily. Wait a couple of seconds and let go,
the unit will reboot and be ready to use in a few
seconds.
NOTE: User settings are retained after the unit is
restarted.
Power On/Off
There is no ON/OFF switch for the OmniWIPE™.
When the unit needs to be hard-booted, unplug the
power supply from the unit. This will shut it off. Wait
a few seconds for the drives to stop spinning, then
6
Logicube OmniWIPE™ User’s Manual
GETTING STARTED
plug it back in again. The unit will reboot and be
ready to use in a few seconds.
NOTE: The power supply is variable, which means
that it will automatically switch from 110VAC power to
220VAC power depending on the kind of power outlet
it is plugged into.
NOTE: User settings are retained after the unit is
restarted.
The user interface
The user interface (UI) has been designed with the
professional in mind. It is fast, responsive, and to the
point; which means it requires very few key strokes to
achieve a desired action. It also displays fewer “are
you sure” messages that may slow down the cloning
session.
Please refer to Figure 2 as you read the information
below.
Figure 2. Buttons and Interface
“Shortcut” buttons (available at all times)
• START/STOP Button – Press it twice to begin a
wiping operation using the current settings; press
the START/STOP button in mid process to abort it.
A single key stroke presents a preview screen
where you can see the current setting, and decide
whether to press it again to begin the wipe, or back
out to reconfigure.
Logicube OmniWIPE ™ User’s Manual
7
GETTING STARTED
• The “Help” (”?”) button provides context sensitive
help and is active at all times. Press it to get
specific help on the current screen. If the selection
cursor is on the screen, pressing the Help button
will retrieve specific help for that item pointed to.
The Help button also brings up a slider to adjust
the screen contrast.
• The “Set” button is the third “shortcut” button. It
brings you to the settings screen where you can
change capture modes and other settings of the
unit.
“Soft” Buttons
The “soft” buttons are used anywhere selection or
toggling are necessary.
• The “Select” button is used to select an option
(e.g. a Wipe setting), to toggle between multiple
available options or to enter a sub-menu.
• The “Back” button is used to go “up” in the menu
system or to cancel out of a given operation.
“Navigation” (Arrow) Buttons
The four Arrow buttons are used for navigation.
• The “Up” and “Down” buttons are most often used
when there is a scrollable window of text and the
right side of the screen displays the scroll arrows.
This occurs when the amount of information to
display exceeds the screen size. There are also
screens in the Settings menu where navigating
from one option to another requires moving up or
down.
• The “Left” and “Right” buttons are used to navigate from one option to another in the Settings
menu. The currently active option will be enclosed
by a dashed rectangle.
Alphanumeric Keypad
The alphanumeric keypad is laid out like the keypad
on your PC or typewriter. It is used in Security Erase
Mode for entering Hard Drive passwords (for drives
that are locked in the BIOS).
Indicator Lights
The POWER indicator light remains on while the
Logicube OmniWIPE™ is receiving power.
The STATUS indicators are lit during any operation
that accesses the Master or Target drive. It will flash
green as data is transferred from one drive to the
8
Logicube OmniWIPE™ User’s Manual
GETTING STARTED
other. The three Status lights are marked
“Master/Target1”, “Target 2” and “Target 3”.
An ERROR light will come on if a problem is
encountered during cloning or any other operation.
The Status Lights will stop flashing and turn red. If
this occurs, check the screen for an error message
and instructions on what to do next.
Logicube OmniWIPE ™ User’s Manual
9
3. Wiping Modes and Settings
Main Menu Screen
The Main Menu Screen appears when the Logicube
OmniWIPE™ is first powered up. It displays the
Splash Screen and two menu options: About and
Drives.
About Screen
Select the About Screen by highlighting “About” and
pressing the Select button. It will display the serial
number of your unit along with the software and
firmware versions that are loaded. In addition, the
About screen lists all options currently enabled on the
unit and provides contact information for Logicube
Technical Support.
To return to the main menu, simply press the Back
button at any time.
NOTE: As of this writing, there are no software
options available for the OmniWIPE™.
Drive Info
Select the Drive Info screen by highlighting “Drives”
and pressing the Select button. After 30 to 45
seconds, the unit will show a list of all the drives it has
detected. Use the arrow keys to navigate the list.
When a drive is highlighted (and the Select button
pressed), the unit will access the drive and report
back the drive’s model number, capacity, geometry
and other information.
To see the drive’s partition information, highlight “See
More” and press the Select button to display all of the
partitions located on that drive.
To return to the main menu, you may press the Back
button at any time.
NOTE: Drives that are locked with a password will
not be detected in Drive Info. Please refer to
“Security Erase Mode” later in this chapter for more
information.
Logicube OmniWIPE™ User Manual
10
WIPING MODES AND SETINGS
Screen Contrast
To adjust the contrast of the display, simply press the
Help button at any time. Underneath the Help
information is a slider bar to adjust the screen
contrast. Use the Left and Right arrows to adjust the
bar. Once the desired contrast is set, press the
Select button to return to the previous screen.
WipeOut™ Mode
Introduction
WipeOut™ Mode erases all data on the Target drives.
This may be required when discarding drives that
contain sensitive information to which you do not want
others to have access, e.g. financial information, trade
secrets, etc.
WipeOut™ Mode writes a pattern over the whole
Target drive 2 X n+1 times, where n is the selected
number of iterations of all 0’s and all 1’s. The last
pass then writes the chosen pattern to every byte of
the drive.
For example, if you set the number of passes (the
value of n in the above formula) to 1, WipeOut™
Mode will perform a total of three passes, first writing
all 0’s then again writing all 1’s. Then one more pass
will be made this time writing the chosen pattern.
Set the number of passes to 0 for a single pass of the
chosen pattern. This method is acceptable for quickly
wiping a drive where removal of sensitive information
is not an issue.
Set the number of passes to 1 and the pattern to
RANDOM if you wish to erase data according to
Department of Defense (DoD) specification M-5220.
NOTE: WipeOut™ Mode is exactly like the
WipeClean™ Target Mode of Logicube’s non-forensic
duplication devices.
WipeOut™ Settings
The following settings are used in configuring
WipeOut™ Mode:
Logicube OmniWIPE ™ User’s Manual
11
WIPING MODES AND SETTINGS
Passes – Determines how many iterations of all 0’s
and all 1’s are performed. The default is 0. Set the
value to 1 for compliance with DoD M-5220.
Value – Select the value to be written on the last
pass. The options are 0xf6, 0x00, 0xff, and Random
(DoD default). (The Random setting will fill the Target
drive with a pseudo random pattern).
WipeOut™ Mode Step-by-Step
1. Attach the drive(s) to be erased to the Target
position(s). Attach a scratch drive to the Master /
Target 1 position.
NOTE: Do not use an actual Master drive in the
Master / Target 1 position. A pattern will be written
to the beginning of the drive which will corrupt any
data residing on it.
2. From anywhere in the menu system click the “Set”
button to enter the Settings menu.
3. Scroll to the top icon and click the “Select” button.
The Modes screen appears.
4. Scroll to the “WipeOut” item and hit “Select”
again.
5. Adjust the “Passes” and “Value” settings as
needed. (These settings are discussed in the
previous section titled “WipeOut™ Settings”).
6. Press the “Start/Stop” button twice.
7. A message will appear stating that portions of your
Master drive will be overwritten. If you are
prepared to continue, choose “<Yes>”. If you wish
to abort the operation, choose “<No>”.
8. If “<Yes>” is chosen, a second message will
appear stating that you are about to erase the
Target. If you wish to continue, choose “<Yes>”. If
you want to abort the operation, choose “<No>”.
9. If “<Yes>” is chosen, the WipeOut™ operation will
begin and a status screen will appear.
10. The Logicube OmniWIPE™ will notify you when
erasing is complete. Press the Back button to
return to the main menu.
12
Logicube OmniWIPE™ User’s Manual
WIPING MODES AND SETINGS
Security Erase Mode
Introduction
Security Erase Mode is a much more automated
process for wiping data. This mode sends “Security
AT” commands to the drives themselves. This allows
the drives to wipe at a very high rate of speed. It also
eliminates the need for a Master drive to hold the
original pattern from.
Security Erase Mode will write a pattern of zeroes to
the entire drive. It does this with the chosen number
of passes. It also has the ability to detect drives that
are protected with a BIOS-enabled password, and
then prompt the user to unlock the drive with the
correct password.
Security Erase is ideal for discarding drives that
contain sensitive information to which you do not want
others to have access, e.g. financial information, trade
secrets, etc.
Not all drives support Security Erase. If Security
Erase detects unsupported drives, it will do an
ordinary WipeOut™ session instead.
NOTE: Security Erase mode does not use a Master
drive. All drives that are attached to the OmniWIPE
are seen as Targets. Master becomes Target 1,
followed by Target 2 and Target 3.
Security Erase Settings
The following settings are used in configuring Security
Erase Mode:
Passes – Determines how many times that the
OmniWIPE™ will write to the drive. The default is 1.
NOTE: Setting the number of passes to 0 will make
the OmniWIPE™ stop cloning immediately after
starting.
Enhanced – A few hard drives are able to support an
Enhanced Wipe procedure. This wiping method is not
much different than Security Erase other than the
pattern. Enhanced Erase writes all “1’s” to the Target
Drives instead of zeroes.
If Enhanced Erase is set to “Y” and the attached
drives do not support it, the unit will do a Security
Erase instead.
NOTE: Hard Drives that are known to support
Enhanced Erase are Samsung 3.5” drives and some
Toshiba 2.5” laptop drives. Other drives may also
Logicube OmniWIPE ™ User’s Manual
13
WIPING MODES AND SETTINGS
support this feature. Please check your hard drive’s
documentation for more details.
Security Erase Mode Step-by-Step
1. Attach the drive(s) to be erased to the Target
position(s).
NOTE: Do not use an actual Master drive in the
Master / Target 1 position. It will be erased along
with the other Target drives.
2. From anywhere in the menu system click the “Set”
button to enter the Settings menu.
3. Scroll to the top icon and click the “Select” button.
The Modes screen appears.
4. Scroll to the “Security Erase” item and hit “Select”
again.
5. Adjust the “Passes” and “Enhanced” settings as
needed. (These settings are discussed in the
previous section titled “Security Erase Settings”).
6. Press the “Start/Stop” button twice.
7. A message will appear stating that you are about
to erase the Target drives. If you wish to continue,
choose “<Yes>”. If you want to abort the operation,
choose “<No>”.
8. If any of the attached drives are protected with a
password, a prompt will come up informing the
user. Use the Alphanumeric Keypad to enter the
password. If the correct password is entered the
wiping operation will continue.
9. If “<Yes>” is chosen, the WipeOut™ operation will
begin and a status screen will appear. It contains
both a progress bar and a “time elapsed” field.
10. The Logicube OmniWIPE™ will notify you when
erasing is complete. Press the Back button to
return to the main menu
14
Logicube OmniWIPE™ User’s Manual
4. Software Loading Instructions
Logicube OmniWIPE™ Software Updating Procedures
The CD-ROM that comes with the OmniWIPE™ is
bootable and used for loading new software on the
unit. This chapter covers two basic sections: Loading
software from the supplied CD-ROM and loading
software when the CD is not available.
New and improved software will appear from time to
time on our web site at www.logicube.com. It is
possible to update the operating software in the field
by a user.
NOTE: The software is downloaded from a PC into
the OmniWIPE™ via a parallel port connection.
Setting up the Software Update PC
A host PC with an EPP 1.9 capable parallel port is
required to successfully load new software on to the
Logicube OmniWIPE™.
The host PC should also have a CD-ROM drive and
the ability to boot from CD. This feature can be set in
the PC’s BIOS. Please check your PC documentation
for more details.
Loading Software With the Bootable CD-ROM
This procedure outlines the steps necessary to set up
the software update with the bootable CD-ROM that is
supplied with the OmniWIPE™.
1. Insert the OmniWIPE™ CD-ROM into the CD tray
of the Software Update PC.
2. Reboot the PC and go into BIOS. Make sure that
the parallel port setting is set to EPP.
Logicube OmniWIPE™ User Manual
15
SOFTWARE LOADING INSTRUCTIONS
NOTE: If EPP mode is not available or does not
work, set the parallel port to Bi-Directional Mode.
3. Save Changes and exit BIOS. The PC will
reboot. The boot disk will automatically create a
Ramdrive and give it the last available Drive
Letter (usually C: on an NTFS-formatted drive).
4. The CD-ROM will also copy the following files to
the Root directory of the Ramdrive: update.exe,
wipeload.h86 and wipeout.h86.
Formatted: Bullets and Numbering
Once the above has been accomplished, perform
the following:
5. Attach the parallel cable between the host PC and
Logicube OmniWIPE™.
Formatted: Bullets and Numbering
6. Change to the new temporary directory and run
"update.exe" (or "update bidi" if Bi Directional
mode is used) and then follow the instructions for
“Downloading Software to the OmniWIPE™
below.
Loading Software Without the Bootable CD-ROM
The next two sections deal with situations where the
bootable CD-ROM has been lost, destroyed or is
otherwise unavailable.
Loading Software from a “Windows 9.x” PC
1. If running Windows 9.x, reboot and go into BIOS.
Make sure that the parallel port setting is set to
EPP.
NOTE: If EPP mode is not available, or does not
seem to work, set the parallel port to Bi-Directional
Mode.
2. Reboot, then press F8 and then select "Command
prompt only". The PC will boot into DOS.
3. Create a temporary directory on the host PC.
Formatted: Bullets and Numbering
4. Copy the following software update files to the
temporary directory: update.exe, wipeload.h86
and wipeout.h86. You can copy them from the
supplied Software Update disk or from files
downloaded from www.logicube.com.
Once the above has been accomplished, perform
the following:
5. Attach the parallel cable between the host PC and
Logicube OmniWIPE™.
NOTE: The parallel cable is an ordinary straightthrough DB25 data cable.
16
Logicube OmniWIPE™ User’s Manual
Formatted: Bullets and Numbering
SOFTWARE LOADING INSTRUCTIONS
6. Change to the new temporary directory and run
"update " (or "update bidi" if Bi Directional mode is
used) and then follow the instructions for
“Downloading Software to the OmniWIPE™
below.
Loading Software With a Third-Party Bootdisk
Note: Windows 2000 and NT that have NTFS file
systems cannot use the procedure above. This is
because NTFS is not accessible through DOS.
The file systems that are compatible include
FAT16 and FAT32. One workaround for this is to
configure the boot diskette to create a
RAMDRIVE and then copy and run the update
files from that drive.
1. Use a WIN98 PC to create a full bootdisk. This
disk will create a Ramdrive on bootup.
NOTE: If you do not have access to a WIN98 PC,
Logicube Technical Support can provide a
suitable bootdisk. Please see the Logicube
Knowledge Base article “How do I create a
bootdisk?” for further assistance).
2. Reboot the PC and go into BIOS. Make sure that
the parallel port setting is set to EPP.
NOTE: If EPP mode is not available or does not
work, set the parallel port to Bi-Directional Mode.
3. Insert the bootdisk into the PC’s floppy drive and
reboot, the boot disk will automatically create a
Ramdrive and give it the last available Drive
Letter (usually C: on an NTFS-formatted drive).
4. Insert another floppy disk containing the update
files and copy the following files to the Ramdrive:
update.exe, wipeload.h86 and wipeout.h86.
You can copy them from the supplied Software
Update diskette or from files downloaded from the
Web.
Formatted: Bullets and Numbering
Once the above has been accomplished, perform
the following:
5. Attach the parallel cable between the host PC and
Logicube OmniWIPE™.
6. Change to the new temporary directory and run
"update.exe" (or "update bidi" if Bi Directional
mode is used) and then follow the instructions for
“Downloading Software to the OmniWIPE™
below.
Logicube OmniWIPE ™ User’s Manual
17
Formatted: Bullets and Numbering
SOFTWARE LOADING INSTRUCTIONS
Downloading Software to the OmniWIPE™
NOTE: Make sure the update is running on the PC
and the Logicube OmniWIPE™ is connected to the
host PC via the supplied parallel cable.
1. Press and hold the Reset button. While holding it
down, press and hold the “Start/Stop” button.
Release the Reset button.
2. The OmniWIPE™ will display a hidden Software
Loading screen.
3. In the Setup Menu, highlight the “Load New
Software” setting and Press the “Select” button.
4. The unit will ask if you want to load new software.
Press the “Select” button again to accept.
5. Watch the PC screen, it should say “OmniWIPE is
alive and well”. It should then say that it is
“transferring files”. After 3-5 minutes it will say that
it is finished. Press ESC on the keyboard to exit
Update.
6. After the software update is finished, the
OmniWIPE™ will reboot itself. Check the About
screen to make sure that the new software is
listed.
NOTE: Please contact Logicube Technical
Support at (818) 700-8488 X3 if you have any
trouble with the software update.
18
Logicube OmniWIPE™ User’s Manual
5. Frequently Asked Questions and Answers
Q. Can the OmniWIPE™ perform any kind of “cloning” operations?
A. No. The OmniWIPE is designed solely for wiping data from hard drives. It cannot duplicate data
from one drive to another. Logicube sells a variety of hard drive cloning solutions; please refer to
our website at www.logicube.com.
Q. Can the OmniWIPE™ erase dissimilar drives simultaneously?
A. Yes. The OmniWIPE is able to determine the size of every drive that is attached. It will then
adjust its “Time Remaining” display to account for the largest drive.
Q. Why do I sometimes see wipe speeds greater than 2.5GB/min., and other times as slow as
200MB/min.?
A. There are a few factors that determine wipe speed:
• The age of the drives – The speed of the operation is governed by the slowest drive in the
system. If an old drive is used, chances are it cannot sustain high speeds. Newer drives
have faster electronics and larger caches, and can sustain rates as high as 16MB/sec.
•
The condition of the drives – Drives with bad/weak sectors or other hardware problems
will typically run slower than “healthy” drives.
•
Wiping more than one Target drive - This can also decrease the wipe speed, especially if
the Targets are significantly different in speed and/or capacity. Wiping one Target at a time
yields the fastest speeds, which decrease slightly as more Target drives are added.
Q. How does the OmniWIPE™ handle bad sectors on the Master and Target drives?
A. Bad (or “weak”) sectors on the Master (in WipeOut Mode) are handled in the following way:
•
The OmniWIPE™ will not notice bad or weak sectors on the Master drive unless they
occur in the same area that WipeOut is writing the chosen pattern to the Master. In
that case the OmniWIPE™ will abort the cloning process.
Bad sectors on Targets are handled as follows:
•
The OmniWIPE will try to skip bad sectors in WipeOut mode. If the unit is running in
Security Erase Mode, then it will “retire” the drive with bad sectors and continue wiping
the other drives.
Logicube OmniWIPE™ User Manual
19
FAQ’s
Q. Can I wipe drives larger than 8.5 Gigabytes?
A. Yes. The OmniWIPE™ software was designed to support drives larger than 250GB. As of this
writing, it was tested on drives up to 500GB in size. Note that some older PC’s cannot “see” drives
larger than 8.5GB due to BIOS limitations.
Q. Can I wipe from a larger drive to a smaller drive in WipeOut Mode?
A. Yes, WipeOut only writes the pattern to a small part of the Master drive so the size of the Target
drive does not matter.
Q. The OmniWIPE™ does not recognize my Master (or Target) drive? What can be done?
A. Make sure that the drive jumpers are set as a Single Master If needed, drive jumper settings
can be found at the drive manufacturer web site. Also, make sure all cables (data and power) are
connected properly to all drives.
Q. In Drive Info, I try to look at the partition table of one of my drives (by selecting “SEE MORE”).
An error message comes up that says: “There was an error reading the partition info from the drive.
Check cables and/or drive contents and try again”.
A. This error message will come up for any drive that has a corrupt or missing partition table.
Wiped drives will also display this error message in Drive Info mode.
20
Logicube OmniWIPE™ User’s Manual
6. Index
Alphanumeric Keypad, I, 8, 14
Bad sectors, 19
BIOS, 8, 13, 15, 16, 17, 20
Bootdisk, II, 17
Button, BACK, 10, 12, 14
Button, HELP, 8, 11
Button, Power, 6
Button, Reset, I, 6, 18
Button, Right Arrow, 11
Button, SELECT, 10, 11
Button, START/STOP, 7
Cable, Drive power, 2, 4
Cable, IDE, 2
Clone, 2
Connector, Power, 4
Disclaimer, Liability Limitation, II, I
Disk, Floppy, 17
Department of Defense, 11
DoD, Department of Defense, 1, 2, 11, 12
DoD, Specification M-5220, 11, 12
Drive letter, 16, 17
Drive, EIDE, 2
Drive, IDE, I, 2, 4, 5
Drive, Jumper Setting, 20
Drive, Master, 12, 13, 14, 19, 20
Drive, SCSI, 2, 4
Drive, Serial ATA (SATA), 1, 2, 4, 5
Drive, Target, 2, 4, 5, 8, 11, 12, 13, 14, 19, 20
Drives, SCSI, 2, 4
Electromagnetic Interference (EMI), 4
Erase ™ Target Mode, 1, 2, 11, 12, 13, 14, 19
Geometry, Drives, 10
Indicator Lights, I, 8
Jumper settings, 20
Laptop Drives, 1.8, 5
Laptop Drives, 1.9, 5
Logicube OmniWIPE™ User Manual
Left/Right buttons, 8
Light, Error, 9
Light, Power, 8
Light, Status, 5, 8, 9
Mode, Enhanced Erase, 13, 14
Mode, Security Erase, II, 1, 2, 8, 10, 13, 14, 19
Mode, WipeOut, II, 1, 11, 12, 13, 14, 19, 20
Partition, FAT16, 17
Partition, FAT32, 17
Partition, NTFS, 16, 17
Partition, Partitions, 10, 20
PC (computer), II, 1, 8, 15, 16, 17, 18
Position, Master, 12, 14
Position, Target, 4, 12, 14
Power Supply, I, 2, 5, 6, 7
RAMDRIVE, 16, 17
Scratch drive, 2, 12
Screen Contrast, II, 8, 11
Screen, About, II, 10
Screen, Drive Info, 10
Screen, Main Menu, 10
Screen, Settings, 8, 12, 14
Screen, Status, 12, 14
Sector, bad, 19
Sector, weak, 19
Single master, 20
Software, Loading, II, 15, 16, 17
Technical Support, Logicube, 3, 5, 10, 17, 18, 22
Transfer speeds, 19
User interface (UI), I, 7
Warranty, II, I
Warranty, Parts and Labor, II, I
Weak sectors, 19
Website, Logicube, 15, 16, 19, 22
Win2000, 17
21
INDEX
19755 Nordhoff Pl., Chatsworth, CA 91311, Tel: 818 700 8488, Fax: 818 700 8466, www.logicube.com
For further assistance please contact Logicube Technical Support at: 818 700 8488 ext. 3, or by email to
[email protected]. Hours are 7:00am to 6:00pm PST M – F.
22
Logicube OmniWIPE™ User’s Manual