1
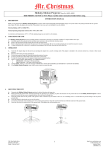
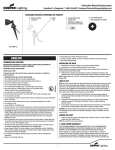
Celebration Series
Projection Light
Instructions
LL01-HC
IMPORTANT:
This manual has been updated.
Keep this version and dispose of
the manual enclosed with product.
IMPORTANT SAFEGUARDS
To reduce the risk of fire, electric shock, or injury when using any electric appliance,
precautions should be made. These precautions include but are not limited to:
Read all instructions.
CAUTION! — Use only as directed.
This product has a polarized plug to reduce the risk of electric shock. It will therefore only fit
into a polarized outlet one way. If the plug does not fit, reverse the plug. If it still does not fit,
contact a qualified electrician. Do not use with an extension cord unless the plug can be fully
inserted. Do not alter the plug.
DO NOT attempt to open the protective housing or operate the device if the aperture
windows are damaged. If the unit requires service that involves removing the protective
housing, contact the manufacturer. Opening the protective housing voids the warranty.
Use only three-wire outdoor extension cords that have three-prong grounding plugs, plugged
into grounded outlets. Acceptable extension cord types:
SW, SW-A, SOW, SOW-A, STW, STW-A, STOW, STOW-A, SJW, SJW-A, SJOW,
SJOW-A, SJTW, SJTW-A, SJTOW, SJTOW-A
Ground Fault Circuit Interrupter (GFCI) protection is to be provided on the circuit(s) or outlet(s)
to be used while operating portable projection light in a wet location. Receptacles with builtin GFCI protection are available for this purpose.
SAVE THESE INSTRUCTIONS
Before You Begin
Carefully unpack package contents to make sure all
parts are present. Some assembly is required. Note:
One slide comes preloaded for your convenience.
Slides
Ground Stake
2-Prong
Adapter
Light Projector
Assembly
1. To attach ground stake, remove the screw from the stake.
2. Use the screw to attach the stake to the pivot mount (see
fig. 1).
3. Plug the 2-prong adapter into the outlet on the power
supply transformer. Screw on the weather-resistant cap
tightly to help protect the connection from weather.
Installing Slides
1. Remove the two screws in the light casing and remove the
slide frame (see fig. 2). One slide comes preloaded in the
frame. In order to install a different slide, locate the arrow
on the slide frame. With that side facing you, remove the
Fig. 1
preloaded slide by pushing gently on both sides at the
center (see fig. 3). Be careful to avoid touching the slide images.
2. To load a new slide, turn the slide frame over. Next, with
the slide frame oriented according to fig. 4, insert the left
edge of the slide into the track on the frame. The nub on the
frame will fit into the hole in the slide (see fig. 4). Holding the
right side of the slide with your right thumb, apply strong
pressure to the back center of the slide with index finger.
Force the slide to bend slightly with strong finger pressure.
The slide will bow slightly and slip into the track (see fig. 5).
Be careful to avoid touching the slide images.
3. R
einsert the slide frame into the projection light casing,
being careful to orient the slide frame correctly with the
arrow on the frame facing the front of the projection light
(see fig. 2). Replace the screws. Note: If you notice that the
images seem to be moving backward after you turn the projection
light on, you may have installed the slide frame backward. If
this is the case, remove the frame, turn it
Fig. 4
around, and reinstall it.
Placing the Projection Light
� The projection light can be staked into
the ground. With the stake removed,
it can also be mounted to a structure
using a sturdy hanging clamp and
safety cable.
� Place light approximately 10 to 15 feet
from the projection surface (see fig.
4). After the light is turned on you may
need to adjust the distance to get the best
results.
Note: If you insert a different slide, you may need
to adjust distance for clarity.
� Position the angle of projection by
loosening and tightening the angle
adjustment screws (see fig. 5).
� The projection light must be positioned
so that the fan vent is on the bottom (see
fig. 5). Also, be sure that the fan vent is not
in danger of being blocked. If the air vent is
blocked, the unit and slide are in danger of
being damaged.
� Only use supplied transformer connected to
a properly grounded outdoor outlet.
� Do not use with dimmers.
Setting the Projection Speed & Timer
The power button on the back of the unit (see
fig. 5) also controls the speed of the motion
projection. Use the power button to toggle
between slow, medium, fast, fixed, and off.
The projection light runs on an automatic
6-hour on, 18-hour off cycle. To set the timer,
turn the projection light on at the time you
wish for the light to begin its 6-hour on cycle.
Turning the light off manually will interrupt the
timer cycle and the timer will reset to the time
at which it is next turned on.
Fig. 2
Fig. 3
Fig. 5
Fig. 6
10 ft
15 ft
Fig. 7
Power
Button
Fan
Vent
Angle
Adjustment
Screws
te
Product Specifications
Power Consumption
Up to 5 watts
Power Input
120VAC (when used with supplied transformer)
Operation
Indoor / Outdoor
Maintenance
Maintenance free — no user serviceable parts
Warranty
Limited 1-year warranty
Viatek Site
Model No. LL01-HC
Like Us
REV- 071315
Follow Us
PATENT PENDING
For customer service call 888.7.VIATEK (+1.423.402.9010 for outside the United States) or visit us online at viatekproducts.com
Pour le service a la clientele appelez le 888.7.VIATEK (+1.423.402.9010 pour l'extérieur des États-Unis) ou visitez viatekproducts.com
Para servicio al consumidor llame al 888.7.VIATEK (fuera de Estados Unidos marque +1.423.402.9010) o visite viatekproducts.com
Read Instructions
Before Operating
MADE IN
CHINA
DO NOT DISPOSE OF BATTERIES IN FIRE. ALWAYS DISPOSE OF BATTERIES PER LOCAL & FEDERAL GUIDELINES
Protect your product for 1 year beyond our standard warranty with the Viatek No Question
Protection Extended Warranty Plan. With the Extended Warranty there are no return
shipping charges, the product will be replaced or reimbursed with no deductible, and the
product is protected 100% from any mechanical or electrical failures caused by power
surges or manufacturer’s defects. Order online at viatekproducts.com today.
© 2015 VIATEK CONSUMER PRODUCTS GROUP, INC. All specifications are subject to change without notice. All rights reserved.