1
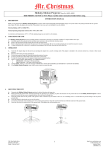
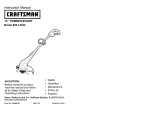
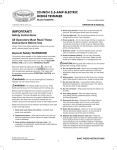
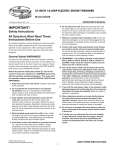
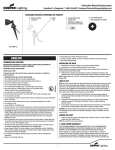
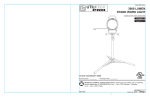
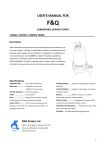
Thanks for shopping with Improvements!
Outdoor Lights &
Sounds Controller
Safety related graphical symbols
Item #302358
Bottom view of the unit
WARNING, SEE INSTRUCTION MANUAL
ELECTRIC SHOCK HAZARD
AC ONLY
PROTECTIVE EARTHING
IMPORTANT SAFETY INSTRUCTIONS
1.
Read these instructions
2.
Keep these instructions
3.
Heed all Warnings.
4.
Follow all instructions
5.
Clean only with dry cloth.
6.
Do not block any ventilation openings. Install in accordance with the manufacturer’s instructions.
7.
Do not install near any hear sources such as radiators, heat registers, stoves, or other apparatus
(including amplifiers) that produce heat.
8.
Do not defeat the safety purpose of the polarized or grounding –type plug.
two blades with one wider than the other.
A polarized plug has
A grounding type plug has two blades and a third
grounding prong. The wide blade or the third prong is provided for your safety.
If the provided
plug does not fit into your outlet, consult an electrician for replacement of the obsolete outlet.
9.
Protect the power cord from being walked on or pinched particularly at plugs, convenience
receptacles, and the point where they exit from the apparatus.
10. Only use attachments/accessories specified by the manufacturer.
11. Unplug this apparatus during lightning storms or when unused for long period of time.
12. Refer all servicing to qualified service personnel. Service is required when the apparatus has
been damaged in any way, such as power-supply cord or plug is damaged, liquid has been spilled
or objects have fallen into the apparatus, the apparatus has been exposed to rain or moisture, does
not operate normally, or has been dropped.
INDEX
Mounting the unit on the wall……………………………………………………..page 2
Installing the ground stake ………………………………………………………..page 2
Turning on the unit……………………..………………………………………....page 3
Selecting songs……………………………………………………………………page 3
Switching from different modes…………………………………………………..page 3, 4
Replacing the fuse………………………………………………………………...page 6
Troubleshooting…………………………………………………………………..page 9
WARNING: When using this outdoor LIGHTS AND SOUNDS OF CHRISTMAS , basic safety
precautions should always be followed to reduce the risk of fire, electric shock, and personal injury.
a) Use only three-wire outdoor extension cords that have three-prong grounding plugs and grounding
receptacles that accept the apparatus’ plug.
b) Ground Fault Circuit Interrupter (GFCI) protection should be provided on the circuit(s) or outlet(s)
to be used for the wet location portable lamp. Receptacles are available with built-in GFCI
protection.
c) Use only with an extension cord for outdoor use, such as type SW, SW-A, SOW, SOW-A, STW,
STW-A, STOW, STOW-A, SJW, SJW-A, SJOW, SJOW-A, SJTW, SJTW-A, or SJTOW,
SJTOW-A.
d) This power unit is intended to be correctly oriented in a vertical or floor mount position.
USE FOR LIGHTING DEVICE ONLY.
DO NOT USE FOR ANY OTHER ELECTRICAL DEVICE OR ADAPTOR.
THIS IS NOT A POWER DISTRIBUTOR.
READ ALL INSTRUCTIONS AND SAVE FOR FUTURE REFERENCE.
THIS INSTRUMENT IS NOT A TOY!
Please read this entire instruction booklet.
I. Description
Thank you for purchasing the Mr. Christmas LIGHTS AND SOUNDS OF CHRISTMAS . This product
plays 20 Christmas songs and has six outlets in which to plug light strings or decorative lighting outfits.
The unit’s capacity is:
1440 watts total or 240 watts per outlet
To calculate the number of light sets or other decorative lighting outfits can work with the Lights and
Sounds of Christmas , follow these steps:
1. Refer to your light set or decorative lighting outfit gift box to determine the set wattage
2. Divide 240 by the wattage of the light set or decorative lighting outfit.
3. The resulting number of sets can be safely plugged into each Lights and Sounds of Christmas
outlet.
EXAMPLE:
1. You have a mini light set of 40 watts.
2. Dividing 240 by 40 watts, the result 6.
3. You can safely plug 6 of these mini light sets into 1 of the outlets on the Lights and Sounds of
Christmas .
1
II. Operation
1. Installation:
FOR WALL MOUNTING:
Attach the three screws (provided) to a wall and then mount the unit on these three screws
through the three “Key holes” on the back of the unit. Make sure the unit fits securely against
the wall (Mounting Template, See FIG I).
FOR GROUND STAKING:
Slide the ground stake into the slot on the base of the unit. Carefully press the stake into the
ground. (See FIG II.)
FIG I: BACK OF UNIT WALL MOUNTING
2
FIG II: STAKE FOR GROUND MOUNTING
2. Plug your Christmas light strings or decorative lighting outfits into the six outlets (MAX 240
watts per outlet).
3. Plug the main power cord into a power outlet (recommended to plug into a receptacle or
extended receptacle protected by GFCI).
4. To turn ON, press the power switch to the “ON” position. (See FIG III.)
FIG III: POWER SWITCH
5. The song select switch allows you to choose between a group of songs in different musical
styles. (See FIG IV.)
FIG IV: MUSIC STYLE SELECTOR
6. Adjust the mode switch to get a different lighting effect:
MULTIPLEX: Each of the six outlets drives each of the coordinating light sets to create a
choreographic lighting effect to the music. (See FIG V.)
UNISON: All six outlets drive all of the light sets to flash simultaneously to the rhythm of the
music. (See FIG VI.)
3
STEADY: All six outlets keep light sets steady On (NO FLASHING). (See FIG VII.)
FIG V: MULTIPLEX LIGHTING MODE
FIG VI: UNISON LIGHTING MODE
FIG VII: STEADY LIGHTING MODE
4
7. In the MULTIPLEX MODE, the six outlets are made to work differently (to create
choreography of lights) and are marked A, B, C, D, E and F. OUTLET A has the most lighting
action, descending to OUTLET F with the least amount of action.
as desired.
8. Press the skip button to hear a new song. (See FIG VIII.)
FIG VIII: SONG SKIP BUTTON
9. Turn the volume control to adjust music loudness.
5
Arrange your light strings
III. Warning
1. Do not connect the light strings or light sets to exceed rating.
2. Always keep the weather proof cover closed after setting.
3. Includes spare fuse for replacement. Fuse replacement (see FIG IX.)
The fuse protects overloading or abuse if the specified max rating is exceeded.
To replace the fuse, always disconnect the main power cord from the power source. Replace
with same type and same rating, 12A 125V UL listed fuse.
To Replace the Fuse
Caution: Only use same type of fuse with same rating: 125V 12AMP.
Always unplug the main power cord during replacement!
Pull out the old fuse following steps 1-2-3 and replace new fuse following steps 3-2-1.
FIG IX: FUSE REPLACEMENT
6
IV. Suggested Set-up in the “Multiplex” setting
Since everyone decorates their home in a unique way, there are likewise many unique ways to set your
lighted decorations to music using the Lights and Sounds of Christmas . One easy way to consider
about using this product in the Multiplex setting is to think of your outdoor lighting décor within
“Zones.” Below are photos and charts outlining two possible arrangements of the six “Zones” using the
Lights and Sounds of Christmas :
1.
Symmetrical-Set Up: Using the following arrangement, the flashing of the light will occur along
symmetrical lines in the outdoor décor:
Lights as Zone:
Zone 1 – Left Eaves and Bushes
Zone 2 – Right Eaves and Bushes
Zone 3 – Door Frame
Light in Zone
Zone 4 – Center Eaves
Zone 5 – Tree
Zone 6 – Deer/Light Sculpture
Plug into
Will Have the Effect
socket on Unit
1—Left Eaves and Bushes
A—Top Left
Most flashing, will interact with Socket B
2—Right Eaves and Bushes
B—Top Center
Most flashing, will interact with Socket A
3—Door Frame
C—Top Right
Medium flashing, will interact with Socket D
4—Center Eaves
D—Bot Left
Medium flashing, will interact with Socket C
5—Tree
E—Bot Center
Least flashing, will “highlight” music with Socket F
6—Deer/Light Sculpture
F—Bot Right
Least flashing, will “highlight” music with Socket E
7
2.
Panoramic Set Up: Using the following arrangement, the flashing of the light show will be
distributed in more of a panorama across the housefront:
Lights as Zone:
Zone 1 – All Eaves
Zone 2 – All Bushes
Zone 3 – Door Frame
Light in Zone
Zone 4 – Tree
Zone 5 – Left Deer
Zone 6 – Right Deer
Plug into socket
Will Have the Effect
on Unit
1—All Eaves
A—Top Left
Most flashing, will interact with Socket B
2—All Bushes
B—Top Center
Most flashing, will interact with Socket A
3—Door Frame
C—Top Right
Medium flashing, will interact with Socket D
4—Tree
D—Bot Left
Medium flashing, will interact with Socket C
5—Left Deer
E—Bot Center
Least flashing, will “highlight” music with Socket F
6—Right Deer
F—Bot Right
Least flashing, will “highlight” music with Socket E
8
V. Troubleshooting
Your LIGHTS AND SOUNDS OF CHRISTMAS
has been designed to give many seasons of trouble
free operation. In the event that a problem does occur, please refer to the following chart for suggested
solutions.
Problem
Likely Cause
Solution
No lighting effect
No power
Make sure the main power cord is plugged into a
working outlet.
No music
Overloading caused by
Replace the fuse (follow the procedure as outlined
connecting light strings or
in the fuse replacement section in this manual).
decorative lighting outfits over
the rating max 1440 watts,
fuse burnt out
1. Make sure the light string plug is plugged into
No lighting effect, Light string problem
the unit receptacle.
but music plays
2. Remove light string(s) from unit and plug
directly into a power source to see if they
light up. If they do not, check for missing or
broken bulbs.
3. Check for blown fuse in light string plug, and
replace if damaged
4. Check to see if fuse in unit is damaged. If it
is, replace with spare fuse (provided). Refer
to Section III in this user manual. .
Lighting effect not 1. If in MULTIPLEX, light 1. Re-arrange string(s). See section II, part 7.
as desired
string(s) not plugged into
correct outlet
2. Adjust mode switch. See section II, part 6.
2. Mode switch on wrong
setting
9
90-DAY LIMITED WARRANTY
Mr. Christmas Incorporated warrants to the original consumer/purchaser of the LIGHTS AND
SOUNDS OF CHRISTMAS
that it will be free from defects in material and workmanship for a
period of 90 days from date of purchase. Any liability of Mr. Christmas under this warranty shall be
limited to the repair or replacement of defective parts without charge if the item is returned with
shipping charges prepaid together with proof of date-of-purchase, name and mailing address of the
original consumer/purchaser and a description of the defect. Please call warranty service at
1-800-4MR-XMAS for a claim number and instructions on how and where to return the item.
Mr. Christmas shall not be liable for any other damages or loss. Some states do not allow the exclusion
or limitation of incidental or consequential damages. Accordingly, the limitation or exclusion may not
be applicable to certain consumers/purchasers.
This warranty does not cover defects caused by damage in transit, abuse, accident, negligence or
repairs made by others. This warranty gives the consumer/purchaser specific legal rights. The
consumer/purchaser may also have other rights which vary from state to state.
©2007 MR. CHRISTMAS
10