1
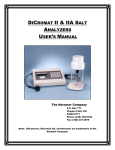
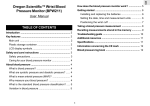
User Manual RELATED ITEMS Hopkins® IMPACT Digital Wrist BP • Hopkins ® Flex Temp Thermometer #579420 • Hopkins ® Wave t m Pulse Oximeter #594029 Item #526014 Hopkins® IMPACT Digital Wrist BP Thank you for selecting the Hopkins® IMPACT Digital Wrist BP #526014. To use this BP monitor correctly and safely, please read this entire manual thoroughly and keep it for your reference. 5 Greenwood Place • Baltimore, MD 21208 1-800-835-1995 • FAX: 410-484-4036 w w w. h m p o n l i n e . c o m INDEX INTRODUCTION ................................................................................................. 1 •Safety information •LCD display •Monitor components BEFORE YOU START ..................................................................................... 4 •Installing and replacing batteries •Setting date and time MEASUREMENT ................................................................................................. 7 •Positioning the cuff •Taking a measurement RECORDED MEASUREMENTS ........................................................................ 9 •Recalling records •Deleting records USER INFORMATION ...................................................................................... 11 •Tips for operation •Maintenance ABOUT BLOOD PRESSURE ........................................................................... 13 •What are systolic and diastolic pressure? •What is normal blood pressure? •Why does my blood pressure fluctuate throughout the day? •Why is the reading I get from a healthcare provider different from the ones I take at home? •Which arm should I use to take my blood pressure? TROUBLESHOOTING ...................................................................................... 15 SPECIFICATIONS ............................................................................................. 16 WARRANTY INFORMATION ......................................................................... 17 Thank you for selecting the Hopkins® IMPACT Digital Wrist BP (Item #526014). This monitor features blood pressure measurement, pulse rate measurement, and an auto-save function. Readings taken by the #526014 are equivalent to those obtained by a trained observer using the cuff and stethoscope auscultation method. This manual contains important safety and care information, and provides step by step instructions for using this product. Read this manual thoroughly before using this product ♥ Features INTRODUCTION •Measures Systolic Blood Pressure •Measures Diastolic Blood Pressure •Measures Pulse Rate •Retains historic records of up to 60 previous measurements ♥ Safety Information The following symbols may be used in the user manual, product labeling, or on other components. They are the requirement of standard and use. Caution: consult accompanying documents Type B applied part CE Mark: conforms to essential requirements of the Medical Device Directive 93/42/EEC DISPOSAL: Do not dispose this product as unsorted municipal waste. Collection of such waste separately for special treatment is necessary. Manufacturer Direct current Specifies serial number Authorized Representative in the European Community ! CAUTION This device is for adult use only. This device is intended for non-invasive measuring and monitoring of arterial blood pressure. It is not intended for use on extremities other than the arm or for functions other than obtaining a blood pressure measurement and pulse rate. Do not confuse self-monitoring with self-diagnosis. This unit allows you to monitor your blood pressure. Do not begin or end medical treatment based solely on self-monitoring, consult a physician for treatment advice. If you are taking medication, consult your physician to determine the most appropriate time to measure your blood pressure. Never change a prescribed medication without consulting your physician. This unit is not suitable for continuous monitoring during medical emergencies or operations. If the cuff pressure exceeds (300 mmHg), the unit will automatically deflate. Should the cuff not deflate when pressures exceeds (300 mmHg), detach the cuff from the arm and press the START/ STOP button to stop inflation. To avoid measurement errors, carefully read this manual before using this device. This device is not AP/APG equipment and not suitable for use in the presence of a flammable anesthetic mixture with air, or with oxygen, or nitrous oxide. Please avoid strong electromagnetic fields as they may interfere with or damage this device. Always check this device to make sure that it is in proper working condition before use. 1 Systolic blood pressure INTRODUCTIONDiastolic blood pressure kPa High pressure result Low pressure result Batteries are low and need to be replaced Shocking remainding Shocking will result in inaccurate Pulse/minute Deflating CUFF air is exhausting of deflating Average Memory blood pressure Systolic Diastolic blood pressure INTRODUCTION Low battery Pulse Time (hour:minute) ♥ LCD Display SYMBOL DESCRIPTION Measurement Unit of the blood pressure (1kPa=7.5mmHg) List 1.Blood Pressure Monitor (TMB-1018-A) ♥ Monitor Components LCD DISPLAY The average of blood pressure Currently time Recalling The erecords will be showed EXPLANATION Irregular heartbeat Arrhythmia If “M”pressure shows, the displayed measurement High result values is from theGrade memory. The grade of the blood pressure. AIR CONNECTOR PLUG For instructions,refer Low pressure result to Page 9 For instructions,refer to Page 13 BATTERY COMPARTMENT 3. 4*AAA alkaline batteries BP LEVEL INDICATOR LIGHT Pulse mmHg SYMBOL SYS DIA Pul/min +Lo mmHg Pulse/minute Measurement Unit of the blood pressure (1mmHg=0.133kPa) Deflating CUFF air is exhausting of deflating DESCRIPTION EXPLANATION kPa Measurement Unit of the blood pressure 2 Time (hour:minute) Currently time Systolic BP High pressure result (1kPa=7.5mmHg) Memory If “M” shows, the displayed measurement are low and need to be replaced values is from the memory. Pulse Pulse per Minute (Beats per Minute) For instructions,refer Page 9 Shocking remainding Shocking will result intoinaccurate Diastolic LowBP battery LowmmHg Battery Low pressure result Batteries Batteries are low and need to be replaced Measurement Unit of Average Millimeters Mercury Recalling kPa Irregular Heartbeat Arrhythmia blood pressure The average of blood the pressure (1mmHg=0.133kPa) Measurement unit of blood pressure The erecords will be showed Measurement Unit of the blood pressure Irregular heartbeat (arrhythmia) detected (1kPa=7.5mmHg) Irregular heartbeat Grade Low battery Memory Shocking If “MEM” shows, the displayed value The gradeare ofmeasurement the blood pressure. Batteries low and need to be replaced is from the memory recorded measurements For ofinstructions,refer to Page 13 (See page 9 forShocking instructions)will result in inaccurate remainding Average Average Recalling 2 Inflating Arrhythmia BATTERY COMPARTMENT List AIR CONNECTOR PLUG 1.Blood Pressure Monitor (TMB-1018-A) 2.Cuff (Type B applied p 3.List 4*AAA alkaline batteries 1.Blood Pressure Monitor (TMB-1018-A) 4.User manual 2.Cuff (Type B applied p 3. 4*AAA alkaline batteries 4.User manual Thewith erecords willthebe showed The unit is inflating air to obtain needed level of pressure Irregular heartbeat Deflating The unit is deflating and the air is being exhausted from the cuff Time (hour:minute) The current time (set by user) Grade 2 The average of The the blood pressureof measurements average blood pressure LCD DISPLAY The grade of the blood pressure. For instructions,refer to Page 13 3 BEFORE YOU START BEFORE YOU START ♥ Installing and Replacing the Batteries 1. Slide off the battery cover on the back of the unit. 2. Install the batteries by matching the correct polarity, as shown below. Always use the correct battery type (2 alkaline AAA size) 3. Replace the battery cover. ♥ Setting the Year, Date, Hour Format, Time, and Measurement Units It is important to set the clock before using your blood pressure monitor so that a time stamp can be assigned to each record stored in the memory. (The year can be set to anywhere between 2000 and 2050.) 1. When the unit is off, press the “SET” button once then press “SET” again and hold for 3 seconds to enter the mode settings. Replace the batteries when any of the following happens •The +Lo shows •The display dims •The display does not light up 2. The [YEAR] will begin to flash. Press “MEM” to advance to the current year. 3. Press “SET” when you have reached the correct year to save your choice and advance to the next step. ! CAUTION •If this device will be stored for an extended period of time, please remove the batteries in order to avoid corrosion. •Used batteries are harmful to the environment, so please dispose of appropriately. Remove the old batteries from the device and follow your local recycling guidelines 4. Repeat steps 2 and 3 to set the [MONTH] and [DAY]. •Battery corrosion is not covered under your three year limited warranty. 4 5 BEFORE YOU START 6. Repeat steps 2 and 3 to set the [HOUR] and [MINUTE]. MEASUREMENT ♥ Positioning the Wrist Cuff 1. Remove all accessories (watch, bracelets, etc.) from your left wrist. If your physician has diagnosed you with poor circulation in your left arm, use your right wrist instead. 2. Roll or push up your sleeve to expose the skin. 8. Your selected settings will advance for review and the monitor will then turn off automatically. 3. Apply the cuff to your left wrist with your palm facing up. 4. Keep the monitor level with your heart. 5. Position the edge of the cuff about 1 inch from your wrist. 6. Fasten the wrist cuff around your wrist, leaving no extra room between the cuff and your skin. If the cuff is too loose, the measurement will not be accurate. ♥ Tips for Accuracy •You should always rest for at least 5 minutes before measuring your blood pressure. •Wait at least 3 minutes between measurements. This allows your blood circulation to recover. •For a meaningful comparison, try to take blood pressure measurements under similar conditions. For example, take daily measurements at approximately the same time, on the same arm, or as directed by a physician. 6 7 RECORDED MEASUREMENTS MEASUREMENT ♥ Start the Measurement ♥ Recalling Recorded Measurements 1. Press the “START/STOP” button to turn on the monitor, and it will complete the whole measurement automatically. 1. Press the “MEM” button to display the average of the records. The monitor will adjust to zero automatically, then inflate and begin the measurement automatically. 2. Press either the “MEM” button or the “SET” button to toggle between the records. The monitor will display and save the results automatically. The Level Indicator Light next to the “START/ STOP” button will display a color corresponding with the category of your reading. For more about blood pressure levels, see page 13. The order of the record, date, and time will display alternately. Blood Pressure Level Indicator Light Colors GREEN YELLOW RED Optimal & Normal Mild Hypertension Moderate to Severe Hypertension (lower than SYS 140 & DIA 90) (SYS 140-159 & DIA 90-99) (higher than SYS 160 & DIA 100) The corresponding date was the 5th of January The corresponding time was 10:38 AM ! CAUTION The most recent record 2. Press the “START/STOP” button to power off the monitor, otherwise it will automatically turn off within 1 minute. 8 is shown first. Each new measurement is assigned to the first (1) record. All other records are pushed back one digit (e.g., 2 becomes 3, and so on), and the last record is dropped from the list. 9 USER INFORMATION RECALLING RECORDS ♥ Deleting a Record from the Memory If you did not get the correct measurement, you can delete your most recent result, or you can delete all the results in the measurement history by following the steps below: 1. Press “MEM” button to enter the memory screen, then press and hold the “MEM” button for 3 seconds – the display will alternately flash “DEL ONE” and “DEL ALL”. ♥ Tips for Measurement Measurements taken under some circumstances may cause the monitor to provide inaccurate readings: Always wait at least 1 hour after eating or drinking Never take a reading immediately after drinking tea or coffee, or after smoking. Always wait at least 20 minutes after taking a bath or shower Never take a reading while talking or moving your fingers Never take a reading in a very cold environment Never take a reading when you need to use the restroom 2. To delete the most recent record, wait until the display shows “DEL ONE”, then press the “SET” button to delete the latest record. 3. To delete all of the records at once, repeat step 1 and when the display shows “DELETE ALL” press the “SET” button. 4. If you don’t want to delete any of the records, press the “START/STOP” button to escape. 5. If there is no record, the display will be blank. 10 11 USER INFORMATION ABOUT BLOOD PRESSURE ♥ What are Systolic and Diastolic Pressure? ♥ Care and Storage In order to get the best performance out of your blood pressure monitor, please follow the instructions below: When the ventricles contract to pump blood out of the heart, the blood pressure reaches its highest pressure in the cycle. This is known as systolic pressure. The lowest blood pressure in the cycle occurs when the heart relaxes between heartbeats, and this is known as diastolic pressure. The systolic pressure is the top number in your blood pressure reading, and the diastolic is the bottom number. Avoid direct sunlight. Do not submerge in water or any other liquid. ♥ What is a Normal Blood Pressure? The following charts illustrate the blood pressure classification level established by the World Health Organization (WHO) and International Society of Hypertension (ISH) in 1999. Avoid shaking or dropping the monitor. Store at room temperature in a dry, clean environment. BP Level (mmHg) Optimal BP Normal BP SYS <120 DIA <80 Mild Moderate Severe Hypertension Hypertension Hypertension 120~139 140~159 160~179 >180 80~89 90~99 100~109 >110 ! CAUTION Never use a wet cloth to remove dirt. Always use a clean, dry cloth. Do not wash the monitor or the cuff. Only a physician can tell you your normal blood pressure range and the point at which you are at risk. Consult your physician to obtain these values. If the measurements taken with these products fall outside the range, consult your physician. 12 13 ABOUT BLOOD PRESSURE TROUBLESHOOTING ♥ Why does my blood pressure This section includes a list of error messages and frequently asked questions for problems you may encounter with your blood pressure monitor. If this product is not operating as you think it should, please check here before arranging for service. fluctuate throughout the day? 1. Individual blood pressure readings can naturally vary throughout the day, so for the best accuracy, take your readings the same way each time. (See Tips for Accuracy on page 6.) 2. Blood pressure readings can fluctuate if you are taking medications. 2. If you are taking multiple readings, wait at least 3 minutes between readings for best accuracy. ♥ Why is the reading I get from a healthcare provider different from the ones I take at home? Your blood pressure can be different even during a 24 hour period because of factors like the weather, emotional state, recent exercise or exertion, etc. Your readings may be elevated in a healthcare setting because of anxiety caused by the “white coat effect” and you may get lower readings at home where you are calmer. When taking your blood pressure at home you should always make sure the cuff is fastened and placed properly, and that the cuff is not too tight or too loose. Make sure you are not overly anxious or stressed as this will elevate your readings. It is recommended to take 2-3 deep breaths before beginning to take your blood pressure. PROBLEM SYMPTOM No Power Display is dim or will not light up Low Batteries Error Message CHECK THIS REMEDY Are the batteries dead? Replace with new batteries. Are the batteries inserted correctly? Insert the batteries correctly. +Lo Shows on the display Are the batteries low? Replace with new batteries. “E 1” Shows on the display The monitor detected that the cuff is not secure Refasten the cuff and take a new reading. “E 2” Shows on the display The monitor detected that the cuff is too tight Refasten the cuff and take a new reading. “E 3” Shows on the display The monitor detected that the pressure of the cuff is in excess Relax for a moment and then take a new reading. “E 10” or “E 11” Shows on the display The monitor detected motion while measuring Movement can affect the measurement. Relax for a moment and then take a new reading. Try to remain still for the second reading. A calibration error occurred Take a new reading. If the problem persists, contact customer service for further assistance. Refer to page 17 for warranty and contact information. ♥ Which arm should I use to take my blood pressure? Blood pressure readings can be taken on either the right or left arm, but it is recommended to take readings using the left arm. Consult your physician if you think you need to use your right arm instead. Whichever arm you use, it is important to take your blood pressure using the same arm every time you take a reading. 14 “EEXX” Shows on the display 15 SPECIFICATIONS WARRANTY INFORMATION ♥ Warranty & Registration Information Power Supply Two AAA Alkaline Batteries (included) Display Model Digital LCD V.A. 1.5” x 1.375” Measurement Mode Oscillographic Testing Mode any time, repairs will be made without charge upon the return of the instrument Measurement Range Pressure: 30 - 280mmHg Pulse Value: 40 - 199 beats/minute to Hopkins Medical Products, except in cases of obvious abuse or accidental Pressure: Approx. 50˚F - 77˚F within ± 3mmHg Approx. 50˚F - 104˚F (out of 59˚F ~ 77˚F) within 6mmHg *NOTE* If your BP monitor will be stored for an extended period of time, please Your Hopkins® Digital BP comes with a 3 year limited warranty. This BP monitor is warranted against any defects in material and workmanship for 3 years from the date of purchase . If you experience a material or manufacturing defect at Accuracy damage. remove the batteries in order to avoid corrosion. Battery corrosion is not covered under your 3 year limited warranty. Pulse Value: ± 5% Normal Working Conditions Temperature: Approx. 50˚F - 104˚F Relative Humidity ≤ 80% Cuff Circumference Approx. 5” - 8.5” (12.5cm - 21.5cm) Weight External Dimensions Parts Included Mode of Operation Degree of Protection Protection Against Ingress of Water Approx. 0.04 oz (excluding batteries) Approx. 3” x 2.5” x 0.75” To register your new Hopkins® Digital BP for its warranty with Hopkins Medical Products, please visit www.hmponline.com/registration or scan this QR code with your smartphone and complete the registration process. (Reorder #526014) Two AAA Alkaline Batteries, and a User Manual Continuous Operation Type B Applied Part ♥ Contact Information For more information about our products, please visit our website: www.hmponline.com IPX-0 For customer service, please call us at 1-800-835-1995 M-F 8:30 AM - 5 PM EST WARNING: No modification of this equipment is allowed Hopkins Medical Products 5 Greenwood Place, Baltimore, MD 21208 16 17