1
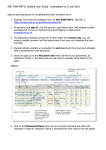
User Manual Content Guide: Create Workplace Add/configure filters Invite Company Add Users Add products Instructions for use Risk Assessment and Substitution The Browser window after you have logged in with your username and password. Press «My Hierarchy» and then press «Workplaces» to view existing workplaces Now you can upload existing workplaces Create Workplace(1) Press «Workplace» and «Create Workplace» Choose next... Create Workplace(2) Fill out the «Workplace Details Blue fields in the Work Place Area are required along with an estimated end date in order to progress in the registration. Add/Configure filters On this level you can adapt filters and lists Here you can choose “Configure filters" and then add phrases or entire lists eg A20 BREEAM list, SIN list, Priority etc. Invite Company(1) Your Workplace is created and automatically added to your dashboard. To retrieve Workplace tap "view" in the established Workplace when you stand on "dashboard“. The first thing you usually do on a new workplace is to invite a company. Invite Company(2) Search for the company you want to invite and click "add“ Here you can add sub-contractors, wholesalers and suppliers. Add product Press «Add Product» Search product supplier (to the left) or commercial / product name(to the right) Once you've found your product press "add“ Click the star to add to favorites. Accompanying documents such as SDS and Declaration of performence are automatically added when adding products. Add users Press «My Profile» The press «User Administration List» Then press «Add User» Fill in all the fields and press save. New user will receive an e-mail with a username and password. Instructions For Use Choose «Instructions for Use» on the menuline to create a Instruction for Use There are three ways to make a Instructions for Use 1) Search and upright work instructions for the selected SDS 2) Create separate Instructions for Use (exhaust, particulate matter, etc.) 3) View or edit the saved work instructions/Risk Assessments Risk Assessment and Substitution (1) Select "Risk Assessment" on the menu bar to do a risk assessment Press “Create New" to begin an assessment Risk Assessment and Substitution (2) Search and add SDS to be included in the assessment. You can choose how many you will. Search and add SDS to be included in the assessment. You can select as many as you want to resort to risk assessment and substitution. Press “add” to the selected SDS(s) Risk Assessment and Substitution(3) Define exposure level and frequency of use Risk Assessment and Substitution(4) Select the status of the product (red, yellow, green). Enter your commentaries product. At the bottom you can make a conclusion and give assessment a name! Risk assessment can also be made direct from workplace.