1
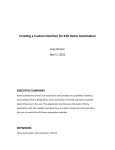
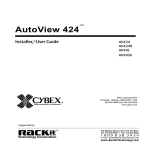
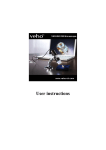
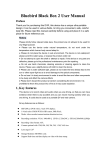
C628 Enhanced JPEG Module
EV Kit
User Manual
C628 Enhanced JPEG Module
EV Kit
USER MANUAL
Kit Content
Model No
C628
CU2RS
CUSBM
CRS232
CAV25
PS5V1A
CDR
Description
Enhanced JPEG Module
Cable - UART to RS232 adapter
Cable - USB with mini connector
Cable – RS232
Cable – AV
Power adapter 5V 1A
CD ROM contain C628ap.exe
Qty
1
1
1
1
1
1
1
PC Setup
1. Create a folder on PC to content the evaluation program and images, eg C628
2. Copy the program C628ap.exe from CD ROM to PC folder C628
3. Connect RS232 cable to UART adapter cable
C628 Setup
PWR LED
AV socket
PWR socket
UART socket
Mini USB
1.
2.
3.
4.
Plug in the 4pin connector of UART adapter cable to the UART socket
Plug in the AV cable, the other end to TV video in, if one would like to view the video and photo in TV
monitor.
Plug in power socket, the LED closed to the power jack will be ON, however, it doesn’t mean the module is
working at this moment. It is used to indicate the power connection status only.
Don’t plug in the USB power at the moment, unless you want to upload the image to PC.
Note: when plug in the USB cable, the C628 module will switch to Mass Storage mode automatically. It
becomes a “hard disk” and cannot do DSC functions.
5.
6.
To turn on the module, press the PWR ON switch, the LED next to the SD card socket will be ON. This time,
the module is really in operation
To turn off the module, press again the PWR ON switch again.
Start communication with C628 module
1. Make sure the setup is correct and turn on the
module
2. On PC, click C628AP.exe, the application window
will pop up as right.
3. Before the program can talk to the module, need to
open the COM port first. You can select either
57600 or 115200 baud rate for connection.
Note:
1. Need to check your COM port setup, make sure the
selected COM port is free
2. In some cases, people use USB to Serial cable instead
of direct COM port, if so, need to set up the COM
port destination to COM 1 – COM 4. Don’t use
COM 5 and up. This can be set from PC control
panel > system >hardware >serial port >properties
Page 2 of 4
C628 Enhanced JPEG Module
EV Kit
USER MANUAL
Operation of the evaluation program C628AP
Introduction
1. The purpose: it is used to evaluate the Enhanced JPEG module. Thru the operation, people will understand
how to communicate with the module. We try to implement as many features as possible in this evaluation
program. Most of the command has been used.
Note: It is not a finished product, however, people can develop his own application as a part of finished
product. NO source code of the program will be provided.
2.
3.
4.
The application has been divided to 3 parts: General setup, Capture and Playback.
All the commands sent to the module or the message response from the module has been recorded on the
right window. The contents are time, command ID, send or receive, detail parameters. It is easy for people to
understand what has been done in between.
Please refer to the C628 user manual for detail command list
General Setting
1. Date /time: user can set his preferable time or get the
system time from PC and set to the module.
2. Memory operation: can select on board memory or
external memory and format the selected memory
device.
3. TV system selection: it needs to set correct TV
system before one can view the image correctly. For
European country, it is PAL and for American
countries, it is NTSC
4. Version check: to provide info of the firmware
version of the module and version of sensor used.
5. Power off: one can turn off the power of the module
by software method.
Capture
1. Image setting: user can use default setting or his
preferable setting on white balance, EV, contrast,
color effect and sharpness
2. Data stamp: the module allows people to stamp
either the date time or character string on to the
image. User can assign different location and format
of the data to stamp on the photo.
3. Current luminance: to read the luminance value
from the module
4. Image size setting: 1280x960 or 640x480
5. Compression ratio setting: 1-45
6. No of image capture: can be set from 1 to 999, but
actual number is dependent on the size of memory.
7. AVI setting: default is 320x240 30fps, can change
to 640x480 30fps. Please note the larger the image size, the more memory required.
8. Length of AVI capture: no limited, if Stop button has not been pressed, it will record until the memory full.
Page 3 of 4
C628 Enhanced JPEG Module
EV Kit
USER MANUAL
Playback
1. Play on TV: if the module has been connected to
TV monitor, people can view the real time video
image, or playback image/AVI on TV. Simply
click buttons, one can operate the module like
portable DSC with TFT display. Note, when
play on TV, it commands the module directly,
image data has not been uploaded to PC.
2. File Operation: every time enter playback page,
it will update the total number of files in
memory. User can set the number of image to
upload it to PC.
3. Upload image to PC: set the number, click get
and wait until the progress bar fill up and
prompt. If upload is success, the thumbnail of
image will be shown in the window. The image
will be stored under the same folder of the
C628AP.
Note that the speed is slow using serial
communication. The bigger the files, the longer
time to upload. If it happened to loss the
communication, need to try again.
4.
5.
6.
Playback AVI: if the AVI is uploaded, the
operation bar will be appeared on the bottom of
the thumbnail image. This time, the AVI file is
stored in PC and user can play the AVI same as
playing other video clip.
Delete images: one can delete all images in the
memory by format at General page or delete
one image by click DeleteCurr button
Get file information: without upload the real
image to PC, user can send command to get the
image information, see if it is photo or AVI,
files size.
Getting data thru USB port
The Enhanced JPEG module will change to mass device if plugged in to the PC USB port, this will facilitate
people to upload the image from module to PC in faster way. However, when it is performed in mass storage
mode, it couldn’t perform DSC functions. It is recommended to shut down the C628AP before plug in the USB
cable.
NOTE: Always keep in mind that the USB connection is used only at file transfer. Unplug the USB cable when
running C628AP.
Page 4 of 4