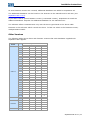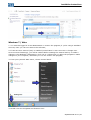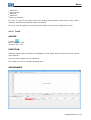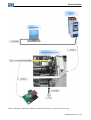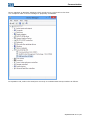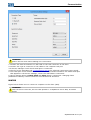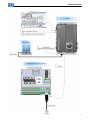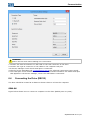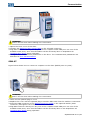
1
Motors | Automation | Energy | Transmission & Distribution | Coatings
Software
SuperDrive G2 12.0.0
User's Manual
User's Manual
Series: SuperDrive G2
Language: English
Document: 10001140879 / 17
Publication Date: 09/2015
Contents
Contents
1
SuperDrive G2 12.0.0
5
2
Getting Started
6
1
Welcome
................................................................................................................................... 6
2
Main Features
................................................................................................................................... 6
3
What's New
................................................................................................................................... 6
4
Copyright
...................................................................................................................................
Notice
14
5
Safety...................................................................................................................................
Warning
14
6
User's ...................................................................................................................................
Manual - PDF
14
3
Installation Instructions
15
1
Before...................................................................................................................................
Installing
15
2
Minimum
...................................................................................................................................
Requirements
15
3
Supported
...................................................................................................................................
Drives
16
4
Installing
................................................................................................................................... 22
5
Uninstalling
................................................................................................................................... 28
6
USB Driver
................................................................................................................................... 32
4
Menus
1
33
Project................................................................................................................................... 33
New
......................................................................................................................................................... 33
Open
......................................................................................................................................................... 34
Close
......................................................................................................................................................... 34
Save
......................................................................................................................................................... 35
Save As
......................................................................................................................................................... 35
Rem ove
......................................................................................................................................................... 36
Im port
......................................................................................................................................................... 36
Export
......................................................................................................................................................... 37
Change Voltage ......................................................................................................................................................... 37
Print
......................................................................................................................................................... 38
Project Inform ation
......................................................................................................................................................... 38
Exit
......................................................................................................................................................... 39
2
Drive ................................................................................................................................... 39
Identify Drive
......................................................................................................................................................... 39
Com m unication .........................................................................................................................................................
Setup
41
Security System......................................................................................................................................................... 43
Security System.........................................................................................................................................................
(Session)
44
New Param eters.........................................................................................................................................................
File
45
Edit Param eters .........................................................................................................................................................
File
46
Rem ove Param eters
.........................................................................................................................................................
File
47
Export Param eters
.........................................................................................................................................................
File
47
Read Param eters.........................................................................................................................................................
from Drive
48
Write Param eters
.........................................................................................................................................................
to Drive
49
Monitor Param eters
......................................................................................................................................................... 49
Monitor using Keypad
......................................................................................................................................................... 50
Monitor Status ......................................................................................................................................................... 51
Monitor Speed Reference
......................................................................................................................................................... 53
SuperDrive G2 12.0.0 | 3
Contents
Trend
......................................................................................................................................................... 54
Rem ove Trend File
......................................................................................................................................................... 58
Export Trend File......................................................................................................................................................... 58
Trace
......................................................................................................................................................... 59
Rem ove Trace File
......................................................................................................................................................... 62
Export Trace File......................................................................................................................................................... 62
3
Tools ................................................................................................................................... 63
Options
4
Help ................................................................................................................................... 66
Contents
About
5
......................................................................................................................................................... 63
......................................................................................................................................................... 66
......................................................................................................................................................... 66
Context menus
1
Project................................................................................................................................... 68
Renam e
Save As
Close
6
68
......................................................................................................................................................... 68
......................................................................................................................................................... 69
......................................................................................................................................................... 70
Communication
71
1
Drive Parametrization
................................................................................................................................... 71
2
Connecting
...................................................................................................................................
the Drive (USB)
73
3
Connecting
...................................................................................................................................
the Drive (USB - Virtual COM Port)
75
4
Connecting
...................................................................................................................................
the Drive (RS232)
87
5
Connecting
...................................................................................................................................
the Drive (RS485)
89
6
Connecting
...................................................................................................................................
the Drive (Bluetooth)
105
7
RS232
...................................................................................................................................
Cable
124
8
USB Cable
................................................................................................................................... 125
9
USB to
...................................................................................................................................
Serial Adapter
127
10
Bluetooth
...................................................................................................................................
USB Adapter
129
11
Before
...................................................................................................................................
Trying to Establish Communication
129
12
Exception
...................................................................................................................................
During Monitoring
129
7
Libraries
130
1
JFreeChart
................................................................................................................................... 130
2
jSSC ................................................................................................................................... 130
Index
131
SuperDrive G2 12.0.0 | 4
SuperDrive G2 12.0.0
1
SuperDrive G2 12.0.0
Technical Support: Contact a local branch or representative.
Contact Us: http://www.weg.net/
Publication Date: 09/2015
Start
Click the Welcome button to start.
Welcome
SuperDrive G2 12.0.0 | 5
Getting Started
2
Getting Started
Welcome
Main Features
What's New
Copyright Notice
Safety Warning
User's Manual - PDF
2.1
Welcome
Welcome to SuperDrive G2!
Thank you for using SuperDrive G2, a windows based graph tool for parameter setting,
command and monitoring of drives.
SuperDrive G2 is a computer tool for making the use of drives as easy and convenient as
possible.
SuperDrive G2 provides user-friendly tools for viewing, manipulating, and exchanging data with
the drive. Data can be retrieved, changed and stored. The computer is connected to the drive
using serial communication.
2.2
Main Features
Online identification of connected drive;
Offline configuration of drive;
Parameter transfer from computer to the drive;
Parameter transfer from drive to the computer;
Offline editing of the parameters stored on the computer;
Online editing of the parameters in drive;
Monitoring of the drive status;
Command operations (motor stop/run, jog, forward/reverse, local/remote, etc);
Supports multiple databases for standard and special firmware version;
RS232, RS485 and USB point-to-point serial communication;
Graphical monitoring of parameters;
Configuration, import and visualization of variables stored in Trace function of the drive
(CFW-11, SCA06 and CTW900)
Project importation and exportation;
Online help.
NOTE!
Some features are not available in all drives.
2.3
What's New
SuperDrive G2 12.0.0
09/30/2015
New Functions:
SuperDrive G2 12.0.0 | 6
Getting Started
Windows 8.1 (x86, x64) is supported;
German language is supported;
Function to change voltage in project (CFW11 only);
Communication with CFW11 V4.21;
Communication with CFW11 V15.16;
Communication with CFW11 V15.84;
Communication with CFW11 V15.90;
Communication with CFW11 V15.91;
Communication with CFW11 V15.97;
Communication with CFW11 V45.11;
Communication with CFW11 V45.12;
Communication with CFW100 V2.4X;
Communication with CFW500 V1.8X;
Communication with CFW501 V1.8X;
Communication with SCA06 V1.5X;
Communication with SSW7000 V1.3X;
Communication with SSW7000 V1.4X;
Communication with PLC11-01 V1.7X;
Communication with PLC11-02 V1.7X;
Communication with CTW900 V1.1X;
Communication with SSW06 V1.8X;
Communication with SSW07 V1.5X;
Communication with SSW08 V1.5X.
Enhancements:
Reduced the response time when connected with CFW11;
Visual improvements (new icons);
Improvement in presentation of option Projects (in Options > Projects);
USB driver update;
Communication with CFW11 V3.5X, added database in german language;
Communication with CFW11 V5.4X, added database in german language;
Communication with CFW11 V65.1X, added database in german language;
Communication with CFW500 V1.5X, added database in german language;
Communication with CFW700 V2.0X, added database in german language;
Communication with MW500 V1.5X, added database in german language.
Corrections:
Communication with CFW11 V5.4X;
Communication with ECW500 V1.0X.
SuperDrive G2 11.3.0
09/24/2014
New Functions:
Function Save As project;
Function Rename project;
New options for printing parameters;
Function Remove project;
Export graphics and parameters to CSV format files;
Function Security System for CFW11 V65.1X;
Function Trace for CTW900;
Communication with CFW501 V1.3X;
Communication with CFW501 V1.5X;
Communication with CFW11 V65.1X;
SuperDrive G2 12.0.0 | 7
Getting Started
Communication
Communication
Communication
Communication
with
with
with
with
CFW11 V5.31;
CFW700 V2.0X line 600V;
CFW701 V2.0X line 600V;
CFW100 V2.3X.
Enhancements:
Added operation mode in the status window of ECW500;
Allow change the default folder where projects are stored.
Corrections:
Database correction of ECW500 V1.0X;
Database correction of CFW100 V2.2X (english);
Correction in printing parameters where overlapping characters could occur.
SuperDrive G2 11.2.0
05/21/2014
The following features were added:
Communication
Communication
Communication
Communication
Communication
Communication
Communication
Communication
Communication
Communication
Communication
with
with
with
with
with
with
with
with
with
with
with
MW500 V1.5X;
CFW100 via Bluetooth;
CFW100 V2.2X;
SCA06 V1.4X;
CFW11 V5.4X;
CFW11 V5.30;
CFW11 V4.20;
CFW11 V3.30;
CFW11 V3.31;
CFW11 V3.32;
CFW11 V3.33.
Minor changes:
Correction of instability during printing parameters;
Database correction of CFW500 V1.1X;
Database correction of CFW500 V1.5X;
Database correction of CFW700 V2.0X;
Database correction of CFW701 V2.0X.
SuperDrive G2 11.1.0
02/06/2014
The following features were added:
Communication with CFW100 V2.1X.
Minor changes:
Correction in Trace function where there was error in the read/write configuration,
Fix reading of parameters that were not saved correctly when the reading was taken before
saving the project.
SuperDrive G2 11.0.0
SuperDrive G2 12.0.0 | 8
Getting Started
12/03/2013
The following features were added:
Compatible with Windows 8 x86, Windows 8 x64
Minor changes:
Indication on the parameter list of what has changed (different from standard);
Fixed the window of Speed Reference to CFW100, CFW500, CFW700/701, CFW11, CTW900,
which presented incorrect values;
Fixed the New File Parameters function (offline generation of files parameters with default
values), where the parameters firmware version, rated current of the drive and rated voltage
of the drive had incorrect values;
Fixed the Trend function which stored incorrectly content 0 when reading error occurred;
Communication with CFW701 V2.0x, database correction.
SuperDrive G2 10.00
10/07/2013
The following features were added:
Communication with CFW11 V5.1X.
SuperDrive G2 9.90
09/13/2013
The following features were added:
Communication with CFW100 V2.0X.
SuperDrive G2 9.80
08/22/2013
The following features were added:
Communication
Communication
Communication
Communication
with
with
with
with
CFW500 V1.5X;
CFW700 V2.0X;
CFW701 V2.0X;
SSW7000 V1.2X.
SuperDrive G2 9.70
07/12/2013
The following features were added:
Communication with CFW-11 V3.5X.
SuperDrive G2 9.60
07/05/2013
The following features were added:
SuperDrive G2 12.0.0 | 9
Getting Started
Communication with ECW500 V1.0X;
Communication with CFW-11 V4.01;
Communication with CFW-11 V4.10;
Improved communication with drives (RS232 and RS485);
Language change no longer requires program restart;
Automatic loading of database on alternative language.
Minor changes:
Communication with CFW-11 V3.1x, database correction;
Communication with CFW100 V1.1x, database correction;
Communication with CTW900 V1.0x, database correction;
Several improvements in Identify Drive and Communication Setup windows.
SuperDrive G2 9.50
10/05/2012
The following features were added:
Communication with CFW100 V1.1X;
Size and position of windows are saved;
Project importation and exportation.
Minor changes:
Communication with CFW701 V1.2X, database correction.
SuperDrive G2 9.40
05/03/2012
The following features were added:
Communication with CFW11 V3.1X;
Communication with CFW700 V1.2X.
Minor changes:
Communication with CFW700 V1.0X, database correction.
SuperDrive G2 9.30
03/16/2012
The following features were added:
Communication with CTW900 V1.0X;
Communication with SCA06 V1.2X.
SuperDrive G2 9.20
12/05/2011
The following features were added:
Communication with CFW500 V1.1X;
Communication with CFW701 V1.2X;
SuperDrive G2 12.0.0 | 10
Getting Started
Communication with CFW-11 V3.11;
Communication with CFW-11 V3.12.
SuperDrive G2 9.10
09/27/2011
The following features were added:
Trend in the function and Trace, minimum, maximum and legend are now saved when the
graph is closed;
Communication with CFW-11 V2.46;
Communication with CFW-11 V2.50;
Communication with CFW-11 V2.51;
Communication with CFW-11 V3.90.
Minor changes:
Communication with CFW-11 V3.0x, database correction;
Communication with CFW700 V1.0x, database correction.
SuperDrive G2 9.00
05/27/2011
The following features were added:
Offline programming.
SuperDrive G2 8.90
04/05/2010
The following features were added:
Communication with CFW-11 V3.0x.
SuperDrive G2 8.80
02/22/2010
The following features were added:
Communication with SSW7000 V1.1x;
Communication with SSW-07 V1.4x;
Communication with SSW-08 V1.4x;
Compatible with Windows 7 x86, Windows 7 x64;
Compatible with Windows Vista x86, Windows Vista x64;
Compatible with Windows XP x86, Windows XP x64.
SuperDrive G2 8.70
10/20/2010
The following features were added:
Communication with SCA06 V1.1x;
Communication with SSW-06 V1.7x.
SuperDrive G2 12.0.0 | 11
Getting Started
SuperDrive G2 8.60
08/10/2010
The following features were added:
Communication with CFW700 V1.0x.
SuperDrive G2 8.50
03/05/2010
The following features were added:
Communication with CFW-11 V2.0x;
Communication with CFW-11 + PLC11-01 V1.4x;
Communication with CFW-11 + PLC11-02 V1.4x.
SuperDrive G2 8.40
09/08/2009
The following features were added:
Identify Drive address selection,
Write Parameters to Drive destination address selection;
Communication with CFW-11 + PLC11-01 V1.2x;
Communication with CFW-11 + PLC11-02 V1.2x;
Communication with SSW-06 V1.6x.
SuperDrive G2 8.33
05/15/2009
The following features were added:
Communication with CFW-11 + PLC11-02 V1.0x.
SuperDrive G2 8.32
12/18/2008
The following features were added:
Communication with CFW-09 PM V12.0x;
Communication with CFW-11 V1.6x.
SuperDrive G2 8.31
05/20/2008
The following features were added:
Communication with CFW-11 V1.3x;
Communication with CFW-11 + PLC11-01 V1.0x.
SuperDrive G2 12.0.0 | 12
Getting Started
SuperDrive G2 8.30
04/16/2008
The following features were added:
Trend function,
Communication with CFW-09 PM V11.3x;
Communication with SSW-07 V1.3x;
Communication with SSW-08 V1.3x.
SuperDrive G2 8.21
08/31/2007
The following features were added:
Communication with CFW-11 V1.1x;
Communication with SSW-06 V1.4x.
SuperDrive G2 8.20
08/01/2007
The following features were added:
Communication with SSW-07 V1.2x;
Communication with CFW-09 PM V10.0x;
New baud rate for RS232: 4800 bps.
Minor changes:
Option "Always on Top" was removed from several windows;
New layout in monitoring windows;
It is no more necessary to reopen the project after changing Communication Setup.
SuperDrive G2 8.11
04/24/2007
Minor changes:
Updated CFW-11 data base;
New baud rate for RS232: 57600 bps.
SuperDrive G2 8.10
03/29/2007
The following features were added:
Communication with CFW-11 V1.0x;
USB point-to-point serial communication;
Reference speed monitoring of CFW-11;
Trace function;
Language selection: English, Portuguese and Spanish.
Minor changes:
SuperDrive G2 12.0.0 | 13
Getting Started
Monitor Parameters: a divider offers user-controlled resizing of two components: parameters
and messages;
Monitor Parameters: if the user press the right button of the mouse in the messages
container, a small popup menu appears with the option to clean the messages;
Monitor Parameters and Edit Parameters File: Ok and Cancel buttons were replaced with
Close button;
Monitor Keypad: validation of parameter value;
Monitor Keypad: the user may now type a value directly into the parameter field;
Always on top functionality is not selected any more when a window is opened;
Parameters conversion for hexadecimal and binary now supported.
SuperDrive G2 8.00
12/20/2006
Initial Version:
Automatic identification of connected drives;
Parameter transfer from computer to the drive;
Parameter transfer from drive to the computer;
Offline editing of the parameters stored in files on the computer;
Monitoring (visualization and change) of drive parameters;
Monitoring of the drive status and command operations (motor stop/run, jog, forward/
reverse, local/remote, etc);
Supports multiple databases for special firmware version;
RS232 point-to-point serial communication;
Online help.
2.4
Copyright Notice
This computer program is protected by copyright law and international treaties. Unauthorized
reproduction or distribution of this program, or any portion of it, may result in severe civil
and criminal penalties, and will be prosecuted to the maximum extent possible under law.
2.5
Safety Warning
The use of this software can change the operation or the performance of the drive. The user
is responsible for the adoption of all necessary precautions to ensure the safety of the
equipment and involved personnel. Before this Software is used, read carefully all Instruction
of the Online Help. The non observation of these instructions can cause serious damages to
the equipment and result in serious personnel injuries.
2.6
User's Manual - PDF
The user's manual in PDF format can be found in the "\docs\en_US\help\PDF" folder where
SuperDrive G2 is installed.
Example: C:\WEG\SuperDrive G2 12.0.0\docs\en_US\help\PDF
SuperDrive G2 12.0.0 | 14
Installation Instructions
3
Installation Instructions
The following instructions cover information of all necessary installations and uninstallations.
Contents
Before Installing
Minimum Requirements
Supported Drives
Installing
Uninstalling
USB Driver
3.1
Before Installing
Check the following items before installing SuperDrive G2:
If the microcomputer meets the Minimum Requirements;
Your antivirus software must allow you to install software;
If the SuperDrive G2 version is compatible with your drive, see Supported Drives.
3.2
Minimum Requirements
Item
Description
Windows Vista - 1 GHz or faster processor
Windows 7 - 1 GHz or faster processor
Processor
Windows 8 - 1 GHz or faster processor
Windows 8.1 - 1 GHz or faster processor
Windows Vista SP2 (x86, x64)
Windows 7 SP1 (x86, x64)
Operating System
Windows 8 (x86, x64)
Windows 8.1 (x86, x64)
You must have administrator privileges to install the software
Windows Vista (x86, x64) - 1 GB or more recommended
Windows 7 (x86) - 1 GB or more recommended; Windows 7 (x64) - 2
GB or more recommended
Memory
Windows 8 (x86) - 1 GB or more recommended; Windows 8 (x64) - 2
GB or more recommended
Windows 8.1 (x86) - 1 GB or more recommended; Windows 8.1 (x64)
- 2 GB or more recommended
Display Color
High color resolution (16 bits) or more
1024x768 pixels
Display Resolution
1280x1024 pixels or higher-resolution screen recommended
Disk Space
1 GB of free disk space for SuperDrive G2
Drive
CD-ROM or DVD-ROM drive
Pointing Device
Mouse or compatible pointing device
Java Runtime Environment Java Runtime Environment (JRE) 8 Update 60 or greater
Mozilla Firefox 40 or greater
Opera 32 or greater
Internet Browser
Safari 5.1 or greater
Internet Explorer 8/9 (Windows Vista)
SuperDrive G2 12.0.0 | 15
Installation Instructions
Internet Explorer 8/9/10 (Windows 7)
Internet Explorer 10 (Windows 8, 8.1)
JavaScript enabled
Browser should support Cascading Style Sheets (CSS1) and
JavaScript
(x86) = 32-bit Edition.
(x64) = 64-bit Edition.
3.3
Supported Drives
The following table shows drives and firmware versions that each database supplied with
SuperDrive G2 supports.
SuperDrive G2
Drive
C FW-11
C FW701
C FW700
12.0.0
1.0X
X
1.1X
X
1.3X
X
1.6X
X
2.0X
X
2.46
X
2.50
X
2.51
X
3.0X
X
3.11
X
3.12
X
3.1X
X
3.30
X
3.31
X
3.32
X
3.33
X
3.5X
X
3.90
X
4.01
X
4.10
X
4.20
X
4.21
X
5.1X
X
5.30
X
5.31
X
5.4X
X
15.16
X
15.84
X
15.90
X
15.91
X
15.97
X
45.11
X
45.12
X
65.1X
X
1.2X
X
2.0X
X
1.0X
X
SuperDrive G2 12.0.0 | 16
Installation Instructions
C FW500
C FW501
C FW100
1.2X
X
2.00
X
2.0X
X
1.1X
X
1.5X
X
1.8X
X
1.3X
X
1.5X
X
1.8X
X
1.1X
X
2.0X
X
2.1X
X
2.2X
X
2.3X
X
2.4X
X
MW500
1.5X
X
EC W500
1.0X
X
1.0X
X
1.2X
X
1.4X
X
1.7X
X
1.0X
X
1.2X
X
1.4X
X
1.7X
X
1.0X
X
1.1X
X
1.1X
X
1.2X
X
1.4X
X
1.5X
X
1.3X
X
1.4X
X
1.6X
X
1.7X
X
1.8X
X
1.2X
X
1.3X
X
1.4X
X
1.5X
X
1.3X
X
1.4X
X
1.5X
X
1.1X
X
1.3X
X
1.4X
X
10.0X
X
11.3X
X
12.0X
X
PLC 11-01
PLC 11-02
C TW900
SC A06
SSW-06
SSW-07
SSW-08
SSW7000
C FW-09 PM
NOTE!
(1 )
SSW-06 1.3X - From version 1.31 and on
(2 )
SSW-07 1.2X - From version 1.21 and on
(3 )
CFW700 1.0X - From version 1.02 and on
SuperDrive G2 12.0.0 | 17
Installation Instructions
As new firmware versions are created, additional databases are added to SuperDrive G2.
The additional databases can be found on the Internet at the manufacturer's web site (see
SuperDrive G2 12.0.0).
If your drive uses a special firmware version (customized version), SuperDrive G2 needs an
additional database. Request this additional database for the manufacturer.
The software allows communication only with the drive types listed in the above table.
Firmware is the software which controls the drive. To find out which is the firmware version,
read parameter P0023.
Older Versions
The following tables show drives and firmware versions that each database supplied with
SuperDrive G2 supports.
SuperDrive G2
Drive
C FW-11
11.0.0
11.1.0
11.2.0
11.3.0
1.0X
X
X
X
X
1.1X
X
X
X
X
1.3X
X
X
X
X
1.6X
X
X
X
X
2.0X
X
X
X
X
2.46
X
X
X
X
2.50
X
X
X
X
2.51
X
X
X
X
3.0X
X
X
X
X
3.11
X
X
X
X
3.12
X
X
X
X
3.1X
X
X
X
X
3.30
X
X
3.31
X
X
3.32
X
X
3.33
X
X
3.5X
X
X
X
X
3.90
X
X
X
X
4.01
X
X
X
X
4.10
X
X
X
X
X
X
X
X
X
X
4.20
5.1X
X
X
5.30
5.31
X
5.4X
X
65.1X
C FW701
C FW700
C FW500
X
X
1.2X
X
X
X
X
2.0X
X
X
X
X
1.0X
X
X
X
X
1.2X
X
X
X
X
X
X
2.0X
X
X
X
X
1.1X
X
X
X
X
2.00
SuperDrive G2 12.0.0 | 18
Installation Instructions
1.5X
C FW501
C FW100
X
X
X
X
1.3X
X
1.5X
X
1.1X
X
X
X
X
2.0X
X
X
X
X
X
X
X
X
X
2.1X
2.2X
2.3X
X
MW500
1.5X
EC W500
1.0X
X
1.0X
X
1.2X
PLC 11-01
PLC 11-02
C TW900
SC A06
X
X
X
X
X
X
X
X
X
X
X
X
1.4X
X
X
X
X
1.0X
X
X
X
X
1.2X
X
X
X
X
1.4X
X
X
X
X
1.0X
X
X
X
X
1.1X
X
X
X
X
1.2X
X
X
X
X
X
X
1.4X
1.3X
X
X
X
X
1.4X
X
X
X
X
1.6X
X
X
X
X
1.7X
X
X
X
X
1.2X
X
X
X
X
1.3X
X
X
X
X
1.4X
X
X
X
X
1.3X
X
X
X
X
1.4X
X
X
X
X
1.1X
X
X
X
X
10.0X
C FW-09 PM 11.3X
X
X
X
X
X
X
X
X
12.0X
X
X
X
X
SSW-06
SSW-07
SSW-08
SSW7000
SuperDrive G2
Drive
8.80
8.90
9.00
9.10
9.20
9.30
9.40
9.50
9.60
9.70
9.80
1.0X
X
X
X
X
X
X
X
X
X
X
X
X
X
1.1X
X
X
X
X
X
X
X
X
X
X
X
X
X
1.3X
X
X
X
X
X
X
X
X
X
X
X
X
X
1.6X
X
X
X
X
X
X
X
X
X
X
X
X
X
2.0X
X
X
X
X
X
X
X
X
X
X
X
X
X
2.46
X
X
X
X
X
X
X
X
X
X
2.50
X
X
X
X
X
X
X
X
X
X
X
X
X
X
X
X
X
X
X
X
X
X
X
X
X
X
X
X
X
X
3.11
X
X
X
X
X
X
X
X
X
3.12
X
X
X
X
X
X
X
X
X
X
X
X
X
X
X
X
2.51
C FW-11
3.0X
3.1X
X
X
9.90 10.00
3.30
3.31
3.32
3.33
SuperDrive G2 12.0.0 | 19
Installation Instructions
3.5X
X
X
X
X
X
X
X
X
X
4.01
X
X
X
X
X
4.10
X
X
X
X
X
3.90
X
X
X
X
X
4.20
X
5.1X
5.30
5.31
5.4X
65.1X
C FW701
1.2X
1.0X
C FW700
X
X
X
X
X
X
2.0X
X
X
X
X
X
X
1.2X
C FW501
1.1X
X
X
X
X
X
X
X
X
X
X
X
X
X
X
X
X
X
X
X
X
X
X
X
X
X
X
X
X
X
X
X
X
X
X
X
X
1.5X
1.3X
1.5X
1.1X
C FW100
X
X
X
2.0X
C FW500
X
X
X
X
2.0X
2.1X
2.3X
MW500
1.5X
EC W500
1.0X
PLC 11-01
PLC 11-02
C TW900
X
X
X
X
X
1.0X
X
X
X
X
X
X
X
X
X
X
X
X
X
1.2X
X
X
X
X
X
X
X
X
X
X
X
X
X
1.4X
X
X
X
X
X
X
X
X
X
X
X
X
X
1.0X
X
X
X
X
X
X
X
X
X
X
X
X
X
1.2X
X
X
X
X
X
X
X
X
X
X
X
X
X
1.4X
X
X
X
X
X
X
X
X
X
X
X
X
X
X
X
X
X
X
X
X
X
X
X
X
X
X
X
X
X
X
X
X
X
X
X
X
X
1.0X
1.1X
SC A06
X
X
X
X
X
1.2X
1.4X
1.3X
X
X
X
X
X
X
X
X
X
X
X
X
X
1.4X
X
X
X
X
X
X
X
X
X
X
X
X
X
1.6X
X
X
X
X
X
X
X
X
X
X
X
X
X
1.7X
X
X
X
X
X
X
X
X
X
X
X
X
X
1.2X
X
X
X
X
X
X
X
X
X
X
X
X
X
1.3X
X
X
X
X
X
X
X
X
X
X
X
X
X
1.4X
X
X
X
X
X
X
X
X
X
X
X
X
X
1.3X
X
X
X
X
X
X
X
X
X
X
X
X
X
1.4X
X
X
X
X
X
X
X
X
X
X
X
X
X
1.1X
X
X
X
X
X
X
X
X
X
X
X
X
X
10.0X
C FW-09 PM 11.3X
X
X
X
X
X
X
X
X
X
X
X
X
X
X
X
X
X
X
X
X
X
X
X
X
X
X
12.0X
X
X
X
X
X
X
X
X
X
X
X
X
X
SSW-06
SSW-07
SSW-08
SSW7000
Drive
SuperDrive G2
SuperDrive G2 12.0.0 | 20
Installation Instructions
8.00
1.0X
1.1X
1.3X
8.10
8.11
8.20
8.21
8.30
8.31
8.32
8.33
8.40
8.50
8.60
8.70
X
X
X
X
X
X
X
X
X
X
X
X
X
X
X
X
X
X
X
X
X
X
X
X
X
X
X
X
X
X
X
X
X
X
X
X
X
X
1.6X
2.0X
2.46
2.50
2.51
3.0X
3.11
3.12
3.1X
C FW-11
3.30
3.31
3.32
3.33
3.5X
3.90
4.01
4.10
4.20
5.1X
5.30
5.31
5.4X
65.1X
C FW701
1.2X
2.0X
1.0X
C FW700
1.2X
2.0X
C FW500
C FW501
1.1X
1.5X
1.3X
1.5X
1.1X
C FW100
2.0X
2.1X
2.3X
MW500
1.5X
EC W500
1.0X
1.0X
PLC 11-01
X
X
X
1.2X
X
X
X
X
X
X
X
X
1.4X
PLC 11-02
1.0X
1.2X
X
X
X
X
X
X
X
X
X
X
X
X
SuperDrive G2 12.0.0 | 21
Installation Instructions
1.4X
C TW900
SC A06
X
X
X
1.0X
X
1.1X
X
1.2X
1.4X
1.3X
X
X
X
X
1.4X
SSW-06
X
X
X
X
X
X
X
X
X
X
X
X
X
X
X
X
X
X
X
X
X
X
1.6X
1.7X
1.2X
SSW-07
X
X
X
1.3X
X
X
X
X
X
X
X
X
X
X
X
X
X
X
X
X
X
X
X
X
X
X
X
X
X
X
X
X
X
X
X
X
X
X
X
X
X
X
X
X
X
X
X
X
X
X
1.4X
SSW-08
SSW7000
1.3X
1.4X
1.1X
1.2X
10.0X
X
X
C FW-09 PM 11.3X
12.0X
NOTE!
(1 )
SSW-06 1.3X - From version 1.31 and on
(2 )
SSW-07 1.2X - From version 1.21 and on
(3 )
CFW700 1.0X - From version 1.02 and on
3.4
Installing
When installing a newer version of SuperDrive G2 it is recommended that you first uninstall the
previous version and re-boot your system to make sure the installation executes correctly.
Close all open programs currently running to prevent interference with the installation process.
To install SuperDrive G2, please follow the steps below.
Installation
1. You must be logged in as an administrator to install the program; if you're using a standard
account, the application will fail to run;
2. If User Account Control (UAC) is enabled (Control Panel > User Accounts > Change User
Account Control Settings), you will be notified before the installer starts the installation and try
to make a change in the Windows configuration; click Yes to confirm that you allow the
program to make changes to your computer, otherwise you can not install the program;
3. You should also run the installer with elevated privileges; to do so, right-click installer
displays a menu; click Run as administrator;
SuperDrive G2 12.0.0 | 22
Installation Instructions
4. Select the language and click OK.
5. The installation program will start and a welcoming screen will appear. Click Next.
6. In the install wizard, respond to the License Agreement, then click Next.
SuperDrive G2 12.0.0 | 23
Installation Instructions
7. Click Next.
8. Specify an empty folder within which to install SuperDrive G2. Verify that the installation
location is correct and that you have available disk space for the installation.
SuperDrive G2 12.0.0 | 24
Installation Instructions
9. Confirm to create the empty folder.
10. Click Next.
SuperDrive G2 12.0.0 | 25
Installation Instructions
11. Select the program group to create program's shortcuts and click Next.
12. Select the program's shortcuts you want as additional icons: create a desktop icon and
create a quick launch icon. Click Next.
SuperDrive G2 12.0.0 | 26
Installation Instructions
13. Please review or change any settings. Click Install to begin the installation.
14. Click Finish to complete the setup.
SuperDrive G2 12.0.0 | 27
Installation Instructions
3.5
Uninstalling
If necessary, you can uninstall SuperDrive G2 using the following procedures.
Uninstall
NOTE!
As indicated below, use the Programs and Features utility to remove SuperDrive G2. Do
not manually delete files and folders.
Windows 8.1
1. You must be logged in as an administrator to remove the program; if you're using a standard
account, then you can not remove the software;
2. If User Account Control (UAC) is enabled (Control Panel > User Accounts > Change User
Account Control Settings), you will be notified before starting the removal and try to make a
change in the Windows configuration; click Yes to confirm that you allow the program to make
changes to your computer, otherwise you can not remove the program;
3. Right mouse click on Start button, and then select Programs and Features option.
SuperDrive G2 12.0.0 | 28
Installation Instructions
4. Select SuperDrive G2 from the list and click Uninstall.
5. Follow the instructions to remove the software.
SuperDrive G2 12.0.0 | 29
Installation Instructions
Windows 7 / Vista
1. You must be logged in as an administrator to remove the program; if you're using a standard
account, then you can not remove the software;
2. If User Account Control (UAC) is enabled (Control Panel > User Accounts > Change User
Account Control Settings), you will be notified before starting the removal and try to make a
change in the Windows configuration; click Yes to confirm that you allow the program to make
changes to your computer, otherwise you can not remove the program;
3. From your system's Start menu, choose Control Panel.
4. Double-click the Programs and Features icon.
SuperDrive G2 12.0.0 | 30
Installation Instructions
5. Select SuperDrive G2 from the list and click Uninstall.
6. Follow the instructions to remove the software.
SuperDrive G2 12.0.0 | 31
Installation Instructions
3.6
USB Driver
Use the USB driver that comes with SuperDrive G2.
Follow the installation instructions.
The USB driver can be found in the USB_Driver folder where SuperDrive G2 is installed.
Example: C:\WEG\SuperDrive G2 12.0.0\USB_Driver
SuperDrive G2 12.0.0 | 32
Menus
4
Menus
Project
Drive
New
Open
Close
Save
Identify Drive
Options
Communication Setup
Security System
Security System
(Session)
New Parameters File
Edit Parameters File
Remove Parameters File
Export Parameters File
Read Parameters from
Drive
Write Parameters to
Drive
Monitor Parameters
Monitor using Keypad
Monitor Status
Monitor Speed
Reference
Trend
Remove Trend File
Export Trend File
Trace
Remove Trace File
Export Trace File
Save As
Remove
Import
Export
Change Voltage
Print
Project Information
Exit
4.1
Tools
Help
Contents
About
Project
New
Open
Close
Save
Save As
Remove
Import
Export
Change Voltage
Print
Project Information
Exit
4.1.1
New
ACCESS
Toolbar:
Menu: Project > New
Shortcut Key: Ctrl+N
SuperDrive G2 12.0.0 | 33
Menus
FUNCTION
Creates a new project with a standard name.
DESCRIPTION
Drive Identification window is presented. See Identify Drive.
4.1.2
Open
ACCESS
Toolbar:
Menu: Project > Open
Shortcut Key: Ctrl+O
FUNCTION
Opens a previously saved project.
DESCRIPTION
User must select a project folder and open the project.
The project name and the drive information are shown in the Project Window.
4.1.3
Close
ACCESS
Toolbar:
Menu: Project > Close
Shortcut Key: none
FUNCTION
Closes the project.
DESCRIPTION
If the project contains unsaved data, a save request dialog will be shown.
SuperDrive G2 12.0.0 | 34
Menus
4.1.4
Save
ACCESS
Toolbar:
Menu: Project > Save
Shortcut Key: Ctrl+S
FUNCTION
Saves the project.
DESCRIPTION
Enabled if the project has unsaved changes.
When the project is first time saved, a dialog is shown with the following information:
Name - type a name for the new project. If the specified name is invalid or already exists, a
warning message will be prompted.
Location - a default location is shown, but can be changed.
Folder - view only.
Description - type the project description. It can be changed later in the Project Information.
4.1.5
Save As
ACCESS
Toolbar:
Menu: Project > Save As
Shortcut Key: Ctrl+D
FUNCTION
Saves a project with different name.
DESCRIPTION
Enabled when a project is created or opened.
When Save As function runs, a dialog is shown with the following information:
Name - type a name for the new project. If the specified name is invalid or already exists, a
warning message will be prompted.
Location - a default location is shown, but can be changed.
Folder - view only.
Description - type the project description. It can be changed later in the Project Information.
SuperDrive G2 12.0.0 | 35
Menus
4.1.6
Remove
ACCESS
Toolbar:
Menu: Project > Remove
Shortcut Key: none
FUNCTION
Erases the current project.
DESCRIPTION
Enabled when a project is open.
When Remove function runs, a confirmation dialog is shown with the following information:
Name - name of the project which is going to be deleted.
Location - a default location is shown.
Folder - project's location is shown.
Description - the project description is shown.
Button OK confirms the exclusion of current project, and Cancel button keeps the current
project.
4.1.7
Import
ACCESS
Toolbar:
Menu: Project > Import
Shortcut Key: none
FUNCTION
Imports a previously exported project.
DESCRIPTION
User must select a project file with extension sdg2z and click the Import button.
This project will be imported into the default folder for projects.
If the project or any of the files already exist, the user will receive a confirmation box to
overwrite the project.
If the user chooses to overwrite the conflicting files will be overwritten, otherwise, no files will
be overwritten and the project will not be imported.
If, during import of the project, another project is open, then it will be closed. If data is not
SuperDrive G2 12.0.0 | 36
Menus
saved, a confirmation window appears allowing the user to save changes, discard them, or
cancel the operation.
When completed the import process, the project will be imported automatically open.
4.1.8
Export
ACCESS
Toolbar:
Menu: Project > Export
Shortcut Key: none
FUNCTION
Exports the current project to a file.
DESCRIPTION
The project must be open.
Click the Export button. Initially the default filename is the name of the project, which can be
changed.
Clicking the save button, the file is created with the extension sdg2z which can be imported
using the Import function.
4.1.9
Change Voltage
ACCESS
Toolbar:
Menu: Project > Change Voltage
Shortcut Key: none
FUNCTION
Allow to migrate the currently opened project to a new one, with another model of CFW11
drive.
DESCRIPTION
User must have a project opened.
This option loads an wizard to help changing the model of drive and checking its parameters.
If there are no compatible drives to the current model, no options will be presented to choice.
SuperDrive G2 12.0.0 | 37
Menus
4.1.10 Print
ACCESS
Toolbar:
Menu: Project > Print
Shortcut Key: Ctrl+P
FUNCTION
Prints the parameters file selected in the Project Window.
DESCRIPTION
Prints all parameters stored in the parameters file:
Parameter number.
User's settings.
Unit.
4.1.11 Project Information
ACCESS
Toolbar:
Menu: Project > Project Information
Shortcut Key: Ctrl+I
FUNCTION
Adds or modifies project information.
DESCRIPTION
Shows the following information:
Name - the name of the project. View only.
Location - the location of the project. View only.
Folder - the folder where the project is. View only.
Description - type the project description.
Name, Location and folder can not be changed after it is first time saved. See Save.
Description can be changed at any time.
SuperDrive G2 12.0.0 | 38
Menus
4.1.12 Exit
ACCESS
Toolbar:
Menu: Project > Exit
Shortcut Key: Ctrl+Q
FUNCTION
Exits SuperDrive G2.
DESCRIPTION
SuperDrive G2 asks the user if he wishes to exit.
If the project contains unsaved data, a save request dialog will be shown.
4.2
Drive
Identify Drive
Communication Setup
Security System
Security System (Session)
New Parameters File
Edit Parameters File
Remove Parameters File
Export Parameters File
Read Parameters from Drive
Write Parameters to Drive
Monitor Parameters
Monitor Using Keypad
Monitor Status
Monitor Speed Reference
Trend
Remove Trend File
Export Trend File
Trace
Remove Trace File
Export Trace File
4.2.1
Identify Drive
ACCESS
Toolbar:
Menu: Drive > Identify Drive
Shortcut Key: none
FUNCTION
SuperDrive G2 12.0.0 | 39
Menus
Automatic identification of the drive (drive must be connected to computer) or user select the
drive manually.
APPEARANCE
DESCRIPTION
Drive Type
If no drive is configured, it shows the address and "No Drive Configured" message.
If any drive is configured, the following information is displayed:
Address.
Type.
Firmware version.
Nominal voltage.
Nominal current.
Remove button: clears the Drive Type field (remove the drive configuration).
Automatic Identification
Connection Type: USB => When USB is selected in Communication Setup window.
Connection Type: Serial => When Serial is selected in Communication Setup window.
SuperDrive G2 12.0.0 | 40
Menus
Connection Type: Bluetooth => When Bluetooth is selected in Communication Setup window.
Scan button: scans for drives connected to the computer. If any drive is connected,
configuration is presented. The scan is finished when a drive is identified.
Start from Address button: to select the initial address of the scan when the connection type
is serial; for USB connection, this button is disabled.
Manual Identification
Connection Type: ----- => The drive need not to be connected to the computer.
Model Button: select the drive model, firmware version and nominal voltage / current.
Accessory button: selects the accessory when it exists; select accessory name and firmware
version.
General Buttons
Ok button: applies changes and closes the window.
Cancel button: discard all changes and closes the window.
4.2.2
Communication Setup
ACCESS
Toolbar:
Menu: Drive > Communication Setup
Shortcut Key: none
FUNCTION
This dialog box allows you to configure the communication port of the computer to match the
setting on the drive for proper communication.
APPEARANCE
SuperDrive G2 12.0.0 | 41
Menus
DESCRIPTION
Select the connection type: USB, Bluetooth or Serial.
Serial
For RS232 you need to adjust some values. The communication protocol is Modbus-RTU.
Connection
Type
Serial Port Settings
Baud rate (bps)
RS232
Data bits
Stop bits
Parity
Range
4800, 9600, 19200, 38400
or 57600
8
1 or 2
No Parity, Even or Odd
Default
9600
8
2
No Parity
Besides the possibility of manual configuration of the fields, you can load the factory default
values for each drive. Select the model in the combobox "Equipment". In addition to the default
values, the combobox also has the user setting, this is saved every time a change is made to
the settings listed in the table above.
USB
For USB no adjustment is necessary.
Get Version Button: Click this button to read the version of USB driver installed on the
microcomputer.
SuperDrive G2 12.0.0 | 42
Menus
Installed Version Field: displays the version of USB driver installed on the microcomputer.
Recommended Version Field: displays the correct version of USB driver should be installed on
the computer.
Note Field: displays a message indicating whether the USB driver is installed OK or not.
Message on Note Field
User Action
USB driver Ok!
Nothing to do, USB driver correctly installed.
Reasons
Install the USB driver available in
- No drive (equipment) is connected to the PC USB_Driver\USBIO folder where SuperDrive G2
- Old USB driver
is installed.
- No USB driver installed
To install: run setup.exe and follow the
See online help.
installation wizard.
USB and Serial
The following timing settings are available for both USB and Serial:
Timing
Transmission Delay (ms)
Response Delay (ms)
Time-out (ms)
Range
0 ... 20000
0 ... 20000
100 ... 20000
Default
0
0
500
For more details see Drive Parametrization.
Bluetooth
The following timing settings are available for Bluetooth:
Timing
Transmission Delay (ms)
Response Delay (ms)
Time-out (ms)
Range
0 ... 20000
0 ... 20000
100 ... 20000
Default
0
50
500
Buttons
Ok: applies changes and closes the window.
Cancel: discard all changes and closes the window.
4.2.3
Security System
ACCESS
Toolbar:
Menu: Drive > Security System
Shortcut Key: none
FUNCTION
The Security System allows you to configure a password to lock online parameters edition
SuperDrive G2 12.0.0 | 43
Menus
during a communication between PC and the drive.
The offline activities and/or the execution of commands are not locked by Security System.
DESCRIPTION
The Security System - when available - allows to enable, disable or change current drive's
password. These operations are done in online mode.
SuperDrive G2 shows a message alerting the user if current drive does not have Security
System capabilities.
WARNING!
Define a strong password to the Security System. Use uppercase and lowercase letters
and numbers intercalated.
Minimal requirement for password in SuperDrive G2 is one digit, but is strongly
recommended to define a password with at least eight characters.
Keep your password in a safe place.
[1] Presents the current Security System state. It could be: Enabled, Disabled or
Communication Failure;
[2] This button Disables the Security System (when the current state is Enabled) or Enables
the Security System (when the current state is Disabled);
[3] This button changes the current Security System password;
[4] This button closes the Security System window.
4.2.4
Security System (Session)
ACCESS
Toolbar:
Menu: Drive > Security System (Session)
Shortcut Key: none
SuperDrive G2 12.0.0 | 44
Menus
FUNCTION
The Security System (Session) allows you to temporarily unlock online parameters edition
during a communication between PC and the drive. By this option, it is not necessary to disable
permanently the Security System. So, when the current project is closed the Security System
is automatically enabled, locking the online parameters edition.
DESCRIPTION
The Security System (Session) - when available - allows to online parameters editing. This
operation is done in online mode.
SuperDrive G2 shows a message alerting the user if current drive does not have Security
System capabilities.
To allow the temporary online parameters edition it is mandatory you inform the password
which is stored in drive.
This option is only available if the drive (which is connected to PC) already have a password to
the Security System.
To access any functionality with access to edit a parameter, SuperDrive G2 asks if the user
wants to allow the temporary online edition of parameters. The answer to this question keeps
in SuperDrive G2 until the current project is closed.
To lock the temporary online edition of parameters just close the current project, or click over
the icon
- it corresponds to the Security System (Session) - and confirm the locking of
online parameters edition in the confirmation message.
4.2.5
New Parameters File
ACCESS
Toolbar:
Menu: Drive > New Parameters File
Shortcut Key: none
FUNCTION
Creates a new parameters file with factory setting.
DESCRIPTION
If the project does not exist, a project name is requested to save.
If the project already exists, a parameters file name is requested.
Buttons
Save: saves the parameters file and closes window.
SuperDrive G2 12.0.0 | 45
Menus
Cancel: discard all changes and closes the window.
The filename must be specified by user and it it created with factory setting.
The file created is shown in Project Window (list of drive files).
This new file can be changed using Edit Parameters File.
4.2.6
Edit Parameters File
ACCESS
Toolbar:
Menu: Drive > Edit Parameters File
Shortcut Key: none
FUNCTION
Opens a previously saved parameters file. Allows to view and change the parameters in the
offline editor.
DESCRIPTION
User must select a filename in the Project Window and double click on the filename or click on
edit parameters file.
The program will show an overview of all the available parameters in a separate window. To
edit a parameter double click on the parameter's user setting you would like to edit.
The following fields are available:
Parameter number.
Function.
Minimum value.
Maximum value.
Factory setting.
User's setting.
Unit.
When the parameter is read-only, the user's setting field is disabled (it can't be edited).
The user types the parameter value and press Enter. Only values between minimum and
maximum are allowed.
Some parameters shows a simple list of values in a single column. The user can select list
entries with the mouse. Only one item can be selected at a time.
Buttons
Close: applies changes if user selects Yes and closes the window.
SuperDrive G2 12.0.0 | 46
Menus
4.2.7
Remove Parameters File
ACCESS
Toolbar:
Menu: Drive > Remove Parameters File
Shortcut Key: none
FUNCTION
Removes the parameters file.
DESCRIPTION
User must select a filename in the Project Window.
SuperDrive G2 will ask the user to confirm deleting the file.
4.2.8
Export Parameters File
ACCESS
Toolbar:
Menu: Drive > Export Parameters File
Shortcut Key: none
FUNCTION
Exports the content of a parameters file to another file in CSV format.
DESCRIPTION
User must select a parameters file name in Project Window.
SuperDrive G2 requests user to confirm the file export. In affirmative case, a window is shown
with the following options:
SuperDrive G2 12.0.0 | 47
Menus
[1]
[2]
[3]
[4]
Field delimiter. Options: semicolon or comma.
Field separator. Options: single quotes, double quotes or without quotes.
The name of the new file, in CSV format.
Buttons to export and to cancel the export.
4.2.9
Read Parameters from Drive
ACCESS
Toolbar:
Menu: Drive > Read Parameters from Drive
Shortcut Key: none
FUNCTION
Reads all parameters from the drive to the computer.
DESCRIPTION
All the parameters are saved in a file in computer. The user specifies the filename. Later the
user can view or edit the parameters.
SuperDrive G2 12.0.0 | 48
Menus
4.2.10 Write Parameters to Drive
ACCESS
Toolbar:
Menu: Drive > Write Parameters to Drive
Shortcut Key: none
FUNCTION
Send all parameters from the computer to the drive.
DESCRIPTION
User must select a filename in the Project Window.
Some parameters can be changed only with the drive disabled (motor stopped).
Select the address of the drive you wish to send the parameters.
4.2.11 Monitor Parameters
ACCESS
Toolbar:
Menu: Drive > Monitor Parameters
Shortcut Key: none
FUNCTION
Monitors all parameters in a grid. Allows to view and change the parameters in the online
editor.
DESCRIPTION
The program will show an overview of all the available parameters in a separate window. When
SuperDrive G2 is online with a drive, it will show information from the drive being monitored. To
edit a parameter double click on the parameter's user setting you would like to edit.
The following fields are available:
Parameter number;
Function;
Minimum value;
Maximum value;
Factory setting;
User's setting;
Unit;
Comparison.
When the parameter is read-only, the user's setting field is disabled (it can't be edited).
SuperDrive G2 12.0.0 | 49
Menus
The user types the parameter value and press Enter. Only values between minimum and
maximum are allowed.
In the online mode, to save the parameters in a file it is necessary confirming the action when
the window is closed.
Some parameters shows a simple list of values in a single column. The user can select list
entries with the mouse. Only one item can be selected at a time. When the user selects an
item, any previously selected item is deselected first.
4.2.12 Monitor using Keypad
ACCESS
Toolbar:
Menu: Drive > Monitor using Keypad
Shortcut Key: none
FUNCTION
Monitors one parameter and sends commands to the drive.
DESCRIPTION
The following information related to the parameter are shown:
Parameter number.
Function.
User's setting.
Unit.
The user can view/change one parameter at a time.
Besides the parameters number there is a pair of tiny arrow buttons that let the user select
the parameter number from an ordered sequence.
When the parameter is read-only, the user can't change the parameter value.
When the parameter can be changed, a button is available for changing the parameter's user
setting.
Clicking on this button opens a new window where the user can change the parameter's user
setting and press the Send button. Only values between minimum and maximum are allowed.
Some parameters shows a simple list of values in a single column. The user can select list
entries with the mouse. Only one item can be selected at a time.
The drive commands window has buttons as described below.
Command Buttons
Jog.
Direction of rotation (forward/reverse).
SuperDrive G2 12.0.0 | 50
Menus
Local/Remote.
Start.
Stop.
General Enable.
General Disable.
Reset.
To use these command buttons in SuperDrive G2, some parameters must be programmed to the
serial/USB option:
CFW-11 / CFW700 / CFW701 / CFW500 / CFW501 / MW500 - P0220...P0228;
CFW100 - P220, P222, P226...P228;
SSW-06 / SSW-07 / SSW-08 / SSW7000 - P220, P229, P230.
4.2.13 Monitor Status
ACCESS
Toolbar:
Menu: Drive > Monitor Status
Shortcut Key: none
FUNCTION
Shows the status of the drive.
DESCRIPTION
The drive status window has indicators as described below.
CFW-11 Status
Drive Status;
Direction of Rotation: Forward/Reverse;
Local/Remote;
General Enable;
Ramp Enable;
Jog.
CFW700 / CFW701 Status
Drive Status;
Direction of Rotation: Forward/Reverse;
Local/Remote;
General Enable;
Ramp Enable;
Jog.
CFW500 / CFW501 / MW500 Status
Drive Status;
Direction of Rotation: Forward/Reverse;
Local/Remote;
General Enabled;
SuperDrive G2 12.0.0 | 51
Menus
Motor running;
Jog;
Configuration Mode;
Alarm;
Fault.
CFW100 Status
Drive Status;
Direction of Rotation: Forward/Reverse;
Local/Remote;
General Enabled;
Motor running;
Jog;
Configuration Mode;
Alarm;
Fault.
ECW500 Status
Drive status;
State of limiters;
State of digital inputs;
Events.
SSW-06 Status
Drive Status;
Direction of Rotation: Forward/Reverse;
Local/Remote;
General Enable;
Motor Running;
Jog;
Accelerating;
Current Limit;
Full Voltage;
Decelerating;
Braking;
Reverting;
Main Power On;
Bypass.
SSW-07 Status
Drive Status;
Direction of Rotation: Forward/Reverse;
Local/Remote;
General Enable;
Motor Running;
Jog;
Accelerating;
Current Limit;
Full Voltage;
Decelerating;
Braking;
Reverting;
Main Power On;
Bypass.
SuperDrive G2 12.0.0 | 52
Menus
SSW-08 Status
Drive Status;
Direction of Rotation: Forward/Reverse;
Local/Remote;
General Enable;
Motor Running;
Jog;
Accelerating;
Current Limit;
Full Voltage;
Decelerating;
Braking;
Reverting;
Main Power On;
Bypass.
SSW7000 Status
Drive Status;
Direction of Rotation: Forward/Reverse;
Local/Remote;
General Enable;
Motor Running;
Jog;
Accelerating;
Full Voltage;
Bypass;
Decelerating;
Braking;
Reverting;
Delay P0831;
Main Power On;
Configuration Mode;
Alarm;
Fault.
4.2.14 Monitor Speed Reference
ACCESS
Toolbar:
Menu: Drive > Monitor Speed Reference
Shortcut Key: none
FUNCTION
Shows the speed reference of the drive.
DESCRIPTION
There are 6 fields which show data related to speed reference:
Speed Reference - RPM or 13 bits
SuperDrive G2 12.0.0 | 53
Menus
Parameter
User Setting
Minimum
Maximum
New User Setting
The user can type a new value in New User Setting field and press Send button. Only values
between minimum and maximum value are allowed.
The new value will appear in User Setting field after the drive has changed the value.
4.2.15 Trend
ACCESS
Toolbar:
Menu: Drive > Trend
Shortcut Key: none
FUNCTION
Captures signal values from drives and displays it as a graph. Data can also be saved, printed
and exported.
Up to ten drive signals can be monitored.
The Trend is for low to medium sampling rates.
APPEARANCE
SuperDrive G2 12.0.0 | 54
Menus
DESCRIPTION
Configuring the Trend
Adding Channels
To add a channel, choose Add Channel.
In the Add Channel dialog box, enter the channel information. Use the drop down list to select
the channel variable.
Once the channel is added to the trend, the range (upper and lower limits of Y-axis) and other
properties related can be set.
To set the channel range and other properties:
1. Select the desired channel.
2. Set the maximum and minimum limits of the Y-axis labels and change the color of the line
used to draw the signal.
To hide channels in the trend:
1. Select the desired channel.
2. Uncheck the visibility property.
NOTE!
To redisplay hidden channels, check the visibility property again.
Removing Channels
To remove a channel from the trend
1. Select the desired channel.
2. Choose Remove Channel.
SuperDrive G2 12.0.0 | 55
Menus
Configuring the Time Axis
The range of the time (horizontal axis) visible on the graph can be changed by using the Trend
Time Axis drop down list. The time axis requires a range in seconds.
Selecting the Sampling Rate
Choose Configure Trend to set up the trend sampling period.
The sampling period requires a value in milliseconds.
Capturing and Saving Trends
After you have added the channels to the trend, you must start capturing to view the trend on
the graph.
Press Start button to start trending.
Press Stop button to stop trending of the selected signals. SuperDrive offers an option to save
a trend for later analysis without a drive connected. The files have the extension .trend.
NOTE!
The minimum sampling period can vary according to the number of channels,
communications’ baud rate, etc.
While capturing, the Trend displays the values of the channels. However, if the values are
not saved, and once they scroll off the screen, they cannot be viewed.
Viewing Trends
To open a previously saved trend, select the file with the .trend extension in the Project
Window and then choose menu Drive > Trend.
SuperDrive G2 12.0.0 | 56
Menus
It is not necessary to have the drive connected while viewing previously saved trends.
You can move through the samples using the scroll bar to examine data in detail.
Using the Cursor
To activate this marker press the left mouse button over the graph area.
The marker can be moved by clicking the mouse over the trend screen.
The selected sample time and value of each channel are indicated.
Zoom
You can zoom in and zoom out of the trend.
To zoom in on the trend, choose + or Zoom and place the mouse pointer at the top left corner
of the area you want to zoom in. Click and hold the left mouse button then drag the pointer to
draw a rectangle and release the mouse button.
The view of the trend zooms in.
To zoom out of the trend, choose -. The view of the trend zooms out. Horizontal Zoom Out
stops when the width reaches its original value.
Scroll (Pan)
You can scroll the trend using the mouse.
To scroll the trend, choose Pan.
Click and hold the left mouse button at the graph area then drag the pointer to move graph in
direction the mouse is moved.
Exporting Trends
SuperDrive G2 12.0.0 | 57
Menus
The currently displayed trend can be exported to a PNG file.
To export a trend:
1. Open the trend you want to export.
2. Choose Export.
3. Enter a filename for the PNG file.
Printing Trends
The currently displayed trend can be printed.
To print a trend:
1. Open the trend you want to print.
2. Choose Print.
NOTE!
When printing or exporting, it is recommended to set the legend visible.
4.2.16 Remove Trend File
ACCESS
Toolbar:
Menu: Drive > Remove Trend File
Shortcut Key: none
FUNCTION
Remove all trend files.
DESCRIPTION
User must select a filename in the Project Window.
SuperDrive G2 will ask the user to confirm deleting all trend files.
4.2.17 Export Trend File
ACCESS
Toolbar:
Menu: Drive > Export Trend File
Shortcut Key: none
SuperDrive G2 12.0.0 | 58
Menus
FUNCTION
Exports the content of a trend file to another file in CSV format.
DESCRIPTION
User must select a trend file name in Project Window.
SuperDrive G2 requests user to confirm the file export. In affirmative case, a window is shown
with the following options:
[1]
[2]
[3]
[4]
Field delimiter. Options: semicolon or comma.
Field separator. Options: single quotes, double quotes or without quotes.
The name of the new file, in CSV format.
Buttons to export and to cancel the export.
4.2.18 Trace
ACCESS
Toolbar:
Menu: Drive > Trace
Shortcut Key: none
FUNCTION
It presents a graph of acquired trace function’s data.
SuperDrive G2 12.0.0 | 59
Menus
APPEARANCE
DESCRIPTION
The window presents a graph of trace channel's data for the selected file. If no file is selected,
a blank graph is presented.
Press the button Config Trace to configure the trace function.
Trace Function Configuration
A window with trace configuration parameters is presented.
Use the editable fields to change parameters contents.
The editable fields have the factory default value (if no file was selected), or the values from
the previously saved file.
Read configuration - to read the trace configuration parameters from the drive. The
parameters settings will be read from the drive and presented in the window.
Write configuration - to send the trace configuration to the drive. The configuration
parameters are sent to the drive.
Start Trace - used to start the trace function on the drive. The start trace command is sent
to the drive.
Close - to close the configuration window.
Acquire data - to acquire trace function data.
Trace Function Acquisition
SuperDrive G2 12.0.0 | 60
Menus
If the trace function status is not complete, the trace function status monitor window is
presented.
While the status is not complete, the button Ok is disabled and the acquisition can not be
performed.
When the status is complete, all programmed trace channel’s data is acquired.
When the acquisition is complete please type the file name where all trace information and
channel’s data is to be stored.
Graph Visualization
Trace channel’s data is presented in a graph.
The channel information table is presented below the graph.
# - trace channel’s index.
Visible - shows/changes channel’s visibility in the graph.
Color - shows/changes the color which represents channel’s data in the graph.
Description - trace channel’s acquired variable description.
Sample time - time of the selected sample in the chart.
Sample value - value of the selected sample in the chart.
Unit - trace channel’s data unit.
Minimum - shows/changes the lower bound for the axis of this channel in the graph.
Maximum - shows/changes the upper bound for the axis of this channel in the graph.
A black vertical line is shown at the trigger position. At the top of the graph is the trigger
description.
Graph Manipulation
It is possible to change the sample cursor position by clicking at the graph.
A toolbar with the following options can be found above the graph:
Export: exports the graph area as a PNG image.
Print: prints the graph area.
Pan: changes to Pan Mode.
Zoom: changes to Zoom Mode.
Zoom +: magnifies the graph area.
Zoom -: zoom out the graph area.
Restore width: restores the initial width of the horizontal axis.
Restore height: restores the initial height of the vertical axis.
Auto height: automatic height depending on the maximum or minimum values of the samples.
Legend: shows/hide the graph legend.
Pan Mode
SuperDrive G2 12.0.0 | 61
Menus
In Pan Mode press the mouse button over the graph area and drag to move the graph in the
desired direction.
Zoom Mode
In Zoom Mode press the mouse button over the graph area and drag to draw a zoom box.
Release the mouse button to magnify the selected graph area.
4.2.19 Remove Trace File
ACCESS
Toolbar:
Menu: Drive > Remove Trace File
Shortcut Key: none
FUNCTION
Remove all trace files.
DESCRIPTION
User must select a filename in the Project Window.
SuperDrive G2 will ask the user to confirm deleting all trace files.
4.2.20 Export Trace File
ACCESS
Toolbar:
Menu: Drive > Export Trace File
Shortcut Key: none
FUNCTION
Exports the content of a trace file to another file in CSV format.
DESCRIPTION
User must select a trace file name in Project Window.
SuperDrive G2 requests user to confirm the file export. In affirmative case, a window is shown
with the following options:
SuperDrive G2 12.0.0 | 62
Menus
[1]
[2]
[3]
[4]
Field delimiter. Options: semicolon or comma.
Field separator. Options: single quotes, double quotes or without quotes.
The name of the new file, in CSV format.
Buttons to export and to cancel the export.
4.3
Tools
Options
4.3.1
Options
ACCESS
Toolbar:
Menu: Tools > Options
Shortcut Key: none
FUNCTION
Allows the user to select options for SuperDrive G2.
PRESENTATION
SuperDrive G2 12.0.0 | 63
Menus
DESCRIPTION
The options are available via tabbed menu. To access them, click over the tab name:
Language
Print
Projects
Language
Allows the user to select a language.
Three languages are available:
English;
Spanish;
Portuguese.
Besides the language selection of the software, the user can change the priority language
selection of alternative database, which occurs when the selected drive does not have support
for the selected language.
When successfully applies a language change, system presents a confirmation message.
Print
Allows the user to select the parameters printing options.
Four options are available:
Print all parameters;
Print all parameters, highlight changes in bold font (when compared to standard values);
SuperDrive G2 12.0.0 | 64
Menus
Print all parameters, highlight changes in red font (when compared to standard values);
Print changed parameters only (when compared to standard values).
Projects
Allows the user to select the main projects folder, when SuperDrive G2 projects are stored.
This option presents the current main projects folder, where is possible to change this path:
You must close the project before accessing this function. Otherwise, while a project is open
SuperDrive G2 disables this option.
SuperDrive G2 12.0.0 | 65
Menus
[1] Current path and folder where projects are stored.
[2] New path where projects will be stored. This field only updates after you choose a new
path throws items [3] or [4].
[3] When selecting this option, the system restores the standard path and folder where
projects will be stored.
[4] This button selects a new path where projects will be stored.
[5] This button apply the changes. It will be available only if there were changes.
[6] This button closes the options window.
4.4
Help
Contents
About
4.4.1
Contents
ACCESS
Toolbar:
Menu: Help > Contents
Shortcut Key: none
FUNCTION
Opens the online help.
DESCRIPTION
A comprehensive online documentation is available. The documentation can be printed.
4.4.2
About
ACCESS
Toolbar:
Menu: Help > About
Shortcut Key: none
FUNCTION
Displays information about SuperDrive G2 version, build, etc.
DESCRIPTION
Displays the following information:
SuperDrive G2 12.0.0 | 66
Menus
Software name.
Version.
Build.
Launch date.
Copyright.
Simplified software description.
Operational systems where the software can run.
Java informations.
SuperDrive G2 12.0.0 | 67
Context menus
5
Context menus
This chapter about context menus covers the following information:
Rename
Save As
Close
5.1
Project
ACCESS
Toolbar: none
Context Menu
Shortcut Key: none
FUNCTION
Allows the user to select options related to current project.
DESCRIPTION
The options are available throws a context menu. To access them, select the current project
name and then right mouse click over it:
SuperDrive G2 offers three options via context menu:
Rename
Save As
Close
5.1.1
Rename
ACCESS
Toolbar: none
Context Menu > Rename project
Shortcut Key: none
FUNCTION
SuperDrive G2 12.0.0 | 68
Context menus
Allows the user to rename current project.
DESCRIPTION
This option is available throws a context menu. To access it, right mouse click over the current
project name:
A dialog box is shown, asking for a new project name.
Case the new name already exists, system adds automatically an unique code to the end of
name was typed.
5.1.2
Save As
ACCESS
Toolbar:
Context Menu > Save As
Shortcut Key: Ctrl+D
FUNCTION
Saves a project with different name.
DESCRIPTION
Enabled when a project is created or opened.
When Save As function runs, a dialog is shown with the following information:
Name - type a name for the new project. If the specified name is invalid or already exists, a
warning message will be prompted.
Location - a default location is shown, but can be changed.
Folder - view only.
Description - type the project description. It can be changed later in the Project Information.
SuperDrive G2 12.0.0 | 69
Context menus
5.1.3
Close
ACCESS
Toolbar:
Context Menu > Close
Shortcut Key: none
FUNCTION
Closes the project.
DESCRIPTION
If the project contains unsaved data, a save request dialog will be shown.
SuperDrive G2 12.0.0 | 70
Communication
6
Communication
This chapter about communication covers the following information:
Drive Parametrization
Connecting the Drive (USB)
Connecting the Drive (USB - Virtual COM Port)
Connecting the Drive (RS232)
Connecting the Drive (RS485)
Connecting the Drive (Bluetooth)
RS232 Cable
USB Cable
USB to Serial Adapter
Bluetooth USB Adapter
Before Trying to Establish Communication
Exception During Monitoring
6.1
Drive Parametrization
The following parameters must be set as below:
Drive
Connection
Type
USB
Driver
Parameter
Description
CFW-11
USB
USBIO
-----
-----
0308
Serial Address
0310
Serial Baud Rate
1 = 19200 bits/s
0311
Serial Bytes Config.
1 = 8 bits, even
parity, 1sb
0308
Serial Address
0310
Serial Baud Rate
1 = 19200 bits/s
0311
Serial Bytes Config.
1 = 8 bits, even
parity, 1sb
CFW700
CFW701
RS485
-----
Recommended
----1
1
2 = Modbus RTU [with
plug-in module
CFW500-IOS]
RS485
----0312
CFW500
CFW501
Serial Protocol
6 = HMIR (1) +
Modbus RTU (2) [with
plug-in module
CFW500-CUSB,
CFW500-CRS232 or
CFW500-CRS485]
7 = Modbus RTU (2)
[with plug-in module
CFW500-CUSB,
CFW500-CRS232 or
CFW500-CRS485]
USB (Virtual
COM Port)
FTDI
0312
Serial Protocol
6 = HMIR (1) +
Modbus RTU (2) [with
plug-in module
CFW500-CUSB]
7 = Modbus RTU (2)
[with plug-in module
SuperDrive G2 12.0.0 | 71
Communication
CFW500-CUSB]
RS485
CFW100
USB (Virtual
COM Port)
Bluetooth
RS232
-----
FTDI
-----
-----
0308
Serial Address
1
0310
Serial Baud Rate
1 = 19200 bits/s
0311
Serial Bytes Config.
1 = 8 bits, even
parity, 1sb
0312
Serial Protocol
2 = Modbus RTU
0308
Serial Address
1
0310
Serial Baud Rate
1 = 19200 bits/s
0311
Serial Bytes Config.
1 = 8 bits, even
parity, 1sb
0312
Serial Protocol
2 = Modbus RTU
0770
Bluetooth Device
Name
Random number
0771
Bluetooth PIN
1234
0308
Serial Address
1
0310
Serial Baud Rate
1 = 19200 bits/s
0311
Serial Bytes Config.
1 = 8 bits, even
parity, 1sb
0312
Serial Protocol
2 = Modbus RTU
0308
Serial Address
1
0310
Serial Baud Rate
1 = 19200 bits/s
0311
Serial Bytes Config.
1 = 8 bits, even
parity, 1sb
2 = Modbus RTU [with
plug-in module
CFW500-IOS]
MW500
RS485
----0312
Serial Protocol
6 = HMIR (1) +
Modbus RTU (2) [with
plug-in module
CFW500-CUSB,
CFW500-CRS232 or
CFW500-CRS485]
7 = Modbus RTU (2)
[with plug-in module
CFW500-CUSB,
CFW500-CRS232 or
CFW500-CRS485]
2 = Modbus RTU (1)
[with plug-in module
CFW500-CUSB]
USB (Virtual
COM Port)
-----
0312
Serial Protocol
CTW900
USB
USBIO
-----
-----
30006
Serial Baud Rate
ECW500
RS485
-----
30008
Serial Parity
30010
Serial Stop Bits
-----
-----
308
SSW Address
312
Serial Protocol
SCA06
USB
USBIO
SSW-06
RS232
-----
6 = HMIR (1) +
Modbus RTU (2) [with
plug-in module
CFW500-CUSB]
----2 = 38400 bits/s
0 = None
1
----1
1: MB 9600 N
SuperDrive G2 12.0.0 | 72
Communication
(Modbus-RTU 9600
bps, no parity), 8
bits, 2sb
USB (Virtual
COM Port)
FTDI
SSW-07
SSW-08
RS232
-----
SSW7000
USB
USBIO
CFW-09
PM
RS232
-----
-----
-----
308
SSW Address
312
Serial Protocol
USB Communication
Kit (K-USB) should be
used, which is
supplied with the
product
1
1: MB 9600 N
(Modbus-RTU 9600
bps, no parity), 8
bits, 2sb
-----
-----
308
Serial:Address
----1
310
Serial:Bit Rate
1: 9600 bps
311
Serial:Data Con.
312
Serial:Protocol
3: 8b, no parity, 2sb
2: Modbus-RTU
NOTE!
Drive and SuperDrive G2 must use the same settings.
For CFW-09 PM, P308, P310 and P311 can be changed, see Frequency Inverter Manual CFW-09 PM.
For CFW700, P0308, P0310 and P0311 can be changed, see Programming and
Maintenance Manual - CFW700.
For SSW, P308 and P312 can be changed, see Serial Communication Manual.
(1) CFW500 - Port 1 - terminals 12, 14, 16.
(2) CFW500 - Port 2 - USB, DB9 or RS485 connector (terminals 20, 22, 24).
6.2
Connecting the Drive (USB)
The drive should be located at a distance shorter than 3 m from the computer.
This connection is made with USB Cable, supplied with drive user's guide.
USB Driver: user must install the USB driver available at USB_Driver\USBIO folder.
CFW-11
Figure below shows how to connect a computer to the drive (USB).
SuperDrive G2 12.0.0 | 73
Communication
WARNING!
Switch off the drive before making the connections.
1. The USB connector is in the front cover of the drive.
2. Connect the type B connector of usb cable to the usb connector of the drive.
3. Connect the type A connector of usb cable to the computer usb port.
4. Check if in the SuperDrive G2 Communication Setup the selected connection type is USB.
CTW900
WARNING!
Switch off the drive before making the connections.
1. The USB connector is in the front cover of the drive.
2. Connect the type B connector of usb cable to the usb connector of the drive.
3. Connect the type A connector of usb cable to the computer usb port.
4. Check if in the SuperDrive G2 Communication Setup the selected connection type is USB.
SCA06
WARNING!
Switch off the drive before making the connections.
1. The USB connector is in the front cover of the drive.
2. Connect the type B connector of usb cable to the usb connector of the drive.
3. Connect the type A connector of usb cable to the computer usb port.
4. Check if in the SuperDrive G2 Communication Setup the selected connection type is USB.
SSW7000
WARNING!
Switch off the drive before making the connections.
1. The USB connector is in the front cover of the drive.
2. Connect the type B connector of usb cable to the usb connector of the drive.
3. Connect the type A connector of usb cable to the computer usb port.
4. Check if in the SuperDrive G2 Communication Setup the selected connection type is USB.
SuperDrive G2 12.0.0 | 74
Communication
CFW700 / CFW701
Figure below shows how to connect a computer to the drive (USB).
WARNING!
Switch off the drive before making the connections.
This connection is available in CFW700's HMI since S/N 1024003697.
This connection is available in CFW701's HMI since S/N 1023801859.
1. The USB connector is in the drive's HMI.
2. Connect the type mini-B connector of usb cable to the usb connector of the drive.
3. Connect the type A connector of usb cable to the computer usb port.
4. Check if in the SuperDrive G2 Communication Setup the selected connection type is USB.
6.3
Connecting the Drive (USB - Virtual COM Port)
The drive should be located at a distance shorter than 3 m from the computer.
This connection is made with USB Cable, supplied with drive user's guide.
USB Driver: user must install the USB driver available at USB_Driver\FTDI folder.
SSW-06
Figure below shows how to connect a computer to the drive (USB).
SuperDrive G2 12.0.0 | 75
Communication
Device manager in Windows indicates which serial port is connected to the drive.
SuperDrive G2 12.0.0 | 76
Communication
The computer name in device manager is purposely unreadable.
In SuperDrive G2, select the serial port correctly in Communication Setup window as follows.
SuperDrive G2 12.0.0 | 77
Communication
WARNING!
Switch off the drive before making the connections.
1. Connect the mini-B connector of usb cable to the usb connector of the drive.
2. Connect the type A connector of usb cable to the computer usb port.
3. In device manager check which serial port is connected.
4. Check if in the SuperDrive G2 Communication Setup the selected connection type is serial.
5. The serial port in the window of communication setup window should be the same serial port
that appears in the device manager, where the USB cable is connected.
CFW500 / CFW501
Figure below shows how to connect a computer to the drive (USB).
SuperDrive G2 12.0.0 | 78
Communication
SuperDrive G2 12.0.0 | 79
Communication
Device manager in Windows indicates which serial port is connected to the drive.
The computer name in device manager is purposely unreadable.
In SuperDrive G2, select the serial port correctly in Communication Setup window as follows.
SuperDrive G2 12.0.0 | 80
Communication
WARNING!
Switch off the drive before making the connections.
1. Connect the mini-B connector of usb cable to the usb connector of the drive.
2. Connect the type A connector of usb cable to the computer usb port.
3. In device manager check which serial port is connected.
4. Check if in the SuperDrive G2 Communication Setup the selected connection type is serial.
5. The serial port in the window of communication setup window should be the same serial port
that appears in the device manager, where the USB cable is connected.
CFW100
Figure below shows how to connect a computer to the drive (USB).
SuperDrive G2 12.0.0 | 81
Communication
Device manager in Windows indicates which serial port is connected to the drive.
The computer name in device manager is purposely unreadable.
SuperDrive G2 12.0.0 | 82
Communication
In SuperDrive G2, select the serial port correctly in Communication Setup window as follows.
SuperDrive G2 12.0.0 | 83
Communication
WARNING!
Switch off the drive before making the connections.
1. Connect the mini-B connector of usb cable to the usb connector of the drive.
2. Connect the type A connector of usb cable to the computer usb port.
3. In device manager check which serial port is connected.
4. Check if in the SuperDrive G2 Communication Setup the selected connection type is serial.
5. The serial port in the window of communication setup window should be the same serial port
that appears in the device manager, where the USB cable is connected.
6. Never change values in P308, P310 and P312 during a connection. Changing these
parameters instantly causes connection lost between PC and drive.
MW500
Figure below shows how to connect a computer to the drive (USB).
WARNING!
With the drive turned off, be sure that position 1 of DipSwitch S10 is OFF, as shown
below:
SuperDrive G2 12.0.0 | 84
Communication
SuperDrive G2 12.0.0 | 85
Communication
Device manager in Windows indicates which serial port is connected to the drive.
The computer name in device manager is purposely unreadable.
In SuperDrive G2, select the serial port correctly in Communication Setup window as follows.
SuperDrive G2 12.0.0 | 86
Communication
WARNING!
Switch off the drive before making the connections.
1. Connect the mini-B connector of usb cable to the usb connector of the drive.
2. Connect the type A connector of usb cable to the computer usb port.
3. In device manager check which serial port is connected.
4. Check if in the SuperDrive G2 Communication Setup the selected connection type is serial.
5. The serial port in the window of communication setup window should be the same serial port
that appears in the device manager, where the USB cable is connected.
6.4
Connecting the Drive (RS232)
The drive should be located at a distance shorter than 10 m from the computer.
SSW-06
Figure below shows how to connect a computer to the drive (RS232 point-to-point).
SuperDrive G2 12.0.0 | 87
Communication
WARNING!
Switch off the drive before making the connections.
1. Opens the front cover of the drive.
2. Connect the RS232 PC/Drive Serial Cable to the X2 serial connector.
3. Plug DB9 connector directly into any one of the computer serial COM port. Use one of the
available serial ports, since this information will be necessary later on SuperDrive G2
Communication Setup during operation.
4. Configure the communication parameters on the drive. The communication parameters are
described in Drive Parametrization.
SSW-07
Figure below shows how to connect a computer to the drive (RS232 point-to-point).
WARNING!
Switch off the drive before making the connections.
1. Take out the optional plug-in cover.
2. Replace the cover with the optional plug-in module. Make sure that the module is connected.
3. Insert the DB9 connector of the RS232 Connection Cable to the optional module (XC41
connector) and tighten the screws to fix the connector.
4. Plug DB9 connector directly into any one of the computer serial COM port. Use one of the
available serial ports, since this information will be necessary later on the SuperDrive G2
Communication Setup during operation.
SuperDrive G2 12.0.0 | 88
Communication
5. Configure the communication parameters on the drive. The communication parameters are
described in Drive Parametrization.
SSW-08
WARNING!
Switch off the drive before making the connections.
1. Take out the optional plug-in cover.
2. Replace the cover with the optional plug-in module. Make sure that the module is connected.
3. Insert the DB9 connector of the RS232 Connection Cable to the optional module (XC41
connector) and tighten the screws to fix the connector.
4. Plug DB9 connector directly into any one of the computer serial COM port. Use one of the
available serial ports, since this information will be necessary later on the SuperDrive G2
Communication Setup during operation.
5. Configure the communication parameters on the drive. The communication parameters are
described in Drive Parametrization.
MW500
WARNING!
Switch off the drive before making the connections.
1. Be sure that accessory RS232 Serial Interface Module is present and correctly connected to
the drive.
2. Connect the DB9 connector from RS232 Connection Cable to the DB9 serial connector of
RS232 Serial Interface Module.
3. Plug the another DB9 connector of cable directly into any one of the computer serial COM
port. Use one of the available serial ports, since this information will be necessary later on
the SuperDrive G2 Communication Setup during operation.
4. Configure the communication parameters on the drive. The communication parameters are
described in Drive Parametrization.
CFW-09 PM
WARNING!
Switch off the drive before making the connections.
1. Remove the keypad (HMI) from the inverter.
2. Install RS232 Serial Interface Module in place of the keypad.
3. Connect the RS232 PC/Drive Serial Cable to the XC7 serial connector.
4. Plug DB9 connector directly into any one of the computer serial COM port. Use one of the
available serial ports, since this information will be necessary later on the SuperDrive G2
Communication Setup during operation.
5. Configure the communication parameters on the drive. The communication parameters are
described in Drive Parametrization.
6.5
Connecting the Drive (RS485)
The drive should be located at a distance shorter than 1000 m from the computer.
CFW700 / CFW701
SuperDrive G2 12.0.0 | 89
Communication
Figure below shows how to connect a computer to the drive (RS485 point-to-point).
SuperDrive G2 12.0.0 | 90
Communication
SuperDrive G2 12.0.0 | 91
Communication
Device manager in Windows indicates which serial port is connected to the USB RS485
converter.
The computer name in device manager is purposely unreadable.
In SuperDrive G2, select the serial port correctly in Communication Setup window as follows.
SuperDrive G2 12.0.0 | 92
Communication
WARNING!
Switch off the drive before making the connections.
1. Connect the type B connector of USB cable to the USB connector of the USB RS485
converter.
2. Connect the type A connector of USB cable to the computer usb port.
3. In device manager check which serial port is connected.
4. Check if in the SuperDrive G2 Communication Setup the selected connection type is serial.
5. The serial port in the window of communication setup window should be the same serial port
that appears in the device manager, where the USB cable is connected.
CFW500 / CFW501
Figure below shows how to connect a computer to the drive (RS485 point-to-point).
SuperDrive G2 12.0.0 | 93
Communication
SuperDrive G2 12.0.0 | 94
Communication
Device manager in Windows indicates which serial port is connected to the USB RS485
converter.
The computer name in device manager is purposely unreadable.
In SuperDrive G2, select the serial port correctly in Communication Setup window as follows.
SuperDrive G2 12.0.0 | 95
Communication
WARNING!
Switch off the drive before making the connections.
1. Connect the type B connector of USB cable to the USB connector of the USB RS485
converter.
2. Connect the type A connector of USB cable to the computer USB port.
3. In device manager check which serial port is connected.
4. Check if in the SuperDrive G2 Communication Setup the selected connection type is serial.
5. The serial port in the window of communication setup window should be the same serial port
that appears in the device manager, where the USB cable is connected.
CFW100
Figure below shows how to connect a computer to the drive (RS485 point-to-point).
SuperDrive G2 12.0.0 | 96
Communication
Device manager in Windows indicates which serial port is connected to the USB RS485
converter.
The computer name in device manager is purposely unreadable.
SuperDrive G2 12.0.0 | 97
Communication
In SuperDrive G2, select the serial port correctly in Communication Setup window as follows.
SuperDrive G2 12.0.0 | 98
Communication
WARNING!
Switch off the drive before making the connections.
1. Connect the type B connector of USB cable to the USB connector of the USB RS485
converter.
2. Connect the type A connector of USB cable to the computer USB port.
3. In device manager check which serial port is connected.
4. Check if in the SuperDrive G2 Communication Setup the selected connection type is serial.
5. The serial port in the window of communication setup window should be the same serial port
that appears in the device manager, where the USB cable is connected.
MW500
Figure below shows how to connect a computer to the drive (RS485 point-to-point).
SuperDrive G2 12.0.0 | 99
Communication
Device manager in Windows indicates which serial port is connected to the USB RS485
SuperDrive G2 12.0.0 | 100
Communication
converter.
The computer name in device manager is purposely unreadable.
In SuperDrive G2, select the serial port correctly in Communication Setup window as follows.
SuperDrive G2 12.0.0 | 101
Communication
WARNING!
Switch off the drive before making the connections.
1. Connect the type B connector of USB cable to the USB connector of the USB RS485
converter.
2. Connect the type A connector of USB cable to the computer USB port.
3. In device manager check which serial port is connected.
4. Check if in the SuperDrive G2 Communication Setup the selected connection type is serial.
5. The serial port in the window of communication setup window should be the same serial port
that appears in the device manager, where the USB cable is connected.
ECW500
Figure below shows how to connect a computer to the drive (RS485 point-to-point).
SuperDrive G2 12.0.0 | 102
Communication
SuperDrive G2 12.0.0 | 103
Communication
Device manager in Windows indicates which serial port is connected to the USB RS485
converter.
The computer name in device manager is purposely unreadable.
In SuperDrive G2, select the serial port correctly in Communication Setup window as follows.
SuperDrive G2 12.0.0 | 104
Communication
WARNING!
Switch off the drive before making the connections.
1. Connect the type B connector of USB cable to the USB connector of the USB RS485
converter.
2. Connect the type A connector of USB cable to the computer USB port.
3. In device manager check which serial port is connected.
4. Check if in the SuperDrive G2 Communication Setup the selected connection type is serial.
5. The serial port in the window of communication setup window should be the same serial port
that appears in the device manager, where the USB cable is connected.
6.6
Connecting the Drive (Bluetooth)
Bluetooth is a wireless technology standard for exchanging data over short distances.
The drive must be placed less than 3ft, 33ft or 330ft from computer, depending on Bluetooth
class available in the computer.
Class
Class 1
Class 2
Class 3
Alcance
Until 330 ft (100 m)
Until 33 ft (10 m)
Until 3 ft (1 m)
CFW100
The image below shows how to connect a computer to the drive via Bluetooth.
SuperDrive G2 12.0.0 | 105
Communication
1) Drive with CFW100-CBLT accessory.
Be sure the drive has a Bluetooth communication module named CFW100-CBLT.
Be sure the drive has parameters P310, P311 and P312 set with the factory default values.
If the computer does not have Bluetooth technology, use an Bluetooth USB adapter.
NOTE!
Once USB Bluetooth adapter was enabled in computer, it can not be removed or replaced
during its utilization.
For the proper operation of the CFW100 inverter with the CFW100-CBLT module,
parameters P310, P311 and P312 must be set with the factory default values.
During communication, the values of parameters P308, P310, P311 and P312 should not be
changed. Otherwise there is loss of communication between the drive and the SuperDrive
G2 12.0.0 .
2) Be sure that Bluetooth communication module has the red LED (ACTIVE) on. This indicates
that it is ready to accept a connection.
SuperDrive G2 12.0.0 | 106
Communication
3) Be sure that Bluetooth technology is enabled and ready on computer. Bluetooth's logo
appears on Windows taskbar.
4) Select the connection type (Bluetooth) in Communication Setup window.
SuperDrive G2 12.0.0 | 107
Communication
5) Click Scan Equipment.
SuperDrive G2 12.0.0 | 108
Communication
6) Wait for the scanning of drive. This process takes a few minutes depending on the
Bluetooth technology.
SuperDrive G2 12.0.0 | 109
Communication
If there is no error until this step, proceed to item 7.
6.1) In Windows 8 or 8.1, some additional steps must be performed on first use.
6.1.1) Once you have clicked Scan Equipment(1), click the box(2) to add the drive:
SuperDrive G2 12.0.0 | 110
Communication
6.1.2) After that, click Pair:
SuperDrive G2 12.0.0 | 111
Communication
6.1.3) If a numerical code was displayed, just click Yes:
SuperDrive G2 12.0.0 | 112
Communication
6.1.4) The drive is paired. Close the Bluetooth's configuration window:
SuperDrive G2 12.0.0 | 113
Communication
6.1.5) If there were no errors until this step, go to item 7. Otherwise, repeat steps from item 5
.
Errors
If a problem occurs during this step, please verify the items below:
If Bluetooth technology fails during the scanning process, a message is shown.
Click OK and repeat the steps since item 2.
Example of failure during detection of Bluetooth technology:
If Bluetooth technology was removed or disabled in computer during the scanning process, a
message is shown.
Example of failure during detection of Bluetooth technology:
SuperDrive G2 12.0.0 | 114
Communication
To fix this problem:
Reconnect USB Bluetooth adapter on computer, if it is disconnected;
Click OK as shown previously;
Repeat the steps of identification process from item 2.
7) Wait for the system message indicating that drives were found.
SuperDrive G2 12.0.0 | 115
Communication
8) Bluetooth technology requires pairing before allowing the use of their services.
Pairing devices is the establishing of a connection between two Bluetooth devices (in this
case, between computer and the drive).
a) When only one drive is found, the system automatically makes the pairing.
SuperDrive G2 12.0.0 | 116
Communication
b) When more than one drive is found, click the combo box and select a drive. The code
presented in this combo box is the content from P770 parameter of CFW100.
SuperDrive G2 12.0.0 | 117
Communication
Click Pair to make the pairing.
NOTE!
Always use unique code (P770 content) for each drive.
NOTE!
Do not skip this step because the system will not warn if any communication failure
occurs.
SuperDrive G2 12.0.0 | 118
Communication
9) This process takes a few minutes depending on the Bluetooth technology.
SuperDrive G2 12.0.0 | 119
Communication
10) Wait for the message indicating that the drive was successfully paired.
SuperDrive G2 12.0.0 | 120
Communication
Click OK to close this window.
Drive is ready for use.
Green LED (STATUS) in the drive is on.
If there is no error until this step, proceed to item 11.
Errors
If drive is out of range during the pairing process, the STATUS LED is off in drive and a
message is shown.
Example of failure during the pairing:
SuperDrive G2 12.0.0 | 121
Communication
To fix this problem:
Check if there are obstacles between the drive and the computer;
Check if distance between drive and computer is too long;
Check if there is another computer with Bluetooth enabled, which is competing for the
same drive connection.
Repeat the steps from 5.
11) Drive is correctly connected. ACTIVE and STATUS LEDs are on:
SuperDrive G2 12.0.0 | 122
Communication
NOTE!
If STATUS LED is off:
Check if there are obstacles between the drive and computer;
Check if distance is too long between drive and computer;
Check if there is another computer around with Bluetooth enabled, which is competing
for the same drive connection.
12) Proceed with drive identification. See Identify Drive for details.
General Information
Depending on the Bluetooth technology available on computer, it may be necessary to confirm
pairing during the search for Bluetooth drives. This usually occurs in the first connection
between drive and computer.
In this case just confirm it if any pairing code is showed, selecting Yes and click Next.
SuperDrive G2 12.0.0 | 123
Communication
If a pairing code is requested, type "1234" and click Next.
6.7
RS232 Cable
RS232 PC/DRIVE SERIAL CABLE
Drive: CFW-09 PM, SSW-06
Figure below shows the cable parts for point-to-point RS232 connection. Only pins 2, 3 and 5
of the DB9 female connector are used.
Maximum cable length: 10 meters.
RS232 CONNECTION CABLE
SuperDrive G2 12.0.0 | 124
Communication
Drive: SSW-07, SSW-08
Figure below shows the cable parts for point-to-point RS232 connection. Only pins 2, 3 and 5
of the DB9 female connector are used.
Maximum cable length: 10 meters.
6.8
USB Cable
USB CABLE
Drive: CFW-11, SCA06, SSW7000, CTW900
Figure below shows the cable parts for point-to-point USB connection.
Figure below shows the connectors.
A = Type A connector
B = Type B connector
Maximum cable length: 3 meters.
Always use a standard host/device shielded USB cable. Unshielded cables may lead to
communication errors.
SuperDrive G2 12.0.0 | 125
Communication
The USB connection is galvanically isolated from the mains power supply and from other high
voltages internal to the inverter. However, the USB connection is not isolated from the
Protective Ground (PE). Use an isolated computer for the USB connection or a desktop
connected to the same Protective Ground (PE) of the inverter.
Purchase Suggestions
Manufacturer:
Samtec, Inc: http://www.samtec.com/
If you want to buy USB cable directly from Samtec, please see below.
Description
USB shielded High Speed Cable 2.0 Revision, 1
m, Samtec
USB shielded High Speed Cable 2.0 Revision, 2
m, Samtec
USB shielded High Speed Cable 2.0 Revision, 3
m, Samtec
Item
USBC-AM-MB-B-B-S-1
USBC-AM-MB-B-B-S-2
USBC-AM-MB-B-B-S-3
At the time this help was being written, the specification was found at
http://www.samtec.com/ftppub/cpdf/USBC-AM-BM-B-B-S-X-MKT.pdf
USB CABLE (mini-B)
Drive: CFW100, CFW700, CFW701
Figure below shows the cable parts for point-to-point USB connection.
Figure below shows the connectors.
SuperDrive G2 12.0.0 | 126
Communication
A = Type A connector
B = Type mini-B connector
Maximum cable length: 3 meters.
Always use a standard host/device shielded USB cable. Unshielded cables may lead to
communication errors.
The USB connection is galvanically isolated from the mains power supply and from other high
voltages internal to the inverter. However, the USB connection is not isolated from the
Protective Ground (PE). Use an isolated computer for the USB connection or a desktop
connected to the same Protective Ground (PE) of the inverter.
Purchase Suggestions
Manufacturer:
Samtec, Inc: http://www.samtec.com/
If you want to buy USB cable directly from Samtec, please see below.
Description
USB shielded High Speed Cable 2.0 Revision, 1
m, Samtec
USB shielded High Speed Cable 2.0 Revision, 2
m, Samtec
USB shielded High Speed Cable 2.0 Revision, 3
m, Samtec
Item
USBC-AM-BM-B-B-S-1
USBC-AM-BM-B-B-S-2
USBC-AM-BM-B-B-S-3
At the time this help was being written, the specification was found at
http://www.samtec.com/ftppub/cpdf/USBC-AM-MB-B-B-S-X-X-MKT.pdf
6.9
USB to Serial Adapter
The USB to serial adapter is the best solution for the connection of serial equipment (RS232) to
USB ports, i. e., for connecting computer USB output to a RS232 serial equipment.
This is a low cost solution and meets the install requirements of new computer serial ports that
have busy bus bars or equipments that are not fitted with RS232 ports.
The USB to serial adapter allows the plug & play connection with your computer, thus
SuperDrive G2 12.0.0 | 127
Communication
maintaining free the existing serial port.
Figures below show a sample of this adapter.
PURCHASE SUGGESTIONS
Manufacturer: Comm5 Tecnologia
Product: Conversor de USB para 1 saída serial RS232
Model: 1S-USB - conversor USB para 1 serial
Web Site: http://www.comm5.com.br/1S-USB--CONVERSOR-USB-PARA-1-SERIAL
For further information about product installation, please refer to user's manual.
Manufacturer: Tripp Lite
Product: USB High Speed Serial Adapter
Model: USA-19HS
Web Site: http://www.tripplite.com/en/products/model.cfm?txtSeriesID=849&txtModelID=3914
For further information about product installation, please refer to user's manual.
SuperDrive G2 12.0.0 | 128
Communication
6.10
Bluetooth USB Adapter
Drive: CFW100
The image below shows an USB Bluetooth adapter (a.k.a. dongle) which should be connected
to the USB port of computer. There are several models with different features.
6.11
Before Trying to Establish Communication
Before trying to establish communication make sure the following has been done:
Communication cable connected to the drive;
Communication cable connected to computer;
Drive is powered up;
Communication parameters on the drive correspond to SuperDrive G2 communication settings.
6.12
Exception During Monitoring
SOFT-STARTER
SSW-06 V1.3X
P014 to P017 = 13107 => this means there is no fault.
SSW-07 and SSW-08
P219 defines parametrization mode for the following parameters: P101, P102, P104, P110,
P202, P206, P401, P520, P521, P611, P613, P617, P620 and P640;
On Trimpot and Dip Switch Mode, the parametrization of the above parameters is done
through the Trimpots and Dip Switches. These parameters act like read only parameters,
showing the Trimpots and Dip Switches programmed values. The values which where
programmed through RS232 serial communication are not used;
On Keypad Mode, the parametrization of parameters previously cited is made with RS232
serial communication or Keypad. The value adjusted with Trimpots and Dip Switch are not
used.
SuperDrive G2 12.0.0 | 129
Libraries
7
Libraries
JFreeChart
jSSC
7.1
JFreeChart
This software incorporates JFreeChart, © 2005-2012 Object Refinery Limited.
The JFreeChart home page can be found at: http://www.jfree.org/jfreechart/.
To read GNU Lesser General Public Licence, Version 3, access http://www.gnu.org/licenses/
lgpl.html.
To get the complete source code of JFreeChart for the version of the library that it is used in
this software please contact the manufacturer (see SuperDrive G2 12.0.0).
7.2
jSSC
This software incorporates jSSC, © 2010-2012 Sokolov Alexey.
The jSSC home page can be found at: http://code.google.com/p/java-simple-serial-connector/
.
To read GNU Lesser General Public Licence, Version 3, access http://www.gnu.org/licenses/
lgpl.html.
To get the complete source code of jSSC for the version of the library that it is used in this
software please contact the manufacturer (see SuperDrive G2 12.0.0).
SuperDrive G2 12.0.0 | 130
Index
Index
-IIdentify Drive
39
Import
36
Installation Instructions
Installing
22
-AAbout
66
-J-
-BBefore Installing
15
Before Trying To Establish Communication
Bluetooth USB Adapter
129
JFreeChart
130
jSSC
130
129
-L-
-C-
Libraries
Close
34
Communication
71
Communication Setup
41
Connecting the Drive (Bluetooth)
105
Connecting the Drive (RS232)
87
Connecting the Drive (RS485)
89
Connecting the Drive (USB - Virtual COM Port)
Connecting the Drive (USB)
73
Contents
66
Copyright Notice
14
-DDrive
39
Drive Parametrization
71
Edit Parameters File
46
Exception During Monitoring
Exit
39
Export
37
Export Parameters File
47
Export Trace File
62
Export Trend File
58
-G-HHelp
66
130
-M-
75
Main Features
6
Menus
33
Minimum Requirements
15
Monitor Parameters
49
Monitor Speed Reference
53
Monitor Status
51
Monitor using Keypad
50
-NNew
33
New Parameters File
45
-O-
-E-
Getting Started
15
Open
34
Options
63
129
-PPrint
38
Project
33
Project Information
38
-R6
Read Parameters from Drive
48
Remove
36
Remove Parameters File
47
Remove Trace File
62
Remove Trend File
58
RS232 Cable
124
SuperDrive G2 12.0.0 | 131
Index
-SSafety Warning
14
Save
35
Save As
35
Security System
43
Security System (Session)
SuperDrive G2 12.0.0
5
Supported Drives
16
44
-TTools
Trace
Trend
63
59
54
-UUninstalling
28
USB Cable
125
USB Driver
32
USB to Serial Adapter
127
User's Manual - PDF
14
-WWelcome
6
What's New
6
Write Parameters to Drive
49
SuperDrive G2 12.0.0 | 132