1
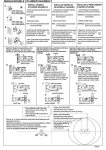
http:// www.keylessdepot.com
Preface
y
Thank you for using Shepherd 240 Biometric Fingerprint Lock.
y
Please read this Installation Manual carefully before attempting
to install your new lock. This manual covers installation
procedures.
y
Manufacture, or their representative, will not be responsible for
any damages caused by incorrect installation or mishandling of
the lock. Any such damages will void manufacture’s warranty.
1
Shepherd240B
V0.02
http:// www.keylessdepot.com
Table of Contents
Preface……………………………………………….………………………..1
Table of Contents…………………………………….…………………….…2
1. Identifications…………………………………….………………….…….3
2. Required tools……..………………………………………………………4
3. Pre installation
3.1 Locating hole center from the edge of the door……….………………5
3.2 Deadbolt adjustment..……………………...……………………………6
4. Installation
4.1 Deadbolt installation……….………………………………….……….7
4.2 Installation of Deadbolt Strike and Strike Lining Box……………....8
4.3 Sizing torque bar……………..………………………………………..9
4.4 Installation of the outside Lock……..……………………………....10
4.5 Installation of Inside Lock………… ………………………………...11
4.6 Tightening Screws……………………………………………………13
4.7 Final inspection/adjustment prior saving fingerprint….................14
5. Problems / Solution …….…………………………….…………….…..15
2
Shepherd240B
V0.02
http:// www.keylessdepot.com
1. Identifications
Please familiarize yourself with all the parts. If any part is missing or
damaged, contact our service center or manufacture immediately.
Inside Lock Assembly
Outside Lock Assembly
Outside Rubber Seal
Inside Rubber Seal
Deadbolt
Strike Lining Box
Deadbolt Strike
Overriding Keys
Attaching Screws
Wooden Screws
Machine Screw
3
Shepherd240B
V0.02
http:// www.keylessdepot.com
2. Required Tools
1. Electric or battery operated Drill
2. One 3/8” Diameter Drill Bit
3. One 1” Diameter. Drill bit
4. One 2 1/8” Diameter Drill Bit
5. A Carpenter Chisel
6. A Hammer
7. A pair of scissors
8. A pair of pliers
9. Philips & flat head screw drivers
4
Shepherd240B
V0.02
http:// www.keylessdepot.com
3. Pre installation
3.1 Locating hole center from the edge of the door
Existing door with deadbolt
Existing Door without deadbolt
Measure this
distance
(needed for
deadbolt
adjustment 2
3/8”or 2 3/4”)
Shepherd
240 replaces
cylindrical
deadbolt lock
5 1/2”
Latch Lock
Latch Lock
Door with existing cylindrical deadbolt lock: Remove existing cylindrical
deadbolt and install the new Shepherd 240 in its place per Section 4 and
paper template.
Door that does not have a cylindrical deadbolt lock nor a hole for the
cylindrical deadbolt lock: Mark the center of the new hole by measuring
the distance from the edge of the door to the existing latch lock center;
door with one hole measure the distance from the edge of the door to
the center of the hole. It should measure either 2 3/8” or 2 3/4”
(American door lock standard). This distance dictates the length of the
deadbolt see section 3.2.
5
Shepherd240B
V0.02
http:// www.keylessdepot.com
3.2 Deadbolt adjustment
1. Manufacture setting is 2 3/8” shown
on deadbolt.
Turn
2. If 2 3/4” is needed, turn and pull as
shown.
Pull
3. Make sure it clicks and the number
matches the measurement you
obtained from section 3.1.
6
Shepherd240B
V0.02
http:// www.keylessdepot.com
4. Installation
4.1 Deadbolt installation
1. Insert the deadbolt from the side
of the door (follow the “UP ”
sign). Mark the edges. Then carve
out 1/8” deep rectangular shape,
per your marking, using chisel and
hammer.
2. Insert the deadbolt; make sure
the deadbolt “UP ” sign is
up. Then screw it to the door.
7
Shepherd240B
V0.02
http:// www.keylessdepot.com
4.2 Installation of Deadbolt Strike (on the door) and Strike Lining
Box (on the door frame).
Install Deadbolt Strike Lining Box by
aligning the deadbolt on door with
the frame. Make a deep enough
cutout with chisel and hammer, to
accept the Strike Lining Box.
Install the Strike Lining Box and
screw it to the frame using provided
wooden screws.
8
Shepherd240B
V0.02
http:// www.keylessdepot.com
4.3 Sizing Torque Bar (to the right length)
Shepherd 240 is designed to fit door thickness of 1 3/8” to 2”
TRIM TORQUE BAR PER DOOR THICKNESS
(Door thickness 1 3/8” to 2”)
Use full length if door thickness is 2”
Trim here if door thickness is 1 3/8 to 1 1/2”
Trim here if door thickness is 1 3/4”
Trim the torque bar accordingly, with a pair of pliers.
Note: If the door thickness falls between 2 notches. Go to next
higher.
(Sketch is not to scale)
9
Shepherd240B
V0.02
http:// www.keylessdepot.com
4.4 Installation of the outside Lock (which contains the finger
scanner)
Rubber Seal
1. Place the rubber seal to the
back of the outside lock.
2. Push deadbolt inside the door.
3. Make sure the torque bar is
vertical.
4. Insert torque bar through the
cross slot of the deadbolt.
Torque Bar
1. Insert the connector and wire
under the deadbolt.
2. Insert the two poles through
corresponding holes on the door
(the newly drilled holes).
3. Temporarily tape the outside
lock to the door. Remove tape
once installation is complete.
Torque Bar
Locate connecting wire under the
deadbolt assembly.
Wire
10
Shepherd240B
V0.02
http:// www.keylessdepot.com
4.5 Installation of Inside Lock
1. Place rubber seal on the back of
the inside lock.
2. Connect the 2 sets of wire (it
only goes one way) by holding the
insulated portion of the wires. It
should end up as shown in the
view to the left.
3. Turn the knob to the open
position (vertically, the dot on the
knob must be on top).
4. Insert the torque bar through the
cross slot of the deadbolt and the
slot of the inside lock.
5. Push gently, sandwiching the
door.
6. Turn the knob to insure the
operation of the deadbolt.
7. Continuously check the
operation of the knob.
11
Shepherd240B
V0.02
http:// www.keylessdepot.com
IMPORTANT
Please make sure the fat end of the knob is
pointing upward. (The dot that number 3
on page 11 is referring to should have been
on top of the fat end but was left out)
12
Shepherd240B
V0.02
http:// www.keylessdepot.com
4.6 Tightening Screws
Use the 1 1/8” screws through the
battery compartment affix the
screws to outside lock.
Use the 3 1/8” screws through the
bottom holes of the inside lock.
Slightly tighten the screws to the
front lock two screw holes.
Recheck by turning the knob to
horizontal position, and then to
vertical position if it feels right,
tighten the screws.
13
Shepherd240B
V0.02
http:// www.keylessdepot.com
4.7 Final inspection/adjustment prior saving fingerprint
Note: After installation and prior to using the unit, make sure you read
and follow the steps below:
1.
Insert 4 new long life AA batteries in the battery compartment.
2.
Turn the inside knob to the vertical position. The dot must be on top
(unlock position); next turn it to the horizontal position (locked
position). It should turn freely.
If and when the inside and outside locks are attached securely and
the inside knob doesn’t turn freely, see the problem and solution
table below for possible solution. If the knob turns freely, continue
with the next step.
3.
Program the unit to work on right or left hand door:
Make sure the inside knob is in vertical and the dot is on top
(unlocked position).
Press and hold the delete button and with the other hand press the
power on button, if the deadbolt protrudes outward, you
programmed the unit successfully.
If it does not, press and hold the save button and with the other
hand press the power on button, the dead bolt will protrude
outwardly, indicating successful configuration.
4.
Try to lock and unlock from outside by pressing the power on
button. The unit should lock and when pressed again it should
unlock.
14
Shepherd240B
V0.02
http:// www.keylessdepot.com
5. Problem/Solution
Problems / Solution Table
PROBLEMS
Inside knob does
POSSIBLE REASONS
SOLUTIONS
1. Incorrect installation.
1. Make sure the torque bar was
not turn or turns
trimmed and inserted vertically
very sluggishly &
through the cross slot of the
hard to turn.
deadbolt and the slot of the inside
lock while the inside knob was
vertical, with the dot on top.
2. Torque bar not
2. Measure the door thickness
trimmed properly.
and trim the torque bar per
section 4.3 of the installation
manual.
Inside knob turns
1. Torque bar did not go
1. Remove & reinstall the
but nothing
through the cross slot of
outside lock. Insert the torque bar
happens
the dead bolt.
through the cross slot of the
deadbolt and slot of inside lock
knob while the knob is in vertical
position with the dot on top.
2. Torque bar was
trimmed too short and
2. Contact service center or the
does not penetrate the
Manufacture.
slot of the inside lock
15
Shepherd240B
V0.02
http:// www.keylessdepot.com
When Power on
1. Right & Left hand
1. Correctly configured the unit
button is pressed
door configuration is
for right or left hand door swing
and the deadbolt
incorrect.
per section 4.7 No. 3 shown
above.
does not protrude
outwardly.
2. The dot on the
Instead, 6 alert
Inside knob was on the
2. Uninstall and reposition the
beeps are heard.
bottom instead of up.
knob vertically with the dot on top.
When Power on
1. Improper
1.
Check the position of the
button is pressed
positioning of the
Deadbolt Strike and Strike Lining
while the door is
Deadbolt Strike and
Box.
closed but does
Strike Lining Box. It
2. Readjust the deadbolt
not lock, Instead 6
may be deflecting the
length make sure the deadbolt is
alert beeps are
deadbolt.
clicked in the 2 3/8” or 2 3/4”
heard.
2. Deadbolt length not
position.
set properly.
The system does
1. Batteries inserted
1. Remove & reinsert batteries
not respond when
incorrectly.
follow the “╋” and “━” signs in
the battery compartment.
pressing the power
on/off button
2. Inside and outside
2. Check the connections make
(lights do not turn
Lock assembly wire not
sure both wires are coupled
on or off).
connected properly.
properly.
When pressing the
Low Voltage.
Replace batteries with 4 new long
life AA batteries.
power on button
(with the door open
or closed) the red
light blinks 3 times
with 6 alert beeps.
16
Shepherd240B
V0.02