1
The RANCH RenderFarm User Guide
Part II – the RANCH for Maya
www.ranchcomputing.com
15-12-09 – December 9, 2015
Welcome to the RANCH automated rendering service, the super-powerful - and affordable supercomputer for all your Maya projects! This document contains information specific to the
use of Maya on the RANCH. Before reading it, we highly recommend you read Part I first the General Guide - which includes everything not specifically related to Maya.
Summary of supported render engines
- The RANCH supports Maya 2010 to 2016 (x64) projects.
- Supported rendering engines: Mental Ray, V-Ray, Arnold, Maxwell Render, Maya
Software for animations.
- We render Maya animation projects only. Still image rendering is not supported.
- We support Vue xStream (from e-on software) as a high-end natural environment solution
for Maya projects.
- If your project needs specific external plugins, please contact us first to see if we can support
them (only 64-bit plugins will be compatible with the RANCH).
1
1) Important information about scene preparation
It is VERY important that you read this section carefully before submitting a scene. It will
help you avoid common mistakes.
Please verify before sending the scene that you have saved it with all the correct
parameters. It is your responsibility to provide the scene with every parameter
correctly set. The scene will be rendered exactly as you send it.
Do not use accentuated / non-alphanumeric characters, spaces, apostrophes and dots in
the filenames of your project (scene, textures, objects, output bitmaps etc.). To avoid
any possible parsing problems on the RANCH Runner, please use only letters and
numbers. You can also use the “_” sign (underscore) to replace spaces.
Please always specify individual frames rendering for animations output (.bmp, .tga,
.rla, etc.). We cannot directly render an animation to a video file format like .avi,
.mov, .wmv… due to multiple differences between video formats, codecs, platforms,
64-bit incompatibilities, etc. In any case it is always best to render individual frames,
for a lot of reasons: more security, better quality, ability to do compositing, ability to
try different compression methods afterward with your video editing software, etc.
The RANCH only accepts .mb (Maya binary) scenes. Do not save your scene in .ma
(Maya ASCII) format, as it would not be recognized.
If you use e-on software Vue xStream in your Maya projects, you must embed the Vue
scene in the Maya scene before sending your project to the RANCH. To do so, please
verify that you have checked the 'Incorporate Vue scene in Maya scene file' square in
the Vue xStream options, before saving your Maya scene in .mb format.
2
Make sure that the 'Renumber frames' square is _unchecked_ otherwise frame output
will not work correctly on the RANCH.
If you use Maxwell Render as the render engine for your Maya animation project,
please verify that the values for 'Render Time(minutes)' and 'Sampling Level' are
correct, as you will not be able to change them in the Maya Submit project form.
The Render Time value entered here is the maximum render time in minutes for each frame of
the animation, not for the entire animation. This render time does not include the preparation /
voxelization time. We recommend that you always use a Sampling Level to stop the render
for each frame, instead of a time limit (to do so, enter a very high value in Render Time so
that the SL will always be reached before the time limit). This is the best way to ensure that
each frame of the animation will have exactly the same image quality.
3
2) Scene preparation before sending the project to the RANCH
As the RANCH is entirely automated, you need to send your scene in a project archive which
contains all the files needed for your scene to be rendered correctly. Follow the steps below:
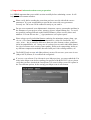
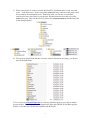
1) Your project must respect the Maya project structure, which makes it easy to gather all
the needed resources in a single location. To create a new Maya project:
- select File / Project / New
- give a name to your project in the Name: field
- enter its location in the Location field
- click on the Use Defaults button
- click on the Accept button. In this Maya 2010 example, the following structure will
be created:
4
It is important for your scene to be saved in the Scenes subdirectory, and all your
textures in the sourceimages subdirectory. If the textures of your project are scattered,
bring them together and relink them if necessary with the excellent freeware
FileTextureManager.
For more details on how to setup a project, please refer to the Maya user manual.
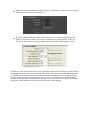
2) a) If you have a Mental Ray project and want the RANCH to use your pre-computed
GI maps (final gather map, photon map, etc.), make sure they are saved in the
renderData\mentalray subdirectory and are referenced in your scene, like in the
example below:
5
b) If you are using pre-computed V-Ray Irradiance map and/or Light cache GI files,
make sure to include them in the root of your project directory, like below:
and that they are correctly referenced in the scene:
C:\Maya\CurrentJob is the directory where your project will be stored when
rendered on the RANCH.
6
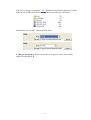
3) When your project is ready to send to the RANCH, check that there is only one .mb
scene - your main scene - at the root of the scenes directory, otherwise the project will
be rejected by the automated server. That being said, you can use several other
referenced scenes (.mb files) in your project, but they must not be at the root of the
scenes directory. They can however be placed in a scenes\references subdirectory like
in the example below:
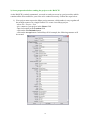
4) Your project should look like this (if some of these directories are empty, you do not
need to include them):
5) You can now use RANCHpacker to convert your Maya project to a ready to render
project archive. RANCHpacker will compress the files into a RANCH for Maya project
archive (.vua) that you can directly upload to the RANCH.
7
3) Referenced projects, or how to save upload time
If you have several scenes which use the same assets/textures, you can use our Local Assets
function (see appendix B of this guide) to upload these assets once and for all. But what can
you do if you have to render the exact same scene several times but with different parameters?
It can happen if:
- you want to render the scene first in low definition for a test, and then at full resolution
- you want to split a lengthy animation into several smaller sequences
- you want to render the same scene but with a different camera
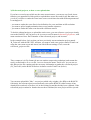
To do this without having to re-upload the entire scene, you can reference a project previously
sent to the RANCH. All you have to do is create a text file named referenced_project.txt, wich
must contain two lines: the ID number of the referenced project, and its name.
In the example below, let's say that you have previously sent an animation project named
'R_Train.vua' with the ID 12345, and now you want to send a new project named 'Train2.vua'
using the exact same scene and assets, but with different settings. First, create the
referenced_project.txt file:
Then, compress it in Zip format (do not use another compression technique) and rename the
newly created archive as a .vua file - here we choose the name 'Train2.vua'. As you can see,
this fake project file contains only the necessary information to gather the referenced project
('R_Train.vua') on the RANCH and use its data to render Train2.vua (below).
You can now upload this "fake" .vua project (which only weights a few KB) to the RANCH.
Obviously, the referenced project must already exist on the RANCH, either because it has
already been rendered, or because it is in the waiting list and has already been validated. If the
referenced project cannot be found or has not been validated, the new project will be rejected.
8
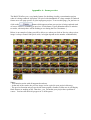
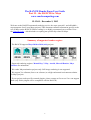
Appendix A : frame preview
The RANCH offers you a very handy feature for checking visually your animation project
when it is being rendered. It displays 256-pixel wide thumbnails of a large sample of rendered
frames on a web page specific to your inprogress project. To access this page, you just have to
click on the
button which appears when your project is being rendered (and
of course if there is something to preview: if each frame of your animation takes 30 minutes
to render, obviously there will be nothing to see during the first 30 minutes :)
Below is an example of what you will be able to see when you click on Preview (the preview
image is always around 1900 pixels wide, its height depends on the number of thumbnails).
Notes:
- This function works with all supported renderers.
- At the end of the render, the preview image is also copied in your project's directory.
- The preview function may not work with some graphics formats; in that case it will display
black frames (or nothing at all). That does _not_ mean that your project has a problem of
course. You can still check its progress in % in the queue.
9
Appendix B : temporary storage of assets
If you have a slow internet connection and need to render several scenes which all use the
same assets (textures, etc.), you may want to use the possibility of uploading the assets once
and then include in your .vua projects only the elements which change (generally the .mb
scenes).
To benefit from this feature, contact us and tell us you would like to use this feature. We will
create a temporary ftp account and master directory on the RANCH for you:
- The ftp server is: ftp://ranch.ftpaccess.cc/
- The login and password to access this ftp account will be the same ones that you use to login
on your RANCH account on the RANCH web site.
- The name of your ftp master directory will be your e-mail address with the "@" replaced by
a "_". e.g. if your RANCH registered user e-mail is [email protected], a
john.smith_MyISP.com ftp directory will be created for you.
Please wait for a confirmation that we have created this ftp account before sending a project.
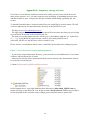
Phase 1: assets directories creation and management
- in your newly created ftp master directory, you can create several subdirectories if you want,
each one with a different set of assets.
- with your favorite ftp client, upload in the chosen assets directory the elements that needs to
be reused by several projects.
Content of /john.smith_MyISP.com/ProjectAssets1
In the example above, user John Smith has been allocated a /john.smith_MyISP.com ftp
master directory on the RANCH. In it, he has created a ProjectAssets1 subdirectory in which
he has uploaded all the assets he needs (a Maya project structure must be preserved).
10
Phase 2: sending a .vua project which use preloaded assets
- on your computer, put in your main project directory only the elements which are not
already included in the assets ftp directory (e.g. the scenes directory, workspace.mel file...)
- include in the root of your project directory a UseLocalAssets.txt text file which contains
the name of the ftp assets directory to use, in our example it would be ProjectAssets1.
- You can now pack your project directory with RANCHpacker as usual to create the .vua
file, and upload it to the RANCH. When the RANCH Runner checks the project archive and
detects the UseLocalAssets.txt file, it will automatically add the content of the
ProjectAssets1 ftp directory to the content of the .vua archive to create the full project.
3) Things to keep in mind
- this feature is not intended to be used as a permanent online storage facility. When the
content of the assets directory(ies) is no longer needed, you must erase it.
- The content of the chosen assets directory is always merged to the content of the .vua
archive you send. If files with the same name are present in the assets directory _and_ in the
.vua archive, the files in the assets directory will overwrite the files in the .vua archive.
- Do not include unnecessary files in your assets directory. They would all be added to the
project even if they are not used in the scene, and thus would increase the time needed to
distribute the project across all the RANCH Runner nodes.
- Very important: make sure that all the assets to be used by a project are already uploaded
on the RANCH _before_ you send the project in the queue. Otherwise, there is a high risk that
the validation process will pack the project without all its content, leading to errors in the final
render. The validation process, which includes the assets in the final project, may indeed
occur as soon as your .vua file is uploaded.
- an assets directory content must respect the Maya project structure, but you have a great
flexibility to organize your files as you want. For instance you can include only a
sourceimages subdirectory (with only textures) in your assets directory, and include
everything else in the .vua project. The important thing to remember is that all that is in the
chosen assets directory will be added to the content of the .vua file to form the final project
(see next page).
11
Typical content of a final project
12