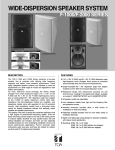
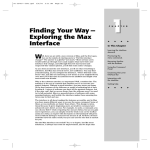
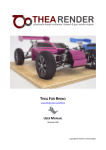
1
Thea for 3ds Max
User manual
NOTE:
This manual covers all particular settings of Thea for 3ds Max, dialogs layout and several
tools developed to achieve a better user experience. Please notice that the explanation of
Thea engine parameters is beyond the scope of this manual, so please refer to Thea Render
manual in case you need any help about the render engine.
Thea Render plugin for 3ds Max user manual
Last revision: February 13, 2013
©
Motiva S.C. 2013
Thea Render™ is a registered trademark of Solid Iris Technologies Ltd.
3ds Max® is a registered trademark of Autodesk® Inc.
TABLE OF CONTENTS
1. INSTALLATION
2. RENDER PANEL
3. LIGHTS
4. CAMERAS
5. MATERIALS
6. INTERACTIVE RENDER
7. THEA TOOLS
5
6
10
12
14
20
22
THEA FOR 3DS MAX
1
INSTALLATION STEPS
INSTALLATION
Once downloaded, run the installer file. A new window with the setup wizard will appear.
Read and accept the license agreement to proceed with the installation. The installer will try to locate your
3ds Max installation path(s).
NOTE: If the installer can’t locate your 3ds Max
installation for some reason, you can install the
exporter files manually later.
Click “Next” to select the installation path. The
installer will copy in this path the plugin files (for
manual installation) and the help files.
MANUAL INSTALLATION
If you need to do the installation process manually, finish the standard installation procedure and go to
your Thea for 3ds Max install folder. You will see 3 zip files: “scripts.zip”, “plugins.zip” and
TheaAdditionalDlls.zip. Decompress the scripts file on your 3ds Max root. Open the file “plugins.zip”
and decompress the plugin that correspond your max version to your 3ds Max plugins folder. Open the
file “TheaAdditionalDlls.zip” and decompress the files that correspond your max version (32 or 64) to
your 3ds Max root folder. And that’s all. Remember that this process is only necessary for manually install
the plugin, if the installer can’t locate your 3ds Max path.
Once installed, a new render engine called “Thea Render” will be added to the production and the
activeshade renderers list. All plugin options are controlled from render panel.
For the license installation procedure, please consult Thea Render manual.
Page 5
2 | RENDER PANEL
2
RENDER PANEL
Almost all plugin parameters can be configured from the render panel. Take in mind that is you place the
mouse cursor for few seconds over any control, a brief note describing how it works will be shown.
THEA RENDER TAB
On top of the panel we can select some options about
the scene translation: the exposure source (darkroom
or per camera) and some options about what to do
when render button is pressed:
•
•
•
•
Open the scene in the studio (don’t start render)
Render the scene in the studio (don’t load
OpenGL viewport)
Export and do nothing (only generates .thea or
.pack.thea files)
Render scene internally (default)
The Export Hierarchy checkbox, is usually disabled
for speed. Enable it if you need to export Hierarchy
information to Thea.
Thea Render Path must be set only for the first time,
but the scene output path must be set for every scene
you want to render outside 3ds Max, since it’s the path
for saving the Thea file.
Here you can select which render engine you want to
use for production and IR (Interactive Renderer). It’s
also possible to set some limits to stop the render
based on time, samples per pixel or passes. Remember
that the frames or ranges to be rendered must be
selected from the standard common tab, as in any
other render engine.
For more information about IR inside 3ds Max, go to page 20
1
Page 6
THEA FOR 3DS MAX
Depending on the render engine some options could be disabled, like relight if you choose Adaptive BSD.
In the same way, if you are in Activeshade mode for using IR1, the limits to stop the render are disabled
and the scene only can be rendered internally.
The button Open Thea Tools opens a dialog with several utilities to improve the user experience of Thea
inside 3ds Max1. We’ll discuss about these tools later.
The 3ds Max common selector for production/iterative renderer and activeshade still in use. The first for
normal Thea engine operation and the later for IR.
RAYTRACING TAB
On this tab we can find all options related to biased
raytracing. If the engine selected is unbiased (TR1 or
TR2) all options are disabled. Other engines like
Adaptive (AMC) or progressive BSD have only access
to some options. Adaptive BSD have access to almost
all options.
In a different way to Thea, some parameters have been
grouped under Global Appearance Parameters rollout for
user convenience.
The Ambient Lighting group has been added to this
panel to make this controls easier to locate. In Thea
are only available on IR settings and the user must
pass this settings to main render using Apply IR settings
to scene button. Can only be used with Progressive BSD.
For more information about these settings, please
refer to Thea manual.
For more information about Thea tools, go to page 22
1
Page 7
2 | RENDER PANEL
BIASED GI TAB
On this tab you can locate all parameters related to Global Illumination when using Adaptive BSD engine.
There are no differences on layout or in the functioning in comparison with Thea so please refer to Thea
manual for more information.
ENVIRONMENT TAB
In this panel we’ll find all options related to environment,
Image Based Lighting and the physical sky included in
Thea.
We can choose the kind of environment to use, including
the option of IBL and Sun at same time. Simply select
from dropdown list.
If Sun is in use, its position can be set with Polar Angle
and Azimuth values, or using a daylight assembly from the
scene, which can be very useful to place the sun when
combined with viewport background visualization of
MentalRay Physical sky.
The rest of the panel work in the same way than Thea
Render Studio, except the environment medium part:
to use a medium, mark the checkbox and then select with
the button a material present in the scene or in material
editor containing the medium configuration you want to
apply. This material must be applied to any object in order
to be saved with the scene (the object can be hidden).
Page 8
THEA FOR 3DS MAX
DARKROOM TAB
Here you can set all the exposure and tonemap settings to be applied to final render. This tab also sets the
global exposure value for the scene if you have selected Use scene global settings in scene translation options
(Thea Render tab).
On other options group you can locate the Min. and Max. depth values (in meters) to be used if depth
channel is selected for output.
RENDER ELEMENTS TAB
These options are, in general, the same than in Thea, but there
are some particularities.
Render elements can be created in two ways:
• Using Save img.thea the selected elements will be stored
only inside the output img.thea file.
• Using Save separated a new file per selected element will be
created, adding the element name as subfix.
In both cases, you must select the output filename in common
tab in render dialog, like any other renderer. The file format
selected here will determine the file format for render
elements, if Save separated is checked.
Some render elements only can be used with biased render engine and will remain disabled if you are
using a progressive renderer.
Additionally, you can also save a COLIMO project file here if you are using Repaint feature.
Page 9
3 | LIGHTS
3
LIGHTS
Lights can be created through Create Panel - Lights - Thea
You can create four light types:
•
•
•
•
Thea Omni
Thea Spot
Thea Projector
Thea IES
Thea lights
THEA OMNI
Based on 3ds Max omni light, it replicates all the Thea Omni
parameters through this simple interface.
You can change the values and see in the max viewport the
results as with any standard max light. Also, there’s a gizmo
linked to the “Soft Shadow” parameter as reference of the
radius of area shadows.
Omni, spot, projector and IES lights
Page 10
THEA FOR 3DS MAX
THEA SPOT
Based on 3ds Max spot light, this light replicates all the Thea Spot
parameters through this simple interface.
There’s a gizmo linked to the “Soft Shadow” parameter as
reference of the radius of area shadows. Also hot spot and falloff
values have a gizmo for previewing purposes.
THEA PROJECTOR
This light is very similar to Thea Spot, but it has a square light
cone and can be used to project an image.
There’s a gizmo linked to the “Soft Shadow” parameter as
reference of the radius of area shadows. Also width and height
of projector area have a gizmo for previewing purposes
THEA IES
This light can load .ies files (IES stands for Illuminating
Engineering Society) and use the information inside the file to
determine the light distribution.
When an ies file is loaded, the light mesh changes in viewport to
adopt the light distribution shape defined in the file.
The light power is also specified in the file, so there’s no units
selector in this light. For convenience, a multiplier control can be
used to modify the light power.
Page 11
4 | CAMERAS
4
CAMERAS
Cameras can be created through Create Panel - Cameras - TheaCam. Cameras in Thea are different than
cameras in max, since Thea uses a more realistic model with film size and controlled by shutter speed,
ISO and f-number values.
Once created, you can convert the camera into a
targeted one.
This section defines the camera lens properties.
Since the viewport aspect ratio depends on this
parameters, and every TheaCam can have different
parameters, you can force a viewport update
pressing the button “Update”.
This section defines the camera shooting
parameters, like f-stop, focus distance or shutter
speed. Also, Thea Camera can replicate shift
lenses. You can control the displacement of the
lenses with “Shift-X” and “Shift-Y” Parameters.
Different camera projections are possible with this
camera. Also, you can select the diaphragm shape.
With polygonal diaphragm, it’s possible to define
the number of blades.
This group shows the DOF near and far planes
distance calculated from the other camera
parameters and the focus distance. Checking
“View Manipulators” show in viewport the near
and far DOF planes and the focus distance. The
“Pick focus point” button can be used to choose
an object as focus center.
Page 12
THEA FOR 3DS MAX
Near plane
Focus point
Far plane
The “Preview DOF” button draws a very basic approximation to DOF effect in viewport. The camera
must be the active viewport before use this.
DOF preview in viewport
Page 13
5 | MATERIALS
5
MATERIALS
IMPORTANT: You must select Thea Render as renderer in order to view the materials properly
Due to the complexity inherent to Thea Materials, the interpretation of materials inside 3ds Max is based
on one container and several layers. The container is called “Thea Material”, and can house several layers
inside.
3ds Max
Thea Render
In the above image the 3ds Max interface (on left) shows, marked in red, three base materials compared
with the same three base materials on Thea material editor. In the same way, the next image compares the
top layers with three layers on Thea material editor:
3ds Max
Thea Render
As you can see the 3ds Max interface can store a maximum of three “base” layers (bottom layers) and
three stacked layers (top layers).
Page 14
THEA FOR 3DS MAX
PREVIEW & MATERIAL EDITOR
This rollout contains all the controls related to
Thea material editor and linked materials.
The button “Open Editor” launch the Thea
Material Editor and loads the current material
parameters from 3ds Max. When the Editor is
closed, the material parameters and the preview
image are updated.
The button “Load to Max” allows to load a
material from a .xml file, and passes all
parameters to current material. The button
“Save from Max” allows to save the current material to a .xml file.
The Room list shows all rooms you have installed in Thea (including custom rooms created by the user).
The preview image will be generated with selected room. Take in mind that unbiased rooms could take a
while to render (as much as couple minutes in slow systems). The material preview can be created without
open the Thea editor by double clicking on the preview image.
It’s possible to override all the UI and use a linked material from file. This material will be included in the
scene xml file at export, but will not be visible in 3ds Max viewports or material editor.
Thea Material Editor
Page 15
5 | MATERIALS
MATERIAL LAYERS
Material Layers (Stacked)
Layer Weights
Layer Masks
Material Layers (Stacked)
The layers for use inside the “container” are the same than inside Thea:
•
•
•
•
•
•
Thea Basic Layer
Thea Glossy Layer
Thea ThinFilm Layer
Thea Coating Layer
Thea SSS Layer
Thea ThinFilm Layer
The properties for every layer are the same than in Thea. For more information, please refer to Thea
Render manual.
You can use any bitmap as mask, including standard Max bitmaps, Thea bitmaps and Thea procedurals.
NOTE: Remember that, as any other material in 3ds Max, you can copy/instance/swap any layer or texture
using drag&drop methods, and can also do copy/cut/clear operations via secondary mouse button.
Page 16
THEA FOR 3DS MAX
MATERIAL PROPERTIES
All material properties are the same than inside Thea, so you can have more information about these
parameters reading Thea manual.
To use inside 3ds Max you first load one Thea Material into material editor. This is the “container” for all
layers in the material. By default, has a basic layer called “Basic1” placed on first slot with a diffuse color
medium grey. Clicking on that button you can modify the properties of this basic material or add textures
to it. In Thea Render website you can see some video tutorials about materials inside 3ds Max:
http://www.thearender.com/cms/index.php/resources/tutorials/3dsmax-plugin.html
Page 17
5 | MATERIALS
BITMAP THEA
Although standard bitmaps can be used, an extended
bitmap has been created to add tonemapping support
to bitmaps.
This tonemap add-on can be located at bottom of
bitmap, after output rollout, and replicates all tonemap
controls present in Thea.
THEA PROCEDURALS
Thea includes several procedural maps that have been replicated in the plugin. Can be loaded as any other
map, but you can’t see it on viewports. Thea Checker Thea Gradient and Thea Noise have a rough
approximation in viewport, but the other procedurals don’t have it and only a Thea logo will be shown.
Page 18
THEA FOR 3DS MAX
BITMAP THEA COMPOSITE
This bitmap has been created to replicated the texture layers
structure present in Thea. If texture operations are not needed,
is preferable to use the standard Thea bitmap.
On top of bitmap you can find 9 texture slots. To load a texture
on any slot simply double click in the slot. Once loaded, a
thumbnail of the selected texture will be shown on the slot.
Alternatively, you can use the filename controls on bitmap
options group to load an image. We’ll discuss later about this
group of controls.
The content of any slot can be copied to another via right mouse button. This will show a menu with
copy/paste and clear options. Clear reset the slot to its default values.
Procedural Map group is intended to load any Thea
Procedural in selected slot. This Map will replace any
previous content of the slot.
Constant Color group fills the slot with a solid color. It’s
useful to tint any other slot image or masked parts.
Bitmap Options group contains the path of the current
loaded image (if any). The “...” button can be used to load
an image, instead of double clicking on slot. Also you can
select here the map channel and if only the alpha part of
the image should be considered.
The bottom part of the panel hold the coordinates and
tonemapping part. It affects only the current selected slot
and uses the same controls than Thea tonemap and
coordinates settings.
Page 19
6 | INTERACTIVE RENDERER
6
INTERACTIVE RENDER
The Interactive Renderer include in Thea (IR) has been implemented in 3ds Max through Activeshade
rendering mode. To use it, you must first select Thea Render as Activeshade renderer in render panel. If
you press Activeshade button, an activeshade window will open, rendering your scene using the engine
selected in Engine General Options rollout on Thea Render tab.
While rendering, you can modify the geometry, change materials or sky settings, and the render will update
instantly. Camera movements or perspective changes are also considered.
Interactive Renderer can also be used as extended viewport. To do this, first select one viewport and
change to any camera you want to use or to perspective view (orthographic views are not supported).
Then, click in the viewport name and select Extended viewports - ActiveShade. If you load the camera in
another view, you can use it to select objects to move, change camera position or anything you want and
these changes will be updated in the extended view.
Using IR as extended view in 3ds Max
Page 20
THEA FOR 3DS MAX
Remember that, in ActiveShade mode, no image will be saved, and many rendering options will be disabled.
For final render you should change to Production mode. Take in mind that render resolution is different
for ActiveShade and production, which is useful to use a scaled down render version while using IR to
change the scene. You can see IR inside max video tutorials in Thea website:
http://www.thearender.com/cms/index.php/resources/tutorials/3dsmax-plugin.html
For more information about IR, please refer to Thea manual.
Page 21
7 | THEA TOOLS
7
THEA TOOLS
Thea for 3ds Max includes several tools not present in Thea stand alone, developed to improve usability
and integration of the plugin.
To open Thea Tools dialog you can use the viewport quad-menu (see fig. 1) or the button Open Thea Tools
at bottom of Thea Render tab in render dialog.
Fig. 1
MATERIAL CONVERTER
This utility makes easier for the user to change the render engine in a finished scene to Thea. It’s compatible
with several render engines and also can convert lights and cameras in most cases.
Take in mind that, because of the very different render engines operation, some parameters, like reflection
or glossy amount could not be accurated after the conversion, so should be revised by the user to refine
the process.
Page 22
THEA FOR 3DS MAX
In the “Main” part you can choose if convert whole scene or only
selected objects
This rollout has specific options for the selected render engine. Try
to detect thin glass refers to some materials, like Arch&design ones,
that has any indicator to use single sheet glass, so it’s converted to
Thin glass layer.
Now some general options. The “Force unknown materials” checkbox
implies that any unknown material wil be replaced by a default Thea
material with a basic grey layer inside. If you prefer to manually
convert unknown materials uncheck this box.
Remember that if original cameras are not deleted after conversion,
will be in the same position that new created cameras.
In the same way that cameras, not deleted lights remain in the same
position that converted ones, so it’s preferable to delete original lights.
If you have any incompatible maps in your scene (third part plugins
or procedurals) and this checkbox is active, the mao will be rendered
to a new map of specified resolution and assigned like texture in the
same chanel occupied previously by the incompatible map.
Once configured al the options, just press the button to start the
process.
After the conversion process, you can see a log file showing all processed materials and new maps created
from procedurals.
Page 23
7 | THEA TOOLS
THEA LIGHT LISTER
In the same way than standard light lister, this tool gives the user faster access to all Thea lights in the
scene. You can change any light parameter and enable/disable lights from this dialog.
CONVERT BITMAPS
If you have any standard bitmaps in your scene can use this tool to convert into Thea bitmaps and gain
access to tonemap settings included in Thea textures. Notice that if you open Thea material editor from
3ds Max, any standard bitmap present in material used to start Thea editor will be converted directly to
Thea bitmap when come back to Max.
Page 24
THEA FOR 3DS MAX
CHANGE MATERIAL PARAMETERS
This tool can change some Thea material properties at
same time for all materials in scene or only for selected
objects.
At first it was intended mainly for use with biased engines,
to modify blurred reflections/refractions precision, but
can also be used to mark materials as shadow-only or
repaintable in a fast way.
This tool will be improved in future versions to add more
changeable properties.
RESET MATERIAL EDITOR
Simple tool that fills the material editor with Thea materials at its default values, replacing any occupied
slots.
RESOURCE COLLECTOR
This tool will collect all bitmaps used in your scene
and will copy to desired path. You can choose to
include also the scene file, Thea environment images
and point cache files.
There’s an option to change the tool behavior to
imitate Max archive command. If you active this
option, a zip file will be created with all files in your
scene while keep the same path structure you are
using in your scene.
Page 25
7 | THEA TOOLS
CREATE THEAPROXY
This tool is intended to use with TheaProxy helper, so we’ll discuss it first.
TheaProxy can be located on Thea Render section in create - helpers panel.
Just click on any part of the viewport to create one TheaProxy. Once
created, you can consider it as an empty container. This container will act
as the pivot point of the proxy, so place it with that in mind. Now select
the objects you want to convert to proxy (and the TheaProxy object) and
use the Create TheaProxy tool. A dialog will ask you about the name for the
proxy file. Introduce a name and the proxy will be created. This file
includes material definition used in the objects selected, but not texture
map files. After that you will be asked if you want to create the proxy replacing current proxy settings,
just in case you were modifying a previously created proxy by error. Also a confirmation dialog will be
shown asking if you want to delete original objects, replacing with the proxy object.
To use a proxy file already created first create an empty TheaProxy as explained before. Then, instead of
select any object to make a new proxy, just use the “...” button in file group to load the .mod.thea file. The
proxy will show in viewport.
Page 26
THEA FOR 3DS MAX
Page 27