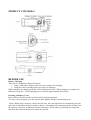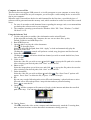
1
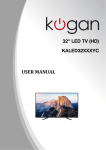
Thank you for choosing the Kogan Dual Camera Car DVR with GPS!
Besides the general functionality of the recorder, this unit has three new features:
1. Double lens can be used to take two images at the front and back at the same time.
2. Newly added GPS module can track and record your entire driving route. Using GPS
reading software, you can watch the video on your computer while connected to Google
maps on the internet. The route will show on the map and you can trace the route of the
vehicle.
3. Built-in gravity sensor (G-Sensor) can record the G forces experienced by the car. Using
specialised software, you can watch the video on your computer while reading the gravity
measurement data to trace accidents or abnormal occurrences that may have occurred.
In order to maximize the performance of the recorder, please read this instruction manual carefully
before use. The unit and accessory design and specifications are subject to change without prior
notice.
Product Features
• Ultra small design and high quality lenses– The front lens with ultra-wide 140 degree
viewing angle can be rotated up and down 20 degrees, while the back lens has an ultra-wide
140 degree viewing angle.
• Built-in 1/4” low illumination, high-quality photographic element can capture ultra clear
pictures in the dark.
• Built-in lithium battery with charging and charging/recording function.
• Built-in microphone/speaker.
• Support for high-capacity micro SD cards.
• Automative turn-on function starts recording when the vehicle starts.
• Slightly delayed start function prevents transient pulse current damage to the unit when the
vehicle starts.
• GPS scanning and positioning.
• Gravity sensor.
WARNING: Do not change any settings or make any adjustments to the unit while driving. If you
need to change a setting or realign the camera, pull your car over to a safe location and do it while
stationary.
PRODUCT CONTROLS
BEFORE USE
Battery Charging
There are two methods to charge the battery:
1. Using a USB cable, plug the unit in to your computer for charging.
2. Using the vehicle-mounted power accessory for charging.
While charging, the charging indicator will be illuminated in red. When charging is complete, the
indicator will go out. A full charging process will take approximated 240 minutes.
Inserting a Memory Card
Insert a Micro SD card into the card slot until it clicks into position.
To remove the card again, press the card inwards slightly, and the card should pop out.
Notice: When using a memory card for the first time, the card will need to be formatted by the unit
to be able to function with the recording software. Formatting will permanently delete all data from
the memory card itself, including any protected images. Please ensure you backup any important
data from the card beforehand, as it cannot be restored.
Adjusting the Position of the Lens
The front lens can be adjusted upwards or downwards by up to 20 degrees to ensure that the camera
is pointing forwards through your windscreen.
Turning On and Turning Off
Turn On: Press and hold the power button once until you hear a beep and the screen illuminates.
Turn Off: Press and hold the power button once until you hear a beep and the screen says
“Goodbye” and then goes dark.
Note: When battery is low, the unit will prompt an automatic shutdown due to low battery.
BASIC OPERATIONS
Changing Operating Mode
This machine has two operating modes: record and playback.
Press the MODE button to change between them.
Setup Menu
Press the MENU button to enter the MENU page. The “Menu Setting” is in blue.
In the menu setting page, click the left and right keys to select the desired settings field, then click
OK to accept the settings, and press MENU to exit the menu.
• System Setting: You can make system setting changes in the framing preview mode.
• Video Mode: Double lens / Front Lens / Rear Lens
• Time Setting: Press left and right for time adjustment. Press OK to confirm and exit.
• Formatting: Press the OK button to enter and select Yes/No.
• Video Format: NTSC/PAL format. (Australian televisions display PAL format by default.)
• Voice: On/Off
• Recording: On/Off
• Language: English/German/Korean/Russian/Traditional Chinese/Simplified
Chinese/Japanese
• Screen Preset: On/Off
• Automatic Video Protection Sensitivity: Low/General/High/Automatically turn off video
protection function. (This function controls how sensitive the G-Sensor is)
• Frequency: 50Hz/60Hz
How to Shoot
Start / Stop Shooting: When in shooting mode, press OK to start recording, then press OK again to
stop recording. When the travelling recorder is on or a memory card is inserted, unit will start to
record automatically.
Note: pressing the left arrow button during recording will mute and unmute the recording.
Video Playback and File Management
Press the MODE key to enter playback mode, and the screen should show an image of the last video
file. Press the LEFT and RIGHT buttons to select a different file to view.
Press the OK button to play and pause the video file.
Computer Access to Files
This device does not support USB protocol, so it will not appear on your computer as a new drive.
To access the recorded files on your computer, you will require a card reading device or micro SD
slot in your computer.
When the card is inserted into the device and formatted for the first time, a specialized piece of
software will be generated onto the memory card, which can then be used to access the files created.
Notes:
1. For ease of use and to avoid abnormal issues regarding the storage card, we recommend that
you backup the software tool to your computer.
2. The computer operating system must be Windows 2000 / XP / Vista / Windows 7 or MAC
OS above 10.3.6.
Using the Software Tool
1. Use the card reader to read the video information on the microSD card.
In the microSD card under My Computer, the user can see three files: ap.bin,
Default_Folder.ini and ADR Player.exe
2. Run ADR Player.exe
3. Open the player to play the video documents.
Click
to open the player.
Select the microSD card path, then click “Apply” to load and automatically play the
document on the card.
Clicking the
controls will perform: rewind, stop, play/pause and fast forward.
4. Select the double lens channel:
Clicking the
will select which lens channel you wish to watch: double lens, front
lens, rear lens.
5. Video on file:
Select the video file you wish to save ( ) and click
to pop up the file path to be saved to.
After selecting your desired path, click “Sure” to save the file.
6. Photo on file:
Select the image photo you wish to save and click
to pop up the file path to be saved to.
After selecting your desired path, click “Sure” to save the file.
7. Delete document:
Select the video file you wish to delete ( ) and click
. The “Sure/Cancel” options will
appear. Press “Sure” to delete the file, or press “Cancel” to keep it.
8. Kit:
Kit can carry out the following tasks: micro SD card formatting / upload software to micro
SD card / micro SD card speed test / map selection and user password setting.
Press
to enter the kit.
9. Google Map:
Click , and the computer will connect to Google via the internet and show the travelled
path on the map. You can trace the path of the vehicle.
10. Gravity Sensor:
Click to watch the video on the computer and simultaneously watch the G-sensing data,
trace accident locations or other abnormal circumstances during your trip.
11. Other Operations
Click
respectively from left to right for the following operations: repair film / unlock
protection / choose display size.
Resetting the Machine
When abnormal circumstances or operations occur, you can press the reset button with a pin to
restart the machine.
TECHNICAL SPECIFICATIONS
LCD Screen Size
2.7” (16:9)
Lens
Front & back lens of ultra-wide 140 degree
viewing angle
Optional Languages
English / German / Japanese / Korean / Russian /
Traditional Chinese / Simplified Chinese
Video Format
AVI
Memory Card Slot
Micro SD
Microphone/Speaker
Built-in
Television Output
NTSC/PAL
TV Output and DC Access
5V 500MA
Battery
Built-in lithium polymer battery
System Requirements
Windows 2000/XP/Vista/Windows 7, Windows
8/8.1 / Mac OS x above 10.3.6
We reserve the right to modify the machine design and specifications without notice.
Accessories list:
• Car charger
• Back Splint
• Vehicle Mount
• GPS Module