1
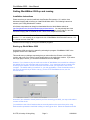
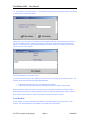
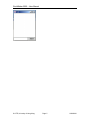
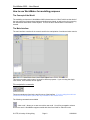
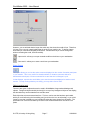
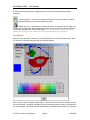
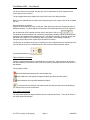
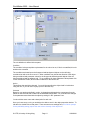
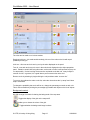
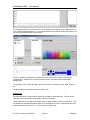
WorldMaker 2000 – User Manual
WorldMaker 2000
User Manual
© CITE, University of Hong Kong, 2001
All instructions/comments in blue are relevant only for the multiplayer mode for WorldMaker 2000.
© CITE, University of Hong Kong
Page 1
12/20/2001
WorldMaker 2000 – User Manual
Overview
WorldMaker is a form of a system that is based on a square grid system: it is based upon the
interactions of entities that act locally. Each cell may have two entities: an object and a
background, which may interact together or separately. Binary interactions (as defined by the
rules) are evaluated between the cell under consideration and each of the neighbouring cells in
turn in the Moore neighbourhood (the eight cells around a central cell under consideration).
Whilst a cell may interact with each of its neighbouring cells in turn, it nevertheless cannot interact
with more than one other cell simultaneously. One useful feature of WorldMaker is that one can
alter the neighbourhood that is being simulated by pre-defining the relative locations of the
neighboring cells that needs to be evaluated when the simulation is run so that the
neighbourhood to be evaluated is not restricted to the Moore neighbourhood.
The new version of WorldMaker 2000 has the following new features, amongst others:
•
•
•
•
•
•
Support for multi-player use.
Increased flexibility due to a larger rule library.
Parameter settings.
Background image support.
Unlimited number of rules and objects.
Descriptions for rules.
© CITE, University of Hong Kong
Page 2
12/20/2001
WorldMaker 2000 – User Manual
Getting WorldMaker 2000 up and running
Installation instructions
Please note that you need to install both Java Runtime Environment 1.3.1 and the Java
Advanced Imaging add-on before you install World Maker 2000. The following instructions
assume you’re using Windows 95 or above.
All of these components can simply be downloaded from the World Maker website at
http://worldmaker.cite.hku.hk/worldmaker/pages/download.htm. You may already have Java
Runtime Environment installed on your computer; however, please ensure that you have the
Advanced Imaging add-on installed as well – this is not a component of the JRE.
Please note that the Java Runtime Environment (JRE) that you have on your computer must be
version 1.3.1 – we currently do not support the use of WorldMaker 2000 with either version 1.2.2
or 1.4 beta versions of the JRE
Install all of those simply by running the installation programs.
Starting up World Maker 2000
World Maker 2000 can simply be started by activating the program “WorldMaker 2000” in the
programs section of the start menu.
This would start up a dialogue requesting that you select either the Chinese or the English
version, and to see if you wish to use the single-player or the multi-player version. If you select
the single-player version, you would then be taken to the main dialogue.
However, if you choose to play the multi-user version of WorldMaker, there would be a dialogue
box asking you for your username and your host name. Your username is what you want to be
known by in this session, and the host name is the server that you would like to use on this
occasion. The default setting is localhost i.e. your own workstation. Enter the domain name or
the IP for the server that you wish to use (e.g. for the CITE WorldMaker server, use citewm.cite.hku.hk)
Note that if your network’s firewall prevents you from accessing port 2468, you may not be able to
connect to other hosts.
You would then see a list of sessions that are currently active on the server that you’re using.
Each session represents a world that is being run at any given time. Select the session and click
© CITE, University of Hong Kong
Page 3
12/20/2001
WorldMaker 2000 – User Manual
on “Join session” to join that session. You will then need to wait for the session owner (see below)
to authorize you to join the session.
Alternatively, you may type in the name of a new session and start a new session by clicking on
the “New Session” button. Please note that you would then assume the rights of the session
owner. You will then see a list of people joining the session. When you’re ready, go forth and
specify the size of the session.
The responsibilities of a session owner
If you were the one who set up a session, you will have the privileges for the session owner. The
session owner has the following rights/responsibilities:
•
•
Authorise/refuse admission for new entrants to a session.
Control the running of the session (start/stop/pause/control speed of the model).
Only the session owner has control over the saving and loading of Worlds, and hence all the
World files that need to be used in a session must be on the local drives for the session owner.
If the session owner leaves or his/her connection is reset, the session will end.
Chat Window
A very simple, no-frills chat window is available for communicating with other people in your
session. IRC commands are not available for use with this chat window.
© CITE, University of Hong Kong
Page 4
12/20/2001
WorldMaker 2000 – User Manual
© CITE, University of Hong Kong
Page 5
12/20/2001
WorldMaker 2000 – User Manual
How to use WorldMaker for modelling purposes
The Concept of the World
The modelling environment in WorldMaker 2000 is based around a “World” which consists both of
the map where the foreground and background objects are placed, as well as the rules governing
the interactions and actions of these objects. The size of this is defined when a new world is
created.
The Main Interface
The main interface contains all the controls used for the manipulation of worlds and other controls.
This screen contains various sets of controls for different purposes. If you are using the singleuser version, some sections will not appear.
File manipulation commands
These commands are found at the top-left corner of the interface. If you are using the multi-user
version the file-manipulation options are only available for the session owner.
The following commands are available
- New world – allows you to start over with a new world. You will be prompted to select a
size for the world. WorldMaker supports worlds with sizes from 20x20 to 100x100 in size.
© CITE, University of Hong Kong
Page 6
12/20/2001
WorldMaker 2000 – User Manual
However, you are advised that the larger the world map, the slower the world will run. Therefore,
it is best if you use only a world window that is as big as you need it to be. To define a larger
world than you need would degrade performance. Please note that you cannot change this
without recreating the world, so think carefully!
- Open world – allows you to open a saved world from the drives on your workstation.
- Save world – allows you to save a world onto your workstation
Share Screen
This option allows you to view the entire screen as displayed on the monitor of another participant
in your session. This is very useful for situations where, for instance, someone wishes to
demonstrate techniques, or when one would like to see what one’s colleague’s up to!
In that dialogue, request view would allow you to see the screen as displayed on another user’s
monitor. To stop viewing what they are doing, you may select Cancel View.
Object creation tools
There are two types of objects that can be used in WorldMaker: foreground and background
objects. Foreground objects would (obviously) lie on top of any background object on the display,
but otherwise they can be treated as one and the same.
Each object has to have an associated icon. This icon can be one that has been pre-loaded,
which you could edit using the icon-editing tool (just click on the icon to select that), or you could
import an icon that is already on your hard-disk by using the import image from file option. The
specification for such icons is that they must be in GIF format and their size must be 32 x 32
pixels.
© CITE, University of Hong Kong
Page 7
12/20/2001
WorldMaker 2000 – User Manual
Use the tabs on the object lists to toggle between the foreground and background editing
interfaces.
- Create object tool – allows you to select an existing icon, edit it using the icon editing
tool (see separate section) and create new objects from that.
- Delete object tool – this allows you to delete an object. All instances of that object, and
all rules involving that object will be deleted at the same time, so please use carefully as there is
no automatic mechanism for undoing that change. In multi-player mode, please note that you
need to have been given lock access to the tool (see below) before you could do so.
Icon editing tool
When you enter the object creation tool, you would find that there is an Edit image option, which
you could use to edit the image that you have already selected.
This tool can be used to modify existing objects. Use the zoom in and zoom out buttons to zoom
in/out of the object. Otherwise, the editing is done by replacing what is in each pixel by whatever
you have selected – the rubber selection would select a transparent colour; whilst if you selected
© CITE, University of Hong Kong
Page 8
12/20/2001
WorldMaker 2000 – User Manual
one of the colours on the palette, the pixel you click on would have its colour replaced by the
colour that you have selected.
The grid toggle switches the display of the grid on/off on the icon editing interface.
When you are satisfied with the results of the image that you have created, click on OK to update
the icon.
Object placement commands
Objects can be placed by any user on the grid. Each space may have one foreground and one
background object. To place objects onto the world, select that object from the list of objects on
).
the left hand side of the interface and then select “Add object” (the icon is
The slide bar below that allows one to select the percentage probability that each individual pixel
would have the selected object added to the cell. If an object is placed in a cell that already has
the same sort of object (e.g. if foreground object A is placed in a cell already containing
foreground object B) then the original object would be overwritten.
The direction of the object can be set by selecting one of the eight directions in that selection box.
If you would like to set it to a random direction, then select the random direction option.
(Coordinate selection tool:
)
Object deletion commands
There are various object deletion commands that you could use. Again, these can be set such
that the probability of execution in each cells is not 100% by sliding the slide bar at the bottom of
that window.
These options include:
Delete all objects and background in the selected area.
Delete instances of the specified foreground object (per object selection panel)
Delete instances of the specified background object.
To reset the entire world area and make it blank (but keep the object and rule definitions)
you may choose to use the reset button:
Rule setting commands
The actions that objects undergo are defined by the rules that can be set. They can be found in
the object properties dialogue:
© CITE, University of Hong Kong
Page 9
12/20/2001
WorldMaker 2000 – User Manual
Please note that you could also set global rules, and there is a global parameter; these
instructions are placed with the instructions for the statistics tool as they go hand in hand.
Double click on the object to enter this dialogue.
Please note that in multi-player mode you must first take the object lock.
To take the lock, click on the lock button at the bottom of the access control panel of the main
panel. Please note that only one person could have the lock for any object at any one time, and
each person could only take the lock for one object at any one time.
If you have either of those conditions not satisfied, you will be put in the waiting list for that
object’s lock. When the lock is released (or, in the latter case, when you relinquished the lock for
the object) the lock is passed on the next person on the waiting list.
The lock button looks like
and the unlock button looks like
.
To add new rules, click on the “Add rule” button.
You would then be able to define new rules:
© CITE, University of Hong Kong
Page 10
12/20/2001
WorldMaker 2000 – User Manual
The rule definition is defined in three parts:
Condition
The condition is the prerequisite requirements for the rule to be run; if this is not satisfied, this rule
would not be executed.
The conditions are based upon the foreground and background objects on the cell being
considered as well as the one next to it. Other conditions may include the direction of the object
being considered and parameter values for the foreground and background objects of the cell
being considered and the adjacent cell. To set conditions for these parameter values please click
on the “Parameter” button, where further conditions on this can be set.
Action
This defines what would be changed. You could change either the object itself or its direction
using the rule, or you can set it to jump (move to the next cell).
Outcome
Based on your action as defined in action , by dragging and dropping the components from the
palette on the left hand side to obtain the final desired configuration. You could also set changes
to the parameter associated with the object by setting it in the “parameter” box.
You should also set a name and a description for each rule.
Once you have set up a rule, you would then be able to see it in the object properties window. To
edit the rule, double-click on that panel. There are some more settings here, all of which (except
for the probability setting) require the user to have custody of the object lock.
© CITE, University of Hong Kong
Page 11
12/20/2001
WorldMaker 2000 – User Manual
The rules can be made to run in three modes:
Randomly pick one – this mode would randomly pick one of the rules on the list with equal
probability of doing so.
Until one – this runs each rule one by one by the order displayed on the panel.
Test all - runs each and every rule once in the order that is displayed on the object properties
panel. Please be careful with using this mode, as the order of rules is still important, as they are
run sequentially. If rules involving movement are not placed as the last rule, it may nullify the
next set of rules. In general, it is a good idea to put movement rules at the end.
Remove a rule by selecting it (single-clicking the rule) and then select “remove rule”
To move a rule up/down the order on the list, select the rule and use the “up swap” and “down
swap” commands.
To change the probability that a rule will be run, change the percentage controls on each rule.
This is also accessible by clicking the percentage sign beside each object on the list of objects.
Background controls
We offer a range of controls for altering the background of the map area:
- Toggles the display of the grid on the map on/off.
- Enables you to choose the colour of the grid.
- Toggles whether the background image is shown
© CITE, University of Hong Kong
Page 12
12/20/2001
WorldMaker 2000 – User Manual
- Allows you to choose the image (GIF or JPG image) for use as the background image.
are two different controls for controlling the display size of the map.
Operational controls
- This shows the parameter and direction of the foreground and
background objects that your mouse is on top of.
The following operational controls are only available to the session owner.
You may vary the operating mode of the world using these controls:
The rewind button takes you back to the state of the World when it was last reset, and resets the
statistics for the world
The stop button stops the simulation.
The play button starts the animation; in turn, there is a
iteration only.
button for running the world for 1
The scroll bar controls the speed at which the simulation would be run.
The Statistics controls
These controls govern the statistics tool of the world.
The buttons include:
- Saves the configuration of the world.
- Opens/closes the graph window
- Toggles the gridlines on the graph (see below).
When you access the graph window, you will see:
© CITE, University of Hong Kong
Page 13
12/20/2001
WorldMaker 2000 – User Manual
On the right hand side you see two icons, one is for adding new statistics to be graphed and one
is for deleting statistics definitions. You can edit the definitions by double clicking the definition on
the list on the right hand side of the interface.
The sum that will be displayed on the graph is the sum total of the number of cells with the
configuration in “Objects to be counted” (for this purpose, any background includes blank
backgrounds).
To change the colour, select the right colour either under the “swatches” or the “HSB” selection
tab.
The graph statistics will update as the simulation is run.
Global rules
As mentioned earlier, a feature that is present is the ability to set global rules. This can be set
using the controls accessible by selecting the global rules button.
These rules allow you to stop the simulation when a certain statistic reaches a certain level. This
can be done by selecting the statistic that the rule is supposed to act on, set the parameters on it,
and then press on OK to confirm. You can only set one global rule.
© CITE, University of Hong Kong
Page 14
12/20/2001
WorldMaker 2000 – User Manual
Appendix: Rule Engine Logic
Please note the following restrictions on the rule engine logic for WorldMaker 2000:
1. On each iteration, the rule engine will only consider the logic for each rule for one
neighbouring object (chosen at random) only. This means for instance that if the rule
was considered for the North direction, regardless of whether the rule was actually run for
that direction or not, it will not be considered for any other direction.
2. After a rule has changed an object from something to something else, this object will not
run any further rules for the current generation and will not be affected by any rules in the
current generation.
© CITE, University of Hong Kong
Page 15
12/20/2001
WorldMaker 2000 – User Manual
Frequently Asked Questions
1. Can I use World Maker (Hong Kong) world files in WorldMaker 2000?
Sorry, but as the architecture of WorldMaker 2000 is substantially different from World Maker
(Hong Kong), the files are not mutually compatible. With the new interface, we feel that it would
be easier and better in most cases to just rebuild the world files, perhaps exploiting the new
capabilities of WorldMaker 2000 in order to develop more elegant solutions to the problems.
© CITE, University of Hong Kong
Page 16
12/20/2001