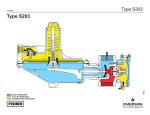
1
The high class house !
MANUAL BOOK
SMART LIGHTING DEVICE
Model: SH - D2
SmartHome technology development investment company limited
HDD2
HDD2 0212 V2.0
SMART LIGHTING DEVICE
Model: SH - D2
The high class house !
User Manual
SH - D2
Thank you for choosing smart lighting device SH-D2 of SmartHome. For selecting
SmartHome’s products, you will enjoy the best warranty services and installation
support from our technical experts.
This document contains useful information during installation process and
product usage. Please read the instructions carefully and retain the manual in
case of need.
Electric shock may cause injuries or death. Before installing, repairing
or cleaning the device, you should check whether the device’s power
is disconnected.
You should request support from technical experts or Customer
Warning
Contact Center to avoid electric related accidents.
You should comply with environmental regulations when discarding
or recycling the device or its packing materials.
User Manual
SH - D2
Copyright © 2012 SmartHome Co., Ltd. All rights reserved.
The smart lighting SH-D1 is the product of SmartHome Company and has been
registered regarding designs, utility solutions and quality certification. All
violations such as copying designs and product ideas are subject to the current
copyright laws of the Socialist Republic of Vietnam.
User Manual
SH - D2
Safety Information
Do not use power source which is different from the one stated in
the specifications of the device.
Disconnect its power prior to installing, disassembling or repairing
the device.
Do not store the device in high-temperature environ-
Do not disassemble the device if not necessary.
Do not clean the device with corrosive chemicals.
Comply with the safety information during the device’s usage.
Warning
User Manual
SH - D2
Contents
Introduction
1. General introduction
2. Product package
3. Sensor area
4. Specifications
Features
1. Smart lighting
2. Forcible lighting
3. Light sensor
4. Setting preferred light level
5. Indicator light
Setting
1. Default mode
2. Switch mode setting
3. Time setting
Installation
1. Connection Scheme
2. Installation steps
Problems during usage
05
05
06
07
07
09
10
10
11
12
12
13
13
13
14
17
18
19
21
Introduction
SH - D2
Introduction
General introduction
Smart lighting device operates using infrared temperature sensing technology.
When users are in the sensor area, the light will automatically turn on. The device
is integrated with the light sensor and the ability to flexibly adjust the pending
time to turn off the light when users leave the sensor area. The product’s smart
feature brings comfort, power saving and absolute safety to its users.
The device is suitable for:
Office, smart house.
Living room, bed room, kitchen, dining room.
Restroom, stair, corridor, courtyard, garage, stockroom.
Introduction
SH - D2
Product package
The high class house !
Manual book
MANUAL BOOK
SMART LIGHTING DEVICE
Model: SH - D2
SH – D2
Sets of ceiling hook, screws and anchors
Introduction
SH - D2
Sensor area
Above the ceiling
Below the ceiling
The above dimensions are the best for the device’s detection ability to
Notice
detect users moving into its sensor area. In case the device fails to
detect users, please contact our Customer Contact Center.
Introduction
SH - D2
Specifications
Voltage
220VAC - 50/60Hz
Load power
Incandescent lamp - maximum 1000W
Fluorescent lamp - maximum 350W
Sensor range
Maximum 5m
Applicable sensor area
Maximum 20m2
Light sensor mode
Light sensor mode
Operation temperature
00C - 500C
Dimensions (D X H)
90 x 90 x 38mm
Weight
90 gram
Features
SH - D2
Features
Components
Sensor
Turn off or turn on
light sensor
Select switch type
Test mode
(for technicians only)
Adjust automatic turn-off time
when there is no user
Adjust the light turn-off time
by switch
Features
SH - D2
1. Smart lighting.
The smart lighting device automatically turns on upon detecting people in
sensor area. When users leave the sensor area, the device will turn off after a
preset period. The preset period for turning off can be set from 10 seconds to 60
minutes by switch S201.
If preset time is too short, high switching frequency will shorten the
Notice
life of fluorescent lamps, compacts.
Forcible lighting
The device can be connected to switch to adjust
S201 switch for adjusting
sensor time
lighting modes according for users’ diversity
needs.
Turn off the light: When the light is on, using
switch to turn off the light, the light will be off for
a preset amount of time. After the period, the
device will automatically turn on the light upon
detecting a user’s presence. The turn-off time is
set by S202.
S202 switch for adjusting
the forcible turn-off time
Features
SH - D2
Turn on the light: When the light is off, using switch to turn on the light, the
device will turn on and automatically turn off the light when users get out of the
sensor area after the automatic turn-off time (refer to time setting on page 14).
Continuous lighting mode: Switch on and off 3 times consecutively in 2
seconds (or press and hold the button for more than 3 seconds), the light will be
continuously on. If users would like to turn off the light, use the switch to turn off.
3. Light sensor
Light sensor helps the device’s operation to be smarter and more powersaving. When using light sensor mode, the device automatically turns on only
when actual light condition is darker than the preset one. Enable or disable
3
1
2
3
ON
Not using light sensor
S2
03
S2
03
1
1
2
3
ON
D
D
IP
IP
1
2
2
ON
3
ON
D
D
IP
IP
ON
ON
D
IP
D
IP
this mode by S203 switch is shown as follow:
Using light sensor
Features
SH - D2
4. Adjust preferred light level
For the preferred light level setting, please take the following steps:
Wait for the environment light to reach the preferred level to turn on the light.
Switch on and off 5 times consecutively in 3 seconds (or hold the press for
more than 10 seconds) so that the device records the new reference light
level.
The device is set up with default preferred light level setting. However, users can
set up the parameter again if the default setting is not suitable.
5. Indicator light
Indicator light is used to inform the device’s status.
If indicator light flashes every 0.5 seconds when users are in sensor area:
The device is operating in automatic lighting mode.
If the indicator light is continuously on: The device is in continuous lighting
mode.
If the indicator light is off: the device is turned off by switch or there is no
user in its sensor area.
If the indicator light flashes every 1-second: the device is booting.
Installation
SH - D2
Installation
1. Device’s default settings.
Mode
Default value
Light sensor
Off
Forcible turn-off
8 hours
Automatic turn-on
10 minutes
Switch type
Ordinary switch
Actual settings
forcible turn-off
after 8 hours
automatic turn-off
after 10 minutes
2. Switch mode setting (adjusting switch S203).
Using pressing switch mode
Using normal switch (default)
Installation
SH - D2
3. Light time Setting.
ON
DIP
ON
DIP
1 2 3
1 2 3
S203
S202
Forcible light turn-off
30 minutes
ON
DIP
ON
ON
DIP
1 2 3
S201
Automatic light turn-on
after 10 seconds
DIP
ON
DIP
ON
DIP
1 2 3
S203
ON
DIP
1 2 3
S202
Forcible light turn-off
45 minutes
ON
DIP
ON
DIP
ON
DIP
1 2 3
S201
Automatic light turn-on
after 60 seconds
ON
DIP
1 2 3
1 2 3
1 2 3
1 2 3
1 2 3
1 2 3
S203
S202
S201
S203
S202
S201
Forcible light turn-off
60 minutes
Automatic light turn-on
after 3 minutes
Forcible light turn-off
90 minutes
Automatic light turn-on
after 5 minutes
Installation
SH - D2
ON
DIP
ON
DIP
1 2 3
1 2 3
S203
S202
ON
S201
Automatic light turn-on
after 10 minutes
Forcible light turn-off
2 hours
ON
DIP
ON
DIP
1 2 3
1 2 3
S203
S202
Forcible light turn-off
6 hours
DIP
1 2 3
ON
DIP
1 2 3
S201
Automatic light turn-on
after 30 minutes
ON
DIP
ON
DIP0
ON
DIP0
1 2 3
1 2 3
1 2 3
S203
S202
S201
Forcible light turn-off
4 hours
ON
DIP
ON
Automatic light turn-on
after 15 minutes
DIP
1 2 3
1 2 3
S203
S202
Forcible light turn-off
8 hours
ON
DIP
1 2 3
S201
Automatic light turn-on
after 60 minutes
Adjusting the forcible light turn-off time (S202) does not affect the
Notice
automatic light turn-on time (S201) and vice versa.
Installation
SH - D2
(*) Difference between normal switch and pressing switch.
Normal switch: is the type of switch mounted on electric panel to turn on and
off the light. Its status does not change after interactions of switching.
Pressing switch: is the type of button commonly used with doorbell. It will
automatically revert to its previous status after interactions of switching.
SH - D2
Installation
Installation
The back of the device
Disconnect device’s power when
installing, adjusting the device.
Read the instructions carefully
during usage.
Neutral wire
220VAC - 50/60Hz
Input
Hot wire
switch
Light
Hot wire
220VAC - 50/60Hz
Neutral wire
Switch
Installation
SH - D2
1. Connection Scheme
Connection diagram with switch.
Neutral wire
~220V
Hot wire
Switch
Sensor
90 mm
Notice
The light can be replaced by other indicator devices based on users’
demand (bell, fan, alarm device etc.).
Installation
SH - D2
Installation steps
Step 1: Drill two screw holes to mount the hook onto the ceiling. (Notice: avoid
underground wire upon drilling as in Figure 1).
Step 2: Connect the supply cord, light wire and switch wire to corresponding
power connector, light, switch of the device (Figure 2).
Power cord
Light wire and
switch wire
19
Installation
SH - D2
Step 3: Mount the device to the hook to fix it onto the ceiling (Figure 3&4).
All wires/cords mentioned in Step 2 should be connected properly to
avoid damage to the device.
Warning
During installation, the sensor surface should be kept from being
scratched, which may affect the sensor’s sensitivity.
Problems during usage
SH - D2
Problems during usage
The following cases are not caused by device’s error
Lights turn off when there is no user’s motion in
the room.
Lights do not turn on when there is enough light
in the room.
21
Problems during usage
SH - D2
The following cases are not caused by device’s error
Lights turn on due to the impact of air
conditioning
or
heat
sources
(cooker,
microwave, stove etc.).
Lights turn on due to moving objects.
Problems during usage
SH - D2
The following cases are not caused by device’s error
Lights turn on due to nearby powerful
transmitting equipment.
Lights turn on due to a nearby steam fan.
23
Problems during usage
Number
SH - D2
Phenomenon
Solution
The device does not
Use switch to turn on and off the light, if
operate,
indicator
the device does not operate please check
light does not flash
the power connection. If you cannot
when there is a user in
solve the problem, please contact
sensor area.
Customer Contact Center.
The indicator light is
Use switch to turn on the light, if the light
on upon detecting
is not on please check whether the light
user but the light is
bulb is broken. If you cannot solve the
not on.
problem,
please
contact
Customer
Contact Center.
The lighting device
Use switch to turn off the light, if you
flashes continuously.
cannot solve the problem, please contact
Customer Contact Center.
24
Problems during usage
Number
4
SH - D2
Phenomenon
The
device
Solution
only
operates in the dark.
The device has been installed in
environment light mode. To disable
this mode, refer to light sensor mode
setting (page 11).
Contact Customer Care Center for more details about products.
Customer Care Center: 1900 6632
25