1
JNIOR Series 3
A Network I/O Resource
Utilizing the JAVA Platform
Command Line Communications
Manual
Release 1.0
INTEG process group, Inc.
11279 Perry Highway, Suite 107
Wexford, PA 15090
PH (724) 933-9350
FAX (724) 933-9333
www.integpg.com
Copyright 2001-2006
All Rights Reserved
Software Version: 2.10.6
Last updated on: September 14, 2009
INTEG process group, inc.
TABLE OF CONTENTS
INTRODUCTION .................................................................................................................................. 1
1.1
About This Manual ....................................................................................................................... 1
1.2
Communications Options ............................................................................................................. 1
2
WHAT CAN I DO FROM THE COMMAND LINE? .............................................................................. 2
2.1
Available Commands ................................................................................................................... 2
2.1.1 File System ............................................................................................................................ 14
2.1.2 System Services Commands ................................................................................................ 14
2.2
Setting Up a Port Number.......................................................................................................... 17
3
FREQUENTLY USED COMMANDS ................................................................................................. 18
3.1
Administering Usernames and Passwords ................................................................................ 18
3.2
Using the JRMON Command .................................................................................................... 18
Description .......................................................................................................................................... 18
Input & Output Monitoring .................................................................................................................. 18
Output Control .................................................................................................................................... 19
Available Commands.......................................................................................................................... 21
Diagnostic Mode ................................................................................................................................. 25
1
JNIOR Series 3
Command Line Communications Manual – Release 1.0
I
INTEG process group, inc.
1 INTRODUCTION
1.1 About This Manual
This manual is intended to provide an overview of the command line communications methods available
to the user for monitoring, controlling and configuring your new JNIOR. This manual also assumes that
the JNIOR has been properly configured and is communicating with your network or computer for both
the serial and Ethernet communications. Additional information on how to properly configure and set up
communications with your new JNIOR is provided in separate documents located on the JNIOR Product
CD that has been supplied with your new JNIOR.
1.2 Communications Options
There are 2 options available to the user for configuring and monitoring the JNIOR from a command line.
If the JNIOR is currently connected to your network, you can use a telnet connection and the appropriate
IP Address to perform all available commands. If you don’t have your JNIOR set up on the network, you
can use HyperTerminal and a serial connection. For complete instructions on how to establish
communications using either of these methods, see the Getting Started Manual available on the JNIOR
Product CD supplied to you with your new JNIOR.
JNIOR Series 3
Command Line Communications Manual – Release 1.0
1
INTEG process group, inc.
2 WHAT CAN I DO FROM THE COMMAND LINE?
2.1 Available Commands
After you have logged in with your user name and password, the JNIOR System Services has several
commands that may be executed from the command line. To display a list of commands enter the help
command at the command prompt. To display usage of a particular command use the help command
prior to the command on the command line. For example help date, displays usage of the date
command.
The following commands are available, but only the more frequently used ones are described in this
section. Please see below for a complete explanation of each of these available commands.
NOTE: It is your responsibility to use System Service commands in an appropriate way such that they
do not affect the operation or set-up of the JNIOR. If you are not familiar with some of the commands,
then it is recommended that you do not use those commands. INTEG is not responsible for errant use of
these commands.
addc
This command adds a dynamically loaded command to slush.
Syntax:
addc CLASSNAME[alias]
Example:
/> addc
JNIOR Series 3
Command Line Communications Manual – Release 1.0
2
INTEG process group, inc.
arp
This command dumps all ARP cache entries.
Syntax:
arp
Example:
/> arp
cat
This command is a JNIOR file system command that is used to display the contents of a file.
Syntax:
cat FILE
Example:
/> cat jniorboot.log
‘displays the contents of the boot log file
cd
This command is a JNIOR file system command that is used to change the current working
directory.
Syntax:
cd DIR
Example:
/> cd www
/> cd..
‘changes the working directory down one level to www
‘changes the working directory up one level
chmod
This command is a JNIOR system services command that is used to change the permissions of the
specified file.
Syntax:
chmod [options] FILE
Example:
/> chmod FILE
JNIOR Series 3
Command Line Communications Manual – Release 1.0
3
INTEG process group, inc.
chown
This command is a JNIOR system services command that is used to change the owner of the
specified FILE to USER.
Syntax:
chown USER FILE
Example:
/> chown jnior FILE
copy
This command is a JNIOR file system command that is used to copy files from SRC to DEST.
Syntax:
copy SRC DEST
Example:
/> copy SRC DEST
cp
This command is a JNIOR file system command that is used to copy files from SRC to DEST. This
command is the same as the copy command described above.
Syntax:
cp SRC DEST
Example:
/> cp SRC DEST
date
This command is a JNIOR system services command that is used to display the current system
date.
Syntax: u
date [option] [mmddyyyyhhmmss] [timezone]
Example:
/> date
del
This command is a JNIOR system services command that is used to delete the specified file.
Syntax: u
del FILE
Example:
/> del FILE
JNIOR Series 3
Command Line Communications Manual – Release 1.0
4
INTEG process group, inc.
dir
This command is a JNIOR file system command that is used to display a list of the files in the
working directory (same as ls command).
Syntax:
dir
Example:
/> dir
downserver
This command is a JNIOR system services command that is used to shutdown a desired server
Syntax:
stopserver [options]
Shuts down the specified server.
[-s] Serial Server
[-d] Disable console output. Used only with '-s'.
[-t] Telnet Server
[-f] FTP Server
[-x] Service Server
Alias: downserver
ftp
This command is a JNIOR system services command that is used to shutdown a desired server
Syntax:
ftp [option] [SERVER]
Where options include:
[-d]
Enable debug output
[-s FILE] Use FTP script file FILE
SERVER should be the full name of the ftp server to connect togc
help
This command is a JNIOR system services command that is used display all available commands
history
This command is a JNIOR system services command that is used to show the user the last 5
commands used
JNIOR Series 3
Command Line Communications Manual – Release 1.0
5
INTEG process group, inc.
hostname
This command is a JNIOR system services command that is used to change the hostname of the
JNIOR
hostname NAME
Displays or sets the system hostname and domain name.
'hostname tini1.dalsemi.com' sets the hostname and the domain name.
'hostname tini1' sets only the hostname.
ipconfig
This command is a JNIOR system services command that is used to display or configure your
JNIOR network settings. You must be logged in as an Admin user to take advantage of this
command.
Syntax:
ipconfig -a IP -m MASK -g GATEWAY -p PRINAME -s SECNAME -h MAILHOST
where:
IP
MASK
GATEWAY
PRINAME
SECNAME
MAILHOST
= desired IP address
= IP mask
= gateway address
= ip address of the Primary Name Server
= ip address of the Secondary Name Server
= ip address of the Mail host Name Server
Example:
/> ipconfig -a 169.144.25.10 -m 255.255.255.0 -g 169.144.25.1 -p 169.144.25.1
-h 169.144.25.3
java
This command is a JNIOR system services command that is used to execute the given Java class.
Syntax:
java [options] FILE [&]
Example:
/> java
JNIOR Series 3
Command Line Communications Manual – Release 1.0
6
INTEG process group, inc.
jrconfig
This command is a JNIOR system services command that is used to display or configure the
JNIOR settings. You must be logged in as an Admin user to take advantage of this command.
Syntax:
jrconfig [-z TCPport]
jrconfig [-f]
jrconfig [-d]
jrconfig [-r]
Set JNIOR TCP/IP port number
Remove Field Firmware Update
Restore the factory settings
Restore factory settings and remove the Field Firmware Update
Example:
/> jrconfig -z 9200
jrflash
This command is a JNIOR system services command that is used to manage flash file system.
Syntax:
jrflash [options]
Example:
/> jrflash
jrmon
This command is a JNIOR system services command that is used to monitor or control active
JNIOR I/O.
Syntax:
jrmon [options]
Example:
/> jrmon
/> jrmon -c
‘monitor the I/O
‘change the outputs with specified change commands
kill
This command is a JNIOR system services command that is used to kill the specified process.
Syntax:
kill PROCESS_ID
Example:
/> kill PROCESS_ID
JNIOR Series 3
Command Line Communications Manual – Release 1.0
7
INTEG process group, inc.
ls
ls - display a list of the files in the working directory (same as dir command)
Ex: /> ls
md
This command is a JNIOR system services command that is used to create the specified directory.
Syntax:
md DIR
Example:
/> md www
‘creates the directory “www”
mkdir
This command is a JNIOR system services command that is used to make the specified directory.
Syntax:
mkdir DIR
Example:
/> mkdir www
‘makes the directory “www”
move
This command is a JNIOR file system command that is used to move the file from SRC to DEST.
Syntax:
move SRC DEST
Example:
/> move SRC DEST
mv
This command is a JNIOR file system command that is used to move the file from SRC to DEST
(same as move).
Syntax:
mv SRC DEST
Example:
/> mv SRC DEST
JNIOR Series 3
Command Line Communications Manual – Release 1.0
8
INTEG process group, inc.
netstat
This command is a JNIOR system services command that is used to list all TCP connections.
Syntax:
netstat
Example:
/> netstat
nslookup
This command is a JNIOR system services command that is used to display the host name or IP
address, whichever is not provided.
Syntax:
nslookup [NAME | IP]
Example:
/> nslookup
passwd
This command is a JNIOR system services command that is used to set the password for the
specified user. You will be prompted for the new password and will be prompted again to confirm
the password change. The password must be entered in twice exactly the same otherwise the
change will not take effect. Note that the password will not be displayed as you type. Passwords
are case-sensitive. You must be logged in as an Admin user to take advantage of this command.
Syntax:
passwd password
Example:
/> passwd jnior
Enter in the new password: new password
Confirm the new password: new password
ping
This command is a JNIOR system services command that is used to send echo requests to
network hosts.
Syntax:
ping HOST
Example:
/> ping HOST
JNIOR Series 3
Command Line Communications Manual – Release 1.0
9
INTEG process group, inc.
ps
This command is a JNIOR system services command that is used to list the currently running
processes.
Syntax:
ps
Example:
/> ps
rd
This command is a JNIOR system services command that is used to remove the specified
directory.
Syntax:
rd DIR
Example:
/> rd www
‘removes the directory “www”
reboot
This command is a JNIOR system services command that is used to shut down all servers and
reboot the system.
Syntax:
reboot [option]
Example:
/> reboot
registry
This command is a JNIOR system services command that is used to start the Registry Editor. You
must be logged in as an Admin user to take advantage of this command.
Syntax:
registry
Example:
/> registry
JNIOR Series 3
Command Line Communications Manual – Release 1.0
10
INTEG process group, inc.
rm
This command is a JNIOR system services command that is used to delete the specified file (same
as del command).
Syntax:
rm FILE
Example:
/> rm FILE
rmdir
This command is a JNIOR system services command that is used to remove the specified
directory.
Syntax:
rmdir DIR
Example:
/> rmdir www
removes the directory “www”
sendmail
This command is a JNIOR system services command that is used to send email to the designated
recipients (separated by commas).
Syntax:
sendmail [-f fromaddr] [recipients] [cc’s]
Example:
/> sendmail [-f fromaddr] [recipients] [cc’s]
setenv
This command is a JNIOR system services command that is used to set the variable to the value in
the current environment.
Syntax:
setenv [VAR VAL]
Example:
/> setenv [VAR VAL]
JNIOR Series 3
Command Line Communications Manual – Release 1.0
11
INTEG process group, inc.
startserver
This command is a JNIOR system services command that is used to start up the specified server.
Syntax:
startserver [options]
Example:
/> startserver
stats
This command is a JNIOR system services command that is used to display current system status
information.
Syntax:
stats [-v]
Example:
/> stats
stopserver
This command is a JNIOR system services command that is used to stop the specified server.
Syntax:
stopserver [options]
Example:
/> stopserver
su
This command is a JNIOR system services command that is used to switch the current user.
Default is root.
Syntax:
su [USER]
Example:
/> su jnior
JNIOR Series 3
Command Line Communications Manual – Release 1.0
12
INTEG process group, inc.
useradd
This command is a JNIOR system services command that is used to add a user to the current
JNIOR. You must be logged in as an Admin user to take advantage of this command.
Syntax: u
useradd -n username -p password -i user ID number
Example:
/> useradd -n jnior -p jnior -i 128
userdel
This command is a JNIOR system services command that is used to delete a user from the current
JNIOR. You must be logged in as an Admin user to take advantage of this command.
Syntax:
userdel username
Example:
/> userdel jnior
who
This command is a JNIOR system services command that is used to display all users on the
system.
Syntax:
who
Example:
/> who
whoami
This command is a JNIOR system services command that is used to display the current user’s
User ID.
Syntax:
whoami
Example:
/> whoami
JNIOR Series 3
Command Line Communications Manual – Release 1.0
13
INTEG process group, inc.
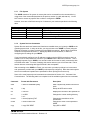
2.1.1
File System
The JNIOR contains a file system in memory that can be accessed from the command line by
using some of the commands described in the previous section (e.g. dir, cd, cat, etc). You do
NOT need to access any specific files to utilize or configure the JNIOR.
However, there are a few files that may be of relevant to your needs as provided in the following
table.
File Name
jniorboot.log
jniorsys.log
jnior.ini
passwd
*
2.1.2
Directory Location
(root)
(root)
/flash
/etc
/www
Description
Log of system events during boot up
Log of all systems events
JNIOR configuration initialization
List of usernames, encrypted passwords, and user ids
Various html and applet files
System Services Commands
System Services are those features and functions accessible when you log into the JNIOR at the
operating system level. In order to do this, you must connect to the JNIOR via Telnet (using the
Ethernet connection) or HyperTerminal (using the RS232 connection). Both of these connection
methods were described in Section 3 - Setting Up JNIOR Communications, in relation to
configuring the IP settings for your JNIOR.
If you have already configured your IP address correctly using the RS232 connection, then it is
easiest to use a Telnet session to connect to your JNIOR over the Ethernet connection. This is
especially important if your JNIOR is in a remote location and cannot be easily connected to with
an RS232 serial cable. For ease of reading, this section assumes you will connect with a Telnet
session however connecting with HyperTerminal is also acceptable.
After connecting to the JNIOR via Telnet, you must enter your admin privilege level <username>
and <password> provided with your JNIOR (or subsequently configured). Note that certain system
service commands and operations are permitted for admin privilege level users only.
Some of the most frequently used commands were described in Section 4.2.1, Command Line
Communication. The following table is a complete list of the available system service commands.
Command
Format with Parameters
Description
addc
/> addc CLASSNAME [alias]
arp
/> arp
Adds a dynamically loaded command to
slush
Dumps all ARP cache entries
cat
/> cat FILE
Displays the contents of the specified file
cd
Changes the current working directory
chmod
/> cd DIR
/> cd ..
/> chmod [options] FILE
chown
/> chown USER FILE
copy
/> copy SRC DEST
JNIOR Series 3
Command Line Communications Manual – Release 1.0
Changes the permissions of the
specified file
Changes the owner of the specified to
USER
Copy SRC to DEST
14
INTEG process group, inc.
cp
/> cp SRC DEST
Same as copy command
date
del
/> date [option] [mmddyyyyhhmmss]
[timezone]
/> del FILE
Deletes the specified file
dir
/> dir [option] FILE
Lists the files in the current directory
downserver
/> downserver [options]
echo
/> echo TEXT
Shuts down the specified server. Same
as stopserver command
Echos the text to the screen
ftp
/> ftp option] [SERVER]
gc
/> gc
Enables a File Transfer Protocol session
to a specified server
Runs the garbage collector
genlog
/> genlog [option]
Toggles system log generation on boot
history
/> history
hostname
/> hostname [HOST.DOMAIN.com]
Ipconfig
/> ipconfig [options]
Displays a history list of previously
commands
Displays or sets the system hostname
and domain name
Display or configure the network setting
java
/> java [options] FILE [&]
Executes the given Java class
jrconfig
/> jrconfig [options]
Display or configure the JNIOR settings
jrflash
/> jrflash [options]
Manages flash file system
jrmon
/> jrmon [options]
Monitor and/or control JNIOR I/O
kill
/> kill PROCESS_ID
Kill the specified process
ls
/> ls [option] FILE
md
/> md DIR
List the files in the current directory
(same as dir command)
Create a new directory
move
/> move SRC DEST
Moves the file from SRC to DEST
mv
/> mv SRC DEST
netstat
/> netstat
Moves the file from SRC to DEST (same
as move)
List all TCP connections
nslookup
/> nslookup [NAME | IP]
passwd
/> passwd [USER]
ping
/> ping HOST
Displays the host name or IP, whichever
is not provided
Sets the password for the specified
USER or defaults to the current user
Sends echo requests to network hosts
ps
/> ps
Lists the currently running processes
pwd
/> pwd
Lists the current working directory
rd
/> rd DIR
Removes the specified directory
reboot
/> reboot [option]
Shuts down all servers and reboots the
system
JNIOR Series 3
Command Line Communications Manual – Release 1.0
15
INTEG process group, inc.
Registry
/> registry
Starts the Registry Editor
rm
/> rm FILE
rmdir
/> rmdir DIR
Deletes the specified file (same as del
command)
Removes the specified directory
sendmail
/> sendmail [-f fromaddr] [recipients] [cc’s]
setenv
/> setenv {VAR VAL]
startserver
/> startserver [options]
stats
/> stats [-v]
stopserver
/> stopserver [options]
Displays current system status
information
Stops the specified server
su
/> su [USER]
Switch user. Default is root
touch
/> touch FILE
useradd
/> useradd [options]
Sets the last modified time to the current
time
Adds a user to the system
userdel
/> userdel [user(s)]
who
/> who
Deletes the specified user(s) from the
system
Displays all user on the system
whoami
/> whoami
Displays the current user’s user id
Send email to the designated recipients
(separated by commas)
Sets the variable to the value in the
current environment
Starts up the specified server
NOTE: It is your responsibility to use System Services in an appropriate way such that they do not affect
the operation or set-up of the JNIOR. If you are not familiar with some of the commands, then it is
recommended that you do not use those commands. INTEG is not responsible for errant use of these
commands.
JNIOR Series 3
Command Line Communications Manual – Release 1.0
16
INTEG process group, inc.
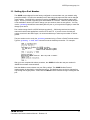
2.2 Setting Up a Port Number
The JNIOR comes shipped from the factory configured to communicate over your network using
ports 80 and 9200. Port 80 is the standard port for launching web pages and this can be changed
in the Registry. Port 9200 is the port that is used by the JNIOR for communicating with its Web
Pages. This is a port that is typically open and available on a network. However, should this port
not be available or should you wish to change your port number, there are two options. You may
use the jrconfig command to immediately alter the port or you may edit the Registry to make the
change upon reboot.
Port numbers range from 0 to 65,535 with port numbers 0 – 1023 being restricted and usually
reserved for well-known applications such as HTTP and FTP. If you are unsure of which port
number to select for the Web Pages, it is recommended that you select a port number of 1024 or
greater.
The port number can be set by the jrconfig command using a Telnet or Serial Terminal session.
Type the jrconfig –z TCP Port command to set the desired port number. For example:
After you have completed the above procedure, the JNIOR will utilize the new port number for
JNIOR Protocol data communications.
Note that Modbus communicates over port 502 by default. The JNIOR Modbus Protocol
Implementation is described in a separate document. The Modbus port may also be changed but
only through the Registry Editor. In this case the JNIOR must be rebooted to begin utilizing the new
port.
JNIOR Series 3
Command Line Communications Manual – Release 1.0
17
INTEG process group, inc.
3
FREQUENTLY USED COMMANDS
3.1 Administering Usernames and Passwords
3.2 Using the JRMON Command
Description
The JRMON command provides for input and output monitoring and control from the Slush command
prompt either through Serial0 or Telnet.
Input & Output Monitoring
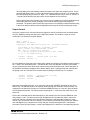
The JRMON command may be issued from the command line without options. This permits the input
and output status to be monitored. This function is available to all JNIOR users who can successfully
log into the OS command mode. Any keystroke will exit the program. The following is a typical display:
TINI /> jrmon
JNIOR Active I/O Monitor
Copyright(c) 2005 INTEG process group, inc.
All Rights Reserved.
Any key to interrupt.
*
8-DINn-1
00000000
8-RLYn-1
00000000
The last line will dynamically update displaying the current status of the digital inputs and outputs. This
ongoing update is indicated by a twirling symbol in place of the ‘*’ above. Any keystroke will terminate
the program and return to the prompt.
8-DINn-1
The eight digits below this heading indicate the status of the eight digital inputs 1 thru 8. This is
displayed with Digital Input 1 on the right through Digital input 8 at the left. A ‘0’ indicates that the
corresponding digital input is inactive or ‘Off’. A ‘1’ indicates that the digital input is active or ‘On’.
A ‘1’ would indicate the presence of a positive voltage between the digital input’s ‘+’ and ‘-’
terminals.
During inactivity the status updates only once per second. Updates occur almost instantaneously
when input states are actively changing. In this case the twirling symbol may appear to
accelerate. The dynamic status of the digital inputs can be successfully monitored with this utility
in this mode.
8-RLYn-1
JNIOR Series 3
Command Line Communications Manual – Release 1.0
18
INTEG process group, inc.
The eight digits below this heading indicate the status of the eight relay outputs 1 thru 8. This is
displayed with Relay Output 1 on the right through Relay Output 8 at the left. A ‘0’ indicates that
the corresponding relay is inactive or ‘Open’. A ‘1’ indicates that the relay is active or ‘Closed’. A
‘1’ would indicate that the relay will conduct current between its two terminals.
During inactivity the status updates only once per second. Updates occur almost instantaneously
when output states are actively changing. In this case the twirling symbol may appear to
accelerate. The dynamic status of the relay outputs can be successfully monitored with this utility
in this mode without interfering with the applications that may be directly controlling the relays.
Output Control
Using the -c option on the command line those logged into the OS command mode as administrators
may use JRMON to change the status of the eight relay outputs. This enables a series of service
commands. The following is a typical display:
TINI /> jrmon -c
JNIOR Active I/O Monitor
Copyright(c) 2005 INTEG process group, inc.
All Rights Reserved.
[C]lose NNN, [L]ist Counters, [O]pen NNN, [P]ulse
[Q]uit, [R]eset, [S]et Counters NNN, [U]sage
NNN - list of 1-8 input/relay selection
'=' to specify parameter (pulse duration in msec, counts)
'<' or '>' for command history
*
8-DINn-1
00000000
8-RLYn-1
00000000
Default pulse = 100 msec
> _
As in the Monitoring mode the last line will actively update as indicated by the twirling symbol replacing
the ‘*’ above. The command prompt ‘>’ followed by the cursor now appears on the line. Commands
may be entered at the cursor while active input and output monitoring proceeds. A brief description of
the available commands is displayed in the header dialog. Once a command has been entered after
the prompt it can be “executed” as one would expect by hitting the ENTER key. For example:
*
8-DINn-1
00000000
00000001
8-RLYn-1
00000000
00010001
Default pulse = 100 msec
> c1c5[ENTER]
> _
Above we see that the command “c1c5” has been entered with “[ENTER]” indicating the use of the
ENTER key. The ENTER key won’t be explicitly shown through the remainder of this document. It is
important to note that upon execution of a command JRMON will move to a new line. Only the latest
line will dynamically update. The twirling symbol replacing the ‘*’ in the above will reside only on the
active line.
Each of the commands will be described shortly. In this example the user instructs JRMON to close
relay outputs 1 and 5. The other relays remain unaffected and in the state they were in before the
command. Only the “selected” relays are affected. Observe the indicated state changes for relay
outputs 1 and 5 under the 8-RLYn-1 heading. In this instance the external wiring around the JNIOR is
such that Digital Input 1 responds to the relay changes. Actually here Digital Input 1 indicates the
successful closure of Relay Output 1 as that output happens to be wired to the corresponding input for
JNIOR Series 3
Command Line Communications Manual – Release 1.0
19
INTEG process group, inc.
demonstration. The entire command is executed at once and the two relay changes occur
simultaneously.
There are only a few valid commands. The user’s entry must conform to the defined syntax. If an error
is made or an invalid command entered it is indicated as follows:
8-DINn-1
00000000
00000001
8-RLYn-1
00000000
00010001
Default pulse = 100 msec
> c1c5
> huh
** invalid command
8-DINn-1
00000001
*
8-RLYn-1
00010001
Default pulse = 100 msec
> _
Here the entry “huh” constitutes an unknown command and the error is indicated upon use of the
ENTER key. JRMON then redisplays the heading along with a new entry line with active monitor.
Command Entry
All JRMON commands are single characters and are case independent. Spaces are ignored and can
optionally be used in commands to make them more readable. Multiple commands can follow each
other on the same line but do not take effect until the ENTER key is used and the command set is
executed.
The digits 1 thru 8 are, with one exception, used to indicate or “select” the relay outputs 1 thru 8. There
are rules for their use and they apply to only a couple of the commands (Close, Open and Set). An
integer parameter may be specified at the end of a command line following an ‘=’ sign (pulse duration).
All of this is described later in this document.
Editing
There are not many features in JRMON supporting the entry and editing of commands. This is to keep
the utility functional across a wide variety of access methods from HyperTerminal to Telnet clients on
multiple platforms including user developed Telnet compliant applications. The following are the only
active editing keys:
ENTER
Executes the current command line or moves to a
new monitoring line (snapshot).
BACKSPACE
Removes the character immediately to the left of the
cursor (if any).
<
Retrieves a prior command line from the command
history (described below).
>
Retrieves a subsequent command line from the
command history (described below).
JNIOR Series 3
Command Line Communications Manual – Release 1.0
20
INTEG process group, inc.
If the user enters a command line and wishes to erase the whole thing and start over the
BACKSPACE key can be used repeatedly to achieve that goal. Alternately the ‘<’ key (bringing up a
prior command if any) followed by the ‘>’ key may result in an empty line depending on the status of
the command history. This may be a shortcut which can be used if you prefer.
Command History
JRMON maintains a record of the last 20 successful commands entered during the current session.
The ‘<’ key is used to emulate a back arrow retrieving the prior command from the history. The ‘<’ key
can be used repeatedly until that desired command is located or the end of the history is reached.
With the desired command displayed the user need only hit ENTER to execute it. This is a convenient
way to repeat command and eliminate any tedious reentry. The displayed command can be further
edited or appended to prior to use.
The ‘> key serves a similar function retrieving the command subsequent to the one displayed. If you
move back in the history and pass the desired command you can use the ‘>’ key to come back to it.
The ‘>’ key can be used repeatedly until you return to the present command entry which will present
as a blank line.
If you exit JRMON returning to the OS command prompt and later restart JRMON in the same session
(without logging out), all of the prior commands may still be available in the history. This is true also for
the default pulse duration (described later).
Available Commands
The JRMON command set for the most part is designed to provide flexibility in the control of the relay
outputs. Only the referenced (selected) relay outputs in any one command are affected by that
command. The remaining relay outputs remain unchanged. Relays may be specifically commanded to
Close or Open. This may be a static change or a pulsed change which is applied for a defined
duration. Commands are case independent and spaces in command lines are ignored. The various
commands are described below:
Q – Quit
The Quit command is used to exit JRMON returning to the OS command prompt. This command may
appear on a command line in combination with other commands. JRMON will exit after executing all of
the commands. The command line “RQ” for instance will reset all of the relay outputs to the open
condition prior to exiting to the OS prompt.
R – Reset
Resets all relay outputs to the open (0) condition.
C – Close NNN…
The Close command indicates that the relay outputs selected by subsequent digits NNN (1 thru 8) are
to be closed (1 state) upon execution of the command. The command “C1C5” selects relay outputs 1
and 5 and both will be in the closed state (1) upon execution. The commands “C1C3C5” and “C135”
are equivalent. The command “C1Q35” although an odd entry would leave the relay outputs in the
JNIOR Series 3
Command Line Communications Manual – Release 1.0
21
INTEG process group, inc.
same state with Relay Outputs 1, 3 and 5 closed (1) prior to exit to the OS prompt. The resulting state
of the selected relays is determined by reading from left to right (see Open below for more).
O – Open NNN…
The Open command indicates that the relay outputs selected by subsequent digits NNN (1 thru 8) are
to be open (0 state) upon execution of the command. The command “O1O5” selects relay outputs 1
and 5 and both will be in the open state (0) upon execution.
All relay output referenced by either the Open of Close commands will be affected by the command.
All other relays will remain in an unchanged state. The states of the selected relays are specified from
left to right in the command. For instance, the command “C135O1” will result in Relay Outputs 3 and 5
being in the closed state (1) and Relay Output 1 in the open state (0). The Open command to the right
overrides the Close at the beginning of the command. The following all have an equivalent effect with
the last having the added benefit of exiting to the OS prompt.
C135O1
c1c3c5o1
c13o1c5
o1c3c5
O1C35Q
The Close and Open commands define new states for the referenced relay outputs which will remain
in effect until the execution of subsequent commands. Note that independent applications controlling
the JNIOR outputs can simultaneous alter the output states. Commands entered through JRMON may
conflict with these applications or may otherwise confuse them. It is recommended that under such
conditions JRMON should be used carefully and by qualified personnel familiar with the application.
P – Pulse
Relay outputs on the JNIOR2B can be pulsed with a resolution of 1 millisecond. This can also be
achieved using JRMON with the Pulse command. The relay output states specified by any
combination of Close and Open commands can be held for the default Duration (count of milliseconds)
by including the Pulse command. The current default pulse duration is indicated in the Header. For
example, the command “C13O2P” pulses the output state 101 for Relay Outputs 1-3 in the following
example for 100 milliseconds.
*
*
8-DINn-1
00000000
00000000
00000000
8-RLYn-1
00000010
00000101
00000010
Default pulse = 100 msec
> c13o2p
> (for 0.100 seconds)
>
th
In the above the italicized line shows the display of the active monitor for the brief 1/10 second of the
pulse. The shortest pulse is 1 millisecond and very lengthy pulses of hours can be initiated. The
JNIOR can only execute one pulse at any time. Any Pulse command that is entered prior to the
completion of an earlier Pulse command will prematurely termination the initial pulse.
Specific pulse durations may be specified within the command lines. In the following example, even
though the default pulse duration remains 100 milliseconds, a 5 second pulse is initiated.
8-DINn-1
8-RLYn-1
Default pulse = 100 msec
JNIOR Series 3
Command Line Communications Manual – Release 1.0
22
INTEG process group, inc.
*
*
00000000
00000000
00000000
00000000
00000101
00000000
> c13p = 5000
> (for 5.000 seconds)
>
As with the normal Open and Close commands, the Pulse command only affects those selected relay
outputs. In the above examples Relay Outputs 4-8 remain in their original state and can be separately
commanded to change state without affecting any pulse in progress. Note the difference between the
last two examples in regards to the state of Relay Output 2. That output is also unaffected in the
second example which selects only Relay Outputs 1 and 3.
The ‘=’ sign allows for the specification of a parameter to the command. It must appear at the end of
the command line and be followed only be an unsigned integer parameter correctly specified with valid
digits (0-9). Spaces are ignored and no JRMON commands may follow the ‘=’ sign. The command will
be invalid if the parameter is not cleanly specified.
Default Pulse Duration
The default pulse duration may be set by a Pulse command that does not select any relay outputs. In
the following example the default pulse is changed from 100 milliseconds to 2.500 seconds.
8-DINn-1
00000000
8-RLYn-1
00000000
Default pulse = 100 msec
> p=2500
8-DINn-1
00000000
8-RLYn-1
00000000
>
Default pulse = 2500 msec
Since the default pulse duration has been changed, JRMON redisplays the header with the new value.
Any subsequent Pulse command entered without specific duration will now be of 2.5 second duration.
If the user exits JRMON and returns to the OS prompt, this new default pulse duration will remain
upon subsequent use of JRMON provided that the user does not log out. Under certain conditions the
default pulse duration may be reset depending on events experienced at the OS prompt. In general it
will remain in place as will the 20-line command history from any prior JRMON use.
A Pulse command given without either the relay selection or the default duration parameter is invalid.
L – List Counters
Each Digital Input has a 32-bit counter associated with it. The [L]ist Counters command will display the
current values present in those counters. For example:
*
8-DINn-1
00000000
8-RLYn-1
00000000
> l
Default pulse = 100 msec
din1
106331
din2
49177
din3
35
8-DINn-1
00000000
8-RLYn-1
00000000
> _
din4
182
din5
0
din6
0
din7
0
din8
0
Default pulse = 100 msec
In the above example we can see that Digital Input 1 has changed state quite frequently and that the
last four inputs have not been used at all.
JNIOR Series 3
Command Line Communications Manual – Release 1.0
23
INTEG process group, inc.
S – Set Counters
Having individual Digital Input Counters generates the need to be able to reset them to zero (0) or to
otherwise initialize them to a known value (perhaps for testing purposes). The Set Counters command
allows you to set individual counters. You must specify the counters using the digits 1-8 or the ‘*’
asterisk to indicate all counters. The new counter value must also be specified even if it is zero. The
following is the required syntax for resetting all counters:
8-DINn-1
00000000
8-RLYn-1
00000000
din1
0
*
8-DINn-1
00000000
din2
0
8-RLYn-1
00000000
Default pulse = 100 msec
> s*=0
din3
0
din4
0
din5
0
din6
0
din7
0
din8
0
Default pulse = 100 msec
>
If individual counters are to be affected and others left unchanged then the specific counter or
counters must be specified. The following initializes two of the counters to 1,000:
8-DINn-1
00000000
8-RLYn-1
00000000
din1
0
*
8-DINn-1
00000000
din2
1000
8-RLYn-1
00000000
Default pulse = 100 msec
> s23=1000
din3
1000
din4
0
din5
0
din6
0
din7
0
din8
0
Default pulse = 100 msec
>
The [S]et Counter command cannot be used in combination with any form of the [P]ulse command.
This is to eliminate ambiguity over the use of the parameter following the equals sign. The [S]et
command requires the parameter as well as the specification of at least one counter otherwise an
invalid command error message results.
U – Usage
The jr310 tallies the amount of time that an individual input is on the “ON” state or that an output relay
is in the “CLOSED” state. The timing is valid to the millisecond. JRMON may be used to display these
Usage Meters. The output appears as follows:
TINI /> jrmon -c
JNIOR Active I/O Monitor
Copyright(c) 2005 INTEG process group, inc.
All Rights Reserved.
[C]lose NNN, [L]ist Counters, [O]pen NNN, [P]ulse
[Q]uit, [R]eset, [S]et Counters NNN, [U]sage
NNN - list of 1-8 input/relay selection
'=' to specify parameter (pulse duration in msec, counts)
'<' or '>' for command history
8-DINn-1
00000000
8-RLYn-1
00000000
Default pulse = 5000 msec
> u
JNIOR Series 3
Command Line Communications Manual – Release 1.0
24
INTEG process group, inc.
din1
din2
din3
din4
din5
din6
din7
din8
rout1
rout2
rout3
rout4
rout5
rout6
rout7
rout8
*
20589298 msec (5.71 hrs)
0 msec (0.00 hrs)
0 msec (0.00 hrs)
0 msec (0.00 hrs)
0 msec (0.00 hrs)
0 msec (0.00 hrs)
0 msec (0.00 hrs)
0 msec (0.00 hrs)
1388597 msec (0.38 hrs)
90092 msec (0.02 hrs)
85195 msec (0.02 hrs)
80289 msec (0.02 hrs)
75164 msec (0.02 hrs)
69945 msec (0.01 hrs)
65173 msec (0.01 hrs)
60577 msec (0.01 hrs)
00000000
00000000
> _
Note that the jr310 then supports 16 Usage Meters covering the 8 digital inputs and 8 relay outputs.
The total time is displayed in milliseconds (msec) and also in hours to the one-hundredth. Here we see
that the first digital input (din1) has been in the “ON” state for over five and a half hours. In this
example the remaining digital inputs have remained dormant and the relays have only been exercised
briefly.
Diagnostic Mode
JRMON supports additional commands that are applicable to diagnostics. In order to enable these
commands the user must start JRMON with the -d option. The -d option enables a superset of
JRMON commands as can be seen in the following example.
TINI /> jrmon -d
JNIOR Active I/O Monitor
Copyright(c) 2005 INTEG process group, inc.
All Rights Reserved.
[C]lose NNN, [L]ist Counters, [O]pen NNN, [P]ulse
[Q]uit, [R]eset, [S]et Counters NNN, [T]est
NNN - list of 1-8 input/relay selection
'=' to specify parameter (pulse duration in msec, counts)
'<' or '>' for command history
*
8-DINn-1
00000000
8-RLYn-1
00000000
Default pulse = 100 msec
> _
Presently only the Test command falls into this category and you can see that it now appears in the
command summary displays in the header. Any diagnostic command entered in the -c control mode
discussed earlier would be considered invalid. An error would result.
Diagnostic commands are meant to be used with the JNIOR out of its application environment. In this
case the outputs of the JNIOR can be changed without regard as to the possible effect on surrounding
equipment. Since it might not be good if a diagnostic command were accidentally evoked in
application, JRMON is started in the separate mode as a safety precaution.
T - Test
JNIOR Series 3
Command Line Communications Manual – Release 1.0
25
INTEG process group, inc.
The Test command starts the relay verification test. This command takes no parameters and must be
the only command on the command line. Otherwise an invalid command error will result. During
execution of the Test command the relays are cycled in order from Relay Output 1 through to Relay
Output 8. Each relay is closed for 1 second. The test repeats indefinitely. Any keystroke will interrupt
the process. Here’s an example again where the italicized lines indicate the changing content of the
monitor.
TINI /> jrmon -d
JNIOR Active I/O Monitor
Copyright(c) 2005 INTEG process group, inc.
All Rights Reserved.
[C]lose NNN, [L]ist Counters, [O]pen NNN, [P]ulse
[Q]uit, [R]eset, [S]et Counters NNN, [T]est
NNN - list of 1-8 input/relay selection
'=' to specify parameter (pulse duration in msec, counts)
'<' or '>' for command history
/
\
|
/
\
|
/
\
8-DINn-1
00000000
00000001
00000010
00000100
00001000
00000000
00000000
00000000
00000000
00000000
8-RLYn-1
00000000
00000001
00000010
00000100
00001000
00010000
00100000
01000000
10000000
00000000
>
>
>
>
>
>
>
>
>
>
Default pulse = 100 msec
t
(for ~1 second)
(for ~1 second)
(for ~1 second)
(for ~1 second)
(for ~1 second)
(for ~1 second)
(for ~1 second)
(for ~1 second, user hits space bar)
_
Note that this demonstrates a setup wherein the Relay Outputs 1 - 4 are wired to Digital Inputs 1 - 4
and a power source. You can see the inputs following the relay outputs in the case of those four
relays. You can also see the progress of the twirling indicator that replaces the ‘*’ in most of these
examples. This Test diagnostic is useful for verifying relay operation as well as the operation of the
various protocols and utilities (like JRMON) that display relay status. It also indirectly verifies the
function of the clock.
JNIOR Series 3
Command Line Communications Manual – Release 1.0
26
INTEG process group, inc.
Summary
Thank you for purchasing the JNIOR. Hopefully this manual made the getting-to-know process of
your new JNIOR very quick and easy. The JNIOR has many more wonderful tools and features
available, and are explained in detail in the supplied documents.
Copyright
Copyright 2001-2006 INTEG process group, Inc.
All rights reserved.
Notice
Every effort was made to make this manual as accurate and useful as
practical at the time of the writing of this manual. However, all information is
subject to change.
Trademarks
Trademarks are the property of their respective holders.
Sun, Sun Microsystems, the Sun logo and Java are trademarks or
registered trademarks of Sun Microsystems, Inc. in the United States and
other countries.
Microsoft, Windows, MS-DOS and Internet Explorer are registered
trademarks of Microsoft Corporation.
HyperTerminal is a registered trademark of Hilgraeve, Inc.
Use Restrictions
This User’s Manual and the software contained in the JNIOR are
copyrighted by INTEG process group and may not be copied or reproduced
without prior consent from INTEG process group, inc. INTEG process group
is not responsible for any errors or omissions that may be contained in this
manual.
Please do not hesitate to contact our JNIOR team at INTEG process group, inc. We can be
reached via phone, fax or e-mail as follows:
INTEG process group, inc.
11279 Perry Highway, Suite 107
Wexford, PA 15090
www.integpg.com
[email protected]
PH (724) 933-9350
FAX (724) 933-9333
JNIOR Series 3
Command Line Communications Manual – Release 1.0
27