1
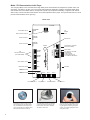
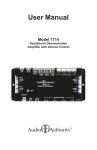
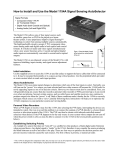
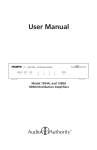
User Manual
Model 1703
Demonstration Audio Player
Model 1703 Demonstration Audio Player
The 1703 plays MP3, FLAC, and WAV files for high fidelity audio demonstrations of headphones, speaker docks, and
sound bars. It is ideal for use with one or more Audio Authority® audio distribution amplifiers. A Toslink® digital output
with variable volume is available and two analog audio outputs may be adjusted individually or together. Push buttons
and/or rotary control knobs allow track selection and volume adjustment at the player. The special Visual Volume™ knob
provides visual feedback with its glow ring.
Model 1703
CUSTOMER
INPUT
DIGITAL AUDIO OUTPUT
AUDIO OUTPUT 2
ANALOG
OUTPUT 2
VOLUME
KNOB 2
NEXT TRACK (PLAY)
NEXT
PREVIOUS TRACK
PREV
4-WIRE BUTTONS
2-WIRE BUTTONS
VOLUME DOWN 2
Push-buttons (4-wire or 2-wire) may be
used to adjust volume and select tracks.
They are available in several styles and
colors; pictured above is a stainless steel
button illuminated with blue LED ring.
2
VOL 2 –
VOL 2 +
VOLUME UP 2
MODEL 1703 DEMO AUDIO PLAYER
VOLUME
KNOB 1
®
STATUS
1794
ROTARY CONTROLS
(VOLUME KNOBS)
12V
POWER
INPUT
STATUS LED
VOL 1 –
1795 ROTARY CONTROL
(WITH GLOW RING)
8-NOT USED
6 & 7-DEFAULT VOLUME
5-LOUDNESS
4-LINK VOLUME
3-CONTINUOUS PLAY
1 & 2-TIMEOUT SETTINGS
MEDIA CARD
SD/HC/XC
ANALOG
OUTPUT 1
CONTROL
PORT
AUDIO OUTPUT 1
DIGITAL AUDIO
OUTPUT
PLAY MODE
1 2 3 4 5 6 7 8
CUSTOMER INPUT
12V DC
POWER
701-16300B
SD CARD
VOL 1 +
VOLUME DOWN 1
The 1794 Rotary Control knob rotates to
control volume level and advances the
track selection with a press. Available
with black or silver knob.
VOLUME UP 1
The Visual Volume™1795 Rotary Control
knob gives visual feedback with its glow
ring, its brightness indicating changes in
volume; a slow pulse highlights the knob
during attract mode.
Button and Rotary Control Functions
Volume may be controlled using a rotary control knob or
up/down push-buttons. Digital Output and Analog Output
1 volume levels are always synchronized. To control
volume on Output 1 and 2 individually, use two 1794 rotary
controls or two sets of push buttons. To control all outputs
with one control, any method may be used (see Linked
Volume).
• Volume Up and Down 1: Connect button to increase or
decrease Output 1 volume.
• Volume Up and Down 2: Connect button to increase or
decrease Output 2 volume.
• Next Track: Play the next track on the card; if no demo
is playing, the first track starts.
• Previous Track: Play the previous track on the card; if
no demo is playing, the first track starts.
• Rotary Control: Connect volume knob or knobs (PN
1794) to control player output (see Linked Volume).
Push to play next track, and turn to adjust volume.
• Rotary Control with Glow Ring (PN 1795): Connect a
1795 knob to the Control Port. Push to play next track,
and turn to adjust volume. A 1795 control may be used
to control Analog Outputs 1 and 2 (see Linked Volume).
Note: Connect only 1795 Rotary Controls on the
Control Port, do not connect other controls.
In “Attract Mode” the 1795 glow ring pulses until a
demo is activated (unless in continous play mode).
Play Modes
Choose the desired features and select using the Play
Mode Switches as shown. If a switch is shown with a dash,
it can be ON or OFF while using the feature.
TIMEOUT: When Switch 1 and/or 2 is on, the demo stops
playing after a period of inactivity. The timeout interval
is the amount of time after the last button press or knob
turn until the demo ends and attract mode begins. Adjust
the length of the timeout interval using the settings below.
When Switch 3 and 4 are off, the demo never times out.
See also Continuous Play.
1 MINUTE TIMEOUT SWITCH SETTINGS:
1
2
3
4
5
6
7
8
OFF
ON
-
-
-
-
-
-
2 MINUTE TIMEOUT SWITCH SETTINGS:
1
2
3
4
5
6
7
8
ON
OFF
-
-
-
-
-
-
3 MINUTE TIMEOUT SWITCH SETTINGS:
1
2
3
4
5
6
7
8
ON
ON
-
-
-
-
-
-
NEVER TIMEOUT SWITCH SETTINGS:
1
2
3
4
5
6
7
8
OFF
OFF
-
-
-
-
-
-
CONTINUOUS PLAY: When (3) Continuous Play is on, the
player plays and repeats all tracks on the SD card, nonstop,
at the volume last set. Volume Reset and Timeout can be
used with this mode, however when the demo times out the
playback continues, but at the volume level selected on the
Default Volume DIP switches.
CONTINUOUS PLAY SWITCH SETTINGS:
1
2
3
4
5
6
7
8
-
-
ON
-
-
-
-
-
VOLUME RESET: When Continuous Play and Timeout are
on, the player returns to the chosen volume after a timeout,
then continues to play at the default volume. See Default
Volume below.
LINKED VOLUME: When Switch (4) is off (default), each
output has separate volume controls. Turn on Linked
Volume (4) to use any of the volume control interfaces to
adjust both analog, and digital output, simultaneously.
LINKED VOLUME SWITCH SETTINGS:
1
2
3
4
5
6
7
8
-
-
-
ON
-
-
-
-
LOUDNESS: A DSP preset boosts bass frequency at
300Hz by +5dB and the treble frequency at 7 kHz by
+5dB. Use to enhance audio when played at low volumes.
Loudness (5) may be used with any other play modes.
LOUDNESS SWITCH SETTINGS:
1
2
3
4
5
6
7
8
-
-
-
-
ON
-
-
-
DEFAULT VOLUME: When Switch 6 and/or 7 is on, this
selects the level of Default Volume at initial power up and
between demonstrations when Timeout is active.
QUIET -30dB VOLUME RESET SWITCH SETTINGS:
1
2
3
4
5
6
7
8
-
-
-
-
-
OFF
OFF
-
MEDIUM -20dB VOLUME RESET SWITCH SETTINGS:
1
2
3
4
5
6
7
8
-
-
-
-
-
OFF
ON
-
LOUD -10dB VOLUME RESET SWITCH SETTINGS:
1
2
3
4
5
6
7
8
-
-
-
-
-
ON
OFF
-
FULL VOLUME 0dB VOLUME RESET SWITCH SETTINGS:
1
2
3
4
5
6
7
8
-
-
-
-
-
ON
ON
-
FIXED VOLUME: Turn 6 and 7 on to set the volume at the
highest output so that it can be attenuated by an external
device such as Model 1714 or 1725A distribution amplifiers.
Customer Input
The 1703 accepts input from any device, such as an MP3
player, with a 3.5mm analog output. The 1703 automatically
detects the device and overrides the internal player.
3
Digital Audio Output
The 1703 digital audio output connects to any digital device that can accept PCM two-channel audio via an optical
cable, such as the Audio Authority® 1725A Soundbar Demonstrator. The digital audio volume follows the settings of
Analog Output 1.
Note: The 1703 does not play multi-channel audio files (e.g. 5.1 or 7.1 audio).
MP3, FLAC and WAV Audio File Information
• MP3 files may be variable or constant bit rate (up to 320 kbps).
• File extensions must be .wav, .flac, or .mp3.
• Audio files must be placed in the root directory of a properly formatted SD card (see below).
• WAV files can be PCM 16 bit, sample rates from 44 to 48kHz.
• WAV files can be IMA-ADPCM, any sample rate up to 48kHz.
• FLAC files can be 16 bit at 44 or 48 kHz, or 24 bit at 44 kHz.
About SD Cards
The 1703 is compatible with SD or SDHC cards. Format in FAT-32 for use with the 1703 (Most SD cards are preformatted FAT-16). Do not put music in directories or folders.
How to Format an SD Card Using Windows:
1.Insert SD card into PC card slot.
2.Click on Start-> (My) Computer.
3.Right Click on the drive letter for the SD card.
4.Select Format from the drop down menu.
5.Select FAT-32 as the File System from the drop down list.
6.Check the Quick Format box.
7.Click on Start.
8.Click Yes in the dialog box.
Installation
• Read these instructions and set the Play Mode switches for the desired demo behavior (see page 3).
• Attach the player to a flat surface with the screws provided.
• Load audio files onto a properly formatted SD card (see above). Note: audio files may be MP3, FLAC, or WAV files
with any filename ending with “.mp3”, “.flac”, or “.wav”.
• If play order is important, name the tracks in numerical order, select them all, and copy them to the card all at once
(e.g. Track 1 = 00000_filename.mp3, etc.). This method is for Windows 7, other systems may behave differently.
• Connect any push-buttons desired for volume adjustment or track selection. Push buttons should be four-wire
momentary switches, and can be illuminated (2-5 volt LED).
• Connect 4-wire rotary controls for volume control and next track if desired. Audio Authority part numbers 1794 and
1795 are available.
• Connect power supply to AC power, then to the 1703 power port.
• For initial testing, connect audio output to headphones or other known audio device and test player for desired
functionality and timeout settings.
• Connect audio output(s) to an amplifier, headphone amplifier or switching system if desired.
• Call Audio Authority with questions that are not addressed in this manual.
2048 Mercer Road, Lexington, Kentucky 40511-1071
800-322-8346 • 859-233-4599 • Fax: 859-233-4510
www.audioauthority.com • [email protected]
752-674 Rev. 20150519