1
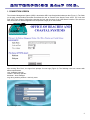
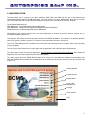
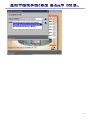
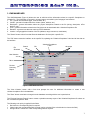
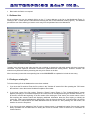
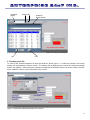
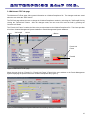
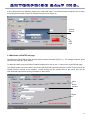
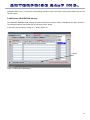
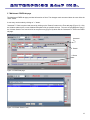
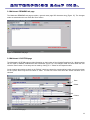
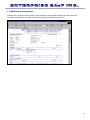
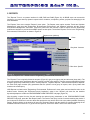
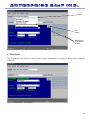
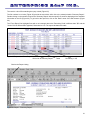
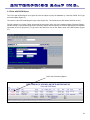
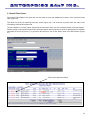
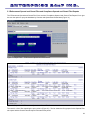
VMS - VIOLATION MANAGEMENT SYSTEM
USER MANUAL
VMS - VIOLATION MANAGEMENT SYSTEM
1. CONNECTION SCREEN
1.1 Remote Login and First Time Connection
2. MAIN MENU FORM
3. VMS MAINBOARD
3.1 Pulldown lists
3.2 Finding an existing file
3.3 Creating a new file
3.4 Mainboard: FILE tab page
3.5 Mainboard: VIOLATOR tab page
3.6 Mainboard: DESCRIPTION tab page
3.7 Mainboard: FINES tab page
3.8 Mainboard: REMARKS tab page
3.9 Mainboard: LOCATION page
3.10 Mainboard: Summary Report
4. LOCATOR QUERIES
4.1 Locator Queries: Violator Name Page
4.2 Locator Queries: R-Monument Page
5. REPORTS
5.1 Fines Report
5.2 Fines with OGC# Report
5.3 Unpaid Fines Report
5.3 Enforcement Opened and Closed Files and Compliance Opened and Closed Files Reports
1
3
4
5
7
8
8
9
10
11
12
13
14
14
15
16
16
17
19
20
22
23
24
2
1. CONNECTION SCREEN
The Violation Management System (VMS) is launched at URL: http://bcsgis/obcs/mainmenu.htm (Figure 1). The fields
on the page contain default information that allows the user to connect to the Oracle Forms server. The "Look and
Feel" and "Color Scheme" fields allow changing the look and the colors of the VMS Oracle interface. The web host
field can be set to a different application server (default: bcsgis) to run the interface.
Figure 1: First screen connection with the intranet web-server.
After clicking "Run Form", the logon form prompts for user login (Figure 2). The following users can connect with
different permissions:
vms - database manager
vmsdeo - data entry operator
bcmsman - bcms manager
eng, obcs, pmsdeo, pmsdem - read only users
Figure 2: Logon form.
3
1.1 Remote Login and First Time Connection
Because VMS is a FDEP Intranet application, users can connect remotely to VMS from any machine with Internet
access, after logging to the FDEP domain. To remotely login to FDEP domain, please contact the Information System
personnel of FDEP.
The web browser supported by FDEP is Internet Explorer (version 5.5 and higher), however the application is also
compatible with Netscape (version 4.7 and higher).
The VMS application creates reports in pdf format. Adobe Acrobat Reader (version 4.5 or higher) can be downloaded
from http://www.adobe.com/products/acrobat/readstep2.html
The first time a user connects to VMS, a JInitiator plug-in is automatically downloaded into the user's PC. After the
download is finished, the user must follow the instruction to install the software in the local PC. After the installation,
the user must close the web browser and then re-open and re-connect to http://bcsgis/obcs/mainmenu.htm. The
JInitiator plug-in is a zip file of about 10Mb. If you have a slow modem connection (50Kbps or slower) ask the
Information System personnel for a CD of the used Jinitiator.
4
2. MAIN MENU FORM
The Main Menu form is common to the three interfaces VMS, PMS, and PrMS that are part of the Beaches and
Coastal Management System (BCMS) application. The main choices are: three "Mainboards" which give a complete
view of the data related to a file and allow to update the file itself, the "Locator Queries" and the "Reports".
The available Mainboards are:
PMS Mainboard - Permit Management System Mainboard
VMS Mainboard - Violation and Compliance Management System Mainboard
PrMS Mainboard - Project Management System Mainboard
The purpose of the "Locator Queries" form is to collect parameters to locate a file (permit, violation, projects, etc.) in
the BCMS databases (Section 4).
The "Reports" form offers more than fifty reports based on the BCMS databases. The purpose is to generate printable
lists of files (permit, violation, projects, etc.) based on user's parameter selections. (Section 5)
The "Code Table Management" is available only to bcmsman user allowing him/her to update, delete, and edit values
in the code tables.
The "Re-Login" button lets the user to login again into the application with a different name and password.
The "Exit" button closes and exits the application. Use this button to close and exit the application. After closing the
application, the user must independently close the web browser.
The "Help" button opens the BCMS Documentation form (Figure 3a). User Manuals, Database Documentation and
Interface Database Documentation for the databases can be viewed by selecting the document from the pull down lists
(Figure 3.a).
VMS mainboard
Locator Queries
Reports Menu
Code Table
Management
Re-login
Close and Exit
Help
Figure 3: Main Menu form.
5
Figure 3a: BCMS Documentation form.
6
3. VMS MAINBOARD
The VMS Mainboard (Figure 4) allows the user to edit/view all the information related to a specific Compliance or
Violation file. The information is grouped in six main pages, accessible by the "tab pages" and a button:
1. File - general file information (type, received date, etc.)
2. Violator - general information about the violator (name, address, etc.)
3. Description - general information about the project descriptions related to the file (timing, description, office
decision, etc.),
4. Fines - general information related to the fine(s) that can be associated with a Violation/Compliance file.
5. Remarks - a general note that can reach up to 255 characters.
6. Location - the geographical location of the file (address, range monument, coordinates).
The "Search" button calls a form that filters the database to find and pick a specific file.
The "GO" button resets the interface to the specific file, updating the "Violation/Compliance" label and all the data on
the interface.
File
Searched
Search
GO
Violation/Compliance
Label
tab-pages
New Violation
Save
Preview
Summary
Report
Figure 4: VMS Mainboard form.
The "New Violation" button calls a form that prompts the user for additional information to create a new
violation/compliance file in the database.
The "Save" button commits the changes into the database according with the user's permissions.
The "Preview Summary Report" button creates a printable summary report of the Violation/Compliance file shown on
the "Violation/Compliance" label.
The following color policy is applied for the fields:
· Red Label: the corresponding field is required.
· Yellow Label: the corresponding field is locked (can be unlocked if the unlock button is close to the field).
· Orange Labels: at least one of the corresponding fields is required.
7
·
Blue Label: the field is not required.
3.1 Pulldown lists
All the pulldown lists can be updated clicking on the "+" button adjacent to the list on the Mainboard (Figure 4).
Clicking on the '+" button opens a code table form allowing the user to enter additional codes (Figure 5). The interface
prevents the user from selecting an inactive code entry from the pulldown lists on the Mainboard.
Figure 5: Example of Edit Code Table form.
"vmsdeo" user can enter a new code entry but can not delete or change the code table entries after they have been
committed. Only the superuser "bcmsman" is allowed to update/delete the existing entries. However "vmsdeo" can
make an entry inactive therefore preventing the entry to be shown on the lists.
After a new entry is saved the corresponding lists on the MAINBOARD are updated to include the new entry.
3.2 Finding an existing file
To find an existing file in the database there are three methods:
1. If you know the file number. Enter the file number in the "Violation #" search field. After pressing the "GO" button
the interface is set to the entered Violation/Compliance file number.
2. If you know a part of the file number. Press the "Search" button (Figure 6). The "Violation# Search" screen
appears prompting for a Violation/Compliance file number that can be shortened using the wildcard character "%"
at the end, or/and at the beginning, of the file number. After clicking the "Find" button, the screen returns a list of
files matching the entered criteria and displaying additional information about the files, helping to identify the
correct file. After having highlighted the desired entry from the list and clicked "OK" (or double-click), the list fills
the "Violation #" search field on the VMS Mainboard with the chosen file. After pressing the "GO" button, the
interface is set to the file picked.
3. If you know only some attributes of the file such as violator name or geographical location first use the Locator
Query reachable from the Main Menu to identify the correct file number. Refer to Section 4 for information on
Locator Queries.
8
Violation#
Search
Search GO
Violation#
Search Screen
Figure 6: Finding an existing file.
OK
Find
3.3 Creating a new file
To create a new violation/compliance file press the "New File" button (Figure 7). Create New Violation Form screen
displays the required fields to create a new file. The interface will not allow the user to input a file number that already
exists in the database. After entering the required information press "CREATE" button to finish the creation of the file.
Press "CANCEL" button to cancel the creation of the new file.
Figure 7: Create New Violation/Compliance File Screen.
9
3.4 Mainboard: FILE tab page
The Mainboard FILE tab page offers general information on Violation/Compliance file. The changes made are saved
when the user clicks the "Save" button.
The FILE tab page allows the user to change the Violation/Compliance number by unlocking the "ViolComp#" field by
clicking the "Unlock/Lock" Button. After the changes made, the user must lock back the field by pressing the
"Unlock/Lock" Button
The "Permit Link Frame" contains the links to the permits related to the Violation/Compliance file. This frame provides
a link from Violation Management System database to Permit Management System database.
Save
ViolComp#
Unlock
+ Button
Permit Link
Frame
Permit#
Figure 8: Mainboard File tab page.
When the user clicks on "Permit #" in "Permit Link Frame" (Figure 8) the user switches to the Permit Management
System displaying the permit linked to the Violation/Compliance file (Figure 9).
Figure 9: Permit Management System Mainboard accessed by clicking on Permit#.
10
A link to the permit can be added by clicking on the "ADD LINK" button. An add link window prompts the user to select
an existing permit number to link to the Violation/Compliance file (Figure 10).
Add Link
Window
ADD
LINK
Figure 10: Add link window.
3.5 Mainboard: VIOLATOR tab page
The Mainboard VIOLATOR tab page provides violator contact information (Figure 11). The changes made are saved
when the user clicks the "Save" button.
To add new violator record to the same Violation/Compliance file click on the "+" button on the VIOLATOR tab page.
The "Search" button next to the "Name" field on the VIOLATOR tab page allows the user to search for the name of the
violator previously entered in the database. Double clicking over an existing entry on the search form fills the
VIOLATOR tab page with the existing information for that contact.
Rank
Search
by Name
+ Button
Figure 11: VIOLATOR tab page.
11
Setting the Rank field to 1 causes the corresponding violator's record to be shown on the reports where only the first
violator is listed.
3.6 Mainboard: DESCRIPTION tab page
The Mainboard DESCRIPTION tab page provides information on project actions, descriptions and office decisions.
The changes made are saved when the user clicks the "Save" button.
A new entry can be made by clicking on "+" button (Figure 12).
+ Button
Figure 12: DESCRIPTION tab page.
12
3.7 Mainboard: FINES tab page
The Mainboard FINES tab page provides information on fines. The changes made are saved when the user clicks the
"Save" button.
A new entry can be made by clicking on "+" button.
"Assessed To" field is required and entered by clicking on the "Search" button on the Fines tab page (Figure 13). Only
the violators related to the current Violation/Compliance file are possible choices. The user must highlight the entry in
the "Violator Search Form" and click OK to accept an entry (Figure 14) which fills the "Assessed To" field in the FINES
tab page.
Assessed
To
Search
+ Button
Figure 13: FINES tab page.
Figure 14: Violator Search Form.
13
3.8 Mainboard: REMARKS tab page
The Mainboard REMARKS tab page provides a general notes page 255 characters long (Figure 15). The changes
made are saved when the user clicks the "Save" button.
Figure 15: REMARKS tab page.
3.9 Mainboard: LOCATION page
The Mainboard LOCATION page provides information on the location of the Violation/Compliance file. Multiple entries
can be made for Address, R-Monument and Coordinates (Figure 16). The changes made are saved when the user
clicks the "Save" button. A new entry can be made by clicking on "+" button for the respective table.
On the location table putting a check on the "Default" check box causes the corresponding location record to be shown
on the reports where only the first location is listed. At least one record must have the default checkbox set to
checked.
Save
Default
+ Button
Figure 16: LOCATION page.
14
3.10 Mainboard: Summary Report
Pressing on the Preview Summary Report on the Mainboard's vertical toolbar displays a printable pdf report
summarizing the information entered in the different pages of the Mainboard (Figure 17).
Figure 17: Summary Report.
15
4. LOCATOR QUERIES
The "Locator Queries Form" is a common interface for VMS, PMS and PrMS (Figure 18). All BCMS users can access
this interface to locate files (violations, compliance, permits, projects, etc.) belonging to the three databases.
The "Locator Queries Form" is logically divided in two parts (Figure 18): gray area (upper side) and blue area (lower
side). The gray area contains query parameters that are common to all the available queries. The blue area offers
different queries of by Name/Company, by Project name/Location and by Monument, all accessible by tab-pages.
Each blue page contains query parameters that are specific to that tab page, and a query button that launches the
query.
After choosing the "DBMS" (Database Management System) field, the interface dynamically adapts to enable the
available tab pages for that DBMS. Violation Management System can access Violator Name/Company and
Monument tab pages.
The result of the query is a list of records matching the criteria. If the list shows file numbers in red color, these files
provide the user with a drill-in link to the related Mainboard interface. Double clicking on the number will open the
Mainboard interface with the specific file, displaying all the available information about the file.
Close
DBMS
Gray Area: Common
Blue Area: Specific
Execute
Query
Clear
Violator
Search
Violator
Field
Figure 18: Locator Query Form - Violator Name page
4.1 Locator Queries: Violator Name Page
The locator query "Violator Name" page is shown on Figure 18.
To run the query, enter the name of the violator you are searching. If you do not know the exact spelling, click the
"VIOLATOR" button. The subsequent screen allows the user to enter part of the name combined with the wildcard
character "%". After clicking the "Find" button, the screen displays a list of available names matching the criteria.
Highlighting the record and double-clicking (or clicking "OK") will fill the "Last Name" field on the Violator Name page.
Clicking on the "Execute Query" button generates the "Violator Search Result" list of violation/compliance files (Figure
19) matching the query criteria.
16
"Clear" button clears the entry made in the "Violator" field.
The "File #" field, in red color, in the "Violator Search Result" list (Figure 19) provides a drill-in link to the VMS
Mainboard. If the user double clicks on the number, the interface opens the VMS Mainboard with the same
violation/compliance file number. All the information for the file can be viewed on the Mainboard and printed using the
"Summary Report" button.
Drill-in Link
to VMS
Mainboard
Figure 19: Violator Search Result
4.2 Locator Queries: R-Monument Page
The locator query "Monument" page is shown on Figure 20.
DBMS
County
Execute
Query
R-monument
Figure 20: Locator Query Form - Monument page
17
To run the query, first enter the County and the Monument Range number in From and To fields. In Monument Range
fields "From Monument R-" and "To Monument R-" use only numbers, alphabetical characters are not acceptable.
Clicking on the "Execute Query" button generates the list of violation/compliance files matching the query criteria
(Figure 21).
The "DBMS" field for the "Monument" page query allows the user to choose the "ALL" option. This option corresponds
to a union query on all the three BCMS databases: VMS, PMS, and PrMS. The monument search result of a such
query lists all the files in all the three databases having a geographical monument with the query criteria.
The "File #" field, in red color, provides a drill-in link to the Mainboard. If the user double clicks on the number, the
interface opens the VMS or PMS Mainboard for that violation/compliance or permit file number. All the information for
the file can be viewed on the Mainboard and printed using the "Summary Report" button.
Drill-in Link
to the
Mainboard
Figure 21: Monument Search Result
18
5. REPORTS
The "Reports" Form is a common interface for VMS, PMS and PrMS (Figure 22). All BCMS users can access this
interface to run more than fifty dynamic reports built for violations, compliance, permits, projects files belonging to the
three databases.
The "Reports" form menu contains "Reports" menu option. The Reports menu option contains "Permit and Violation
Management" menu item with "Engineering, Environmental, Enforcement" and "Manager" subitems, and the "Project
and Contract Management" menu item. (Figure 22). When the user chooses a class of report, the form dynamically
modifies the interface to provide the available reports for that option. The default "Reports" screen is the "Engineering,
Environmental, Enforcement" as shown in Figure 22.
Reports menu (choices)
Close
Gray Area: Common
Blue Area: Specific
Figure 22: Reports Form - default screen of "Engineering, Environmental, Enforcement"
The "Reports" Form is logically divided in two parts (Figure 22): gray area (upper side) and blue area (lower side). The
gray area contains query parameters that are common to all the report queries. The blue area provides different types
of reports grouped by functionality such as: "Weekly Reports", "Inspector Reports", "Enforcement/Compliance Reports"
etc. Each blue page contains query parameters that are specific to that group of reports, and a query button that
launches the related query.
VMS Reports are listed under "Engineering, Environmental, Enforcement" menu option and are therefore also on the
default screen. Choosing the "Enforcement and Compliance" option in the "Section" pull down list, the interface
dynamically adapts to enable the "ENFORCEMENT/COMP REPORTS" tab page (Figure 23).
After choosing a report from the list and entering the optional query parameters on the "ENFORCEMENT/COMP
REPORTS" tab page, press the "Run Report" button. The result of the query is a list of records matching the criteria. If
the list shows file numbers in red color these files provide the user with a drill-in link to the related printable "Summary
Report". Double clicking on the number will open the "Summary Report" with the specific file number displaying all the
available information on the file. To go back to the report list, click on the "Back" arrow of the web browser.
19
Section
Run
Report
Enforcement
/Compliance
Reports
Figure 23: Reports Form - "Enforcement and Compliance Reports"
5.1 Fines Report
The "Fines Report" form gives the user the option to query the database by: Counties, Fine Type and Levied Date
(Figure 24).
Figure 24: Report Form - "Fine Report"
20
The result is a list of files matching the query criteria (Figure 25).
The file numbers in red color (Figure 25) provide the user with a drill-in link to the related printable "Summary Report".
Double clicking on the number will open the "Summary Report" with the specific file number displaying all the available
information on the file (Figure 26). To go back to the report list, click on the "Back" arrow of the web browser (Figure
26).
The "Fines Report" list highlights fines with a red rectangle where the "Remaining" field is different than "$0" and the
"Action" field is different than Appealed, Rescinded or Lien. The report calculates the totals.
Figure 25: Report List - "Fines Report"
Drill-in link to Summary Report
Totals
Remaining <> 0$
Back to the Report Listing
Figure 26: Report - "Summary Report"
21
5.2 Fines with OGC# Report
The "Fines with OGC# Report" form gives the user the option to query the database by: Counties, OGC#, Fine Type
and Levied Date (Figure 27).
The result is a list of files matching the query critea (Figure 28). The list shows only files where OGC# is not null.
The file numbers in red color (Figure 28) provide the user with a drill-in link to the related printable "Summary Report".
Double clicking on the number will open the "Summary Report" with the specific file number displaying all the available
information on the file (Figure 27). To go back to the report list, click on the "Back" arrow of the web browser (Figure
27).
Figure 27: Report Form - "Fines with OGC# Report"
Drill-in link to Summary Report
Figure 28: Report List - "Fines with OGC# Report"
22
5.3 Unpaid Fines Report
The "Unpaid Fines Report" form gives the user the option to query the database by Counties, Fine Type and Levied
Date (Figure 29).
The result is a list of files matching the query criteria (Figure 30). The list shows only files where the value in the
"Remaining" field is different than zero.
The file numbers in red color (Figure 28) provide the user with a drill-in link to the related printable "Summary Report".
Double clicking on the number will open the "Summary Report" with the specific file number displaying all the available
information on the file (Figure 27). To go back to the report list, click on the "Back" arrow of the wen browser (Figure
27).
Figure 29: Report Form - "Unpaid Fines Report"
Drill-in link to Summary Report
Figure 30: Report List - "Unpaid Fines Report"
23
5.3 Enforcement Opened and Closed Files and Compliance Opened and Closed Files Reports
The "Enforcement Opened and Closed Files" form and the "Compliance Opened and Closed Files Reports" form give
the user the option to query the database by Counties and Opened and Closed date (Figure 31).
Figure 31: Report Form - "Enforcement Opened and Closed Files"
Figure 32: Report List - " Enforcement Opened and Closed Files "
The result is a list of files matching the query criteria (Figure 32). The list shows the files grouped in the Opened Files
sub-report and the Closed Files sub-report in the same time period.
24